You can make a big difference to how people shop on your website by setting up WooCommerce product filters. It helps users quickly find what they’re looking for and makes your store feel faster and smarter. If you’ve been thinking about how to get started or what tools you need, you’re not alone. Many store owners search for a quick start guide to setting up your first WooCommerce product filter.
Set up your first WooCommerce filter by installing Dynamic AJAX Product Filters, displaying it with a widget or shortcode, and enabling Ajax in settings. Customize styles like checkboxes or colors to match your store and improve customer experience.
If you’re curious about the best way to display and manage filters in your store, you’re in the right place. This article covers every important step, from installation to troubleshooting. Take a few minutes to explore and make your store easier to use for every customer.
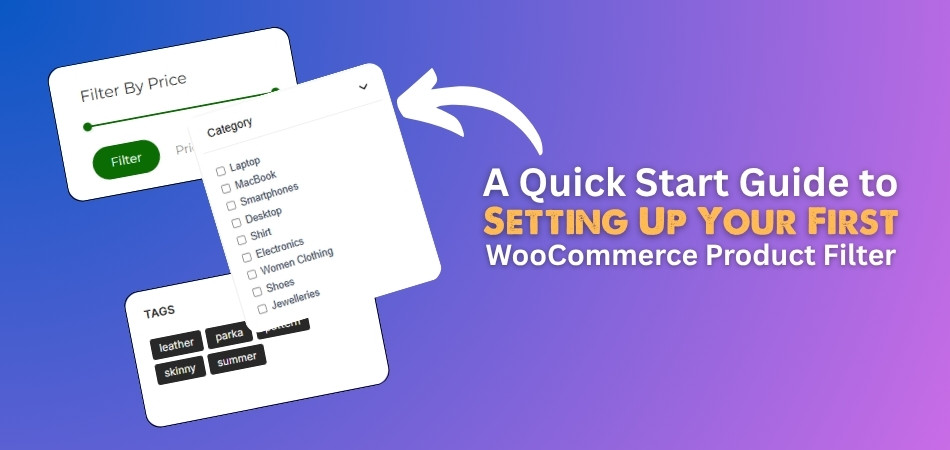
A Quick Start Guide to Setting Up Your First WooCommerce Product Filter
Setting up product filters in WooCommerce can be done using the built-in options provided by WordPress, which work well for basic needs. However, if you’re looking for a quicker setup and more advanced functionality—such as AJAX filtering, customizable styles, or dynamic loading—then using a dedicated plugin is the smarter choice. These tools streamline the process and offer enhanced features that improve the shopping experience for your customers.
Powerful Filtering Tool
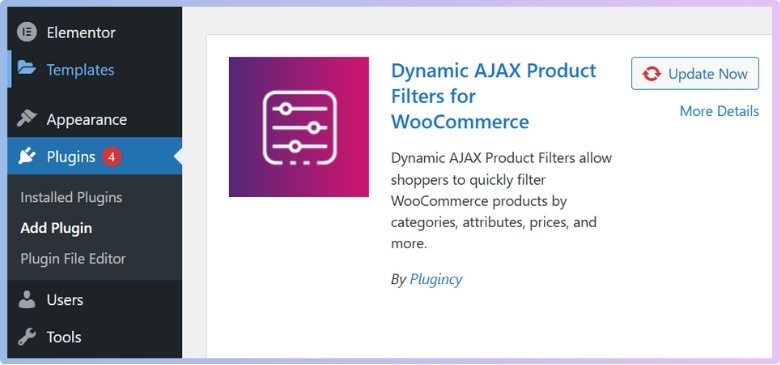
One of the most effective ways to enhance product filtering in WooCommerce is by using a plugin like Dynamic AJAX Product Filters for WooCommerce. It offers both a free and a pro version, making it accessible for beginners and powerful enough for advanced users. The free version includes essential filtering tools, while the pro version unlocks more customization, styles, and control over how your filters behave and look, ideal for scaling your WooCommerce store efficiently.
Here’s how you can install both of them:
Step 1: Install the Plugin
Start by installing the plugin so you can enable advanced filter features in your store.
Free Version
Install the free version directly from the WordPress plugin repository.
- Go to your WordPress Admin Dashboard > Plugins.
- Click “Add New”.
- Search for “Dynamic AJAX Product Filters for WooCommerce”.
- Click “Install Now”, then “Activate”.

PRO Version
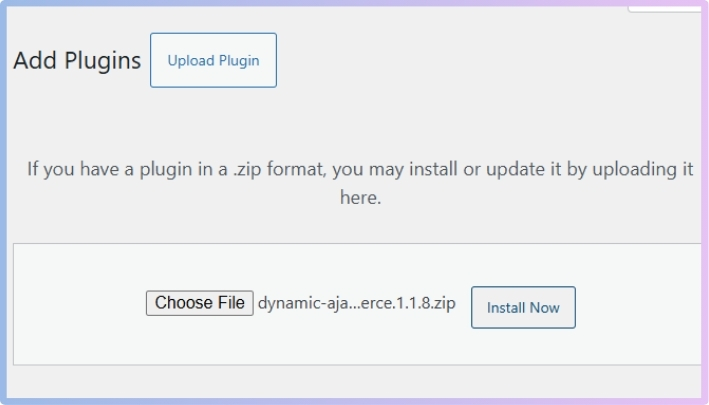
The Pro version unlocks more advanced filtering features. If you’ve purchased the plugin, follow these steps to upload and activate it manually.
- Go to Plugins > Add New.
- Click “Upload Plugin”.
- Choose the plugin ZIP file you downloaded.
- Click “Install Now”, then “Activate”.

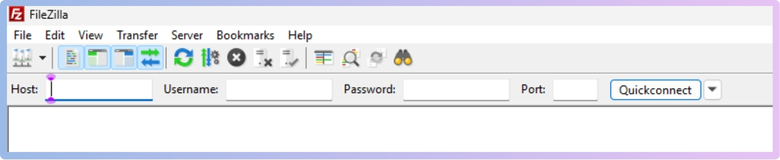
Manual FTP Installation
For advanced users, here’s how to upload the plugin manually using FTP.
- Download the plugin ZIP file (from WordPress or your account).

- Extract the ZIP file on your computer.
- Connect via FTP (e.g., using FileZilla by giving Host, Username, Password, and Port).

- Upload the extracted folder to /wp-content/plugins/.
- Go to WordPress Dashboard > Plugins > Installed Plugins, then click Activate.
Step 2: Displaying Filters
Once installed, you’ll need to display the filters on your site. You can do this easily using either a widget or a shortcode, depending on your layout preferences.
Using a Widget
Widgets are perfect for showing filters in your sidebar or footer. This method is easy and doesn’t require any coding.
- Go to Appearance > Widgets.
- Locate the Dynamic AJAX Product Filters widget.
- Drag it to your desired sidebar or widget area.

- Configure settings, then click Save.
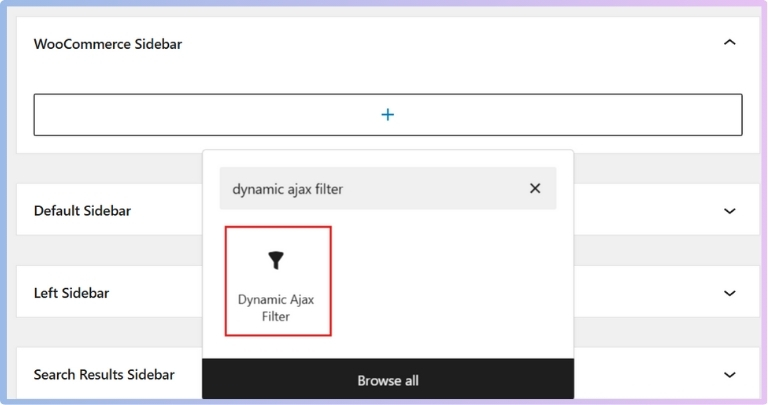
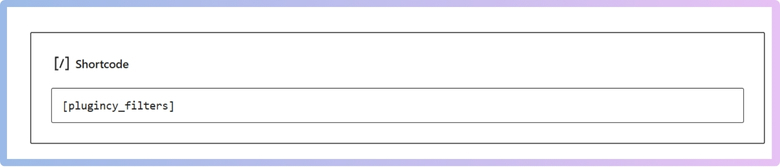
Using a Shortcode
Want to place filters inside a page or post? Use a shortcode for maximum flexibility in layout and positioning.
- Add the following shortcode to any page or post:
“plugincy_filters”
Remember, paste the shortcode inside the square brackets [ ]
To add the shortcode, first, you have to add a shortcode block by clicking on the + icon.![]()
- You can add parameters for more control.
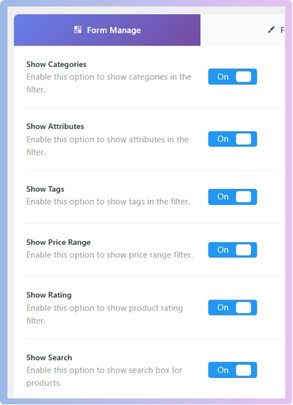
Step 3: Manage Filter Display Settings
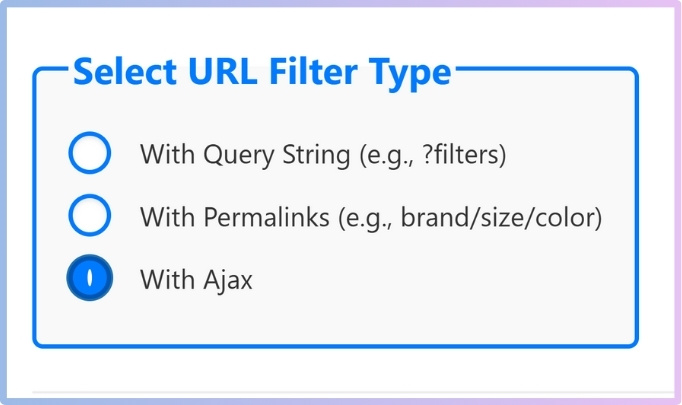
With the plugin active and displayed, now it’s time to choose which filters to show. This section allows you to enable AJAX functionality and control the filter behavior.
- Go to Product Filters > Form Manage.
- Enable the filters you want to display.

- Scroll down and you’ll see a box named “Select URL Filter Type”, choose “With Ajax” for a seamless experience.

- Click on Save.
Step 4: Customize Filter Styles
Make your filters visually appealing to match your store’s branding. This step lets you style the filter interface using checkboxes, color swatches, images, or dropdowns.
- Go to Product Filters > Form Style.
- Under Select Attribute, choose an attribute (e.g., color, size).
- Choose your preferred display type:
- Checkbox
- Color
- Image
- Dropdown (Select)

- Customize colors, images, or layout.
- Click Save.
Your WooCommerce store now has a powerful, customizable product filtering system that improves user experience and helps customers find what they need faster.
Types of Product Filters You Can Add in WooCommerce
Online store visitors usually want to find what they need quickly. That’s where product filters in WooCommerce help. These filters make it super easy to narrow down the choices fast.
1. Category Filters
- Purpose: Let users narrow products by predefined categories.
- Example: Clothing → Men, Women, Kids.
- Use Case: Ideal for stores with diverse product ranges.
2. Price Filters
- Purpose: Allow customers to filter products within a specific price range.
- Types:
- Range slider (e.g., $10–$100)
- Predefined ranges (e.g., Under $50, $50–$100)
- Use Case: Useful for budget-conscious customers or high-end product filtering.

3. Tag Filters
- Purpose: Filter by product tags, which are descriptive labels.
- Example: “Eco-friendly,” “Limited Edition,” “Best Seller.”
- Use Case: Great for marketing-specific or seasonal collections.
4. Attribute Filters
- Purpose: Let users filter by product characteristics.
- Examples:
- Color: Red, Blue, Black
- Size: S, M, L, XL
- Material: Cotton, Leather, Metal
- Use Case: Essential for apparel, accessories, or customizable items.
5. Rating Filters
- Purpose: Filter products by customer review ratings (e.g., 4 stars & up).
- Use Case: Helps quality-conscious shoppers find highly rated items.
6. Stock Status Filters
- Purpose: Filter products based on availability.
- Options: In stock, Out of stock, Backorder.
- Use Case: Allows customers to avoid browsing unavailable items.
7. On Sale Filters
- Purpose: Show only discounted or promotional products.
- Use Case: Great for deal-hunters or during sales events like Black Friday.
8. Brand Filters (Custom Taxonomy)
- Purpose: Filter products by brand names.
- Use Case: Essential in stores that carry multiple brands or manufacturers.
9. Custom Filters (via Plugins)
- Purpose: Create advanced filters like:
- Date added
- Custom fields
- Tools: Plugins like Dynamic AJAX Product Filters for WooCommerce can help you add these custom filters easily.
Bonus: Combined Filters
- Purpose: Let customers apply multiple filters simultaneously (e.g., category + price + color).
- Use Case: Improves precision and reduces bounce rate.
Filters are simple but powerful tools that make shopping easier and more fun. With the right filters, your online store becomes faster, smarter, and more useful.
Built-in Product Filters vs. Advanced Plugin Product Filters: Which One is Better?
WooCommerce offers two types of filters: built-in ones included with the plugin and advanced ones you can add using plugins. Here’s a simple comparison to help you decide.
| Feature | Built-in Product Filters | Advanced Plugin Product Filters |
| Ease of Use | Easy to set up, basic options only | Slightly more setup, but very user-friendly |
| Filter Types | Limited (category, price, tags) | Many options like color, brand, ratings, etc. |
| Design Control | Basic styling, not very flexible | Customizable look to match your site’s theme |
| Speed and Performance | Fast and lightweight | May use more resources depending on the plugin |
| Mobile Responsiveness | Works well on mobile | Fully responsive with advanced layouts |
| Live Filtering (AJAX) | Not available | Shows results instantly without page reload |
| Custom Filter Options | Hard to add custom filters | Easy to create special or unique filters |
| Product Search Integration | Basic product search only | Often includes advanced search with filters |
| User Experience | Simple and clean | More interactive and smoother experience |
| Cost | Free (comes with WooCommerce) | Often requires a paid plugin for full features |
If your store requires more dynamic or layered filtering, implementing advanced product filters in WooCommerce through plugins becomes essential for scalability and performance.
Should You Use Ajax Product Filters for Your First Filter?
Yes, using Ajax product filters for your first filter is a smart choice. Ajax filtering allows users to see product updates instantly without refreshing the page. This makes shopping faster and smoother. It works in real-time, so when someone clicks a filter, the products change right away. This quick response helps people find what they want faster, which keeps them engaged.
One major benefit of Ajax filters is a better user experience. Without the need to reload the page, everything feels quicker and easier. It saves time and makes the website feel modern. This can lead to longer visits and more purchases because users enjoy browsing without interruptions or waiting times.
If you are launching a new online store, adding Ajax filters early can give you an advantage. It helps your website feel more advanced from the start. Though it may take a bit of work to set up, the results are worth it. It can help build trust and make your website more user-friendly.
Why Product Organization Matters Before Using Product Filters in WooCommerce?
People can find what they’re looking for much faster in an organized store. If your products are all over the place, filters won’t work well. Even if filters look great, they won’t help if your products aren’t sorted. Keep reading to see why product structure really matters before using filters.
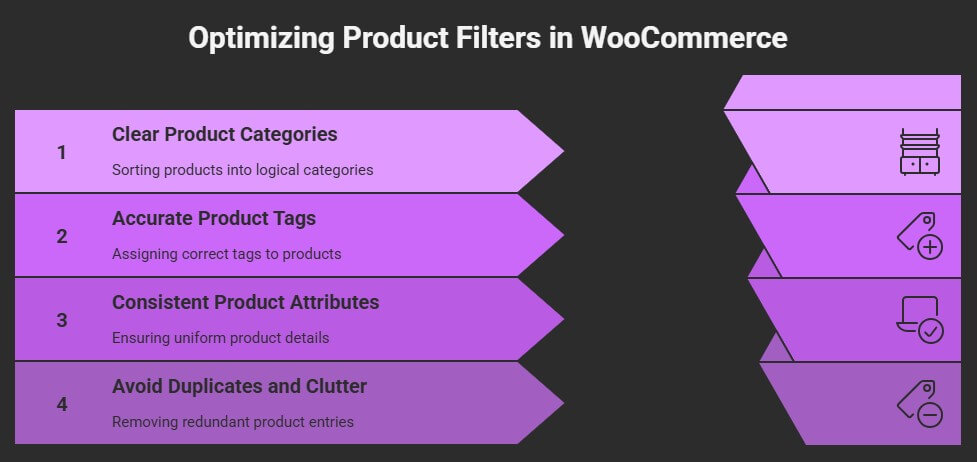
Clear Product Categories
It is easier for people to shop when products are sorted into the right categories. If shoes are mixed with shirts or mobile covers are in the same place as laptops, it confuses the buyer. Categories help filters show only what the shopper wants. Without them, filters may give wrong or blank results. Think of categories as a map, and filters as the search tool. If the map is wrong, the search goes nowhere useful.
Accurate Product Tags
You can’t expect filters to work well if products don’t have proper tags. Tags tell the filter what kind of product it is. If your t-shirts don’t have size or color tags, how will someone filter by size or color? It’s like looking for something in the dark. Making sure each product is tagged correctly helps filters show the right items without mistakes or confusion.
Consistent Product Attributes
Product details that are inconsistent often cause filters to fail. One product might have its size listed as “M,” another says “Medium,” and another says nothing at all. Filters get confused and show odd results. That’s why it’s super important to make sure every product uses the same words and formatting for things like size, color, or brand. It keeps everything working smoothly for the shopper.
Avoid Duplicates and Clutter
Having too many similar or duplicate products makes filters messy. When the same item appears multiple times with tiny changes, it clogs up the filter results. Customers get overwhelmed or see repeated results, which is frustrating. This also affects how the filters sort or group items. The smarter move is to clean up your listings so filters can show the best variety without all the noise.
Preparation Before Filtering
A lot of store owners jump straight into using filters without setting things up first. That’s where problems begin. Without thoughtful store preparation for filtering, even well-designed filters can produce confusing or empty results for users. Products need to be organized in a way that filters can actually understand. It’s like setting the table before dinner—if you skip that part, the whole experience feels off.
Filters work best when the product list is clean and complete. Taking time to organize your store helps buyers find things fast. Small mistakes in product setup can ruin how filters behave later. So, fix the basics first, and filters will do their job well.
What to Do If Product Filters Don’t Show Any Products?
No products appear when the product filters stop working. You might feel like something is broken, but don’t worry—it’s usually a simple issue. There are a few things you can check and fix. Let’s look at them one by one.
Missing Product Attributes
Sometimes, products don’t appear in filtered results because they don’t have the right tags or details assigned to them. For example, if a filter checks for color but your product has no color selected, it won’t show up. Always make sure your products have the correct details added. Go through your product list and double-check that every item is connected to the right filters.
Theme Problems
Depending on your website’s theme, your filter plugin might not work properly. If you recently changed your theme and the filters stopped showing products, this might be the issue. Some themes need extra settings or updates to work with filters. Try switching back to your old theme and testing the filters again. If that fixes the problem, the theme needs some tweaks.
Cache Issues
Your website might be showing an old version of the page because of caching. Cache helps speed up your site, but it can also hide changes. Try clearing your site’s cache from the plugin or server settings. Also, clear your browser cache and test the filters again. This often helps get the latest updates to show.
Plugin Conflicts
Filters not working could also be because of other plugins. Sometimes, one plugin blocks another one without warning. Try turning off other plugins one by one and testing the filter each time. If filters start working after turning off a plugin, you’ve found the problem. Update or replace that plugin to avoid further issues.
Filter Settings
It’s possible the filter itself is set up the wrong way. Maybe it’s too strict or not pointed at the right product group. Go into the filter settings and check if the filter rules match your product list. Test different options to see what brings results. Small changes here can make a big difference.
Fixing filter problems can feel tricky at first, but most issues have simple solutions. Take your time and check each area one by one. Small changes often make a big difference. Once everything is set right, your filters will start showing products again.
FAQs About A Quick Start Guide to Setting Up Your First WooCommerce Product Filter
It can be a little tricky to set up your first WooCommerce product filter, but once you understand the basics, it’s actually quite easy. Whether you are just starting out or want to understand something better, these answers will guide you step by step. Let’s take a look at some of the most useful questions people ask when setting up product filters for the first time.
How Do I Choose the Right Filter Plugin for My Store?
Choosing the right plugin depends on your store’s needs. If you want filters that load quickly without refreshing the page, look for one that offers AJAX support. Check reviews and features on the WordPress plugin page to see if it’s user-friendly and updated regularly. Also, pick a plugin that gives you enough options in the free version, in case you don’t want to buy the premium one right away.
Can I Use Product Filters Without Any Coding Knowledge?
Yes, you can use product filters without writing any code. Most WooCommerce filter plugins are designed to work with simple clicks and drag-and-drop tools. You only need to follow steps like installing the plugin, placing widgets, or using shortcodes. The settings are explained clearly, and anyone can do it with a little practice.
What Happens If I Delete a Filter by Mistake?
If you delete a filter by mistake, you can easily make it again using the same settings. Most plugins don’t delete your saved forms unless you manually remove them. If you had a backup of your website or plugin settings, you can restore it. It’s a good idea to keep notes or screenshots of your filter settings just in case.
Can I Show Different Filters on Different Pages?
Yes, many filter plugins allow you to show different filters on different pages. You can do this by using shortcodes or widget placements on specific pages. This is helpful if you want to offer certain filters only on some product categories or collections. It makes your store look clean and more helpful to users.
How Do I Know If My Filters Are Working Properly?
To check if your filters are working, use them like a shopper would. Try selecting different options and see if the product list changes as expected. Make sure there are no empty results unless they are correct. You can also test your site on a phone or another device to make sure everything looks and works the same way.
Can Filters Help My Store Get More Sales?
Yes, good filters can help you get more sales. They make it easier for shoppers to find what they want faster, which keeps them on your site longer. When people find what they like without confusion, they are more likely to buy. Filters also make your store look more professional and easy to use.
Do Filters Work Well on Mobile Phones?
Most modern filter plugins are designed to work well on mobile phones. They usually adjust to smaller screens and allow easy taps and scrolling. It’s important to test your filters on mobile to make sure they don’t look too crowded. A mobile-friendly store keeps more visitors happy and helps with mobile sales.
Will Adding Filters Slow Down My Website?
Sometimes, using too many filters or a poorly made plugin can slow down your site. But most good plugins are built to work fast, especially if they use AJAX. To keep your site fast, avoid adding filters you don’t need and clean up unused plugins. You can also use caching tools to speed things up.
Is It Okay to Use a Free Filter Plugin for a Long Time?
Yes, using a free plugin is fine if it gives you all the tools you need. Many store owners use the free version without problems. Just make sure the plugin is updated often and works well with your theme. You can always switch to the Pro version later if you need more features.
How Do I Remove or Edit a Filter I Don’t Need Anymore?
To remove or change a filter, go to the plugin’s settings area in your WordPress dashboard. Find the filter you want to update, and you’ll see options to edit or delete it. You can change things like labels, styles, and which products it shows. Just make sure to click Save after making any changes.
Conclusion
Starting your WooCommerce store with great filters may seem hard, but it’s actually easy when you follow the right steps. With helpful tools, clear settings, and simple plugins, you can add powerful filters without needing coding. You’ve now learned how to install, display, manage, and style filters the smart way. So if you ever wondered how to make filtering easier, faster, and more useful, this guide gives you all the basics — that’s your full answer to a quick start guide to setting up your first WooCommerce product filter.
Be sure to organize your products well, use clean tags and names, and test everything before going live. Keep in mind that filters work on mobile devices as well. Use trusted plugins, clear cache often, and don’t use too many filters at once. Good luck setting up WooCommerce filters — I wish you a smooth setup and lots of happy customers.