Customizing fields on a WooCommerce One-Page Checkout lets you take control of how your checkout looks and works. It helps you make things easier for your customers and cleaner for your store. If you’re confused about how to customize fields on a WooCommerce One-Page Checkout, you’re not alone—many store owners think about this exact thing.
To customize checkout fields on a WooCommerce One-Page Checkout, you need to use a plugin like One Page Quick Checkout for WooCommerce by Plugincy. First, install and activate the plugin. Then go to Onpage Checkout > Checkout Form Manage in your WordPress dashboard. From there, you can remove or hide fields like name, address, phone, email, and more using the customization settings.
Do you want to change the checkout layout or remove unnecessary fields for a smoother shopping experience? If yes, then read on – this article will teach you how to manage and customize WooCommerce One-Page Checkouts.
How to Customize Fields on a WooCommerce One-Page Checkout?
You can make a huge difference when running an online WooCommerce store if your checkout page is simple and easy to use. The one-page checkout process makes buying quick and easy for customers. But sometimes, you may want to change the fields on that page. Maybe removing a few, adding something new, or just making it look better. Check out how you can do all that and make your checkout page work as you want it to.
Customize fields on a WooCommerce One-Page Checkout by Using a Plugin
If you want to customize fields on a WooCommerce One-Page Checkout form, you first need to set up One-Page Checkout by using a plugin like One Page Quick Checkout For WooCommerce by Plugincy. Afterwards, you can add, remove, or hide checkout fields in Customization Options. The following is the full process to customize fields in WooCommerce One-Page Checkout:
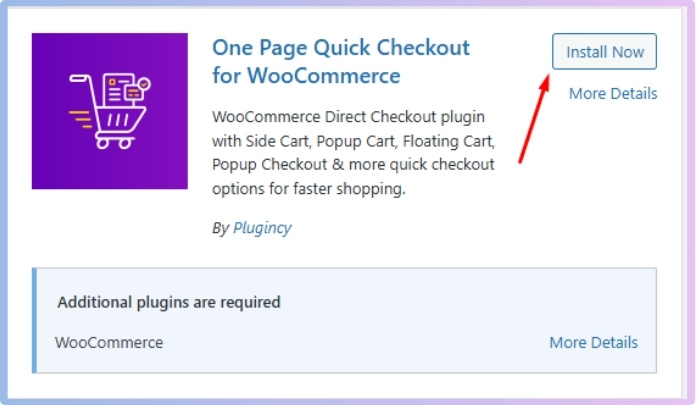
Step 1: Install The Plugin
For the Free Version:
- Go to your WordPress Admin Dashboard.
- Navigate to Plugins > Add Plugin.
- Search for “One Page Quick Checkout for WooCommerce”
- Click Install Now and then Activate.

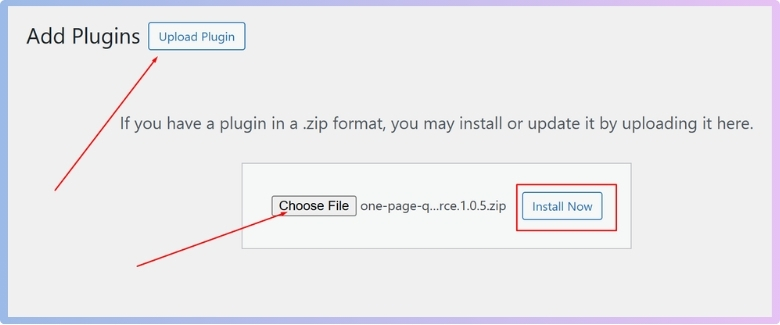
For the Pro Version:
- Visit plugincy to purchase the PRO version.
- After your purchase, you will receive a download link in your email. Click the link to download the ZIP file.
- Go to Plugins > Add Plugins.
- Click Upload Plugin.
- Select the Pro version ZIP file from your device.

- Click Install Now, then Activate.
Manual Plugin Installation Using FTP
- Download the Plugin:
- Download the ZIP file for the Free or PRO version.
Extract the ZIP File:
- Extract the contents of the ZIP file to a folder on your computer.
Upload via FTP:
- Use an FTP client (like FileZilla) to connect to your website’s server.
- Navigate to the /wp-content/plugins/ directory.
- Upload the extracted plugin folder to the plugins directory.
Activate the Plugin:
- Log in to your WordPress admin dashboard.
- Go to Plugins and find “One Page Quick Checkout for WooCommerce”.
- Click on the Activate button.
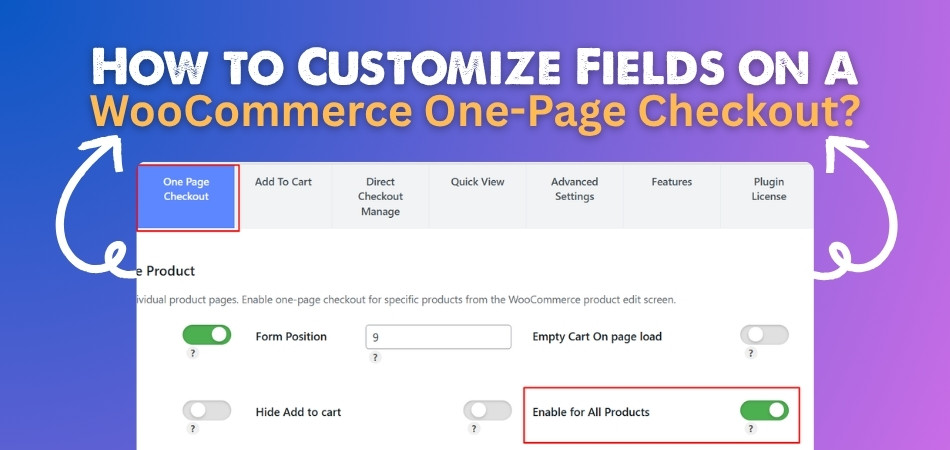
Step 2: Enable One Page Checkout
After installing the plugin, the One Page Checkout for WooCommerce feature is usually enabled by default. If it’s not, you can easily turn it on manually:
- In your dashboard, go to Onpage Checkout > One Page Checkout.
- Toggle the Enable One Page Checkout option to On.


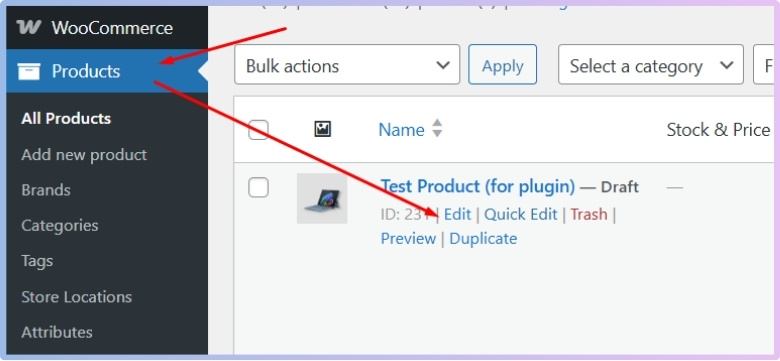
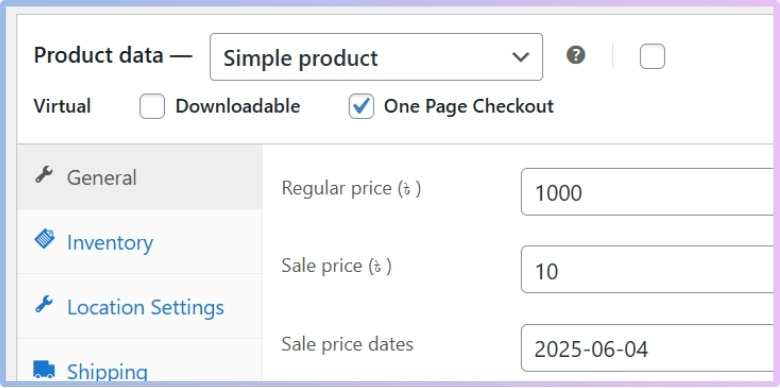
Step 3: Enable One Page Checkout for Individual Products
To apply One Page Checkout to specific products:
- Go to Products in your dashboard.
- Edit the product you want to modify.

- Scroll to the One Page Checkout settings on the product edit page.
- Click the One Page Checkout option to On.

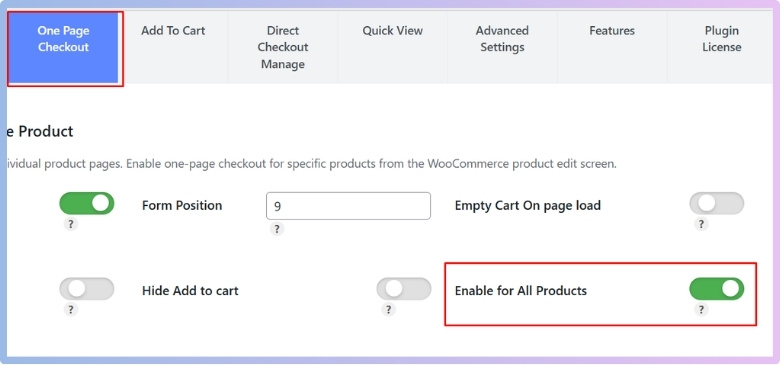
Step 4: Enable One Page Checkout for All Products
If you want to apply One Page Checkout across your entire store:
- Go to Onpage Checkout > One Page Checkout.
- Turn on the “Enable for All Products” option.

Step 5: Navigate to Checkout Form Management
- Log in to your WordPress admin dashboard.
- Go to Onpage Checkout in the sidebar.
- Click on Checkout Form Manage.

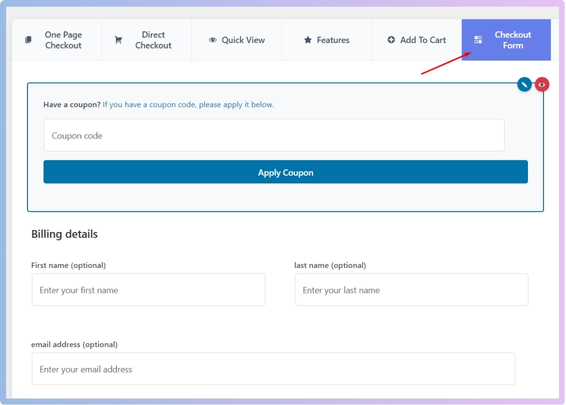
Step 6: Manage Checkout Fields
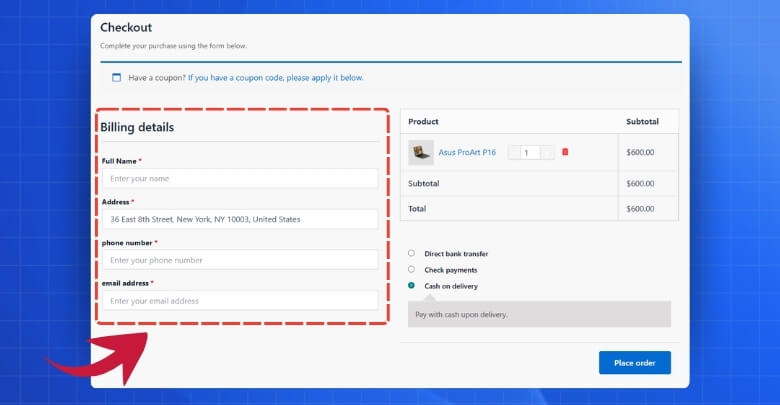
In the Checkout Form Manage section, you can customize which fields are displayed during the checkout process.
Remove Checkout Fields
Choose which checkout fields you would like to remove in the selection box. Options include:
- First Name
- Last Name
- Country
- State / District
- City
- Postcode
- Address 1
- Address 2
- Phone
- Company
- Notes
Others Removable things are:
- Remove the coupon input field at the top of the checkout.
- Exclude the shipping address fields if not applicable.
- Hide any notices or messages displayed during checkout.
- Remove the privacy policy text from the checkout page.
- Exclude payment options if you only want a single payment method.
- Remove the table displaying the products being purchased.
Step 7: Manage Headings
The Heading Manage Section lets you customize which headings are displayed:
- Remove the billing details heading.
- Exclude the additional details heading.
- Remove the order review heading for a cleaner layout.
By customizing the checkout form and headings, you can create a clean, minimal, and high-converting one-page checkout experience in WooCommerce.
Why Do You Need to Customize Fields on a WooCommerce One-Page Checkout?
Customers want a smooth checkout process when shopping online. If it feels too long or confusing, they may just leave. That’s why changing or removing some fields can help a lot. Let’s see why it’s good to customize the fields on a WooCommerce One-Page Checkout:
Make It Simple
Too many fields on the checkout page can make things messy. When people see a lot of boxes to fill, they may feel lazy or confused. You can make it easier by showing only the important fields. A clean checkout form looks better and is faster to complete. This helps people finish their order without any stress.
Save Customer Time
No one likes to spend too much time filling out forms. When you remove extra fields, the checkout becomes quicker. This is helpful for people who are busy or in a hurry. They can pay and leave in just a few clicks. Quick checkouts can make people come back next time.
Focus on What Matters
Not every product needs the same details. For example, if you’re selling a digital item, you don’t need a shipping address. You can hide fields that don’t matter for that product. This makes the form shorter and easier. Only showing what’s needed keeps things simple.
Build More Trust
A short and clear checkout page makes people feel safe. It shows that your store is easy to use and well managed. You can also add trust badge to the WooCommerce one page checkout form to make people feel more secure. This helps them believe their payment is safe. When people trust your store, they’re more likely to buy.
Make It Look Better
It gives a good feeling to have a nice-looking checkout page. You can match the form style with the rest of your website. It will look clean and work better on all devices, like phones and tablets. This makes shopping smooth for everyone. A better design can bring more happy buyers.
Get More Sales
If the form is too long, many people leave without buying. A short and simple form helps more people finish the checkout. This means more orders for your store. When it’s easy to buy, people don’t get confused or bored. Good checkouts help your business grow.
How Many Fields Are Too Many in WooCommerce One-Page Checkout?
A long checkout form can confuse people and make them leave without buying. Most shoppers don’t like typing too much while shopping. If they see many fields, they may feel it takes too long to finish. A short and simple form can help keep them interested in completing their order.
Every store is different, but usually 6 to 8 fields are enough for most checkout pages. You need only the important ones like name, email, address, and payment details. If your form asks for too much, people may feel tired and click away. Fewer fields can make the page look cleaner and easier to use.
Think about what you really need from your customers before asking for it on the checkout page. Extra questions can slow down the buying process a lot. Removing unneeded fields helps customers save time and stay focused on the purchase. Keep it simple so more people finish their checkout without getting stuck.
Common Errors When Customizing Checkout Fields
Customizing checkout fields in WooCommerce is helpful, but small mistakes can cause big problems. Many store owners make changes too quickly. Knowing the common errors can save time and keep your checkout page working smoothly.
- Removing Required Fields: Deleting important fields can break the checkout process and confuse customers during payment. Always check what WooCommerce needs before removing anything.
- Adding Too Many Fields: Putting too many custom fields can make the form long and tiring. Shoppers may leave before finishing their purchase completely.
- Using Wrong Field Types: Choosing the wrong field type, like text instead of a dropdown, can make data messy. Use correct formats to keep it clean.
- Not Testing the Form: Skipping a full test after changes can cause problems for buyers. Always test the checkout on desktop and mobile devices.
- Poor Field Labels: Using unclear or short labels can confuse users during checkout. Make sure every label clearly explains what the field is for.
- Not Saving Field Settings: Forgetting to save after editing fields can undo your changes. Always double-check if your settings are saved and working properly.
- Breaking Mobile Layout: Customizing without checking mobile view can ruin the checkout layout. Always make sure the form looks fine on small screens.
- Ignoring Plugin Conflicts: Adding new checkout plugins without checking for conflicts can cause loading or payment errors. Use trusted plugins and update them regularly.
Is It Better to Use Default Fields or Custom Ones in WooCommerce Checkout?
Default checkout fields in WooCommerce work well for most stores and cover basic customer needs. They are simple, tested, and easy to use. For small shops or beginners, sticking with default fields can save time and avoid mistakes. These fields are made to give shoppers a smooth and safe experience.
Custom fields are useful when your store needs special information not found in the default form. You might sell digital items or special services that need extra details. Adding only what’s needed can keep the form clean and clear. Always make sure to optimize checkout for mobile devices so every user has a good experience.
Choosing between default and custom fields depends on what your store sells and how your checkout should feel. If default fields are too basic, custom ones give more control and better flow. Don’t add too many custom fields that slow things down or confuse people. A short, clear form helps people complete orders without getting stuck or giving up.
Tips to Restore Default Checkout Fields in WooCommerce One-Page Checkout
Sometimes when we change too much on the checkout page, it doesn’t work the way we want. Things can go missing or break. That’s when going back to the default setup can really help. If you ever need to reset your WooCommerce checkout form, here’s how to do it the right way.

Check Plugin Settings
Most checkout plugins have a reset button in the settings area. This button helps bring back the original form fields in one click. Look for it under the plugin options in your WordPress dashboard. If you don’t see it, check the plugin help guide. It’s an easy way to fix the form quickly.
Disable Extra Plugins
Checkout fields can be changed without your knowledge by some plugins. If something looks wrong, try turning off new or unused plugins. After doing that, reload the checkout page to see if it’s back to normal. This can help bring back the default fields. It’s a smart way to find the problem.
Use Theme Default
Some themes change the look of the checkout form. Try switching to the basic WordPress theme just for a test. If the default fields show up again, the problem may be with your theme. You can then check the theme settings or contact support. Always test with the default theme when unsure.
Reinstall the Plugin
Uninstalling and reinstalling the plugin can sometimes fix broken field settings. It brings back the original files and clears saved changes. Just delete the plugin and add it again from your dashboard. Don’t forget to activate it after reinstalling. This can solve many small issues.
Restore with Backup
To restore things, take a backup before you change the fields. Backups help you undo changes safely. Many plugins or hosting services let you restore a backup with a click. Always keep a backup before making big changes. It’s the safest way to fix mistakes.
Ask for Support
If nothing works, it’s okay to ask the plugin or theme support team for help. They can guide you step by step. Send them screenshots or explain what’s missing. Support teams are usually very helpful and quick to reply. Don’t try to fix everything on your own if you’re unsure.
Frequently Asked Questions
You probably have many small questions in mind as you work on improving your WooCommerce One-Page Checkout. Whether it’s about using plugins, handling settings, or improving the layout, this FAQ section is here to help. Below, you’ll find common questions that haven’t been covered yet, along with clear and useful answers to guide you through the process.
What Plugin Works Best for Field Customization?
One Page Quick Checkout for WooCommerce by Plugincy is one of the best plugins for easy field customization. It gives simple options to remove, hide, or manage checkout fields without writing code. You can also manage headings and display settings from the dashboard. It’s beginner-friendly and fits well with most WooCommerce themes.
Does Field Customization Affect Payment Gateways?
Most of the time, field customization does not affect payment gateways if you don’t remove essential fields. However, removing required billing fields can cause issues. Always test your checkout with all payment options active. That ensures your changes don’t block payments or break functionality.
Is It Possible to Add Custom Notes Fields?
Yes, you can add extra fields like notes or instructions for customers using the plugin’s custom field section. These fields are helpful for getting specific information about orders. You can place them anywhere in the checkout. Just remember to label them clearly.
Can I Translate Custom Fields for Multilingual Stores?
Yes, if you’re using a translation plugin like WPML or Loco Translate, you can translate all custom field labels. It ensures your international users can understand the checkout easily. Always check that all fields display properly in every language. Multilingual support is very important for global stores.
Which Fields Are Safe to Remove Without Breaking Checkout?
Fields like company name, address line 2, and order notes are usually safe to remove. These are often not needed for all stores. But never remove fields like name, email, and payment info. Always test the checkout after removing anything to be sure it still works.
How to Test Custom Checkout Fields Before Going Live?
Use a staging site or a test product to check how the checkout form looks and works. Fill it out as a real customer would. Try different devices and browsers for full testing. This way, you can fix issues before showing it to customers.
What Happens If I Leave a Field Unnamed?
If a custom field doesn’t have a name, WooCommerce can’t store or display the data properly. You may lose important order info. Always use unique and clear field names. It helps you find and use the data later without confusion.
Bottom Line
When you customize your WooCommerce checkout, you make things easier for your customers and better for your business. A clean and simple checkout can keep people from leaving and help them finish their orders faster. Small changes, like removing extra fields or fixing the layout, can make a big difference.
If you’re wondering how to customize fields on a WooCommerce One-Page Checkout, the process is easier than it seems. With the right plugin and a few smart choices, you can control what shows up, what doesn’t, and how your checkout feels overall. The goal is to create a smooth experience that works well for both you and your buyers.
Now that you know what’s possible, it’s time to take action. Start customizing step by step, test as you go, and keep things simple. A better checkout means more happy customers—and more sales in the long run.