Backorders in WooCommerce allow customers to purchase products even when they are out of stock. By default, WooCommerce provides three backorder options:
- No Backorder: Customers cannot order products that are out of stock.
- Allow: Customers can order out-of-stock products without any notification.
- Allow, but Notify Customer: Customers can order out-of-stock products and see a message indicating the product is “Available on Backorder.”
The Multi Location Product & Inventory Management for WooCommerce plugin extends this functionality by enabling backorder management on a per-location basis. This ensures that each store location can have its own backorder rules, giving store owners precise control over inventory and customer experience.
Benefits
Managing backorders by location provides several benefits:
- Flexibility: Configure backorder availability differently for each store location.
- Customer Transparency: Notify customers when products are available on backorder.
- Operational Control: Prevent overselling by restricting backorders in specific locations.
- Improved Experience: Customers can still place orders even if stock is unavailable, depending on your settings.
Real-World Example
Imagine a store with two warehouses: one in New York and another in Los Angeles. The New York warehouse may allow backorders with customer notifications, while the Los Angeles warehouse may not allow backorders at all. This ensures that customers ordering from New York see the message “Available on Backorder” while customers ordering from Los Angeles cannot add out-of-stock products to their cart.
Enable Location-Based Backorder Settings
Before configuring products, you must enable location-specific backorder management.
- From your WordPress dashboard, go to Location Manage > Settings > Inventory.
- Toggle on the option labeled Enable Location Backorder.
- Click Save Changes.
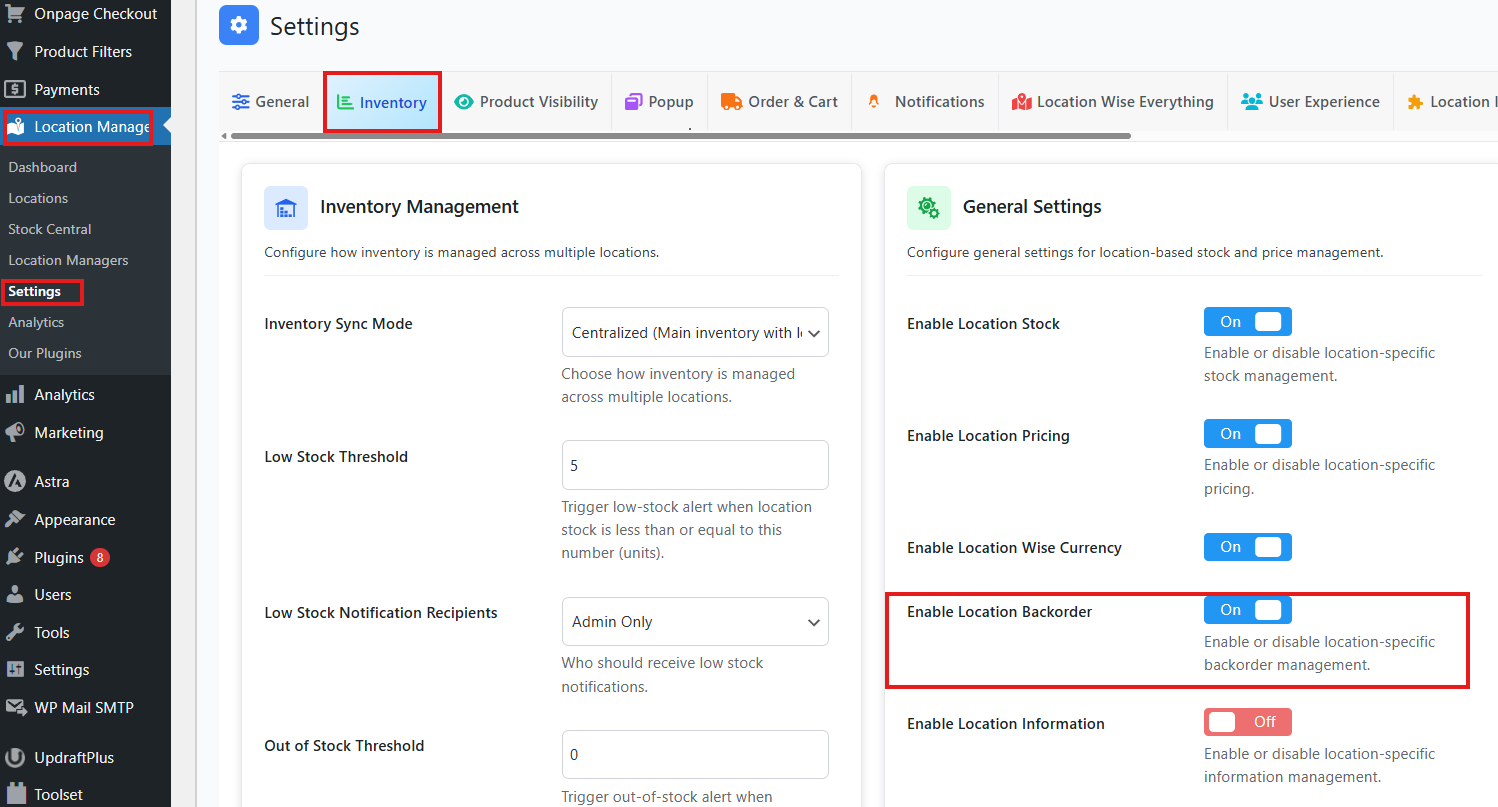
Enabling this setting allows you to manage backorders separately for each location.
Method 1: Configure Location-Based Backorder from Product Edit Page
This method allows you to configure backorders directly from the product edit page.
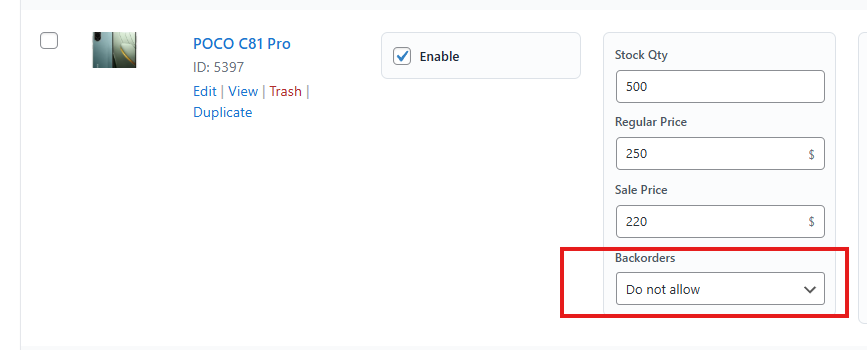
Simple Products
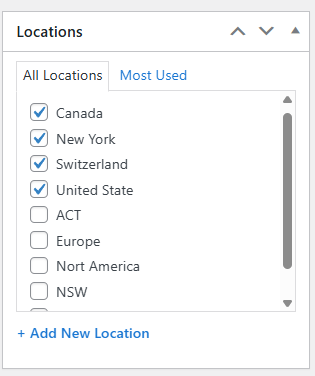
- Go to Products > All Products and select the product you want to configure or create a new product.
- Assign locations to the product in the Location section. If you have not created locations yet, refer to the Location Creating and Managing documentation.
- In the Product Data section, configure pricing. (See Location-Based Price Setup documentation.)
- In the Inventory tab:
- Select Stock Status: In Stock, Out of Stock, or Backorder.
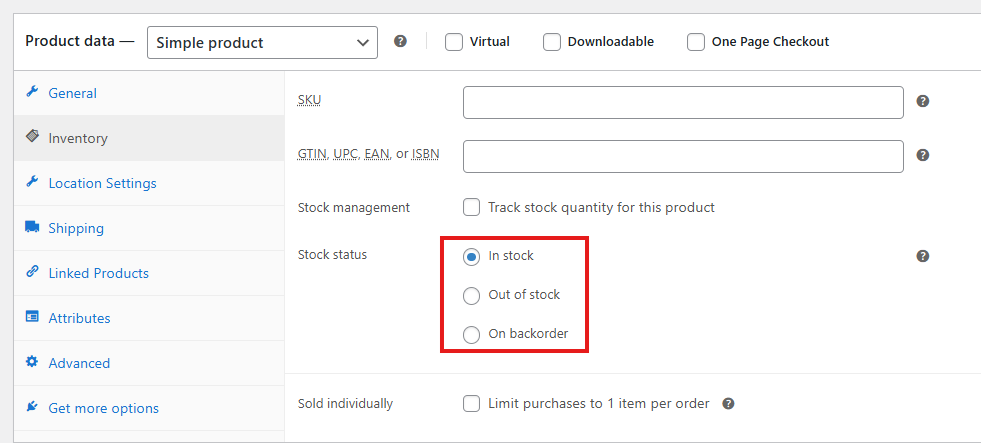
- Tick Track stock quantity for this product to enter exact stock numbers.
- Choose a backorder option: Do Not Allow, Allow, or Allow but Notify Customer. Since you are configuring location-based backorders, you can leave this as default.

- Go to the Location Settings tab.
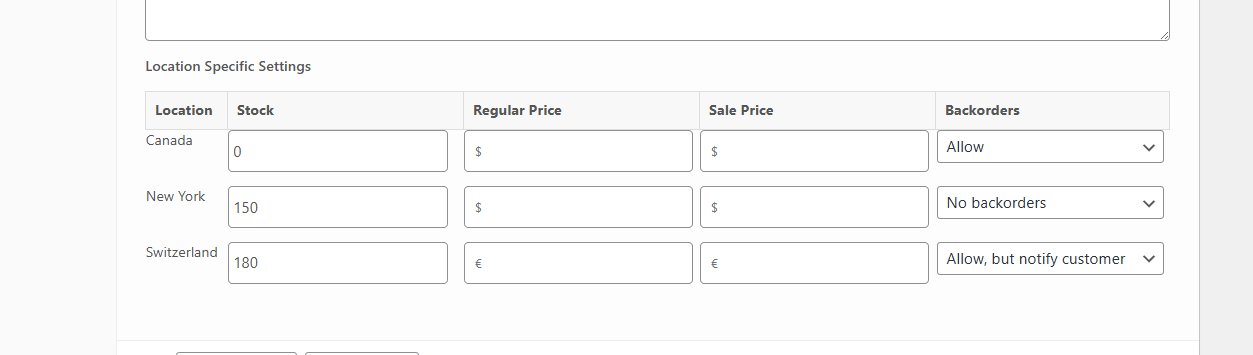
- For each location, enter stock quantity, price, and backorder availability.
- Options include:
- No Backorder: Customers cannot order out-of-stock products.
- Allow: Customers can order out-of-stock products without notification.
- Allow, but Notify Customer: Customers can order out-of-stock products and see the message “Available on Backorder.”
- Click Update or Publish to save changes.
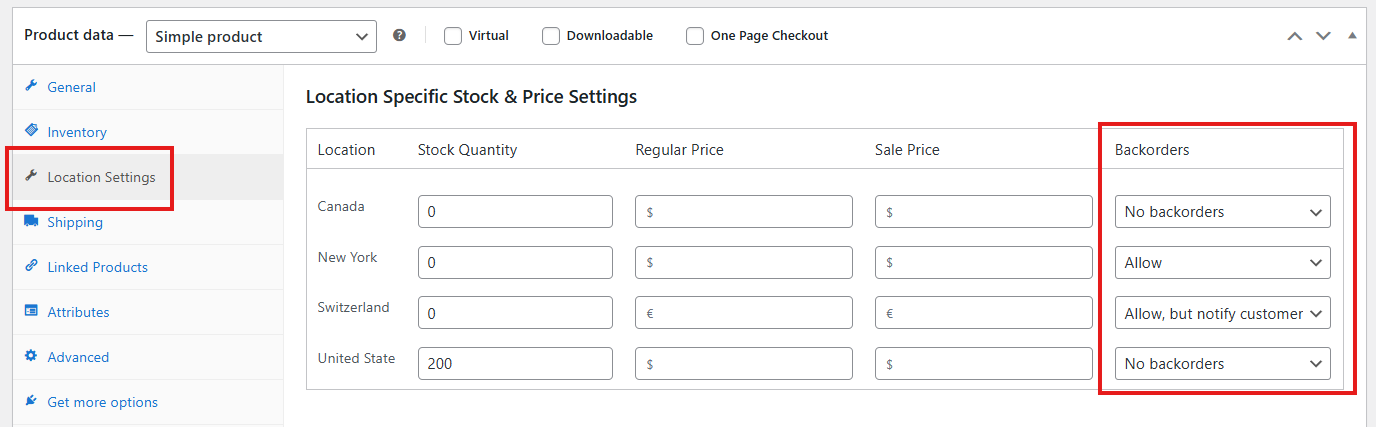
Configuring simple products ensures each location has its own backorder rules.
Variable Products
- Open the variable product edit page.
- Assign locations to the product.
- In the Product Data section, go to the Inventory tab and enter stock quantity.

- In the Variations tab:
- Expand each variation.
- Tick Manage Stock?.
- Enter regular price, sale price, purchase price, and stock quantity.
- Choose a backorder option (leave as default for location-based configuration).
- Go to the Location Specific Settings tab.
- For each location, enter stock quantity, price, and backorder availability.
- Repeat for each variation.
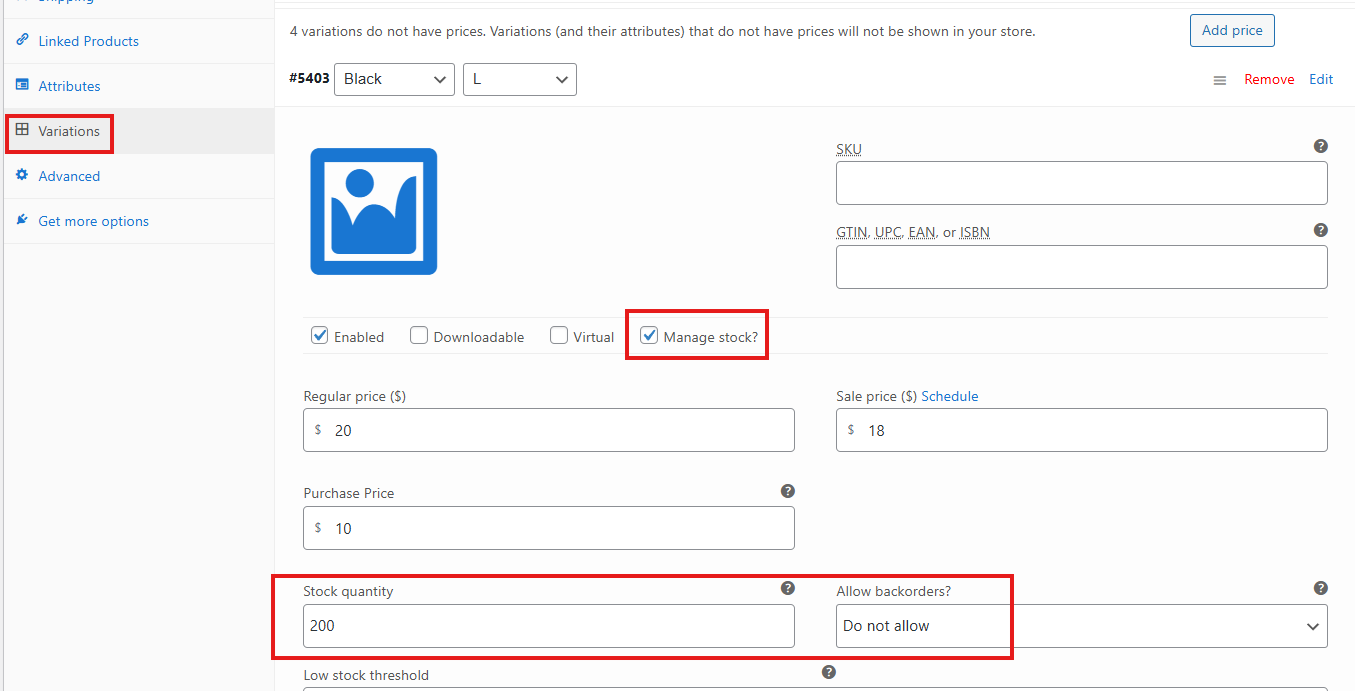
- Click Save Changes, then Update or Publish the product.
Managing variable products ensures each variation has accurate backorder settings per location.
Method 2: Configure Location-Based Backorder from Stock Central
Stock Central provides a centralized interface with two modes: Modern Mode and Classic Mode. Here’s how you can access both
- Go to Location Manage > Stock Central
- At the top right you’ll see two options to switch between.
- Choose if you want Modern mode or Classic mode
Modern Mode
Here in the Modern mode you’ll see all the products of your store. On the right side of each product you’ll see a button named Manage Stock or Add to Location. Products already assigned to a location will show Manage Stock, while products not yet assigned will show Add to Location. Even though the button names are different, clicking either one opens the same settings popup
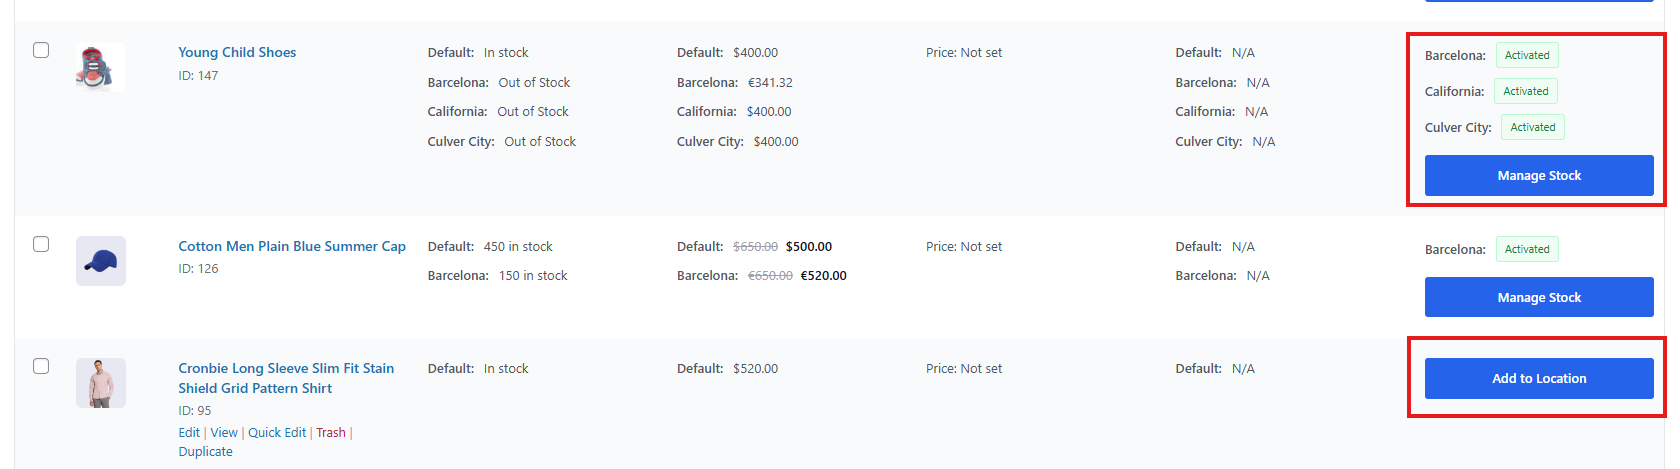
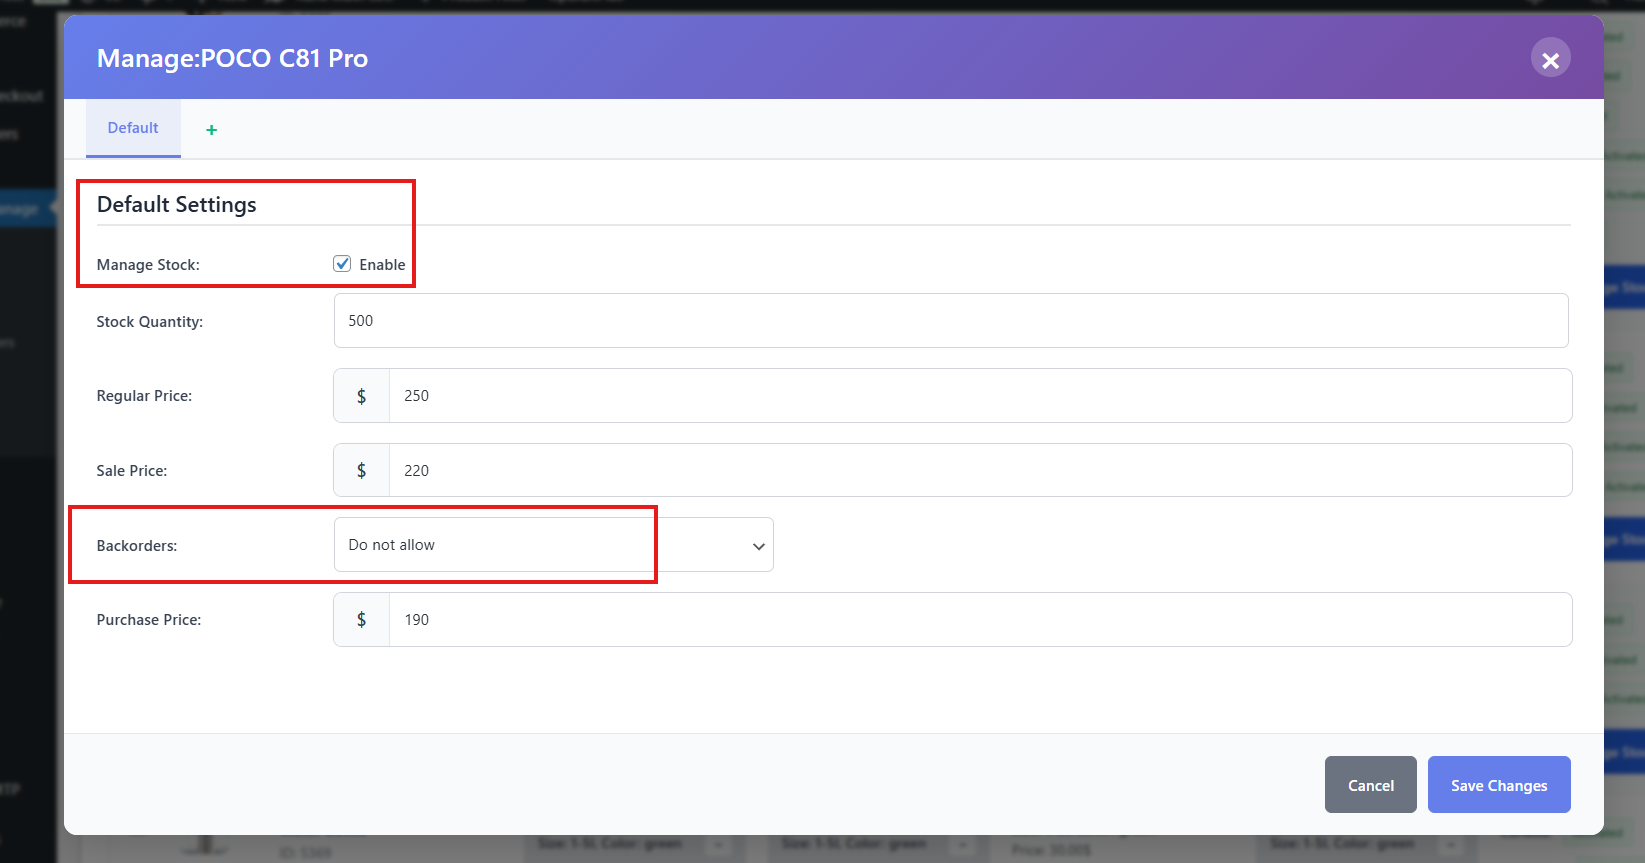
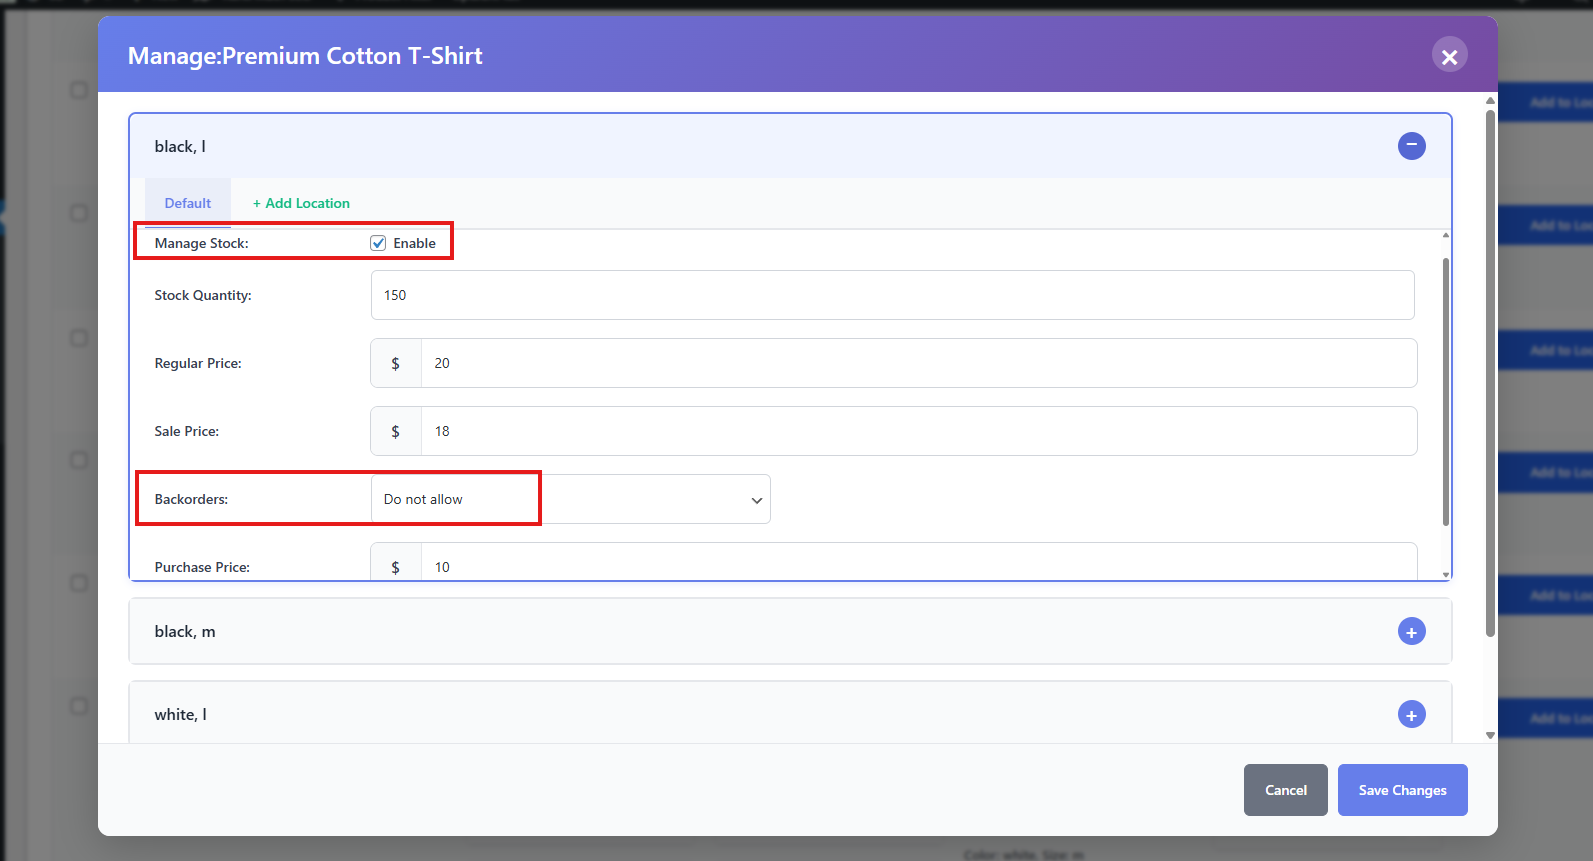
Simple Products
- Go to Stock Central.
- Choose a product and click Manage Stock or Add to Location.
- In the popup, tick Manage Stock.
- Enter stock quantity, regular price, sale price, and purchase price.
- For the backorder availability, you can keep it the same as it is since we are going to configure it location-wise.
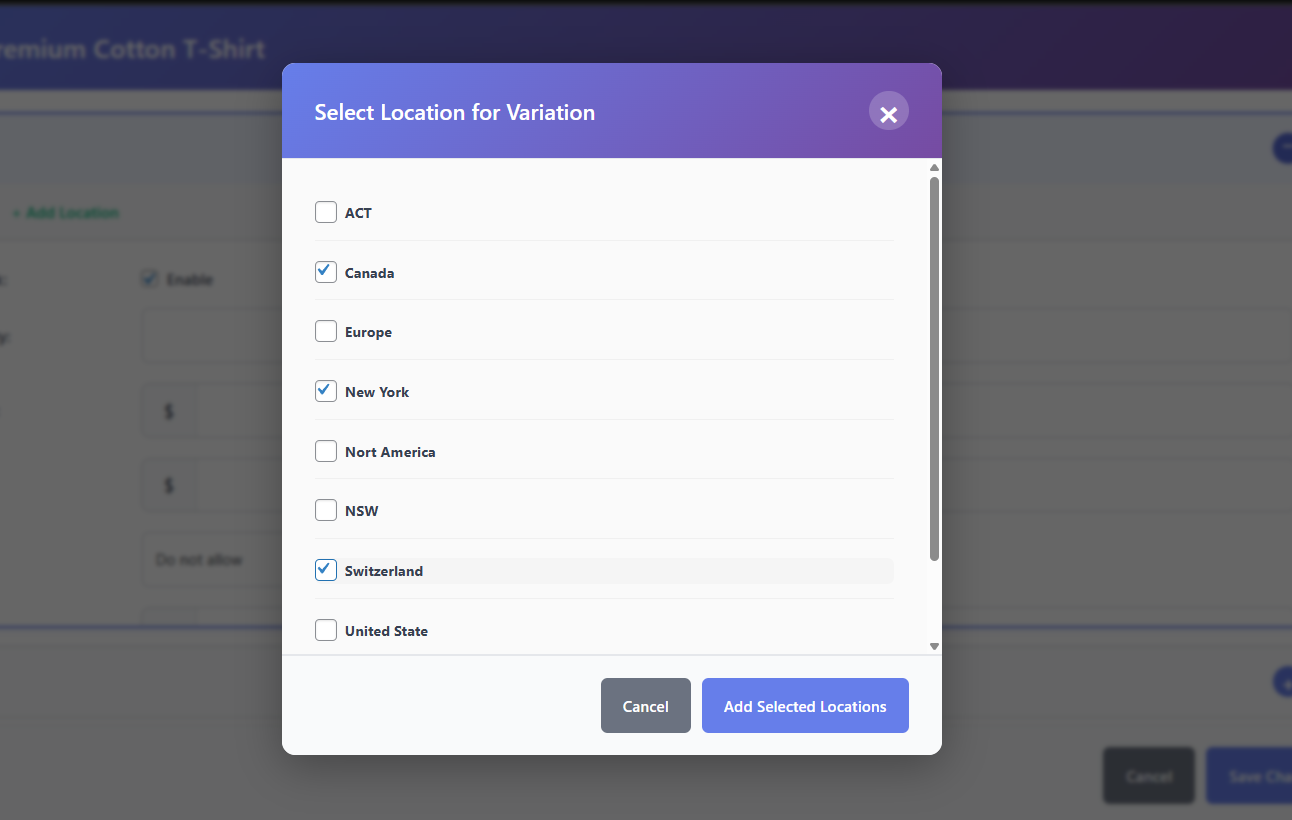
- Assign locations if not already assigned:
- Click the + icon beside the Default tab.
- A list of all available locations will appear.
- Select the locations you want to assign.
- Click Add Selected Locations.
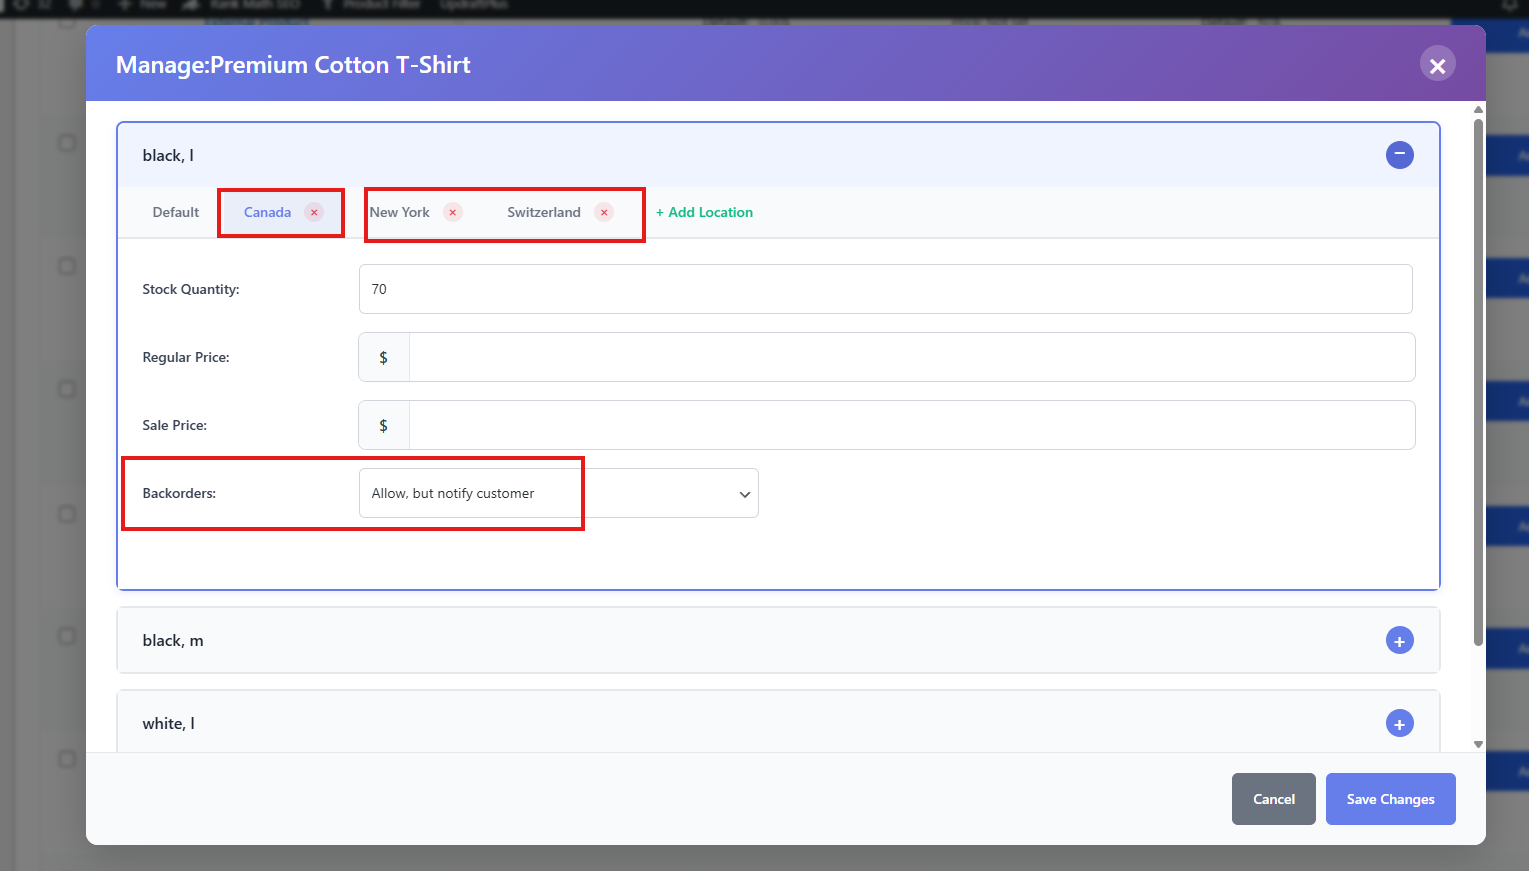
- Each location will now appear as its own tab.
- For each location tab, enter stock quantity, price, and backorder availability.
- For each location you can set different backorder availability depending on your needs.
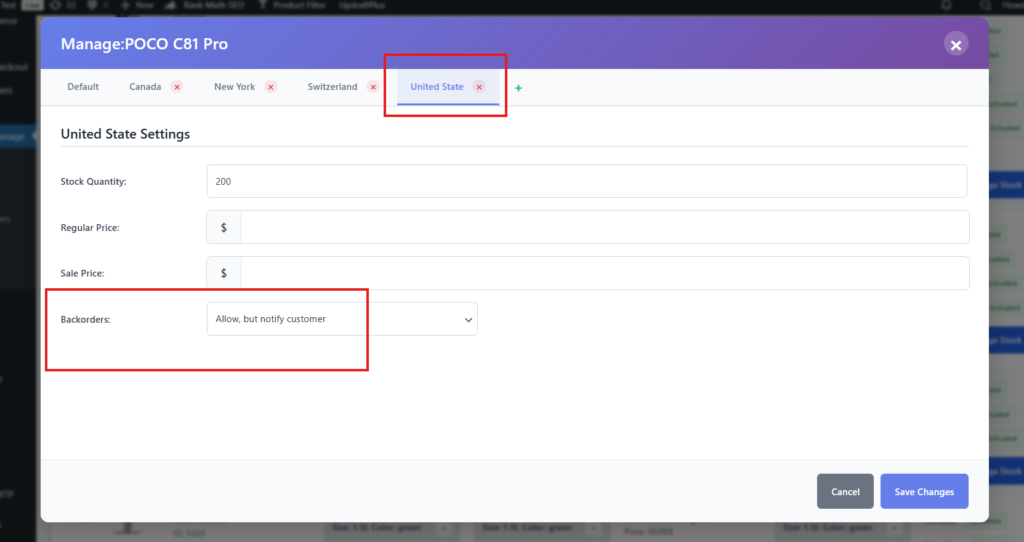
- Click Save Changes.
Assigning locations in Modern Mode ensures each product has location-specific settings before you configure backorders.
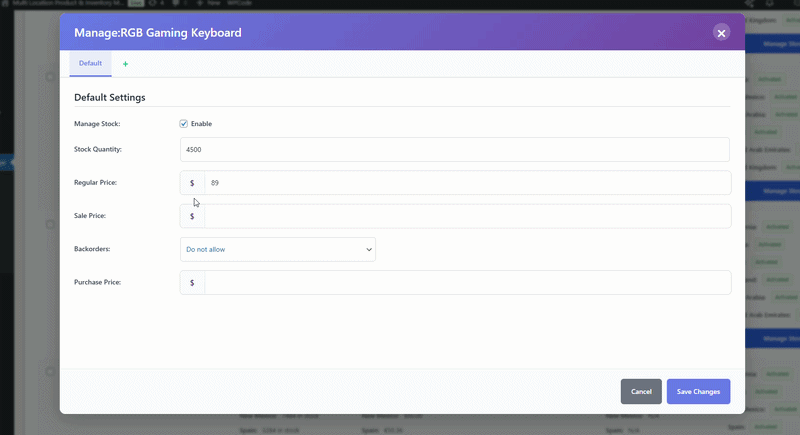
Variable Products
- Choose a variable product in Stock Central.
- Click Manage Stock or Add to Location.
- A popup will appear with all the variations of your selected variable product.
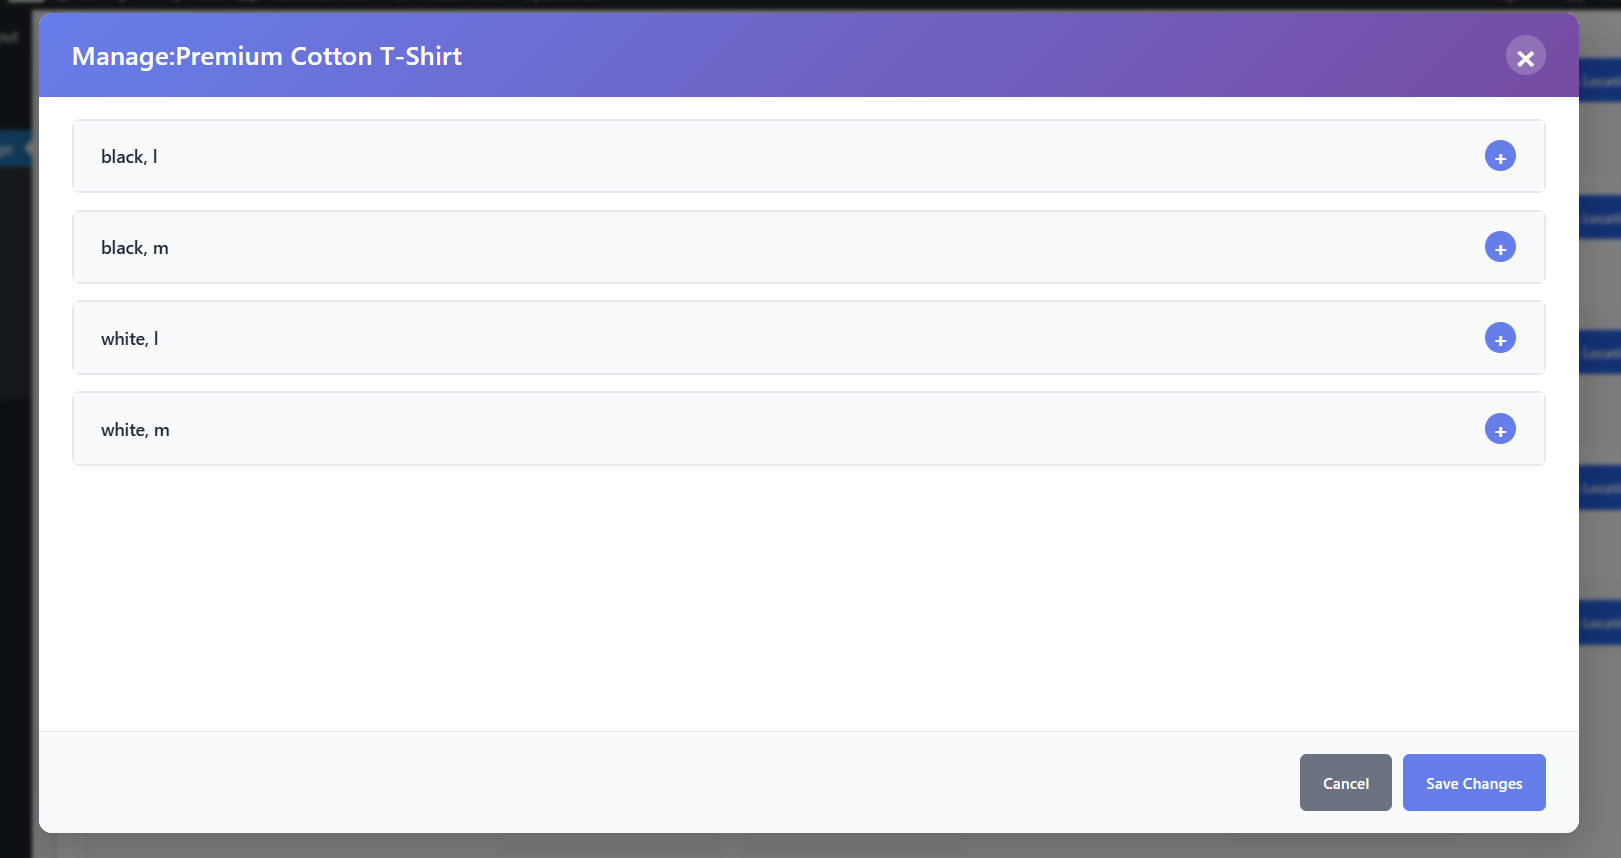
- Expand each variation.
- In the Default tab, tick Manage Stock and enter stock details, regular price, sale price, and purchase price.
- For the backorder availability, you can leave it the same as it is. We will configure it location-wise.
- Assign locations if not already assigned (Same as the simple product)
- Remember, once you have assigned a location for a variation, it will automatically assign them to the other variations too.
- For each location tab, enter stock quantity, price, and backorder availability.
- Repeat for each variation.
- Click Save Changes.
Modern Mode ensures each variation has location-specific backorder settings.
Classic Mode
Now let’s see how you can do this job on classic mode.
Simple Products
- Switch to Classic Mode in Stock Central.
- Choose the product and tick Enable beside its name.
- Enter stock quantity, regular price, and sale price.
- For the backorder availability, you can keep it the same as it is. We are going to configure it location wise.
- Assign locations if not already assigned:
- Click the Select Location dropdown.
- To add all locations at once, choose All Locations and click Add.
- To add specific locations, select them one by one and click Add.

- For each location, enter stock quantity, price, and backorder availability.
- Enter purchase price.
- Click the Check mark icon to save changes.

Assigning locations in Classic Mode provides flexibility to add all or specific locations, making it easier to manage backorders per location.
Classic Mode
Variable Products
- Choose the variable product and tick Enable.
- In the Variation Manage Stock section, tick each variation.
- Enter total stock quantity and backorder option (leave as default).
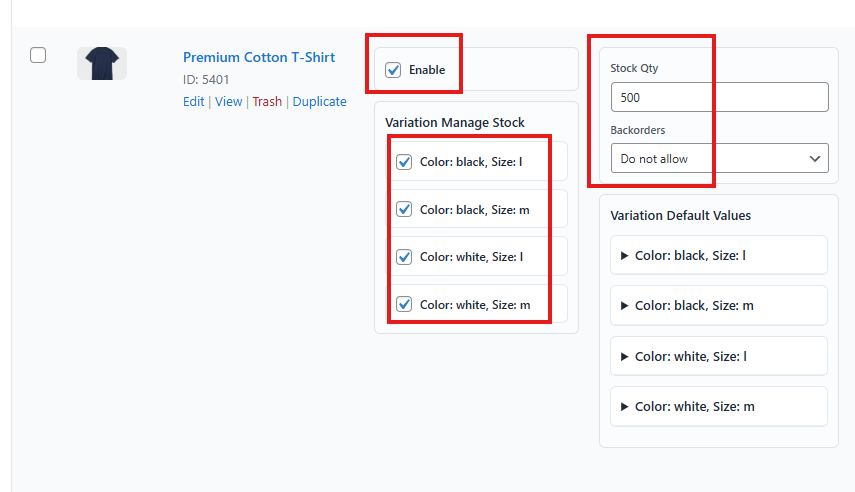
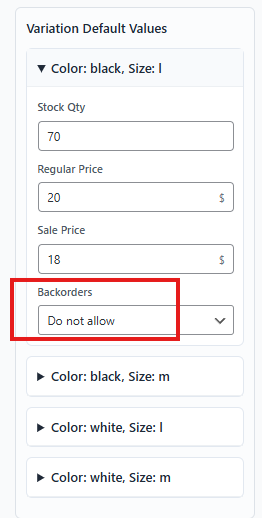
- In the Variation Default Values section, enter stock quantity, price, and backorder option for each variation. (Leave the backorder same as it is.)
- Assign locations if not already assigned (Same as the simple product)
- In the Variation Locations section, enter stock quantity, price, and backorder availability for each variation and location.
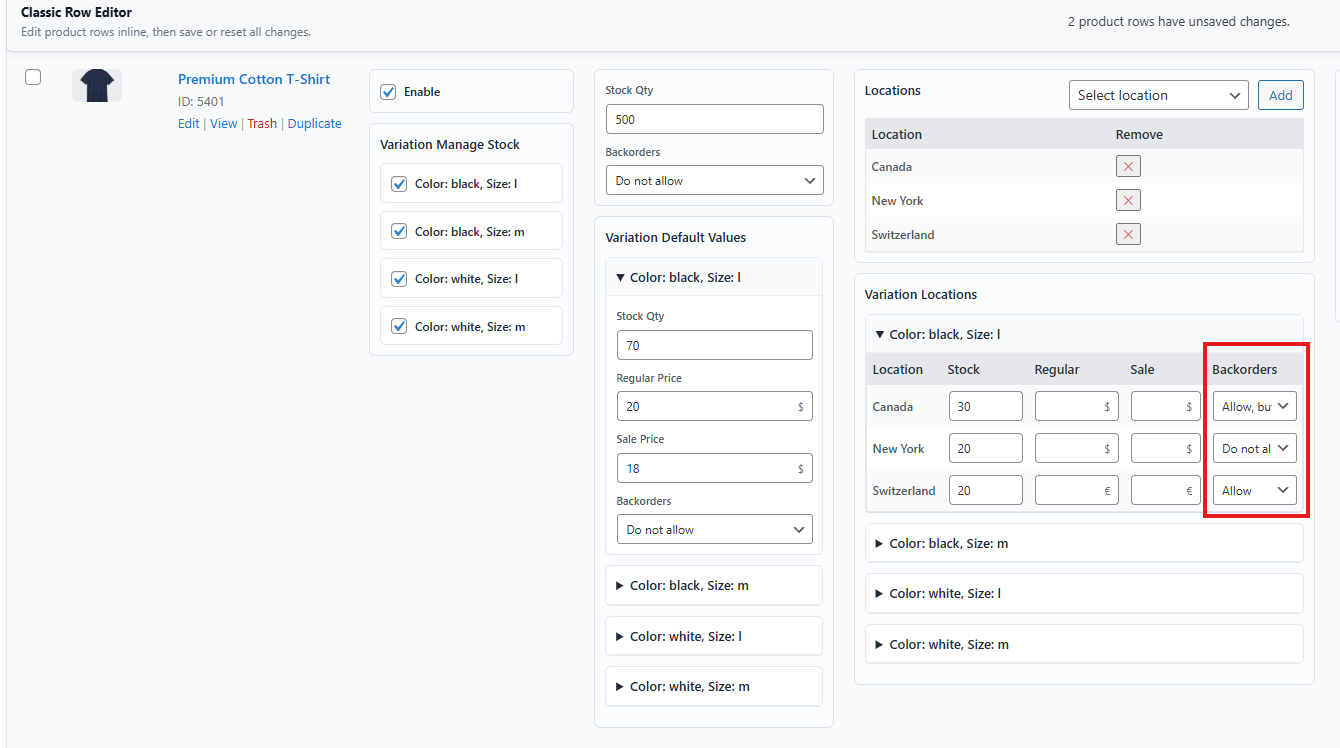
- Enter purchase price.
- Click the Check mark icon to save changes.
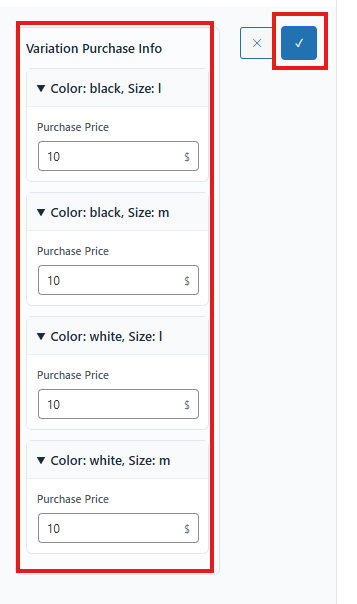
Classic Mode allows detailed backorder configuration for each variation across locations.
Checklist
- Enable Location Backorder in settings.
- Assign locations to products.
- Configure stock quantity and pricing.
- Set backorder availability for each location.
- Save changes and publish products.
Testing the Feature
Testing ensures your backorder configuration works correctly.
- Go to a product page.
- Change the location.
- Verify that backorder availability matches your settings.
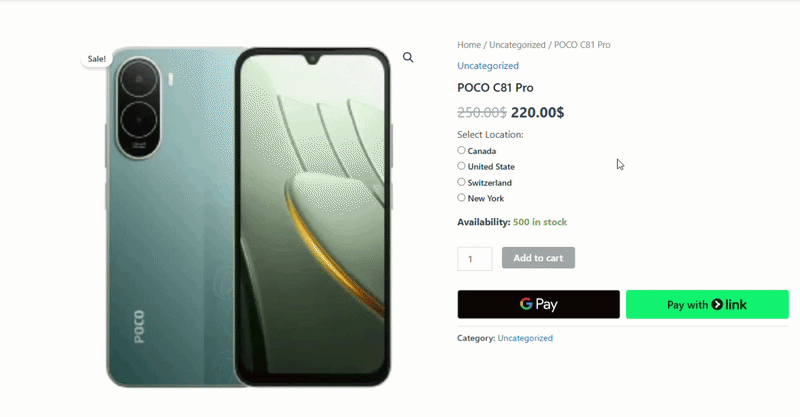
Testing confirms that customers see accurate backorder options based on location.
Troubleshooting
Common mistakes include:
- Forgetting to enable Location Backorder in settings.
- Not assigning locations before configuring backorders.
- Entering inconsistent stock quantities across locations.
- Skipping backorder settings, leading to incorrect customer messages.
Solution: Always enable location backorder, assign locations first, and carefully configure each setting.
Key Takeaway
Location-based backorder management gives store owners precise control over product availability. By configuring backorders per location, you can balance customer satisfaction with operational efficiency.