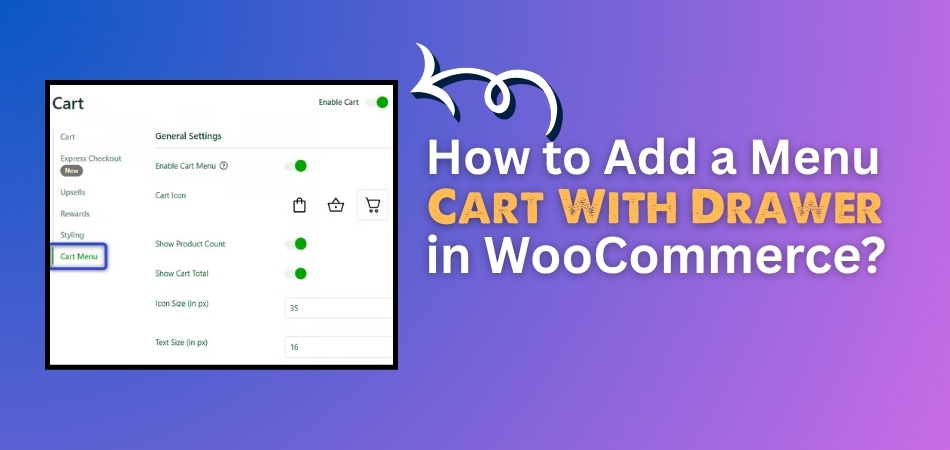
A menu cart with a drawer in WooCommerce makes shopping smoother and more fun. It shows what’s in the cart without opening a new page, so users stay right where they are. If that sounds helpful, you might already be wondering how to add a menu cart with drawer in WooCommerce?
Add a menu cart with drawer in WooCommerce by using the One Page Quick Checkout plugin. Install it, then add the Plugincy Cart using shortcodes, block editor, or Elementor. Show the drawer in the header, footer, sidebar, or as a fixed cart.
Are you curious about how to show the cart in the right place or test it properly? Keep reading this article because you’ll find all the important steps and simple tips you need to set it up the right way.
How to Add a Menu Cart With Drawer in WooCommerce?
Adding a menu cart with a drawer in WooCommerce can be super helpful. It lets shoppers view their cart without opening a new page. This makes shopping faster and easier for everyone on your site. Keep reading to learn how you can add this cool feature today.
Use a Plugin to Add a Menu Cart with Drawer
To create a sleek and interactive menu cart with a drawer in WooCommerce, using a plugin is the most effective solution. It saves time, avoids complex coding, and offers customizable options for styling and behavior. One such plugin that stands out for its versatility is One Page Quick Checkout for WooCommerce. It supports cart drawers, integrates with popular page builders like Elementor, and includes shortcode and widget support, making it easy to display the cart anywhere on your site. If you’re looking for a simple way to enhance your store, quick checkout for WooCommerce is a great place to start.
Step 1: Install the Plugin
Free Version
- Go to your WordPress Dashboard > Plugins > Add New
- Search for: One Page Quick Checkout for WooCommerce
- Click Install Now and then Activate


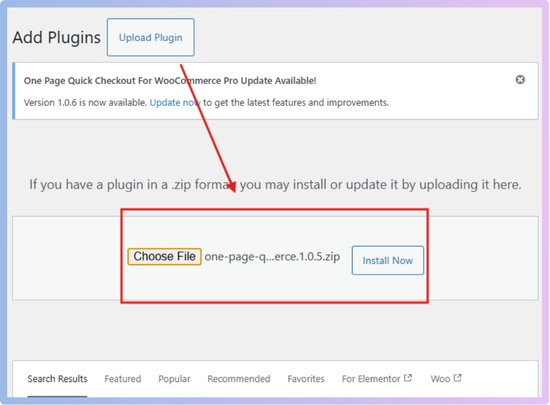
PRO Version
- Purchase the PRO plugin from the official website.
- Download the ZIP file from the email you received.
- Go to WordPress Dashboard > Plugins > Add New > Upload Plugin

- Upload the ZIP file, click Install Now, then Activate
- Enter the License Key under One Page Quick Checkout settings.
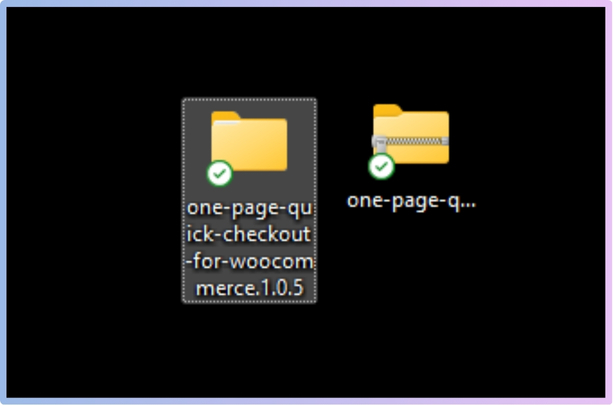
Manual Plugin Installation Using FTP
- Download the ZIP file
- Extract the ZIP file.

- Upload the extracted folder to /wp-content/plugins/ using FTP.
- Go to Plugins in the WP admin and click Activate.
With the plugin installed, you can now add a menu cart with a drawer to WooCommerce. To do so, follow the next guide.
Integration Options
You can add this by integration in Widgets, Sidebar Integration, Header Integration, and Footer Integration.
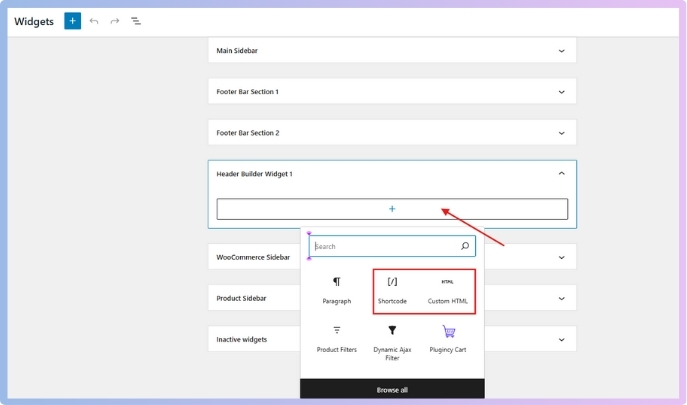
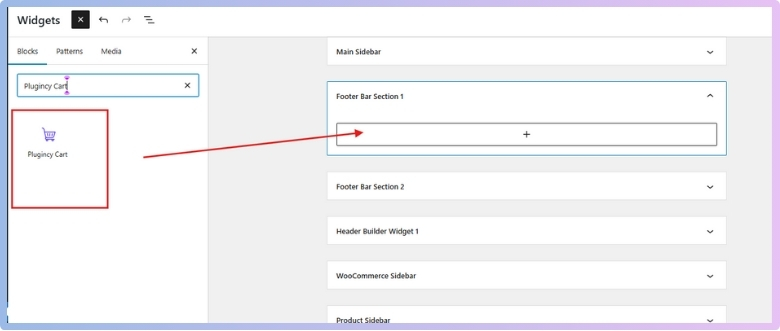
Integration in Widgets, Sidebar Integration
The steps for both options are the same. Here you can add the cart in 3 ways.
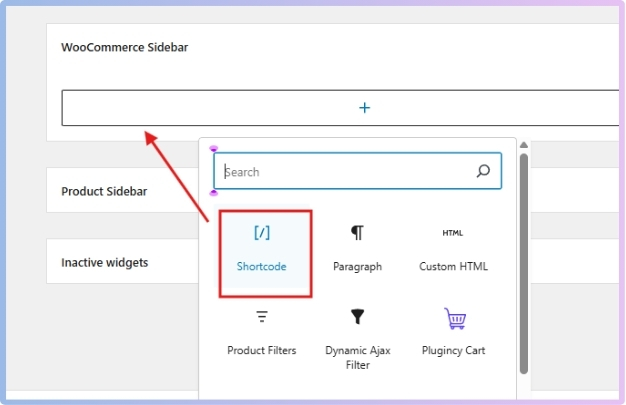
- Use Shortcode
- Navigate to Appearance > Widgets
- Add a Shortcode or Text, or Custom HTML widget

- Insert the shortcode:
“plugincy_cart drawer=”right” cart_icon=”cart” product_title_tag=”h4″”
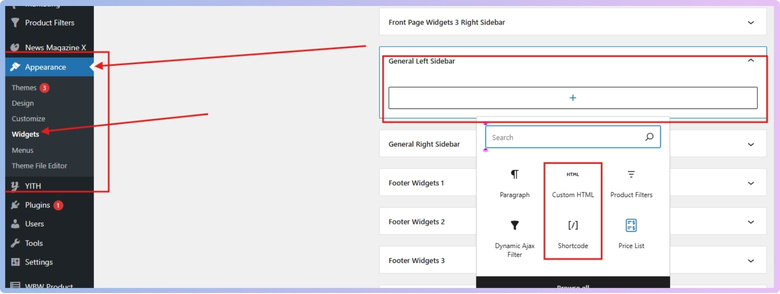
Paste the shortcode inside the square bracket [ ] and remove the inverted comma.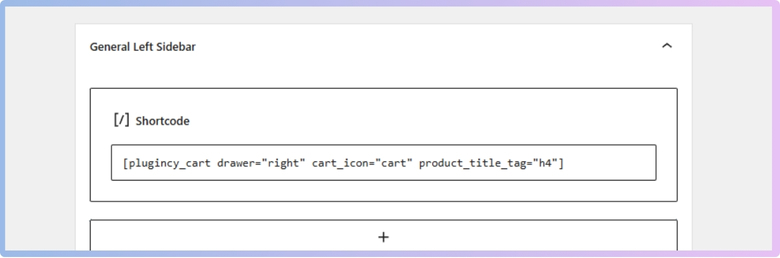
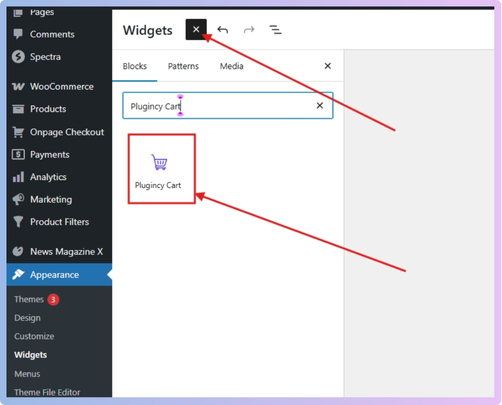
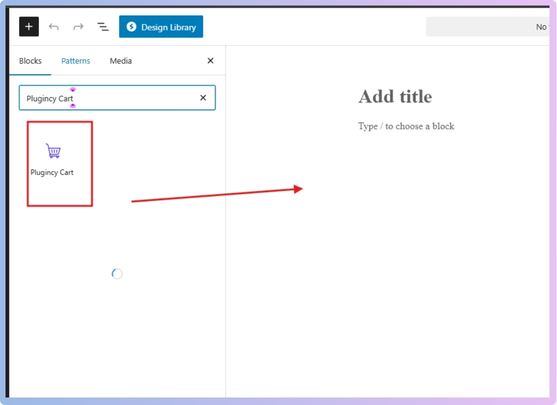
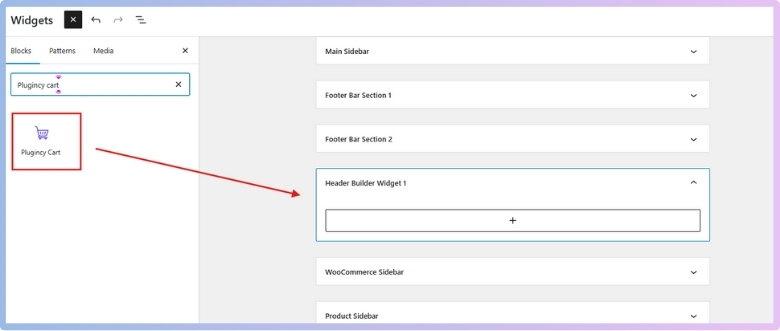
- Use Plugincy Cart Blocks
- In the block editor, search for “Plugincy Cart”
- Drag and drop the Plugincy Cart block into your widget area for easy integration

- Use Elementor Plugincy Cart Widget
- Open the page you want to edit with Elementor

- Search for the “Plugincy Cart” widget
- Drag it to your desired section for a visually appealing cart display

Header Integration
Integrate the Plugincy Cart into your header with these steps:
- Use Shortcode
- Go to Appearance > Widgets
- Add a Shortcode, Text, or Custom HTML widget in the header area

- Insert the shortcode to make the cart accessible from anywhere on your site:
“plugincy_cart drawer=”right” cart_icon=”cart” product_title_tag=”h4″”
Paste the shortcode inside the square bracket [ ] and remove the inverted comma.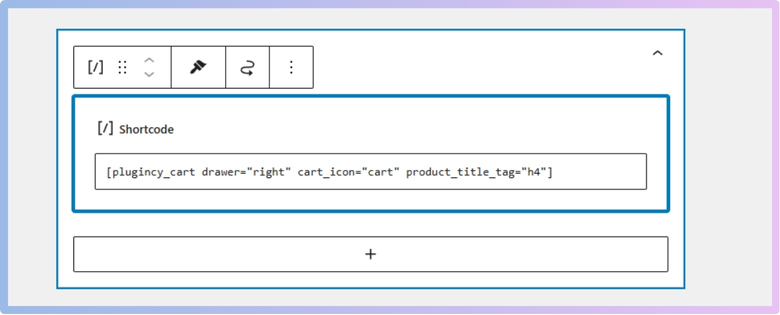
- Use Plugincy Cart Blocks
- In the block editor, search for “Plugincy Cart” and add it to the header section for a smooth user experience

- In the block editor, search for “Plugincy Cart” and add it to the header section for a smooth user experience
- Use Elementor Plugincy Cart Widget
- Open the page you want to edit with Elementor.
- In Elementor, drag the Plugincy Cart widget to your header for immediate visibility


Footer Integration
To display the Plugincy Cart in the footer:
- Use Shortcode
- Go to Appearance > Widgets
- Add a Shortcode, Text, or Custom HTML widget in the footer area
- Insert the shortcode for easy access
“plugincy_cart drawer=”right” cart_icon=”cart” product_title_tag=”h4″”
Paste the shortcode inside the square bracket [ ] and remove the inverted comma.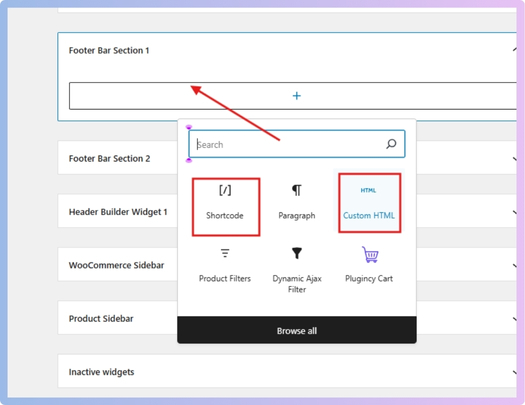
- Use Plugincy Cart Blocks
- In the block editor, look for “Plugincy Cart” and add it to the footer section to keep essential links available
- In the block editor, look for “Plugincy Cart” and add it to the footer section to keep essential links available
- Use Elementor Plugincy Cart Widget
- Drag the Plugincy Cart widget to the footer in Elementor for a consistent look
As a Fixed Element
For a fixed cart element on your site:
- Use Shortcode

Use the following shortcode, adjusting the position as needed:
“plugincy_cart drawer=”right” cart_icon=”cart” product_title_tag=”h4″ position=”fixed” top=”” left=”””
(Paste the code inside the [ ] square bracket and remove the inverted comma)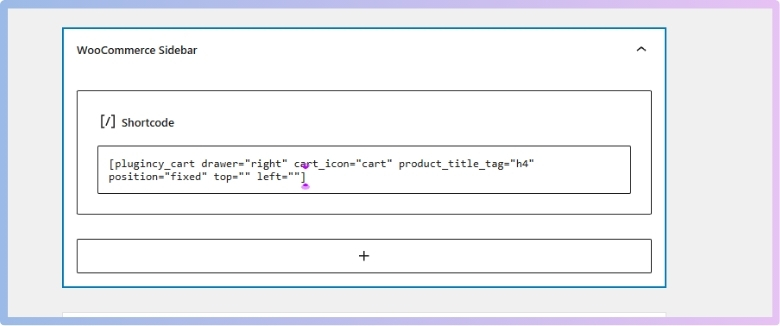
Attributes:
- position: Set to “fixed” to keep the cart visible as users scroll
- top: Set the distance from the top of the viewport
- left: Set the distance from the left side of the viewport
- Use Plugincy Cart Blocks
- Add the Plugincy Cart block
- Configure it to be fixed in the block settings for a dynamic shopping experience
- Use Elementor Plugincy Cart Widget
- In Elementor, set the Plugincy Cart widget to be fixed through the advanced settings for consistent visibility
Adding a menu cart drawer is easy and makes your store better. It helps people shop faster without opening a new page. You can make it look just the way you want. Try it today and see how much easier shopping becomes.
How to Position the Cart Drawer: Left, Right, or Top?
You can change the feel of your store by changing where your cart drawer appears. A good spot makes shopping quick and easier for your visitors. The wrong spot might slow things down or confuse people. Keep reading to find the best place for your cart drawer.
Left Side
Some websites place the cart drawer on the left side of the screen. This works well if the right side has menus or other content. It helps balance the page and keeps everything from feeling too heavy on one side. Choosing the right position for your cart drawer often depends on how well you understand drawer cart functions and how they interact with your store layout. Testing a left drawer is smart if your layout supports it.
Right Side
Many online stores use the right side for the cart drawer location. This is because most people are used to seeing it there already. It matches up with where checkout buttons often sit on the screen. Most themes let you choose this option with one simple setting. If you want something safe that works well, try starting with the right side drawer.
Top Slide
Using a drawer that slides from the top can look really clean. It helps save space on the left and right sides of the screen. This is good for mobile users who need more room to scroll. Make sure your top area is not too full of other things. Some plugins can add this style easily, or use CSS if you want.
Depends on Layout
Every website has its own layout, so think before choosing a side. If your site has a sidebar, pick the opposite side for the drawer. It should not cover important things like menus or search bars. Try different spots and check how they look on each device. A small change in position can make shopping much easier for visitors.
Think About UX
Your drawer should open easily and not block anything important. Test it on both desktop and mobile to see how it works. A good cart drawer helps people shop without slowing them down. Try to keep the shopping flow smooth and simple for everyone. A better user experience means people will want to come back again.
Always check your cart drawer on phones and laptops before going live. Even a small mistake can confuse someone and stop them from buying. Pick the position that works best for your store layout. Keep testing until everything feels smooth and easy to use.
How to Test Your Cart Drawer Before Going Live?
Before launching your cart drawer on a live store, it’s essential to thoroughly test its performance and usability. A well-functioning cart drawer ensures a smooth shopping experience, reduces friction at checkout, and enhances conversions. Here’s a quick guide to help you test all the essential aspects.
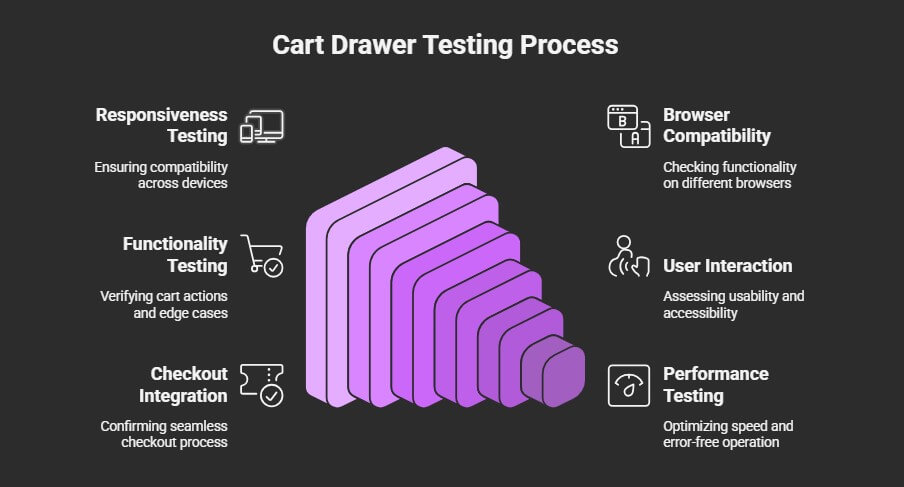
1. Test Responsiveness (Mobile, Tablet, Desktop)
- Use Device Emulators: Use browser dev tools (e.g., Chrome DevTools → Toggle Device Toolbar) to simulate different screen sizes.
- Real Devices: Test on actual devices (iPhone, Android, tablet, laptop) for touch behavior, load speed, and layout issues.
- Check Breakpoints: Ensure the drawer opens properly, doesn’t overflow, and is usable at all common screen sizes (e.g., 320px to 1440px+).
2. Browser Compatibility
- Test Across Major Browsers:
- Chrome
- Firefox
- Safari
- Edge
- (Optional) Opera, older versions of Internet Explorer, if relevant
- Verify JavaScript & CSS Support: Ensure animations, transitions, and functionality behave consistently.
3. Cart Functionality Testing
- Add/Remove Items: Check that items can be added and removed instantly and reflected in the drawer.
- Update Quantity: Test quantity updates and ensure the total price adjusts correctly.
- Product Variants: Try adding different product options (size, color) and verify they display accurately.
- Edge Cases:
- Adding out-of-stock items
- Empty cart scenarios
- Maximum quantity limits
4. User Interaction & Usability
- Opening/Closing the Drawer:
- Via icon/button click
- By clicking outside the drawer (to close)
- Using the “ESC” key
- Focus & Accessibility:
- Check keyboard navigation (Tab, Shift+Tab)
- Ensure screen readers can announce cart contents
- Feedback:
- Show a loader or feedback when updating the cart
- Error handling (e.g., “Item unavailable”)
5. Integration with Checkout
- Ensure “Checkout” or “View Cart” buttons route correctly.
- Confirm any discounts, shipping estimates, or taxes carry over properly.
6. Performance Testing
- Speed: Ensure the drawer loads quickly, even with many items.
- Lazy Loading: Optimize image or data loading if needed.
- No Console Errors: Check the browser console for JavaScript errors or warnings.
7. User Testing
- Ask team members or test users to complete key cart actions.
- Record sessions or gather feedback on:
- Confusing interactions
- Visual bugs
- Overall flow and ease of use
A smooth, responsive, and bug-free cart drawer sets the tone for a trustworthy checkout experience. By testing thoroughly across devices, browsers, and user scenarios, you can confidently go live knowing your cart is optimized for every customer.
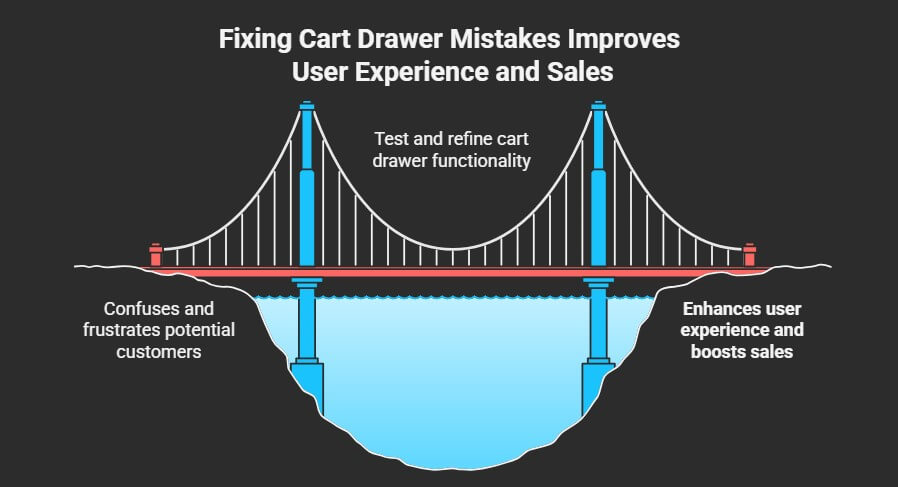
Common Mistakes to Avoid When Adding a Cart Drawer
Adding a cart drawer is a great way to improve your store. But if it’s not working right, it can confuse your visitors. Small issues can make people stop shopping and leave your site. Let’s look at common mistakes you should avoid before going live.
Drawer Doesn’t Close
Many people forget to test if the cart drawer closes properly. If someone clicks outside or taps the close button, it should shut right away. A drawer that stays stuck can feel like a broken page. Users should feel in control while shopping, not frustrated. Always make sure it closes without delay, both on desktop and mobile. A good drawer should open and close smoothly every single time.
Slow to Load
As soon as someone adds an item to their cart, the cart should appear. Waiting too long makes people think nothing has happened or that it’s broken. Try to avoid large images, too many scripts, or heavy code. These things can slow everything down. A fast drawer feels smooth, works better, and keeps shoppers happy. Speed is important, especially when someone is ready to check out quickly.
Hides Other Stuff
It’s easy to make a drawer that takes over the whole screen. But that can block the menu, the search bar, or even the product page. People might want to keep shopping and feel stuck if they can’t. Always check how the drawer looks on different screen sizes. The cart should not block other important parts of the page. A small but clear drawer works best for everyone.
Wrong Total Price
Trust is broken fast if the cart shows the wrong total. Maybe a sale isn’t applied, or the shipping fee is missing. Customers want to know what they’ll pay before clicking “Buy.” You must test price changes when items are added or removed. Totals should always match what the checkout shows. A clear, correct total helps users feel confident and ready to purchase.
Doesn’t Work Everywhere
Sometimes, the cart drawer looks fine on a laptop but not on a phone. Buttons can go missing, or the text might get too small. Testing on all devices helps you find these problems early. Try your drawer on both Android and iPhone, if possible. Check if everything works with touch and swipe as well. A drawer should feel simple and easy, no matter what screen someone uses.
Messy Layout
Crowding too many things into the drawer can make it hard to use. People want to see their items, prices, and a checkout button clearly. Make sure the text is big enough and the images are neat. Don’t add extra things that aren’t helpful or important. The layout should be clean, with just the right details showing. A simple design always makes the cart feel better and easier to understand.
No Feedback Given
After adding something to the cart, people expect a quick response. If the drawer doesn’t open or nothing changes, they might feel confused. Show a clear message or open the cart to confirm the action. Feedback can be a small message or just an animation. It tells users their click worked as expected. A little feedback can really make the shopping experience feel smoother and safer.
Even small problems in your cart drawer can confuse your shoppers quickly. Always test it on different devices to catch these small mistakes early. Make sure the drawer works fast, feels easy, and looks neat. A smooth cart drawer helps more people finish their shopping with ease.
Tips to Make the Cart Drawer Mobile-Friendly
Making your cart drawer mobile-friendly is super important for a better shopping experience. Most people shop using their phones, so the cart needs to work well on small screens. A good mobile cart should feel smooth, easy, and quick to use.
- Slide From the Side: Always make the cart drawer slide in from the right or left side, not the top or bottom, so it feels more natural on phones.
- Easy to Close: Let users close the drawer by tapping outside or using a simple “X” button that is clearly visible and easy to tap.
- Keep It Small: Don’t make the drawer too big or wide, so it doesn’t cover the whole screen or block important buttons or menus.
- Touch-Friendly Buttons: All buttons in the drawer should be big enough so fingers can tap them easily without pressing the wrong thing.
- No Screen Blocking: Make sure the cart drawer never hides the navigation bar, back buttons, or any helpful links while it is open.
- Fast to Open: Make sure the drawer opens quickly after clicking the cart icon so it doesn’t feel slow or stuck while using a phone.
- Clean Layout: Keep the layout simple with clear prices, product names, and a checkout button that stands out and is easy to press.
Ensuring the cart drawer is optimized for mobile not only improves usability but can also help increase conversion rates in WooCommerce, as shoppers are more likely to complete purchases on responsive, hassle-free sites.
FAQs About How to Add a Menu Cart With Drawer in WooCommerce?
Adding a menu cart with a drawer in WooCommerce can improve your online store and make shopping easier for your customers. But as you set it up, you might have some questions. These FAQs will help clear up common doubts and guide you through small but important details that can affect how the cart drawer works. Let’s look at some simple and useful answers.
Can I Add a Drawer Cart Without Knowing Any Coding?
Yes, you can add a drawer cart without writing any code at all. Many WooCommerce plugins are designed to be beginner-friendly, so you just click and set things up. Most of the time, you just drag and drop or use a simple shortcode. This makes it very easy for people who don’t have coding skills.
Will the Drawer Cart Work With All WooCommerce Themes?
The drawer cart should work with most WooCommerce-compatible themes, but not all of them. Some older or custom themes may need small changes to support the drawer display. It’s a good idea to test it on your theme before going live. If there’s a problem, you can contact the plugin developer or switch to a theme that supports modern WooCommerce features.
Is It Possible to Show a Cart Icon Only When Items Are in the Cart?
Yes, many drawer cart plugins let you show or hide the cart icon based on cart content. This means the icon can stay hidden when the cart is empty. Once a product is added, the icon will appear, making the shopping experience cleaner. It’s a good way to keep your site simple and avoid distractions.
Can I Choose a Different Icon for the Cart Drawer?
Yes, most plugins let you choose or upload a different icon for your cart. You can pick one that matches your website’s style or use icons from popular icon libraries. This makes your cart look unique and more professional. It’s a small change, but it helps your brand look better.
Will the Cart Drawer Still Work If I Use a Caching Plugin?
Yes, the cart drawer can still work with caching plugins, but you must be careful. Some caching tools may prevent the cart from updating in real-time. You should exclude the cart drawer or its AJAX actions from the cache. This way, customers will always see the correct cart contents.
Can I Add Sounds or Animations When the Drawer Opens?
Some advanced plugins or custom settings allow you to add small animations or sound effects. These effects can make the cart feel more fun and interactive. However, it’s best to keep it simple so it doesn’t slow down the website. Just a smooth slide or soft click sound can improve the shopping experience.
How Can I Hide the Cart Drawer on Certain Pages?
You can hide the cart drawer on specific pages, like the checkout or contact page. Many plugins offer settings to control where the cart shows up. You just need to list the pages you want to hide it from. This helps keep the focus on the important parts of those pages.
Can I Translate the Cart Drawer Into Another Language?
Yes, if you have a multi-language website, most good cart drawer plugins support translations. They often work with tools like WPML or Loco Translate. You can change the text in the cart to any language you want. This is helpful for making your store friendly for international customers.
Is It Safe to Use a Drawer Cart Plugin on a Live Store?
Yes, it is safe if you use a trusted and updated plugin. Always download from the official WordPress plugin library or the developer’s website. Check for recent updates and good reviews before using it. Also, test the plugin on a staging site first to make sure it won’t break anything.
Can I Track How Many People Use the Drawer Cart?
Yes, with the help of analytics tools or tracking plugins, you can see how customers interact with your cart drawer. You can track clicks, opens, and even abandoned carts. This data helps you understand what users do before they buy. It’s a great way to improve your store and increase sales.
End Note
Adding a menu cart with a drawer in WooCommerce is one of the smartest upgrades you can make to your store. It helps users shop faster and keeps the shopping experience smooth and easy. A simple drawer can make your site feel modern and more user-friendly as well.
If you’re still wondering how to add a menu cart with drawer in WooCommerce?, the answer is simple: use a plugin like One Page Quick Checkout. It lets you install, customize, and place the cart drawer anywhere using blocks, shortcodes, or widgets without touching code.
Before you wrap up, remember to test it well, keep the layout clean, and make sure it’s mobile-friendly. Don’t forget to choose the right position and add feedback after actions. Best of luck with your store—hope your new cart drawer brings more happy shoppers and sales!