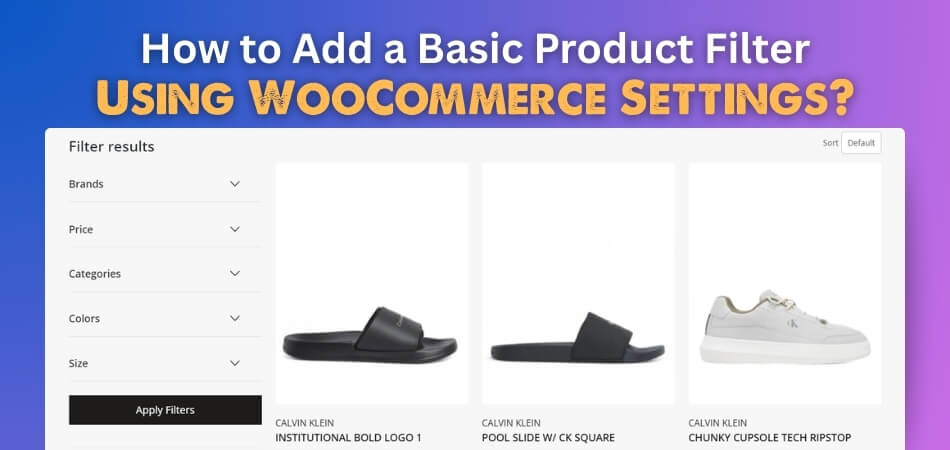
Basic product filters can make shopping easier by helping people find what they want faster. They allow users to sort items by price, size, rating, or other features without scrolling through everything. If you’re building an online store, you might be wondering how to add a basic product filter using WooCommerce settings.
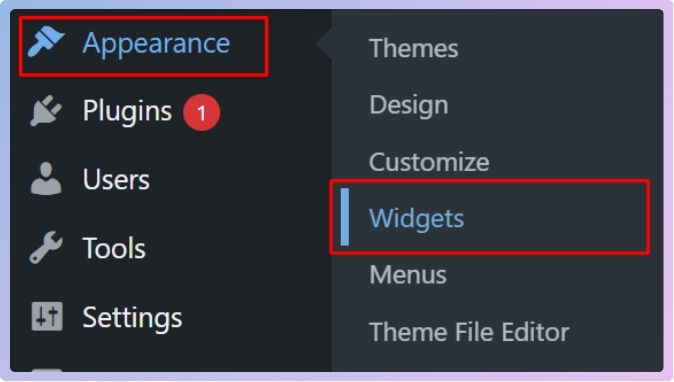
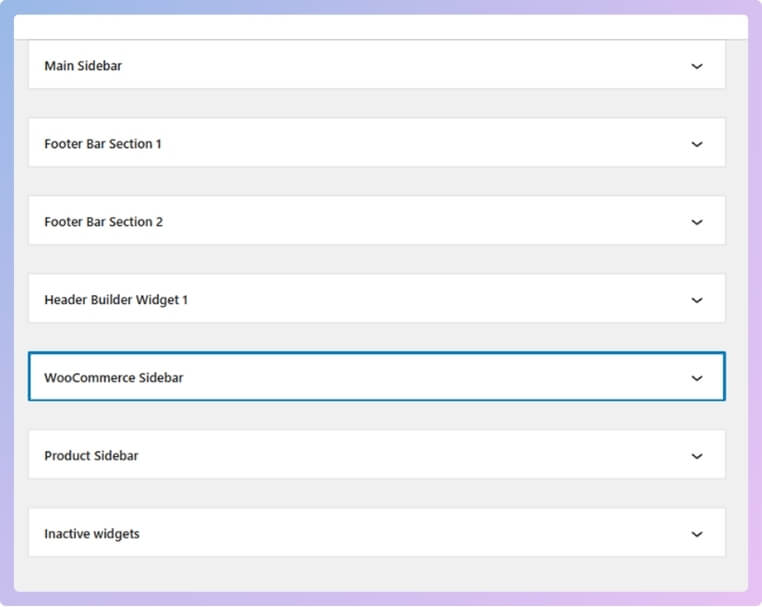
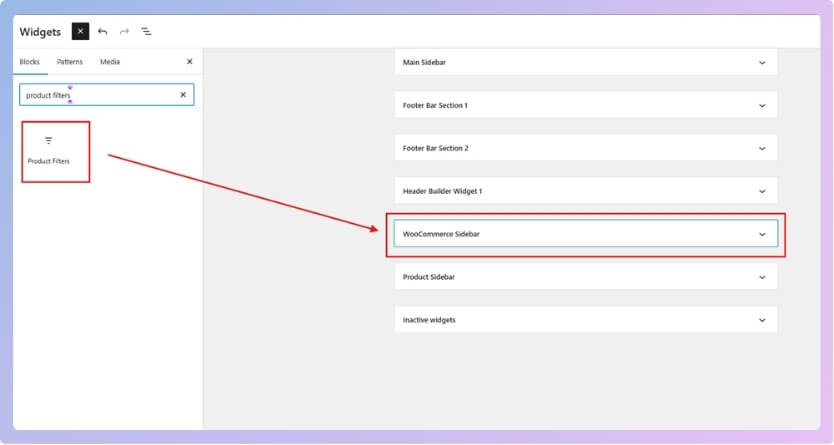
Add a basic product filter in WooCommerce by going to Appearance > Widgets, then dragging “Product Filters” into the WooCommerce Sidebar. These built-in filters are simple, but reload the page after each selection.
Want to know which filters are available or where you should place them for the best results? Curious if the default filters are enough or if advanced options are better for your store? Keep reading—this article covers everything you need to know from setup to testing and more.
How to Add a Basic Product Filter Using WooCommerce Settings?
Product filters help people find exactly what they’re looking for without too much scrolling. They make shopping quicker and less confusing, especially when there are lots of products. WooCommerce gives some built-in options you can use right away. Keep reading to see how you can set up these filters easily.
Step 1: Go to Appearance > Widgets
- In your WordPress Dashboard, go to Appearance > Widgets.

- You’ll see different widget areas. Look for WooCommerce Sidebar (or any sidebar area you use for your shop pages).

Step 2: Add Filter Widgets
- In the widget area, click the “+” button or use the search bar to look for “Filter” or “Product Filter” widgets.

- WooCommerce offers basic filter widgets like:
- Filter Products by Price
- Filter Products by Attribute
- Filter Products by Rating
If you’re using WordPress version 9.9.5, instead of 3 different filter options, you’ll get 1 option called “Product Filters”, where you’ll find all the filters together.
- Drag and drop your preferred filter widgets into the WooCommerce Sidebar.
Step 3: Customize the Filters
Once added:
- You can rename or reorder the widgets.
- Remove the ones you don’t need.
- Only keep filters relevant to your products (e.g., by color, size, price, etc.)
Note: These filters are basic and require the page to reload each time a filter is applied. If you want faster, AJAX-based filtering, consider using a plugin.

Want Advanced Filtering (AJAX, Multi-Select, etc.)?
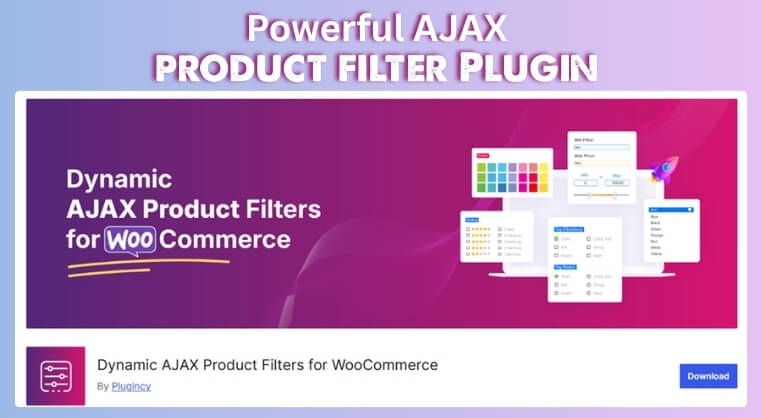
While the built-in WooCommerce filters are great for simple needs, they have limitations, especially when it comes to user experience. They typically require a full page reload after each filter selection, which can slow down the shopping process. If you want faster, smoother filtering with more customization, an advanced solution is the way to go.
That’s where Dynamic AJAX Product Filters for WooCommerce comes in. This powerful AJAX product filter for WooCommerce adds real-time filtering, multi-select options, and advanced styling, making it a much better choice for stores that want to enhance usability and performance.
How to Install the Plugin:
Free Version (From WordPress Dashboard)
- Go to Plugins > Add New
- Search for “Dynamic AJAX Product Filters for WooCommerce”
- Click Install Now > Activate
PRO Version (Upload from ZIP)
- Go to Plugins > Add New
- Click Upload Plugin
- Choose the PRO plugin ZIP file
- Click Install Now > Activate
Manual Installation via FTP
- Download the plugin ZIP file.
- Extract the ZIP on your computer.
- Connect to your server via FTP (use software like FileZilla).
- Upload the plugin folder to:
/wp-content/plugins/ - Go to your WordPress dashboard > Plugins > Installed Plugins
- Find the plugin and click Activate
Once the installation is complete, you can start using the plugin to add advanced product filters to your store. It allows you to create custom filter sets with AJAX functionality, so customers can refine products without reloading the page, leading to a faster and more user-friendly shopping experience.
What Product Filters Are Available in WooCommerce by Default?
You should let visitors sort through products easily when you run an online store with WooCommerce. Filters make this possible. They help shoppers quickly find what they need without going through every product manually.
- Filter by Price: This filter adds a slider so customers can choose a price range that fits their budget and see only those products.
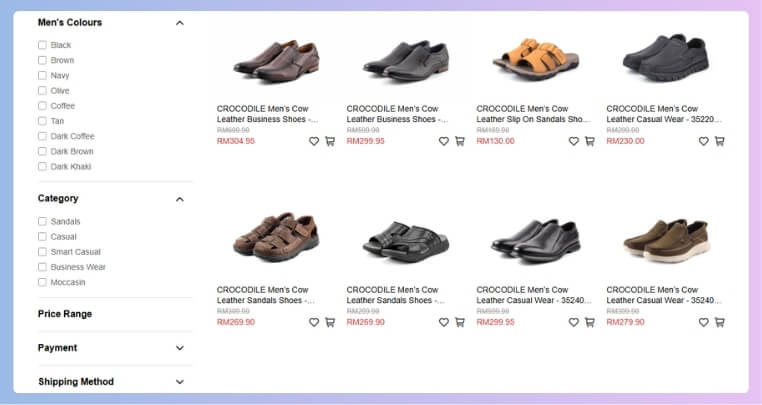
- Filter by Attribute: If your products have different features like size, color, or brand, this filter lets people narrow down by those choices.
- Filter by Rating: Shoppers can pick products based on customer ratings, which makes it easier to find the best-rated items in the store.
- Filter by Categories: When you’re managing products in your dashboard, this filter helps you view only the items in a specific category quickly.
- Filter by Stock Status: You can see which products are in stock, out of stock, or available on backorder when managing items from the admin panel.
- Filter by Product Type: This helps store owners view items like simple products, variable products, or grouped products in the WooCommerce admin area.
- Tag-Based Filtering: You can also use product tags as filters to show items that have similar themes, features, or uses, based on how they are tagged.
Using filters makes shopping easier and product management faster. Even the basic WooCommerce filters can help customers find what they’re looking for without confusion. They keep your store organized and save people time. If you ever need more options, you can always add advanced filters later.
Where Should You Place Product Filters for Best Results?
Choosing the best place for your product filters is very important. It helps your customers find what they need faster and more easily. If the filters are hard to find, people might leave your store. Let’s look at the best filter spots so your shop works better.
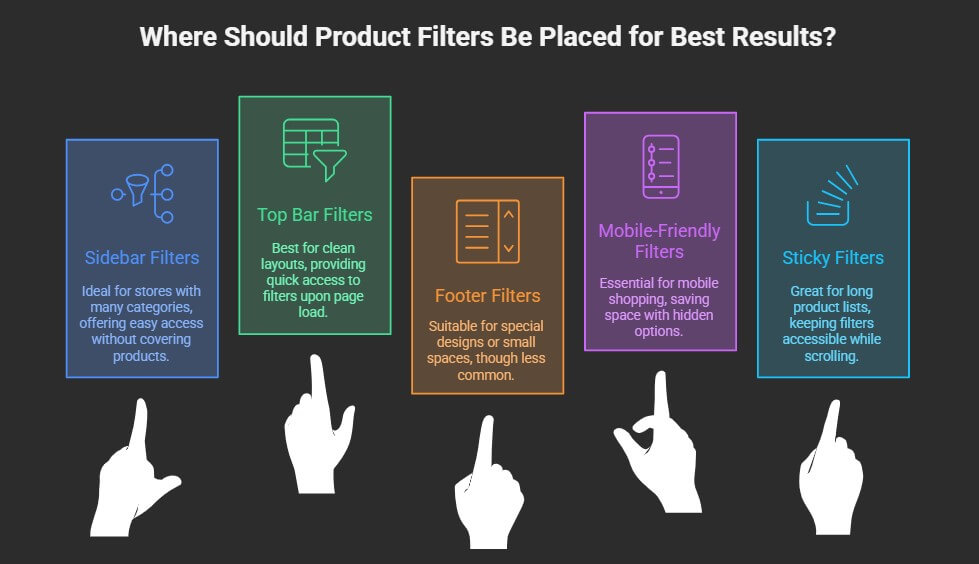
Sidebar Filters
Many online stores show filters on the left side of the page. This layout helps users see options while scrolling through the products. It keeps everything neat and easy to use without covering the main items. Sidebar filters are great for stores that have many product categories or features. They work really well on desktops and give a smooth shopping experience. People can easily apply or remove filters without getting lost on the page.
Top Bar Filters
You will often see filters placed in a bar above the product grid. This keeps all the filtering options in one easy-to-see spot. It’s helpful for stores that don’t have room on the sides. The top bar layout is clean and doesn’t get in the way of product images. It also gives customers quick access to filters right when the page loads. That means less clicking around and faster browsing time for your visitors.
Footer Filters
In some stores, filters can be found at the bottom of the page. This setup is less common but works for special designs or small spaces. Shoppers have to scroll down to find these filters, which takes more time. If you use sticky footers, though, this option becomes more useful. It’s not the fastest method, but it still gives access to filter tools. Use this only when sidebars or top bars won’t fit your layout.
Mobile-Friendly Filters
People shop on their phones because the screen space is much smaller. That’s why filters on mobile usually stay hidden behind a button or menu. This setup saves space while still keeping filter options just a tap away. Slide-out panels or collapsible sections are very common in mobile shops. They help users filter without scrolling past a crowded page. Always test your filters on mobile to make sure they are clear and simple.
Sticky or Floating Filters
These filters stay in the same place even as you scroll down. This means shoppers can change filters at any time without moving around. It’s great for stores with long product lists or many pages. Sticky filters save time and help people stay focused on finding what they want. They often appear as a bar or button stuck to the top or side. It’s a smart way to keep filters handy without clutter.
Good filter placement makes your online store easier to shop in. It helps visitors find products quickly without getting confused or lost. Try using different styles to see what works best. Even small filter changes can help make more sales.
Limitations of the Default WooCommerce Filter System
Not every store needs fancy tools at the beginning, but as your product list grows, simple filters might not be enough. Default options can feel limited when customers want faster or more specific searches. It’s good to understand where the built-in system falls short. Keep reading to learn what these filters can and can’t do.
No Real-Time Filtering
Most users like it when filters work instantly without reloading the whole page. Unfortunately, WooCommerce’s default filters do not offer this kind of quick response. Every time someone applies a filter, the page refreshes completely, which can feel slow. This might cause users to leave without buying. Faster filtering makes a big difference, especially on busy or larger stores with many items to sort through.
No Multi-Select Options
Sometimes shoppers want to select more than one option within a filter. For example, they might want to see both “Red” and “Blue” products at the same time. The default filters don’t allow this kind of flexibility. You can only choose one option from each filter at a time, which can be frustrating. A more advanced system would allow people to make better and broader product selections.
Very Basic Styling
While the filter widgets do their job, they often don’t match the store’s design. The default look is plain and can’t be changed much unless you know coding. Many store owners want filters that blend in with their theme. A better design helps create a smoother shopping experience. When filters look out of place, the whole page can feel less professional or less organized.
Limited Filter Types
There are only a few default filter options in WooCommerce, like filtering by price, attribute, or rating. You won’t find filters for things like tags, brands, or custom features unless you use other tools. This can be a big problem for stores with lots of detailed product information. While WooCommerce offers basic options like filtering by price or category, many store owners eventually explore more advanced e-commerce product filters to meet user expectations and improve product discovery.
No Filter Customization
Built-in filters don’t offer many settings or ways to adjust how they work. You can’t easily change how results appear or how filters are grouped. Store owners often want more control over the way filters behave. Without customization, you’re stuck with whatever the default system gives you. To do more, you’ll need to look into plugins or other add-ons that give better control.
Basic WooCommerce filters are fine for small stores with simple needs. But as your product list grows, so does the need for better tools. Using improved filters can help shoppers save time and find items faster. Choosing the right setup can really improve your store’s success.
How to Test If Your Filters Are Working Properly?
After setting up your product filters, it’s important to make sure they actually work. Filters that don’t show the right results can confuse shoppers. It’s easy to test them yourself with just a few steps. Let’s go over how you can check that everything is working fine.
Preview the Shop Page
First, open your shop page on the front end just like a regular visitor. Make sure all your filters are showing in the sidebar or wherever you placed them. Try clicking different filter options one by one and watch how the products change. The page should show the correct filtered items without any errors. If nothing happens or the results look wrong, go back and double-check the settings you used.
Test by Category
Once your page loads correctly, start filtering products by the different categories available in your store. Click one category at a time and make sure only products from that group appear. Switch between categories to see if results update the way they should. You can also test a category with no products to see how your site handles it. This helps make sure your filters work under every condition.
Check Price Filters
Try using the price slider or any price filter to narrow down results. Set a price range and look at the products that show up. You should only see items that fall within that selected range. If something outside the range appears, you may need to adjust your price settings. Always test both low and high ranges to be sure it works from every angle.
Use Attribute Filters
Go ahead and select filters like color, size, or brand to test attribute-based filtering. Try combining two or more attributes to see how well your filters work together. If results don’t match your selected options, it could be a setup problem. If you’re using the block editor, make sure you manage product filters block settings correctly so all filtering options display and function as expected during testing.
Try Mobile View
Many people shop on phones, so it’s also important to test filters on mobile. Open your site on a phone or shrink your browser window to mobile size. Try opening the filter section and applying a few options. Make sure everything is easy to tap, and filters don’t break the page layout. A good mobile filter should work just as smoothly as it does on a desktop.
Checking your filters is a simple but important step for any store. It makes sure shoppers find what they want without any problems. A smooth filter system helps your store look clean and work well. Keep testing from time to time to avoid future issues.
Commonly Asked Questions
If you’re setting up product filters in WooCommerce for the first time, you might have a few questions. This FAQ section will help you understand more about using filters, fixing common problems, and improving your store’s setup. These answers are written in simple words to make everything easy to follow. Let’s explore the most helpful tips and tricks!
What Happens If My Filters Don’t Show Any Products?
Sometimes filters may show no products if they are not set up properly. This can happen when a filter is applied to items that don’t exist in your store, like a color or size that’s not available. Always check if the filter choices match your actual product options. If not, edit the filters or add the missing product data to fix the issue.
Can I Use Filters Without Any Plugins?
Yes, you can use filters in WooCommerce without installing extra plugins. WooCommerce includes some built-in filter widgets like price, rating, and attributes. These are basic, but they help customers narrow down what they want. You can find and add them easily through your WordPress widget settings.
Do Filters Work with Sale Items or Discounts?
Yes, filters can work with products that are on sale. You just need to make sure that the sale products have the right attributes or categories connected to them. For example, if a product is on sale and also has the “Red” color, it will show up when someone filters by “Red.” You don’t have to do anything extra for filters to include discounts.
Will Filters Slow Down My Website?
Basic WooCommerce filters don’t usually slow down your site because they use simple page reloads. But if your store has many products or filters, it might take a few extra seconds to load pages. Using too many filters at once can also affect speed. You can keep your site running fast by using only the most important filters.
Can I Use Product Filters on Any Page?
WooCommerce filters work best on your main shop page or product category pages. They don’t always show up on custom pages unless you set them up with the correct widgets or blocks. If you want filters on other pages, make sure your theme or builder allows it. Using a WooCommerce-compatible theme helps avoid problems.
How Do I Make Filters Easy for Customers to Use?
Keep your filters short, clear, and focused on the most helpful product details. Use simple names like “Color,” “Size,” or “Price” so people understand them quickly. Too many filter options can confuse users, so only include the ones your customers really need. Testing your filters on different devices also helps make sure they are easy to use.
Do Filters Work with Variable Products?
Yes, WooCommerce filters work with variable products like shirts with different sizes or colors. Just make sure that each variation has its attributes added correctly in the product settings. If the variations are missing data, the filter might not show those products. Setting up your variations carefully will help filters work better.
Can I Show Filters in More Than One Place?
Yes, you can place filter widgets in different areas like the sidebar, footer, or even the top of the page. This gives your customers more ways to find what they want. Just make sure the filters are not too crowded or hard to see. Adding filters in helpful spots makes the shopping experience easier and faster.
Are Filters Safe for All Types of Themes?
Most modern WooCommerce themes support basic filters without issues. But if you’re using an old or custom theme, the filters may not display correctly. Always check your theme’s documentation or try switching to a WooCommerce-approved theme. This can help avoid problems and make filters work better.
Last Words
Setting up product filters helps your store look better and work faster. Now you know how to add widgets, pick useful filter types, and test them on desktop and mobile. So, if you were wondering how to add a basic product filter using WooCommerce settings, the steps are simple: use the widget area, add filters, and test everything once it’s live.
As a final tip, keep your filter list short and useful, test on phones, and always match your filters to your products. Clean filters keep customers happy and your shop easier to use. Wishing you the best as you build a store that’s easy to browse and fun to shop!