The WooCommerce Quick View Display feature enhances the shopping experience by allowing customers to view product details in a convenient popup. This feature helps to improve user engagement and streamline the purchasing process.
Step 1: Install the Plugin
Before configuring the Quick View Display settings, ensure the plugin is installed. For detailed installation steps, please visit the Installation Guide Documentation Page.
Step 2: Enable Quick View
If Quick View is not enabled, please enable it from the General Settings. Learn more by visiting the General Settings Documentation.
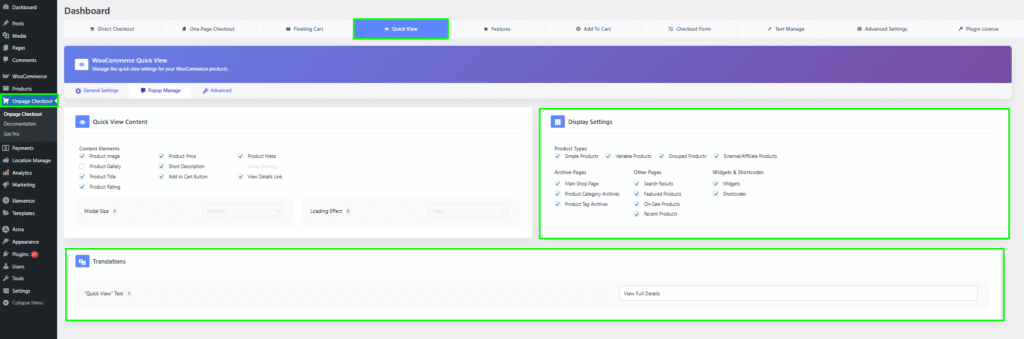
Step 3: Navigate to Display Settings
- Log in to your WordPress admin dashboard.
- Go to Onpage Checkout in the sidebar.
- Click on Quick View and then select Display.
Configuration Options
Product Types
Select which product types should have the Quick View feature enabled:
- Simple Products
- Variable Products
- Grouped Products
- External/Affiliate Products
Archive Pages
Enable Quick View for the following archive pages:
- Main Shop Page
- Product Category Archives
- Product Tag Archives
Other Pages
Select additional pages for Quick View functionality:
- Search Results
- Featured Products
- On-Sale Products
- Recent Products
Widgets & Shortcodes
Enable Quick View for:
- Widgets
- Shortcodes
Translations
Customize the text displayed in the Quick View popup:
- “View Details” Text: Customize the text for the “View Full Details” link.
This documentation provides a comprehensive guide for managing the WooCommerce Quick View Display settings in the One Page Quick Checkout for WooCommerce. For further assistance, please refer to our support section or contact our support team.