Attribute filters in WooCommerce help online stores look more organized and easy to use. They let customers pick what they want faster by narrowing down choices based on color, size, brand, or price. If you run a shop and want to improve how people find products, you might be thinking about how to add filter by attribute in WooCommerce?
You can add attribute filters in WooCommerce using widgets or a plugin. Use the built-in widget or install Dynamic AJAX Product Filters for advanced styling, real-time updates, and flexible display. Assign attributes, place a widget or shortcode, then test live.
If you want to organize your store and help customers shop faster, this article has all the details you need. You will find clear steps and helpful tips on adding attribute filters. Keep reading to make your online store better and easier to use for everyone.
How to Add Filter by Attribute in WooCommerce?
Adding filters by attribute is a great way to improve your store. It helps people find what they want without getting confused. WooCommerce makes it pretty simple to set this up. If you want to learn how to do it, keep reading below.
Method 1: Add Attribute Filters Using WooCommerce’s Built-in Widgets
If you’re looking for a basic and plugin-free way to add attribute filters to your shop, WooCommerce comes with a built-in widget system. It lets you display filters for product attributes like color, size, and more using your theme’s sidebar or widget area. This method works best for small shops or simpler layouts. However, it lacks flexibility, real-time filtering, and styling options compared to plugin-based solutions.
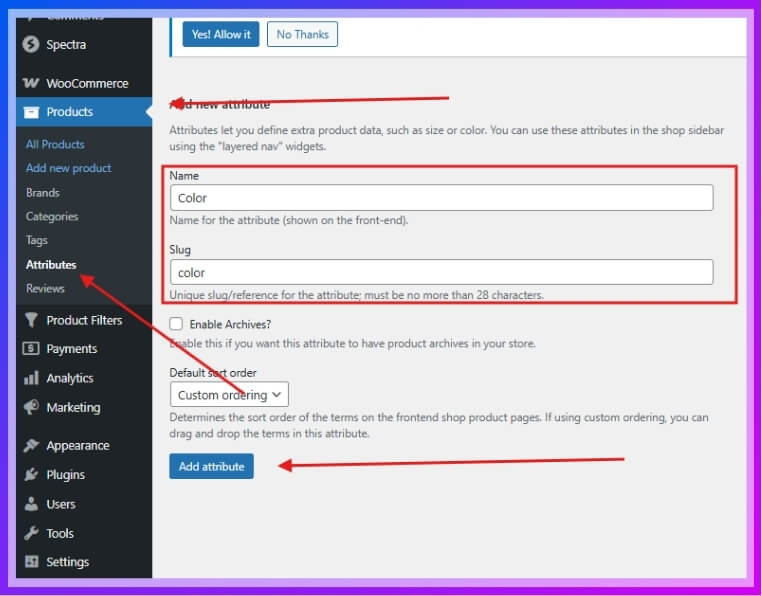
Step 1: Create Product Attributes
- Navigate to Products > Attributes
- Add a new attribute (e.g., Color or Size)

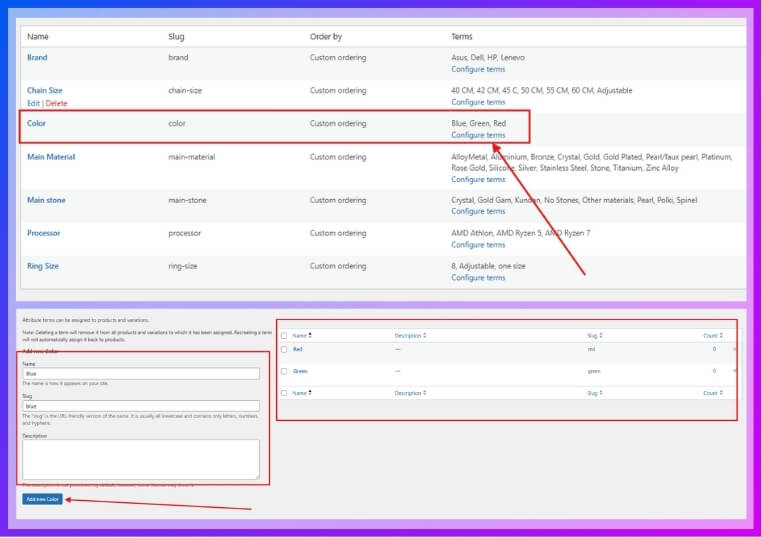
- Click Configure terms to add values (like Red, Blue, Green)

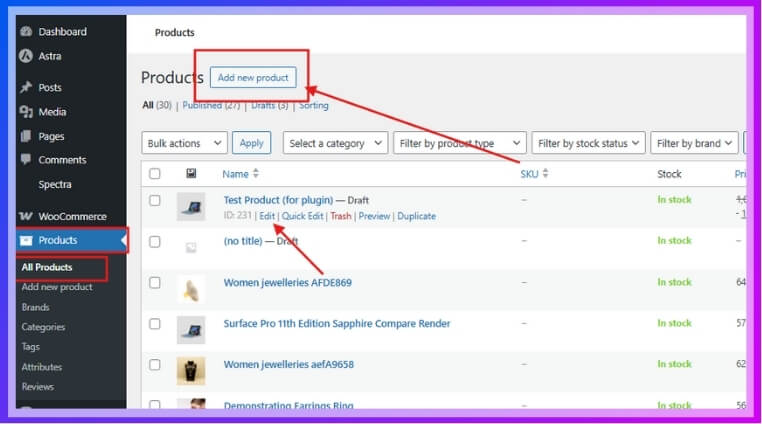
Step 2: Assign Attributes to Products
- Go to Products > All Products
- Edit a product, or you can add a new product

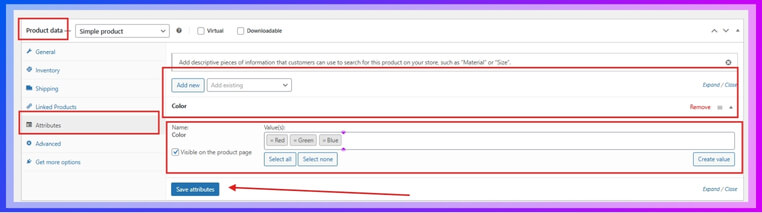
- In the Product Data section, go to Attributes
- Select the attribute and add relevant terms (e.g., Red, Blue)

- Save changes and Update/publish the product
Step 3: Add Filter Widget to Shop Sidebar
- Go to Appearance > Widgets
- Locate the Filter Products by Attribute widget
- Drag it to the Shop Sidebar or relevant widget area
- Choose the attribute you want to filter (e.g., Color)
- Give it a title if needed
Step 4: Ensure Sidebar Appears on the Shop Page
- Go to Appearance > Customize > WooCommerce > Product Catalog
- Make sure your shop layout includes a sidebar
- If it doesn’t show, adjust your theme settings or page templates

Method 2: Add Attribute Filters Using Dynamic AJAX Product Filters Plugin (Recommended)
For a more advanced and user-friendly filtering system, using a plugin like Dynamic AJAX Product Filters is highly recommended. This method allows real-time product filtering, custom styling (color swatches, checkboxes, images), and better compatibility with variable products. It’s ideal for medium to large online stores that need smooth filtering without page reloads. You can get started easily with AJAX product filters for WooCommerce, available in both free and premium versions for flexible use.
Step 1: Install the Plugin
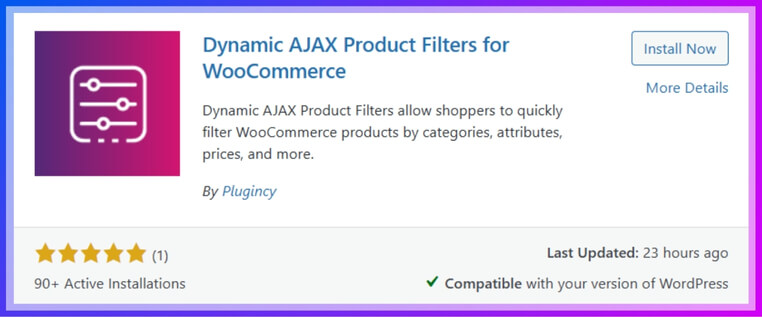
- Go to Plugins > Add New
- Search for Dynamic AJAX Product Filters for WooCommerce
- Click Install, then Activate

Step 2: Set Up Attributes (Same as built-in option)
- Go to Products > Attributes
- Add new attributes (e.g., Color)
- Click Configure terms to add values (e.g., Red, Green, Blue)
Step 3: Assign Attributes to Products
- Go to Products > All Products
- Edit or add a product
- In Product Data > Attributes, select the attribute and terms
- Save and update the product
Step 4: Assign Attributes to Products
- Go to Products > All Products
- Edit or add a product
- In Product Data > Attributes, select the attribute and terms
- Save and update the product
Step 5: Manage Attribute Display in Filter Form
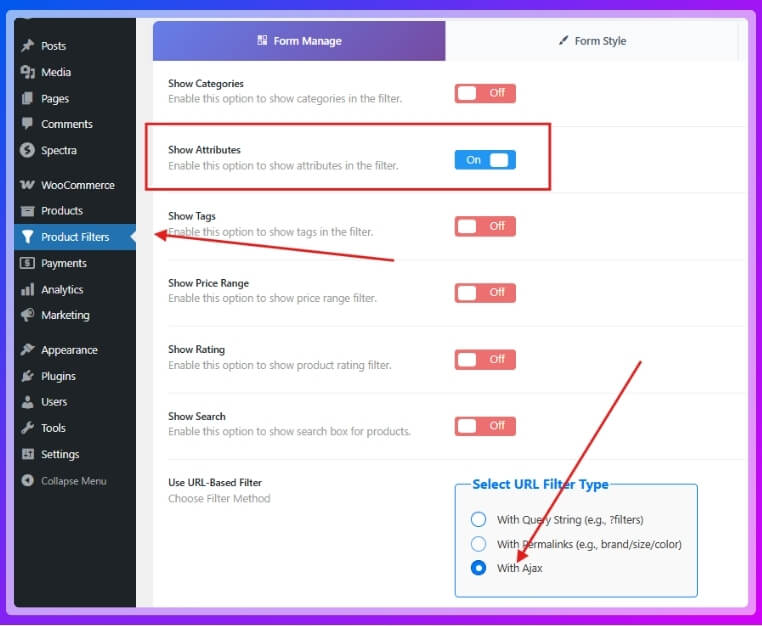
- Go to Product Filters > Form Manage
- Toggle on Show Attributes to enable them in the filter form

- Check the “With Ajax” option for a better reloading option
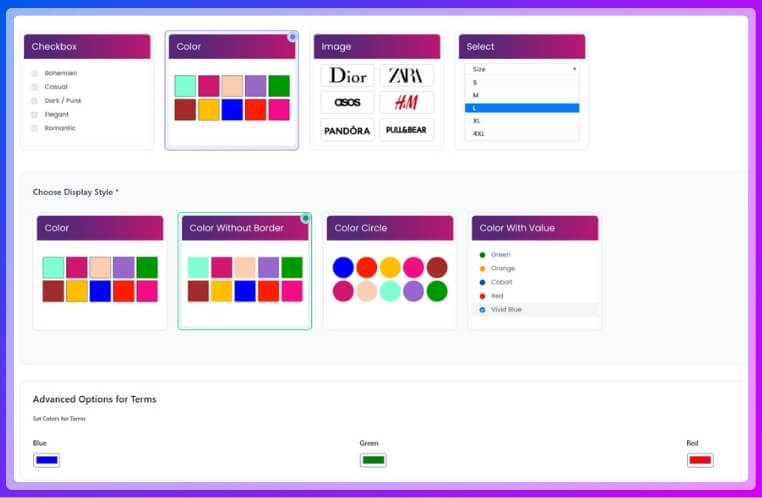
Step 5: Style the Attribute Filter Widget
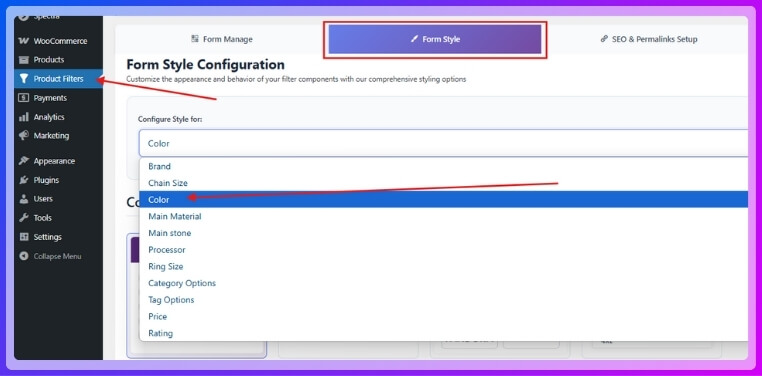
- Go to Product Filters > Form Style
- Select your created attribute from the dropdown

- Choose a filter style (e.g., Checkbox, Color, Image)
- Configure style-specific options and click Save

Step 6: Display the Product Filter on Your Webpage
Once you’ve created and styled your attribute filters, it’s time to place them where shoppers will use them—either on your sidebar or directly within a page.
Insert Filter Shortcode:
- Go to the page or widget area where you’d like the filter to appear
- Add the shortcode (Paste the shortcode inside the square bracket [ ] and remove the inverted comma):
“plugincy_filters”
This will display the product filter form.
Optional Product Shortcode:
- To display filtered products on the same page, add this shortcode alongside the filter:
“products”
Make sure you paste the shortcode inside the square bracket [ ] and remove inverted comma.
Customize Sidebar or Page:
- You can insert the shortcodes in a sidebar widget, Shop page content, or a dedicated filtering page
- Use page builders or the default WordPress editor to place shortcodes exactly where you want them to appear
Adding filters by attribute makes online shopping faster and easier to use. When people find products quickly, they enjoy visiting your site more. A clean setup keeps everything simple and helps reduce confusion fast. If you want a better shop, filters are a smart thing to try.
Which Attributes Work Best for WooCommerce Product Filters?
Finding the right product in a large store can feel like searching for a needle in a haystack. Filters help narrow things down so people don’t get overwhelmed. If you’re setting up a WooCommerce store, knowing which attributes work best can really make a difference—keep reading to learn which ones help the most!
- Size: Offering size options helps people quickly pick products that match their needs, especially for clothes, shoes, or furniture, where fit really matters.
- Color: Adding color filters lets users find what they like visually without scrolling through every item, saving time and effort while shopping.
- Material: This filter works great for shoppers who care about product quality, comfort, or eco-friendly materials like cotton, leather, or recycled plastic.
- Brand: Letting people choose by brand makes it easy for those loyal to certain names to find what they trust without extra searching.
- Price Range: Many people shop within a budget, so giving a filter to choose price ranges helps them stay on track without guessing.
- Ratings: Filters based on star ratings help buyers pick top-reviewed products and avoid low-quality items they might regret buying later.
- Stock Status: Showing only items that are in stock means users don’t waste time looking at products they can’t even buy right now.
Using smart filters in your WooCommerce store makes shopping faster, smoother, and way more enjoyable. When people find what they need without hassle, they’re more likely to buy. That’s why picking the right product attributes really matters. Try them out and see the difference they make in your store.
Do Attribute Filters Work With Variable Products in WooCommerce?
If your products come in different sizes or colors, filtering becomes interesting in a WooCommerce store. These are called variable products, and they need a bit more attention to show correctly in filters. Let’s explore how they behave and what to do to make everything work smoothly.
Filter and Variation Link
Attribute filters work best when your product variations are connected to global attributes. If you use custom attributes created inside the product only, filters may not recognize them properly. So, make sure your variations are using global ones like “Color” or “Size” that are set from the Attributes menu in WooCommerce.
Set Variations Properly
Each variation should be created and saved in the product settings. If you miss saving any variation, it might not show up when filtered. Also, double-check if every variation has its price, stock, and image set up. Without these, even if someone clicks on the filter, the variation may not appear at all.
Use Compatible Plugins
Some filters might not work right unless you use a plugin that supports variable products. Dynamic AJAX Product Filters is a popular choice because it works well with different product types. It can even improve how fast filters respond and how neatly variations load when someone clicks on them.
Check Product Visibility
Sometimes, variations are hidden because of catalog settings or stock status. If your product is set to “Hidden” or “Out of stock,” it won’t show up in the filter results. Go to the product settings and make sure everything is visible and in stock so filters can find them.
Regular Filter Testing
Every time you update products or add new variations, test your filters. Try filtering by size, color, or whatever you added. If something doesn’t show up, it’s easier to fix it early. Keeping your filter system updated helps your store run smoother and gives shoppers a better experience.
Making attribute filters work with variable products isn’t hard if you set things up the right way. Use global attributes, save each variation, and test your filters often. That way, your shop will be more organized and easier to use.
How to Combine Attribute Filters With Other Filters in WooCommerce?
A single filter can make shopping easier, but mixing more than one can make it even better. Filters work best when they help shoppers quickly get to what they want. If you want to give your store a smart boost, here’s how to make filter combinations really useful.
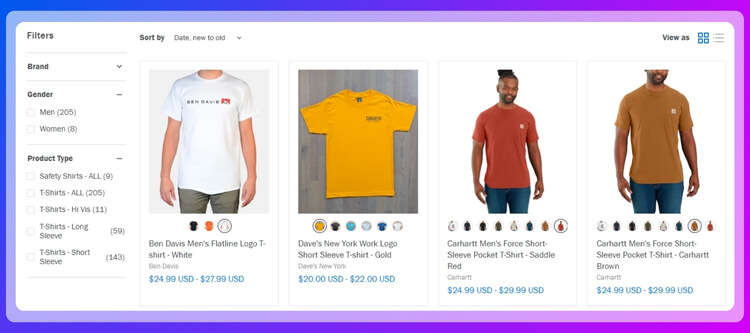
Use of Categories
Letting shoppers filter by category is a simple way to guide them. Someone looking for shoes doesn’t want to scroll through jackets. When you combine category filters with size or color options, it makes searching quicker. For example, in the “T-Shirts” category, you could also offer filters like medium size or blue color. This way, shoppers find exactly what they want without wasting time on unrelated items.
Pair with Tags
Product tags can connect similar items without using the same category. Imagine someone likes “casual” clothes—they can see all items tagged that way, no matter the category. When you let people filter by tags along with color or brand, it gives more specific choices. This helps people fine-tune their search even more and makes the shopping experience feel more personal and smooth.
Add Price Range
Price filters are very useful, especially when people are shopping on a budget. Someone might love a jacket, but not if it’s too expensive. If they can choose their budget range first, and then filter by brand or size, it saves them time. This combo works great for keeping shoppers interested instead of making them scroll through products that don’t match their budget at all.
Combine Attributes
An effective filter system considers more than just one product detail. Attributes like size, color, and material work better when used together. If a shopper selects a large red t-shirt, that’s already two filters at once. When you’re combining size, color, or brand filters, it’s also helpful to add rating filters in WooCommerce to help users narrow down products based on customer feedback and reviews. This little extra step can boost trust in the products people choose.
Use Stock Filters
Out-of-stock products can be a real letdown for shoppers. When users click on filters, they expect to see items they can actually buy. That’s why it’s smart to combine stock filters with others like size or category. For example, someone picking “sneakers” and “in stock” avoids wasting time. This also helps reduce frustration and keeps your store experience positive.
Combining filters the right way gives your visitors a better shopping experience. It’s faster, smarter, and way more enjoyable. When everything works together, it just feels easier to shop. Try building your filter system in a way that truly helps your shoppers.
Tips to Make Attribute Filters Mobile-Friendly in WooCommerce
Mobile shopping is more popular than ever, and filters need to work just as well on phones as they do on computers. A messy filter on mobile can confuse users or even make them leave. Let’s look at some ways to keep it simple and smooth.
Keep the Layout Simple
Too many filter choices on a small screen can feel overwhelming. It’s better to group filters into dropdowns or collapsible sections. This saves space and avoids clutter. Also, use short labels like “Color” or “Price” instead of long phrases. A clean layout helps users tap through options easily without needing to scroll endlessly. Focus on making the design feel easy to use, even with one hand.
Use Vertical Stacking
Instead of putting filters in sidebars that don’t show up well on phones, place them above product lists or in slide-out panels. Vertical stacking keeps everything in one direction, making it easier to scroll and select. This approach feels natural for mobile users who are already used to scrolling down. It also avoids pushing the product list too far down the screen.
Add Clear Buttons
After a user selects a filter, they should be able to apply or reset it with one tap. Add clear buttons like “Apply” and “Clear All” so users don’t get confused about what happens next. Without clear actions, people might think the filter isn’t working. Giving them control boosts confidence and helps them explore more products in less time.
Choose Touch-Friendly Sizes
Buttons and checkboxes should be large enough to tap without zooming. If filter options are too small or close together, it becomes frustrating. To make it better, use spacing that fits a finger tap and avoids accidental clicks. Ensuring that filters are touch-friendly, fast-loading, and logically organized not only helps mobile users but also works to improve product search in WooCommerce across all devices.
Mobile filters don’t have to be fancy, but they do need to be smart and simple. A smooth filter setup makes shopping feel easy, especially on smaller screens. When filters are easy to tap and understand, people stay longer. That means better chances for more clicks and more sales.
FAQs About How to Add Filter by Attribute in WooCommerce?
Adding product filters in WooCommerce is a smart way to help customers find what they need quickly. But when you’re new to using attributes or filters, many small details can be confusing. These FAQs will answer common questions in a clear and simple way so you can set things up without stress.
What Happens If I Delete an Attribute After Using It in a Filter?
If you delete an attribute that is being used in your filter system, the filter will stop working properly. The filter widget may not appear at all or may show errors. Your products will also lose the attribute values, which means customers can’t filter by them anymore. Always check where an attribute is used before deleting it.
Can I Use Filter by Attribute Without Assigning Categories?
Yes, you can use attribute filters without adding categories, but it’s not the best idea. Without categories, your shop can become messy and harder to manage. Filters work better when they are grouped under useful sections like “Clothing” or “Electronics.” So even though it works, it’s better to use both filters and categories together.
Why Don’t My New Attribute Filters Show on the Shop Page?
Sometimes, new filters don’t show up because they haven’t been added to a visible widget area. Another reason could be that your shop page doesn’t have a sidebar, or the filter plugin isn’t active. Also, make sure the attribute is already used in at least one product. Filters only appear if there’s something to filter.
Is It Safe to Use Many Attribute Filters at Once?
Using many filters is okay, but it can also confuse your visitors if not done neatly. Try to show only the most important ones, like size, color, or brand. If you add too many options, the page may load more slowly, especially on mobile. Keep your filter list simple and helpful so people enjoy shopping.
Can I Translate Attribute Filters for a Multilingual Store?
Yes, WooCommerce filters can be translated using tools like WPML or Polylang. This helps your store work in different languages, which is useful if you have customers from many countries. Make sure your attributes and terms are also translated in the settings. A translated store feels more friendly and clear for everyone.
Will Filters Still Work If I Change My WordPress Theme?
Filters can still work after a theme change, but you may need to place the widgets again. Some themes have different widget areas or use custom layouts. You might also need to adjust your sidebar settings or check compatibility with your new theme. Always test your filters after switching themes to make sure everything looks right.
Do Attribute Filters Slow Down the Website?
If you use too many filters or a poorly coded plugin, your website might slow down a bit. This usually happens in large stores with lots of products. A fast server and a good filter plugin like Dynamic AJAX Product Filters can help solve this. Try to keep your store clean and updated for better speed.
How Can I Hide Certain Attributes from Filters?
You can hide any attribute by not adding it to the widget or filter form. Some plugins also let you turn off specific attributes for filters in their settings. This is useful if an attribute is only for internal use or is not helpful for customers. Just make sure you’re not hiding anything that users might really need.
End Note
Adding filters to your WooCommerce shop helps people find products faster. Now that you’ve learned each method step by step, you finally know how to add filter by attribute in WooCommerce? It’s all about setting up attributes and displaying them clearly.
As you finish setting up, remember to keep your filters simple and neat. Always test on both desktop and mobile for better results. Stick to clean labels, clear buttons, and smart layout choices. Good luck with your store!