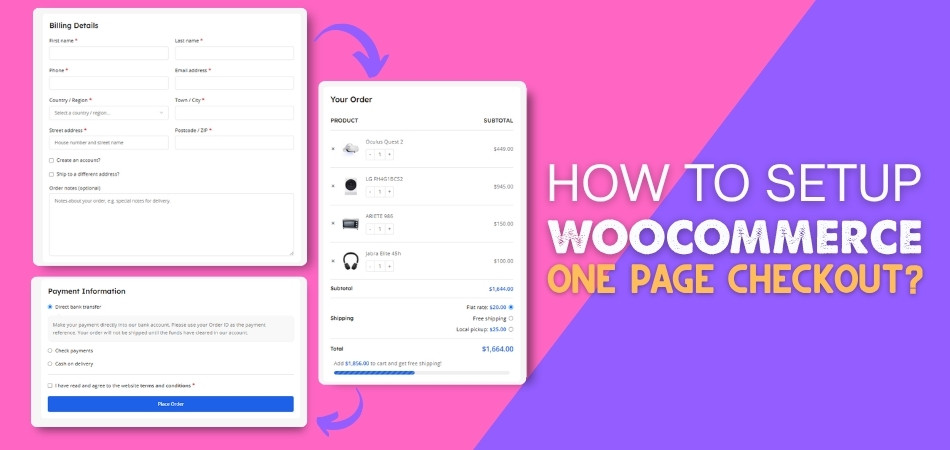
The speed and ease of use of your WooCommerce store can increase the number of sales and keep shoppers satisfied. Many store owners realize that a simple checkout process helps customers finish their purchases quickly, and that’s why the idea of setting up a WooCommerce One Page Checkout is becoming popular. If you are not sure how to setup WooCommerce One Page Checkout, you are not alone.
WooCommerce comes with a built-in checkout page, but it may sometimes be missing, disabled. In this case, you will need to install the One Page Quick Checkout for WooCommerce through plugincy. Activate it, then enable the feature in your dashboard. Apply it to individual or all products, and customize settings like form position, cart behavior, and layout to optimize the checkout experience.
Are you interested in learning more about setting up WooCommerce One Page Checkout, or want to know which method works best for your store? Throughout this article, you will discover all the steps, tips, and extra details you’ll need to create a better shopping experience.
How to Setup WooCommerce One Page Checkout?
Setting up a One Page Checkout in WooCommerce helps simplify the purchasing process, reduce cart abandonment, and improve conversion rates. Here’s a step-by-step process to help you get started:
Step 1: Install the Plugin
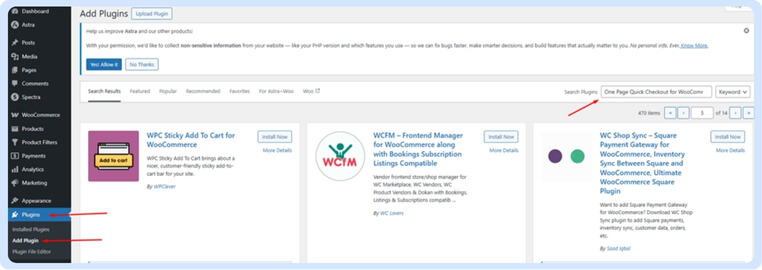
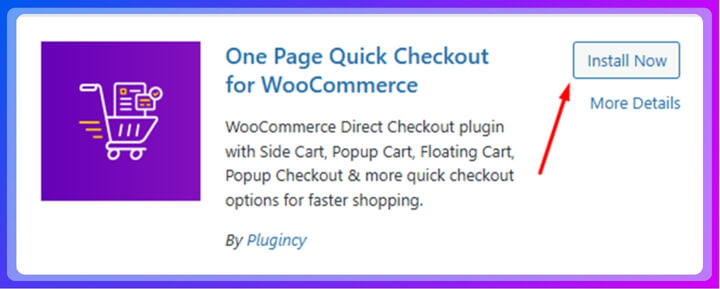
WooCommerce includes a built-in checkout page, but it may sometimes be missing, disabled, or not fully optimized for conversions. To resolve this and gain more control over your checkout experience, installing a dedicated One Page Checkout plugin is recommended. The most popular and highly recommended option is One Page Quick Checkout for WooCommerce by plugincy. It simplifies the process and allows customers to complete their purchase on a single page, boosting sales and user satisfaction. Here is how to install it:
For the Free Version:
- Go to your WordPress Admin Dashboard.
- Navigate to Plugins > Add Plugin.
- Search for “One Page Quick Checkout for WooCommerce”.

- Click Install Now and then Activate.

For the Pro Version:
- Visit plugincy to purchase the PRO version.
- After your purchase, you will receive a download link in your email. Click the link to download the ZIP file.
- Go to Plugins > Add Plugins.
- Click Upload Plugin.
- Select the Pro version ZIP file from your device.

- Click Install Now, then Activate.


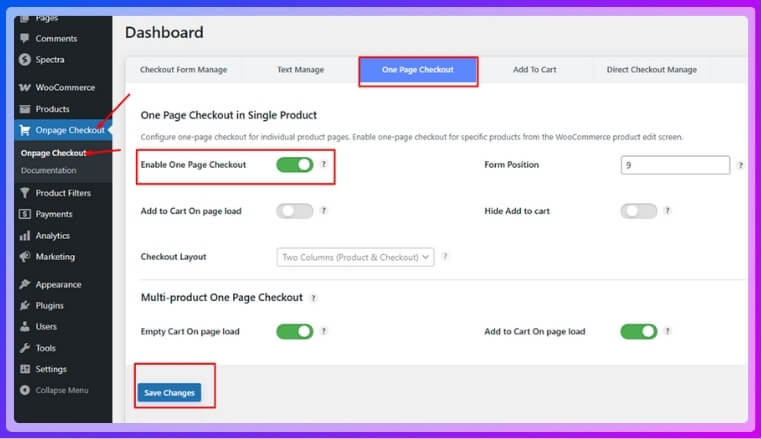
Step 2: Enable One Page Checkout
After installing the plugin, the WooCommerce One Page Checkout feature is usually enabled by default. If it’s not, you can easily turn it on manually:
- In your dashboard, go to Onpage Checkout > One Page Checkout.
- Toggle the Enable One Page Checkout option to On.

Step 3: Enable One Page Checkout for Individual Products
To apply One Page Checkout to specific products:
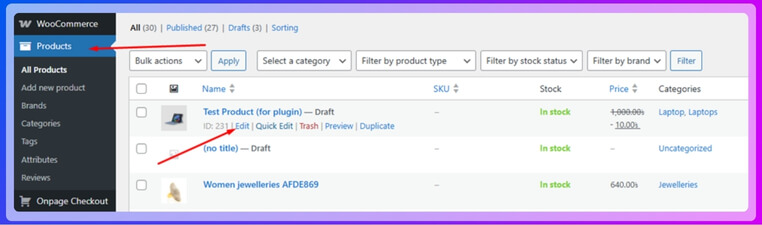
- Go to Products in your dashboard.
- Edit the product you want to modify.

- Scroll to the One Page Checkout settings on the product edit page.
- Click the One Page Checkout option to On.


Step 4: Enable One Page Checkout for All Products
If you want to apply One Page Checkout across your entire store:
- Go to Onpage Checkout > One Page Checkout.
- Turn on the “Enable for All Products” option.
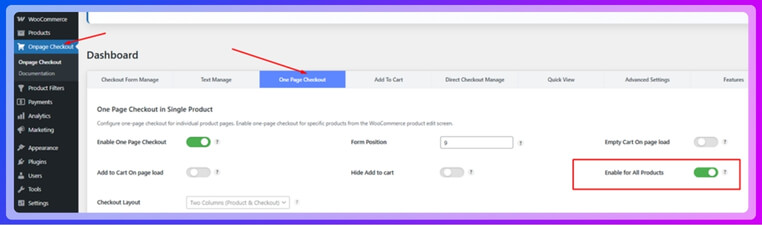
Step 5: Additional Configuration Options
Customize the checkout experience further to align with your store’s needs:
- Form Position – Choose where the checkout form appears on the product page.
- Empty Cart on Page Load – Useful for flash sales or special events.
- Add to Cart on Page Load – Automatically adds a product to the cart when the page loads.
- Hide Add to Cart Button – Focuses the user directly on the checkout.
- Checkout Layout – Adjust the design to fit your brand’s look and feel.
To adjust these settings:
- Go to Onpage Checkout in your WordPress dashboard.
- Click on One Page Checkout.
- Adjust the settings as needed to optimize the checkout experience.
Why You Should Use One Page Quick Checkout for WooCommerce?
Setting up an online store is exciting, but getting people to actually complete a purchase can be tricky. That’s where One Page Quick Checkout for WooCommerce helps. It makes everything faster, smoother, and a lot easier for your customers. Let’s break down why it’s a great tool to have in your store.
Popup Checkout Form
Instead of sending people to another page, this plugin shows a checkout form in a pop-up. That means shoppers can fill in their details without leaving the page. It saves time and keeps the focus on buying. The popup is clean and simple, so it’s easy to use. Everything happens right there, which makes the whole shopping process feel faster.
No Page Reload
Nobody likes waiting for a page to reload, especially when buying something. With this feature, the checkout happens instantly without refreshing the page. It feels smoother and more modern. The buyer stays on the same page the whole time. This keeps things quick and helps stop people from changing their minds.
One-Page Checkout
This plugin puts the whole checkout process on one page, which saves clicks and confusion. It works for both single and multiple products. You also get different layout styles to choose from. Whether someone is buying one item or five, everything stays in one place. That makes it super easy to finish the order.
Easy Form Customization
You can change the checkout form to match what you need. Add images, remove buttons, or adjust how the quantity is shown. It’s simple to make the form look the way you want. This helps keep the checkout neat and clear for customers. A better-looking form means a better buying experience.
Quick Checkout Button
There’s a button right on the product or shop page that takes people straight to checkout. No need to go to the cart page first. This is great for people who know what they want. It cuts out extra steps and speeds things up. That means more sales and fewer drop-offs.
Works With Any Page Builder
No matter which page builder you use—Elementor, Gutenberg, or something else—this plugin fits right in. It also supports shortcodes and widget areas. That means you can place your checkout section wherever it looks best. You don’t need to worry about things not matching your design. It’s flexible and easy to set up.
What Slows Down a WooCommerce Checkout Page?
WooCommerce checkout pages that take too long to load can frustrate shoppers. Slow checkout can cause people to leave without buying anything. There are many reasons why this happens, and some of them might surprise you. Keep reading to find out what can slow down your WooCommerce checkout page and how to fix it.

Too Many Plugins
If you have a lot of plugins installed on your site, they can make your checkout page slower. Each plugin adds extra work for your site to load, especially if they all run at the same time. Some plugins may even clash with each other, causing more delays. Try to keep only the plugins you really need and remove the rest.
Heavy Themes
Fancy themes with a lot of features and designs might look cool, but they can slow down your checkout page. These themes often load lots of images, animations, and scripts. This makes your page take longer to open. A clean and simple theme will usually help your site load faster.
Unoptimized Images
Large image files can seriously slow down your checkout page. If product images or background pictures are too big, they take time to load. This affects the overall speed of your website. Always use properly sized and compressed images to keep your site running fast.
Poor Hosting
Your website speed also depends on the company that hosts it. If your hosting is cheap or shared with too many other sites, it might be slow. A slow server means your checkout page won’t load quickly. It’s better to use good-quality hosting made for WooCommerce.
Too Many Checkout Fields
Asking for too much information at checkout can slow everything down. Every extra field adds more to the load and process. It also makes the page longer and harder for the customer to complete. Try to ask only for the most important details.
Outdated Plugins or Themes
Old plugins or themes may not work well with the latest version of WooCommerce. This can lead to bugs or delays in loading. Updating your plugins and themes often fixes speed problems. Always keep your site updated to avoid such issues.
Slow Payment Gateways
Some payment gateways take longer to connect or process. If your checkout takes too long to talk to the payment system, the whole page slows down. Choose faster and more reliable payment options for your store. Test them regularly to make sure they work well.
Too Much JavaScript
JavaScript is what makes your site interactive, but having too much of it can slow your page. Many themes and plugins load extra scripts that may not be needed on the checkout page. Too many scripts make the browser work harder. Try to remove or reduce them where possible.
Difference Between Default and Plugin-Based One page Checkout
Many online stores use WooCommerce’s default checkout page, but it doesn’t always offer the best experience. That’s where plugin-based one-page checkout options come in. Here’s a clear comparison to help you decide what suits your store best:
| Aspect | Default WooCommerce Checkout | Plugin-Based One Page Checkout |
| Checkout Layout | Fixed layout, not very flexible | Customizable layouts with multiple display options |
| Page Reloads | Requires full page reloads during checkout | Works smoothly without a page refresh |
| Popup Support | No built-in pop-up checkout | Offers pop-up checkout for faster action |
| Customization | Limited customization options | Full control over form fields, buttons, and layout |
| Speed | Slower due to extra steps | Faster, all-in-one checkout flow |
| Add to Cart Options | Standard add-to-cart process | Can auto-add products on page load |
| Mobile Friendliness | Basic responsive support | Optimized for mobile with a better user experience |
| Cart Management | Traditional cart process | Options like empty cart on load or skip cart entirely |
| Design Compatibility | May require theme adjustments | Compatible with most page builders and themes |
| User Experience | Can feel long and confusing | Simplifies checkout, reducing drop-offs |
By comparing both options, you can clearly see how plugin-based solutions bring more value to your store. Whether it’s customization, speed, or ease of use, plugins often provide a better experience. So if you’re serious about improving conversions, understanding One Page Checkout and choosing the right tool can make a big difference in how your customers shop.
How Often Should You Update Your Checkout Plugin?
Keeping your checkout plugin updated is important because it helps your store run smoothly and safely. New updates often fix bugs and improve speed. When a plugin is out of date, it can slow down the checkout process. A fast and easy checkout helps your customers complete their orders without any problems.
Most developers suggest checking for plugin updates at least once every two weeks. This gives you time to test before applying changes. Always update your plugin after major WooCommerce or WordPress updates. That way, your checkout stays fully compatible and works without any errors.
If your store gets lots of orders daily, updating regularly is even more important. Outdated plugins may not work well with payment gateways or shipping tools. A broken checkout can cost you lost sales and unhappy customers. To avoid issues, make WooCommerce checkout plugin updates a regular part of your store routine.
Tips for Avoiding Checkout Plugin Errors or Failures
Checkout plugins are super helpful, but they can sometimes cause problems if not handled the right way. These issues can stop people from completing their orders, which isn’t good for your store. The good news is, most of these problems can be avoided with a few simple steps. Here are some helpful tips to keep things running smoothly and error-free.
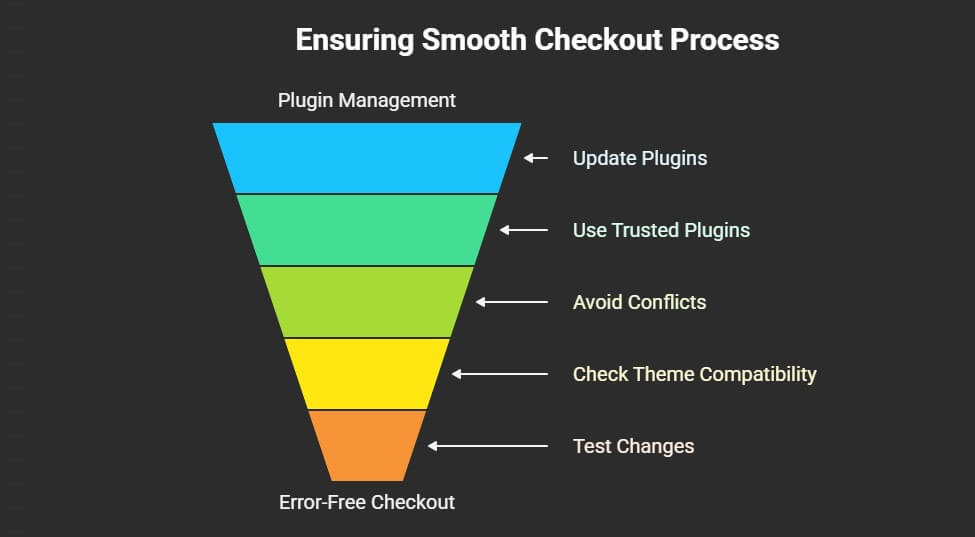
Keep Plugins Updated
Always use the latest version of your checkout plugin. Updates often fix bugs and make things work better. Old versions might not match your current WooCommerce setup. This can cause things to break or behave strangely. So, check for updates regularly and don’t ignore them.
Use Trusted Plugins
When choosing tools for your store, make sure the checkout plugins for WooCommerce you use come from trusted sources. Free ones might look tempting, but they can come with problems or poor support. Look for plugins with good ratings and reviews. Trusted developers usually fix bugs quickly and keep their plugins working well. This helps avoid crashes and checkout errors.
Avoid Plugin Conflicts
Too many plugins can sometimes fight with each other. If something breaks after adding a new plugin, it might be a conflict. Try turning off other plugins one by one to find the problem. It’s best to keep only the plugins you really need. Fewer plugins mean fewer problems.
Check Theme Compatibility
Some checkout plugins don’t work well with certain themes. If your checkout layout looks weird or buttons don’t work, it could be the theme. Try switching to a basic theme like Storefront and see if the issue goes away. If it does, you may need a theme that supports your plugin better.
Test After Changes
Every time you install or update a plugin, do a test checkout. Try adding a product to the cart and going through the full process. This helps you spot problems early before real customers face them. It only takes a few minutes and can save you a lot of trouble later.
Keep WooCommerce Updated
An old version of WooCommerce can cause issues with new plugins. Plugin makers usually design their tools for the latest WooCommerce versions. So if you skip updates, things might stop working right. Always back up your site, then update WooCommerce to keep everything working together.
Clear Cache Regularly
If you’re using a caching plugin, it can sometimes show old data. This can stop new checkout changes from showing up properly. Clear your website cache after making changes to the checkout plugin. This makes sure your visitors see the latest version of your checkout page.
Use Staging Site
Before making big changes to your live site, try them out on a test (staging) site. This is like a practice website where you can test updates safely. If something goes wrong, your real store won’t be affected. It’s a smart way to prevent unexpected issues.
Frequently Asked Questions
Setting up a WooCommerce One Page Checkout can come with lots of small doubts and details that often get overlooked. Whether you’re just starting or looking to fine-tune your setup, these FAQs cover extra points that weren’t mentioned earlier. Let’s clear up some common concerns and help make the setup even easier for you.
What Is the Main Purpose of One Page Checkout?
The main goal of One Page Checkout is to help customers buy faster by putting product selection and checkout on a single page. This cuts down steps and saves time, making it easier for people to finish their purchase without leaving the page.
How Do I Know If One Page Checkout Is Working?
You can test your One Page Checkout setup by visiting the page yourself, adding a product, and going through the checkout. If everything happens without page reloads and the order goes through smoothly, then it’s working as expected.
How Do I Make the Checkout Page Look Better?
You can improve the checkout page’s appearance by using Elementor or Gutenberg with the plugin. These tools let you drag and drop sections, move buttons, or add trust badges. It makes the page not only work well but also look great.
What Makes a Plugin-Based Checkout Better?
A plugin-based One Page Checkout gives more features like AJAX updates, product displays, and custom layouts. It combines cart and checkout on one screen. This setup saves time for shoppers and often results in more people completing their orders.
How Do I Choose the Right Plugin?
Choose a plugin that supports your WooCommerce version, works with your theme, and has good reviews. Look for features like mobile support, shortcode options, and payment gateway compatibility. Always test it on a sample page before using it live.
What Should I Avoid During Setup?
Avoid using too many plugins that do the same job, and don’t overload the page with heavy images or long forms. Keep the layout simple and clean. Test the checkout process often to make sure it stays fast and easy.
What Happens If a Plugin Conflicts With My Theme?
Sometimes, a theme may not fully support all plugin features, and this can break the layout. To fix this, switch to a basic theme or ask the plugin support team for a small CSS fix. Always test on a staging site first.
Final Thoughts
It’s exciting to set up your online store, but the real success lies in making your checkout process as smooth as possible. A slow or confusing checkout can turn potential buyers into lost sales. That’s why improving this step is one of the smartest moves you can make for your WooCommerce store.
Learning how to setup WooCommerce One Page Checkout gives you more control, better design options, and a faster shopping experience your customers will appreciate. With the right plugin, a few simple settings, and some smart testing, you’ll have a checkout process that actually helps boost your sales.
So take the time to set it up right. Cleaner, faster checkout is just a few steps away-and your customers will appreciate it. Give your customers a fast, friendly, and easy checkout experience and let your store shine.