An author filter allows shoppers or admins to filter products based on who created, owns, or manages them. This is especially useful in multi-vendor marketplaces, creator-led stores, or content-driven shops where products are associated with different sellers, writers, or contributors.
In this guide, you will learn how to add filter by author in WooCommerce using WordPress’s post-author logic and AJAX-based filtering. We will also cover real use cases, limitations of WooCommerce, and SEO considerations so author-based filtering works correctly without causing layout, performance, or indexing issues.
Quick Answer
WooCommerce does not give you a built-in way to filter products by author. If you want shoppers to browse by seller, creator, or contributor, you need a setup that can pull the product author into the filter area on the shop or category page.
Use the steps below to confirm author-based filtering is set up correctly. Advanced and scalable methods are explained later in the guide.
- Confirm products are assigned to different authors
- Use an AJAX filter plugin that supports filtering by author
- Add the author filter to shop or category pages
- Test filtering by switching between authors
What an Author Filter Does in WooCommerce
An author filter helps narrow products based on who published, added, or manages them in the store. Since WooCommerce products are stored as WordPress posts, each one is tied to an author, which makes it possible to use that connection as a filtering option.
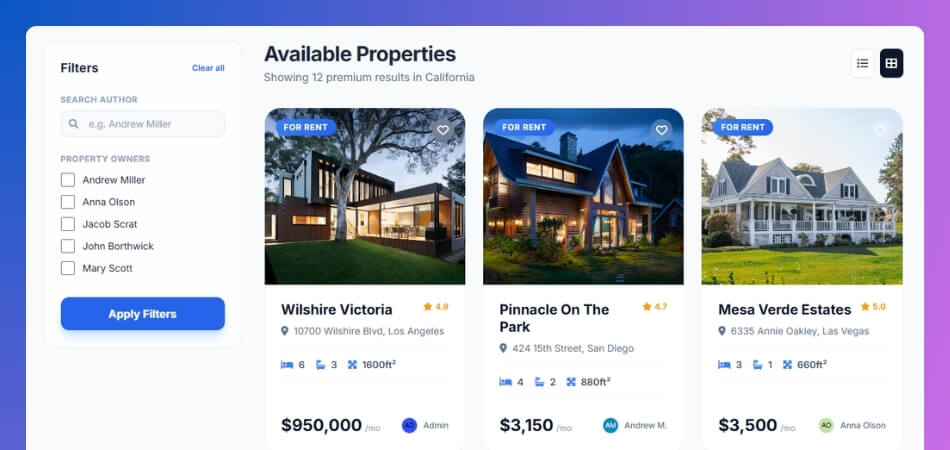
This kind of filter is especially useful in stores where the person behind the product matters just as much as the product itself.
Author filters are often useful for:
- Multi-vendor marketplaces
- Creator-led product catalogs
- Stores with multiple contributors
- Book, course, or digital product shops
When Author Filters Are the Right Choice
This kind of filter only helps when the author actually means something in the store. If shoppers care who listed the product, who created it, or which seller it comes from, then an author filter can be worth having.
It usually makes sense when:
- Different sellers handle their own products
- People come back for a specific creator or contributor
- Trust in the seller matters before someone buys
- The store is more marketplace-style than single-brand
It usually does not add much when:
- One admin manages everything
- The store is presented as one brand, not many people
- Buyers are choosing mostly by specs, price, or features
Why Doesn’t WooCommerce Include a Native Author Filter?
WooCommerce was built mainly around the usual storefront filters people expect, like category, price, stock, and product attributes. Those are the things most stores use to help shoppers narrow products, so that is where the default filtering tools are focused.
Author data exists in the background because products are still WordPress posts, but WooCommerce does not treat that author connection as a normal shopping filter. For a lot of stores, it is just not something customers ever need to use.
That is why, out of the box, you do not get:
- A built-in author filter widget
- A block for filtering products by author
- A simple setting to turn author-based filtering on
- A ready-made front-end author filter for shop pages
How to Add Filter by Author in WooCommerce? 3 Effective Methods
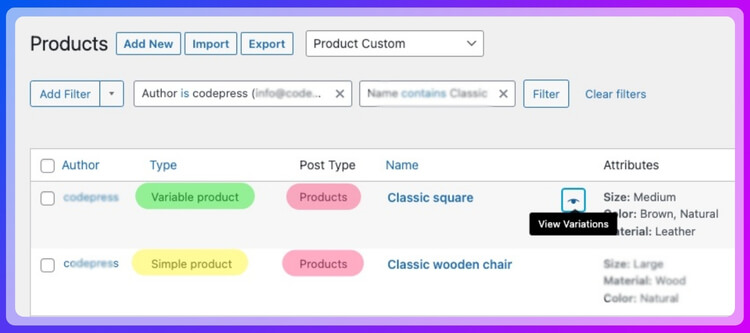
Before anything else, check whether the products are actually assigned to the right authors. This part is easy to overlook, but it matters because the filter can only separate products if different authors are already attached to them.

Step-By-Step Check (Product Author)
- Open a product in WooCommerce
- Look for the Author field in the product editor
- If you do not see it, enable it from Screen Options
- Select the correct user for that product
- Save or update the product
Once you add the author field to your product, move forward to setting the filter. Here are the three main ways stores usually handle author-based filtering in WooCommerce.
Method 1: Using Dynamic AJAX Product Filters Plugin
Dynamic AJAX Product Filters by Plugincy is a no-code plugin that delivers advanced AJAX product filters for WooCommerce stores, letting you add real-time product filters, including an Author filter, without touching a single line of code.
Step 1: Install the Plugin
Free Version (via WordPress.org)
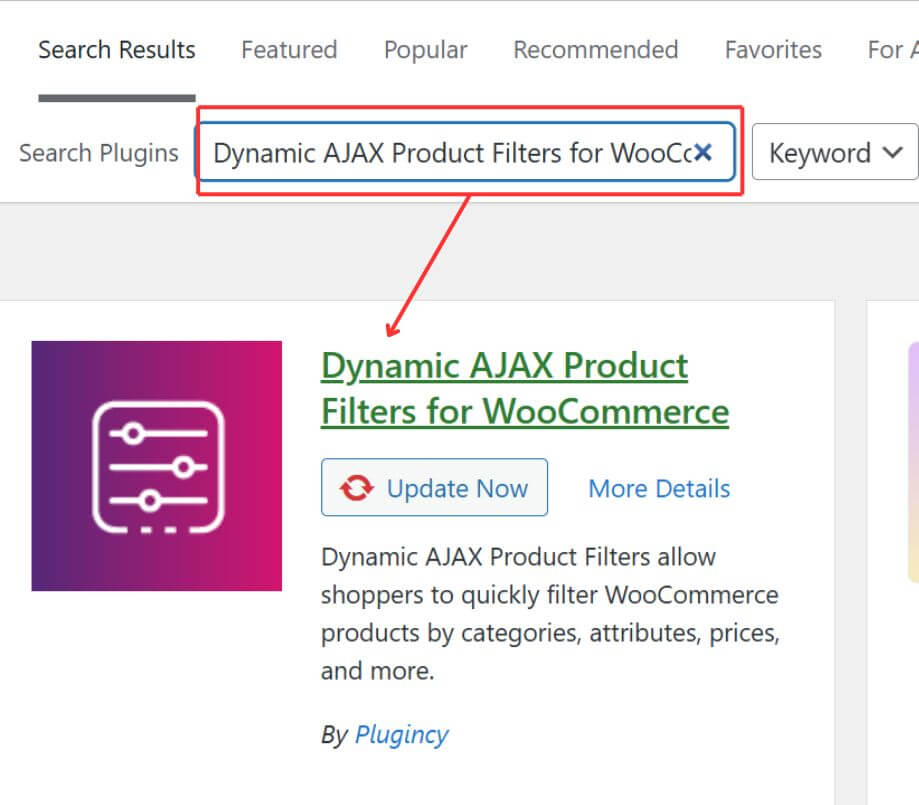
- From your WordPress dashboard, go to Plugins → Add New
- In the search bar, type Dynamic AJAX Product Filters for WooCommerce
- Click Install Now on the plugin by Plugincy, then hit Activate

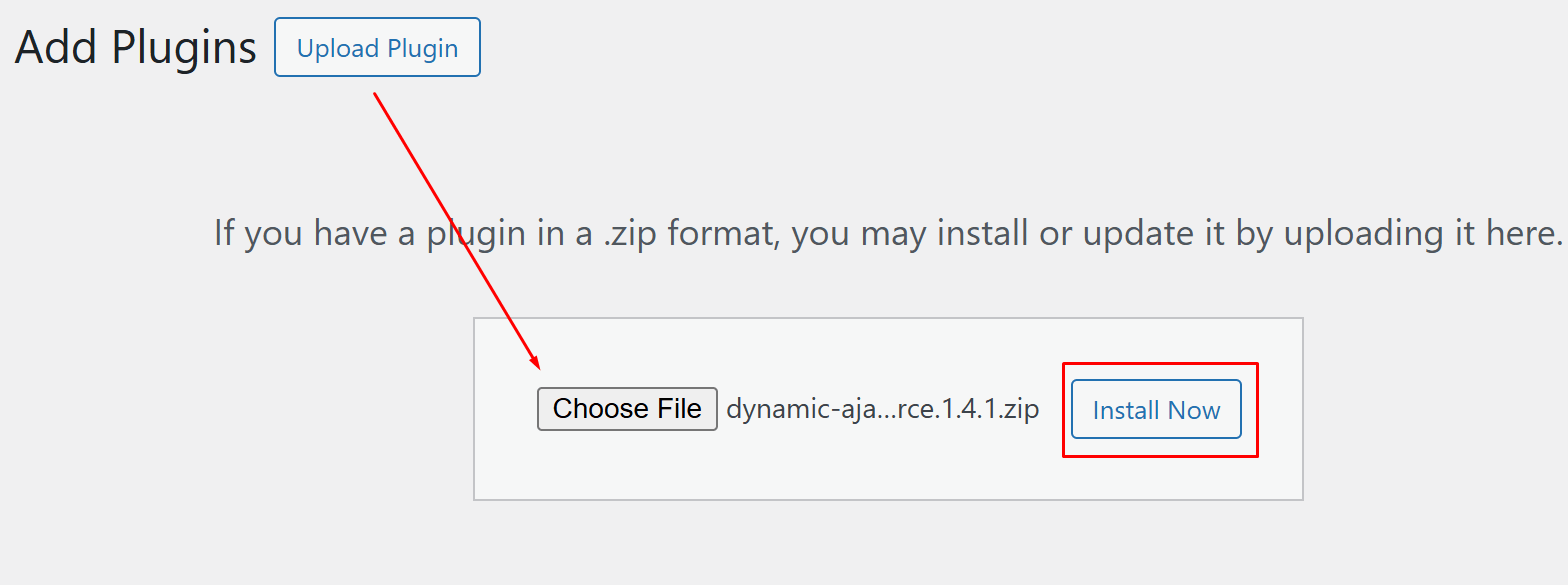
Pro Version (via Plugincy.com)
- Purchase the Pro license from the Plugincy
- After purchase, download the .zip file from your account dashboard
- In WordPress, go to Plugins → Add New → Upload Plugin
- Upload the .zip file and click Install Now, then Activate
- Go to Product Filters → License and enter your license key to unlock the full suite of advanced AJAX product filters features

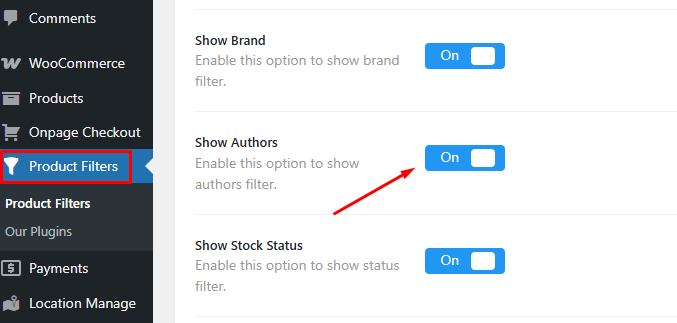
Step 2: Enable the Author Filter in Form Settings
Once the plugin is active, you need to turn on the Author filter.
- From your WordPress dashboard, go to Product Filters → Form Manage
- Look for the Show Authors toggle in the list of available filter options
- Enable it to make the Author filter visible in your filter widget form

Step 3: Style and Customize the Author Filter Widget
Now control how the Author filter looks and behaves.
Go to Product Filters → Form Style.
Choose a Display Style
From the Select Attribute dropdown, pick Authors. You can then choose one of multiple filters and display styles.
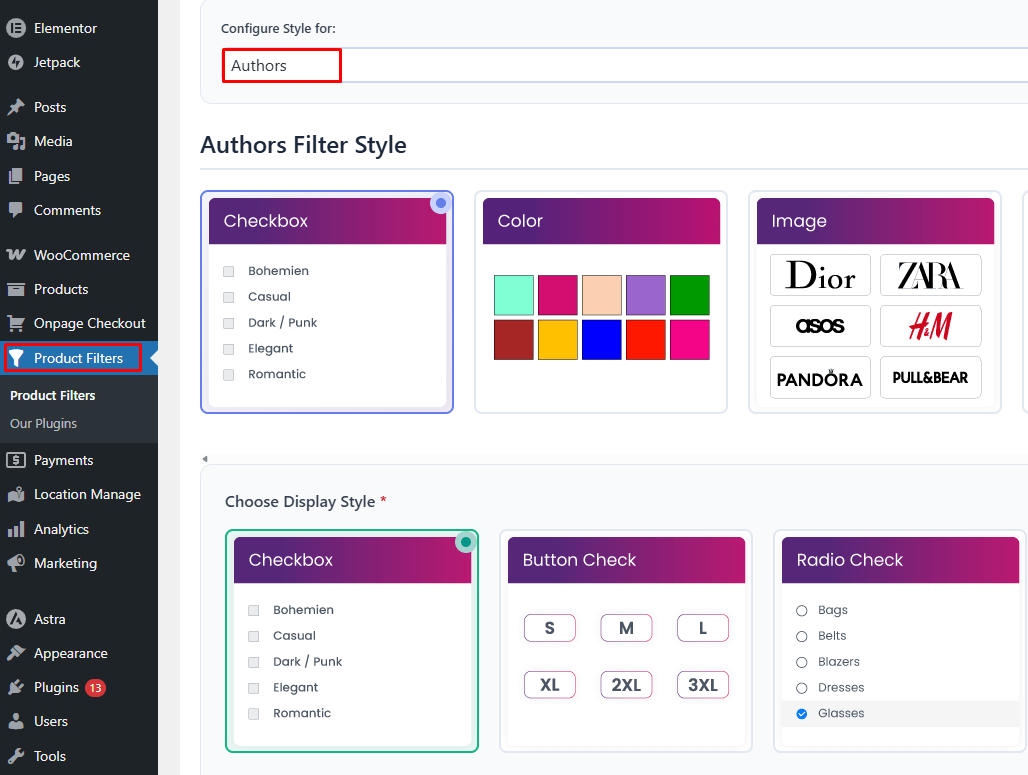
Optional Settings
These let you fine-tune the widget’s basic behavior, such as whether it can be collapsed, allowing only single author selection, and showing product counts next to each author name.
Advanced Settings
This is where the advanced AJAX product filters capabilities really shine. You can add a custom CSS class, switch between OR/AND operator logic, and include or exclude specific authors.
Step 4: Save Your Changes
Once you’re satisfied with the configuration, click Save at the bottom of the Form Style page. None of the changes will take effect on the frontend until this step is completed.
Step 5: Display the Filter on Your Store Page
Now, place the filter where your customers can actually use it.
Using Shortcodes
Visit the page where you want the filter to appear (e.g., your Shop page) and add the following shortcode:
[[plugincy_filters]]
To display the filtered product grid alongside the filter, also add:
[[products]]
Other Placement Options
- Sidebar Widget: Go to Appearance → Widgets and add the filter to any widgetized sidebar area
- Gutenberg Block: Use the dedicated block inside the WordPress block editor
- Elementor Widget: Drag and drop the filter widget if you’re building with Elementor
Method 2: Custom Widget (PHP Code)
If you prefer a lightweight, plugin-free approach, you can build an Author filter directly into your theme using custom PHP. This method gives you full control and is a solid choice for developers comfortable with editing theme files.
Step 1: Add the Filter Function
Open your theme’s functions.php and add the following. This fetches all authors and renders them as a clickable filter list:
php
function display_author_filter() {
$authors = get_users( array(
‘role__in’ => array( ‘author’, ‘administrator’ )
));
$current = isset( $_GET[‘filter_author’] )
? sanitize_text_field( $_GET[‘filter_author’] )
: ”;
echo ‘<ul class=”author-filter-list”>’;
foreach ( $authors as $author ) {
$url = add_query_arg( ‘filter_author’, $author->user_login );
$active = ( $current === $author->user_login ) ? ‘class=”active”‘ : ”;
echo “<li><a href='{$url}’ {$active}>{$author->display_name}</a></li>”;
}
echo ‘</ul>’;
}
Step 2: Hook Into the WooCommerce Product Query
This intercepts the product loop and filters results based on the selected author in the URL:
php
add_action( ‘woocommerce_product_query’, function( $q ) {
if ( isset( $_GET[‘filter_author’] ) && ! empty( $_GET[‘filter_author’] ) ) {
$user = get_user_by( ‘login’, sanitize_text_field( $_GET[‘filter_author’] ) );
if ( $user ) {
$q->set( ‘author’, $user->ID );
}
}
});
Step 3: Display the Filter in Your Template
Call the function wherever you want the filter to appear — for example inside sidebar.php:
php
<div class=”author-filter-widget”>
<h4>Filter by Author</h4>
<?php display_author_filter(); ?>
</div>
Step 4: Add Basic Styling
Paste this into your theme’s style.css or Appearance → Customize → Additional CSS:
css
.author-filter-list { list-style: none; padding: 0; margin: 0 0 20px; }
.author-filter-list li { margin-bottom: 8px; }
.author-filter-list a { text-decoration: none; color: #333; }
.author-filter-list a.active { font-weight: bold; color: #0071a1; }
Important: Always add custom code to a child theme to avoid losing changes when your theme updates.
Method 3: Custom Taxonomy (Assign Authors as a Taxonomy)
This is the most WooCommerce-native approach. Instead of relying on WordPress post authors, you register a dedicated product_author taxonomy, making it behave just like any other WooCommerce attribute and integrating cleanly with the built-in layered navigation filters.
Step 1: Register the Custom Taxonomy
Add this to your theme’s functions.php or a custom plugin file:
php
add_action( ‘init’, function() {
register_taxonomy( ‘product_author’, ‘product’, array(
‘label’ => ‘Product Author’,
‘rewrite’ => array( ‘slug’ => ‘product-author’ ),
‘hierarchical’ => false,
‘public’ => true,
‘show_in_rest’ => true,
));
});
Once registered, a new Product Author menu item will appear under Products in your dashboard.
Step 2: Assign Authors to Products
- Go to Products → Product Author and create your author terms (e.g., “Jane Smith”, “John Doe”)
- Open any product, find the Product Author panel in the sidebar, and assign the relevant author
- Repeat for all products you want to be filterable by author
Step 3: Display the Filter Using a Widget
WooCommerce’s built-in Filter Products by Attribute widget works natively with any registered taxonomy.
- Go to Appearance → Widgets
- Add the Filter Products by Attribute widget to your sidebar
- In the widget settings, select Product Author as the attribute
- Choose your preferred display style — list, dropdown, or checkbox
- Save the widget
The Author filter will now appear in your sidebar and work automatically with the WooCommerce product loop.
Step 4: Display via Shortcode (Optional)
If you’re not using widgets, you can also output the filter directly on a page using the WooCommerce shortcode:
[woocommerce_layered_nav attribute=”product-author” show_counts=”true”]
Important: As with Method 2, always add custom code to a child theme or a dedicated custom plugin to avoid losing changes on theme updates.
Which Author Filter Method Fits Your Store Best?
Choosing the right method comes down to store structure, technical comfort, and how much flexibility the filter setup needs. Some stores need a quick no-code option, while others are better served by custom logic or a more taxonomy-based approach.
| Store Type | Best Method | Why It Fits |
| Marketplace Or Multi-Seller Store | Dynamic AJAX Product Filters Plugin | Gives a cleaner way to let shoppers browse products by seller without extra development |
| Store That Needs A No-Code Setup | Dynamic AJAX Product Filters Plugin | Keeps setup simpler and gives more front-end control without writing code |
| Developer-Led Custom Build | Custom Widget (PHP Code) | Offers direct control over query handling and template output |
| Store That Prefers Taxonomy-Based Filtering | Custom Taxonomy | Makes author filtering behave more like native WooCommerce term-based filtering |
| Small Store Testing Author-Based Browsing | Plugin First | Helps validate whether shoppers actually use author filters before moving into heavier customization |
How to Combine Author With Other Filters for Better Product Sorting?
Sorting products in a better way helps customers find exactly what they want without too much scrolling. When filters work together, it becomes easier to narrow things down. Author filters are great for special shops like bookstores or blogs. Here are some simple ways to set that up and make your shop smoother to use.
Use Global Setup
Start by making sure all your filters are created globally in your dashboard. This means they’re shared across products and not just added one by one. A global setup lets you manage filters better and combine them easily. It also keeps things clean behind the scenes, so filters don’t clash. This step is simple but really important before combining anything together.

Match Filter Logic
Filter combinations work based on how you set their logic. You can choose “AND” when both filters must match, or “OR” when either one is fine. For example, users can select Author A and a blue cover, or Author A or Author B. You can test both and see what fits your store best. The goal is to help users narrow down products fast without confusion.
Adjust Filter Style
Different filters need different display types for better results. Author filters work well in dropdowns or checkboxes, while attributes like color might look better as swatches. Picking the right layout makes things easier to scan and select. If your shop has more product options, combining a layout like swatches with a simple list keeps things neat and useful for the buyer.
Connect All Filters
After you add filters to your form, make sure they work together on the same page. Some plugins let you drag filters into one form and save the setup. Before going live, test everything on your shop page. While testing, if you already use options like attribute filter in WooCommerce, check that those filters blend smoothly with the author filter too.
Avoid Repeating Filters
Double-check that filters don’t repeat or clash. If two filters show the same thing in different ways, it may confuse visitors. Stick to one clear version of each filter, like author, color, or size. This makes the whole system easier to use. Clean filters look better and help people focus more on shopping instead of figuring things out.
When filters work well together, your site becomes more fun and useful. Customers can click, sort, and find what they need without any hassle. With just a little setup, your shop can feel faster and smarter right away. Give it a try and see the change.
Tips to Optimize Author Filters for SEO and Product Discoverability
Author filters can help shoppers reach the right products faster, but they need to be handled with some care. If the setup is messy, the filter may still work for users while creating thin pages, weak URL variations, or clutter that does not add much value to the store.
- Use Author Filters For Navigation First: Author filtering works best as a browsing tool, especially in stores where seller or creator identity matters during product selection.
- Keep Main SEO Value On Core Pages: Product pages, category pages, and dedicated seller pages should carry the stronger search value, not every filtered author view.
- Avoid Letting Low-Value Filter URLs Pile Up: Too many crawlable filter combinations can create duplicate or weak archive pages that add little search value.
- Show Clear And Recognizable Author Names: People are more likely to use the filter when the names feel familiar and easy to understand.
- Match Author Filters To Store Intent: This type of filter makes more sense in marketplaces, creator shops, and multi-seller stores than in a single-brand catalog.
- Support Product Discovery With Useful Filter Pairing: Author filters often work better alongside price, stock, or category filters, so shoppers can narrow results in a more practical way.
- Keep Filter Placement Easy To Spot: If the filter is buried or looks out of place, shoppers are less likely to use it, even when it could help them.
- Do Not Treat Every Filtered State Like A Landing Page: Most author-filtered views are there to help users browse, not to rank on their own in search.
- Apply The Same Thinking To Other Utility Filters: If you are also using something like a rating filter in WooCommerce, it should usually support product discovery on the page rather than create a large set of indexable filtered URLs.
- Review Filter Value Before Keeping It Live: If shoppers rarely use author filtering or it does not really help narrow the catalog, it may not deserve a prominent place in the filter set.
FAQs About Author Filters in WooCommerce
Once the setup side is handled, the next questions are usually about how author filtering fits into real store behavior. These are the kinds of things store owners often want to clear up before making the filter a bigger part of the shopping experience.
Can Author Filters Work Alongside Vendor Plugins Or Marketplace Setups?
Yes, in many cases they can, as long as the product ownership is tied to the right user account structure. What matters most is that the store setup keeps author data aligned with the seller or creator you want shoppers to browse by.
Should Every Seller Or Contributor Be Shown In The Filter?
Not always. In some stores, showing every author can make the filter feel crowded or less useful. It often works better to include only the sellers or creators who have enough products to make the filter worth using.
Can Author Filters Help Repeat Buyers Find Products Faster?
Yes, especially when customers come back looking for products from a seller or creator they already know. In that case, author filtering can shorten the path to familiar products without making them browse the full catalog again.
What Happens If An Author Leaves The Store Or Stops Publishing Products?
That usually depends on how the store manages old product ownership. Some stores keep the original author attached for consistency, while others reassign products to a different user to keep the filter cleaner and easier to manage.
How Do You Know If An Author Filter Deserves Space On The Page?
Usually, it comes down to whether people actually use it and whether it helps narrow products in a meaningful way. If it supports the way shoppers browse the store, it earns its place. If not, it can end up being just another filter people ignore.
Final Note
Author filters can make a lot of sense in the right kind of store. When people care who a product comes from, being able to browse by seller, creator, or contributor can make the catalog feel easier to use and a lot less frustrating to sort through.
That is really the value behind how to add filter by author in WooCommerce. It is about giving shoppers a simpler way to reach the products tied to the people they already trust or want to buy from. When the setup matches the way the store actually works, author filtering becomes genuinely useful instead of just filling space.