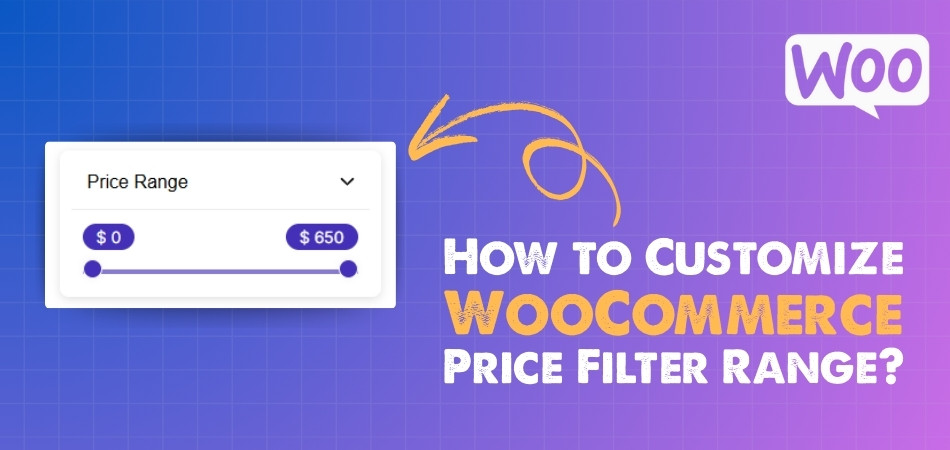
Price filters are a small but powerful part of online shopping. They let people quickly narrow down products based on budget, making browsing faster and easier. Many store owners often wonder how to customize WooCommerce price filter range.
Customize the WooCommerce price filter range by installing the Dynamic AJAX Product Filters plugin, setting product prices, enabling the price filter in the widget, choosing styles like sliders or input fields, and placing shortcodes to display it on your store pages.
If you are curious about setting filters that actually match your products and customers, this article explains everything in clear steps. You will learn about plugin setup, styling choices, display options, and why customization makes a big difference for online stores.
How to Customize WooCommerce Price Filter Range?
When running an online store, making it easier for visitors to find what they need is very important. One useful option is the price filter, which lets shoppers pick items within their budget. Let’s look at how to set it up in detail.
Needs of Plugin
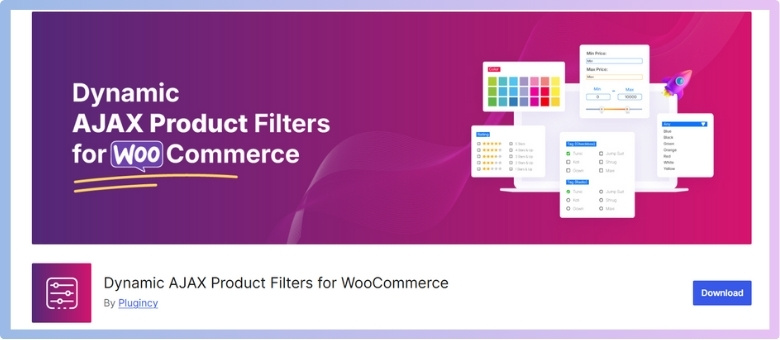
WooCommerce gives you a basic option to filter products, but it does not offer enough choices to fully customize the price filter. To make shopping easier and more user-friendly, you need a plugin that allows you to set, style, and control the price filter range. One such plugin is Dynamic AJAX Product Filters for WooCommerce. It comes in both free and paid versions, and it is simple to install and use. If you want more control, using a plugin is the best way to extend the default WooCommerce price filter and create a better shopping experience.
Step 1: Install the Plugin
There are two ways to install this plugin: the free version and the Pro version.
Free Version
- Log in to your WordPress Admin Dashboard.
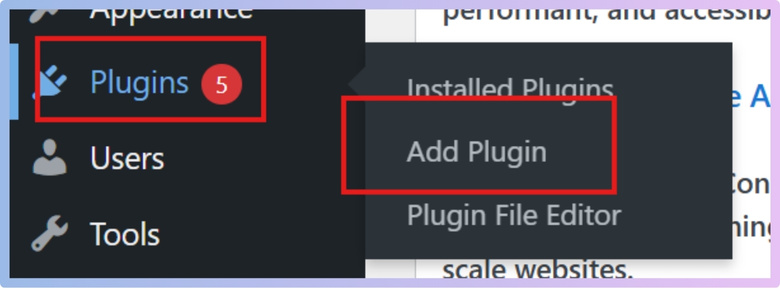
- From the left menu, click Plugins > Add New Plugin.

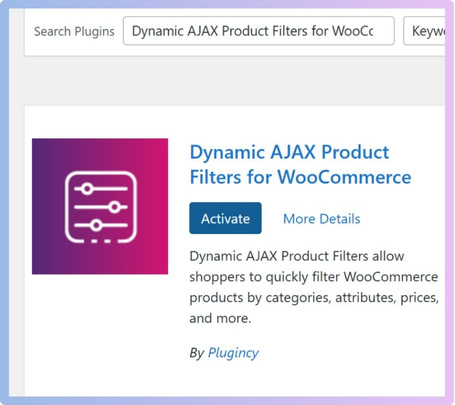
- In the search bar, type Dynamic AJAX Product Filters for WooCommerce.
- When it shows up, click Install Now.
- After installation, click Activate.

Now the free version is ready to use.
Pro Version
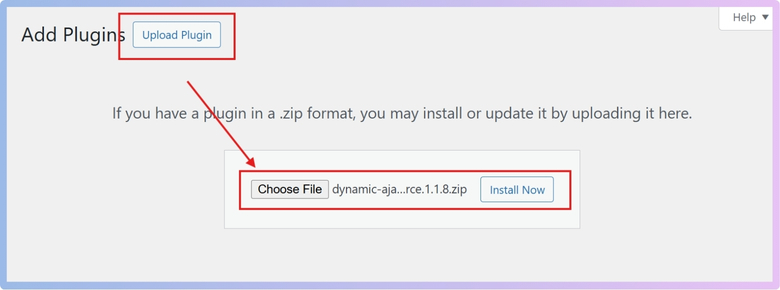
If you have purchased the premium version, here’s how you can install it:
- After purchasing, you will receive a ZIP file and a license key.
- In your dashboard, go to Plugins > Add New Plugin > Upload Plugin.
- Click Choose File, select the ZIP file, and click Install Now.

- Once installed, go to Product Filters > Plugin License.
- Enter your license key and activate it.

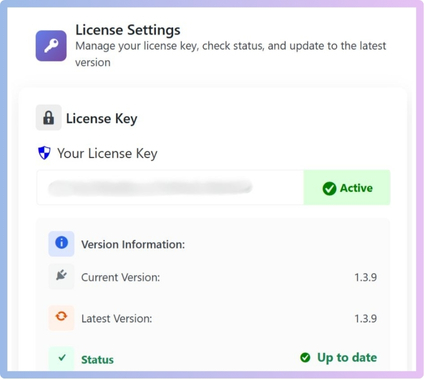
Now the Pro features are unlocked.
Step 2: Add Products and Set Prices for Price Filter
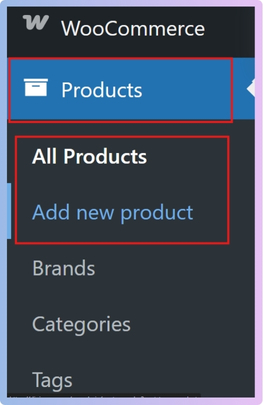
- In your dashboard, go to Products > All Products.
- Either edit an existing product or click Add New to create one.

- In the product edit screen, scroll to the Product data section.
- Enter the product price in the Regular price field.
- (Optional: Add a Sale price if needed).

- (Optional: Add a Sale price if needed).
- Click Update or Publish to save.
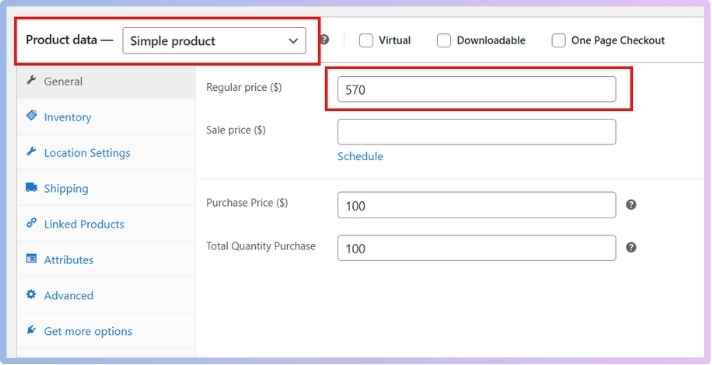
This ensures your products have prices that the filter will use.
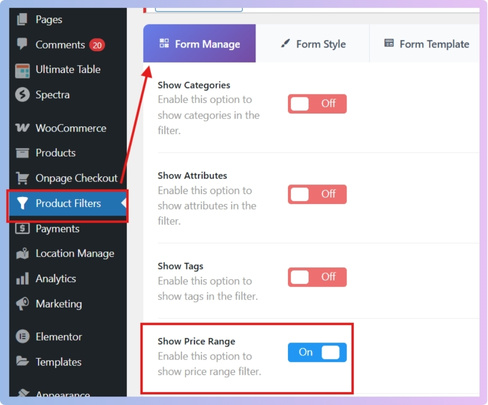
Step 3: Manage Price in the Filter Widget
- Go to Product Filters > Form Manage.
- Find the option Show Price Range.
- Turn it ON to display the price filter in the widget.
- Turn it OFF if you don’t want it displayed.

Step 4: Style and Customize the Price Filter
When you go to Product Filters > Form Style and choose Price from the dropdown.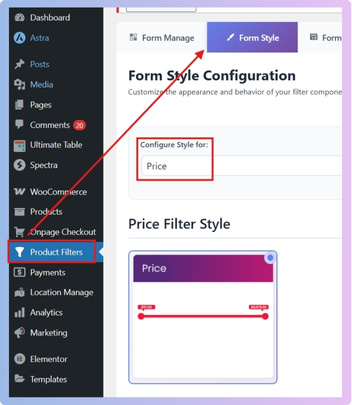
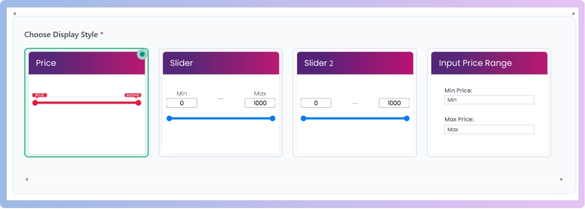
After selecting the price option, now click on Price Filter Style, and you will see a few style options. Here is what they mean:
- Price
- This option shows a simple list of price ranges.
- For example, it might display ranges like:
- $0 – $50
- $51 – $100
- $101 – $200
- Shoppers can click one of these ranges to filter products within that price range.
- It’s the most basic option and works well if you want a quick, no-fuss filter.
- Slider
- This option shows a sliding bar with two handles that users can drag left or right.
- Customers can set the minimum and maximum price by sliding the handles.
- For example, if your product range is from $10 to $500, someone can drag the handles to only see products between $100 and $300.
- This is very interactive and user-friendly because shoppers can set the exact range they want.
- Input Price Range
- This option shows two empty boxes where shoppers can type the exact price range they want.
- For example, they can type:
- Minimum Price: 75
- Maximum Price: 250
- It’s best for people who know the exact numbers they want and don’t want to scroll or slide.
- This gives full control, but it requires users to type, which some may find less convenient.

Step 5: Display the Price Filter on Your Website
- Go to the page where you want the filter to appear.
- Add this shortcode:
“plugincy_filters”
(This will show the filter). - If you also want to show products, add this shortcode:
“products” - Remember: always use square brackets [ ], not quotation marks.
- You can place these shortcodes in a sidebar widget or directly in a page content area.
With these steps, you can set up and customize the WooCommerce price filter using the Dynamic AJAX Product Filters plugin. Whether you use the free or Pro version, these tools give shoppers a smooth way to shop by price.
Why Should You Customize the Price Filter Range in WooCommerce?
Customizing the price filter range in WooCommerce can make your online store feel simpler and useful. It helps shoppers find products within the prices they are interested in, without wasting time. Let’s look at why this matters more.
Better Shopping Experience
When the price filter matches your products well, customers can quickly set a range that makes sense. They do not have to scroll through too many options or struggle with confusing price steps. This makes the whole shopping process smoother and more enjoyable.

Focus on the Right Buyers
Different stores target different groups of people. If you sell affordable products, showing filters starting at very high prices does not make sense. By setting the filter properly, you focus on the buyers who are most likely to purchase.
Avoid Irrelevant Options
Sometimes, default filters create price ranges that do not fit your products at all. For example, a shop selling only low-cost items may still show a filter option for high prices. Customizing helps you remove these irrelevant ranges and keep things clear.
Highlight Popular Ranges
Many customers have a set budget when they shop. You can adjust the filter to highlight price ranges that match the most common budgets in your store. This way, people find what they want faster and are more likely to buy.
Increase Conversions
A smooth filter system can help turn visitors into buyers. When shoppers see the right price options, they do not feel confused or lost. This small step improves their experience and can lead to more completed purchases in your store.
Customizing the price filter range is not just a design choice. It plays an important role in making shopping easy, keeping customers interested, and improving sales results.
How Do You Set Minimum and Maximum Price Ranges in WooCommerce?
Price filters are very useful in online stores because they let customers quickly narrow down products within a certain budget. Instead of scrolling through endless lists, people can set their own price limits. If you want to set custom price ranges, here’s how you can do it step by step.
Add Price Filter
Start by going to your Dynamic Ajax Product Filters Plugin. From here, add a price filter. This filter is the part that controls how price limits are shown to customers. Without adding this, you cannot move forward to adjust custom price settings.
Open Form Style
Once you have added the price filter, head to the section called Product Filters. Inside this, click on Form Style. This is where you manage the design and behavior of your filters. Opening Form Style helps you reach the right settings area.
Select Filter Style
Inside the Form Style section, choose the price filter and then select the filter style. Many store owners prefer using a slider price filter in WooCommerce because it allows customers to easily drag and set their preferred minimum and maximum ranges. It makes the filter more user-friendly.
Use Optional Settings
Now scroll down until you see a box called Optional Settings. In this box, you’ll notice that the option Set Min & Max Price is turned to auto by default. That means the system chooses the range for you automatically, but you can switch this off.
Set Custom Range
To use your own custom price range, simply turn off the auto option. After doing this, you’ll see two input fields appear: Min Price (Minimum) and Max Price (Maximum). Enter your desired amounts in these fields, then click Save Changes. That’s all it takes.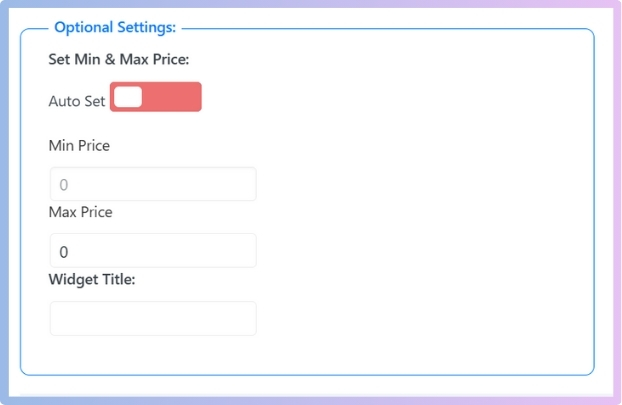
By following these steps, you can set the price range exactly how you want. This gives you more control and makes it easier for customers to shop within their budget.
How Do AJAX-based Price Filters Handle Customized Ranges?
Shopping online often feels easier when we can filter products by price. A slow filter can make the process tiring and less enjoyable. AJAX makes this faster by updating results instantly. Keep reading to see how it improves custom price filters.
Instant Results
Selecting a specific range triggers AJAX to quietly send the request to the server without reloading the full page. The server then sends back only the updated list of products. This fast response saves time and makes shopping smooth for everyone.
Smooth Process
Instead of refreshing the whole page, AJAX changes only the product section. The rest of the page stays exactly the same without interruptions. This avoids waiting screens and provides quick results, making the browsing and filtering process more enjoyable.
Flexible Input
Shoppers can easily enter or slide their own price choices. AJAX then uses that exact range to fetch matching products instantly. Wide or narrow selections update without extra effort, giving more freedom to adjust the results as many times as needed.
Reduced Load
By refreshing only parts of the page, AJAX lowers heavy requests. This makes the system work faster, even with many users online. Servers handle less data at once, which helps deliver filtered results quickly and keeps everything stable during busy times.
User Control
Having the power to change many times is important. AJAX ensures each change instantly updates the list without delay or confusion. Users feel confident when they see results quickly, making it easier to decide and move forward with purchases.
AJAX makes online shopping faster by showing filtered results instantly. Price filters become smoother and work well with custom ranges. Shoppers feel more control while browsing with quick changes and updates. This creates a simple and friendly experience for every user.
What Role Does Theme Compatibility Play in Customizing Price Filter Ranges?
When you customize price filter ranges in WooCommerce, the theme you use can make a big difference. Some themes give you wide control and flexibility, while others keep things limited and harder to adjust. Let’s look deeper into this.
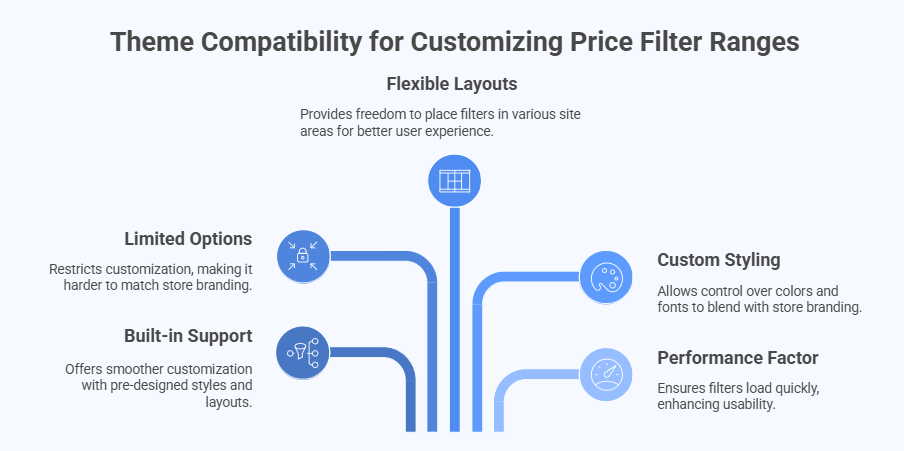
Built-in Support
Some WooCommerce themes are designed with built-in support for price filters. This means they already include styles and layouts that make the filter look neat and easy to use. These themes usually make customization smoother because you don’t have to fight with the design.
Limited Options
Not all themes are flexible. Some restrict how far you can customize your price filters. For example, they might not allow changes in the slider design, range style, or filter placement. This can make it harder to match the filter with your store’s look.
Flexible Layouts
A theme with flexible layouts gives you more freedom to place your price filter in different parts of the site. You could put it in the sidebar, above products, or in custom areas. This flexibility helps you create a smoother shopping experience.
Custom Styling
Themes with custom styling support let you control colors, fonts, and shapes of the filter bar. This allows the filter to blend with your store’s branding. Without this option, the filter may look out of place or basic compared to the rest of the site.
Performance Factor
Some themes are optimized for speed and handle filters more efficiently. A theme that loads filters quickly keeps users happy and encourages them to keep browsing. Slower or poorly coded themes may make filters lag, which hurts usability.
Theme compatibility plays a big role in how far you can go with customizing price filter ranges. Picking the right theme makes the process easier, gives more control, and improves your store’s overall look and performance.
What Common Problems Do Store Owners Face When Customizing Price Filter Ranges?
Price filters make shopping easier, but many store owners face different problems when they try to set custom ranges. These issues can affect how products show up and how smooth the shopping experience feels. Let’s look at the most common ones in detail.
Wrong Price Range
Sometimes the price filter shows ranges that do not match the real prices of products. This can confuse buyers when they see empty results or mismatched items. The problem often happens due to an outdated cache or settings that were not updated properly.
Slider Not Working
Many owners complain that the filter slider does not move or respond as expected. If sliders don’t work as expected or ranges don’t display correctly, knowing how to troubleshoot WooCommerce price filter issues can save time and keep your store running smoothly.
Slow Page Loading
When the price filter is not optimized, it can slow down the entire page. This usually happens when the filter has to load too many products at once or when the store uses a heavy theme that adds extra load on the filter.
Empty Results Shown
A common problem is when the filter shows no products even though items exist in that price range. This often happens if products are missing proper price data or the filter is not syncing well with the product database.
Theme or Plugin Conflict
Not all themes or plugins are built to work smoothly with price filters. Sometimes another plugin overrides the filter function, or the theme does not support it well. This can lead to display issues, broken filters, or unexpected behavior.
Price filters are a useful feature, but small problems can create big trouble for store owners. By keeping an eye on these issues, you can fix them quickly and give shoppers a better experience.
FAQs About How to Customize WooCommerce Price Filter Range
Customizing WooCommerce price filter range is a smart way to improve how shoppers browse your store. Many people have questions about setting up, adjusting, and using these filters. To make things simple, here are some common questions with clear answers.
How Can You Add a Price Filter Without Using a Plugin?
WooCommerce, by default, has a basic price filter widget that you can enable from the Widgets section in your WordPress dashboard. This filter does not give you many advanced features, but it can still help customers narrow down results. If your store has only a few products, this simple filter might be enough. For advanced control, you will still need a plugin later.
What Is the Best Place to Show the Price Filter on a Website?
The best place to add a price filter is usually in the sidebar or near the product listing area. This way, visitors can quickly see and use it without scrolling too far. You can also place it above the products for faster visibility. The goal is to keep it easy to find and simple to use.
Can Price Filters Work Together With Other Product Filters?
Yes, price filters can work along with other filters like categories, colors, or sizes. This helps customers refine their search step by step. For example, someone can first select a category like “Shoes” and then set a price range. Using filters together makes shopping more accurate and quicker.
Do Price Filters Work on Mobile Devices Smoothly?
Most price filter plugins are designed to work well on mobile devices. The slider or input boxes adjust to small screens, making them easy to use with fingers. If a theme is not mobile-friendly, the filter may look messy. This is why choosing a responsive theme is very important.
How Can You Test If the Price Filter Is Working Correctly?
After setting it up, try filtering products using different price ranges yourself. Make sure the results show products that actually match those prices. You can also ask a friend to test it on their device. Regular testing ensures that the filter works as expected for all customers.
Can You Set Different Price Filters for Different Categories?
Yes, some advanced plugins let you create separate price filters for specific categories. For example, you can set lower ranges for “Accessories” and higher ranges for “Electronics.” This helps match the filter to the actual product prices in each category. It gives shoppers more accurate results.
How Do Price Filters Affect Search Engine Optimization?
A well-structured price filter can improve user experience, which indirectly supports SEO. If visitors find products faster, they are more likely to stay longer on your site. Longer visits and smooth navigation send positive signals to search engines. While filters don’t directly boost SEO, they improve store usability.
Can Price Filters Show Products in Order From Low to High?
Yes, many price filter tools come with sorting options that let shoppers view products from lowest to highest price or the other way around. This feature is different from the filter itself, but it works well with it. Customers often use both filtering and sorting together. This helps them compare products more effectively.
How Can Store Owners Track If Price Filters Are Helping Sales?
You can track filter usage through analytics tools or plugins that record customer activity. These tools show how often customers use the filter and whether they end up buying products. If sales increase after adding filters, it means they are working. Regular tracking helps store owners improve their filters further.
Do Price Filters Slow Down a Website?
Price filters usually do not slow down a site if they are set up correctly. Problems happen when a site has too many heavy plugins or a theme that is not optimized. AJAX-based filters are faster because they only reload the product area instead of the full page. Choosing the right plugin and theme keeps the website fast.
Conclusion
Customizing the WooCommerce price filter range is more than just adding a tool to your store. It’s about making shopping easier, faster, and more enjoyable for your visitors. A well-set filter range guides them straight to products that fit their needs.
So, how to customize WooCommerce price filter range? The answer is simple: install a plugin like Dynamic AJAX Product Filters, add products with proper prices, choose your preferred filter style, and adjust the settings to fit your store’s needs.
As a final note, always test your filter after setup, keep your products updated with correct prices, and ensure your theme works well with the plugin. These small steps will give your shoppers a smooth experience. Best of luck with your store setup!