A size filter is one of the most helpful tools in any online store because it lets shoppers find the right fit quickly without checking every product. If you are running a WooCommerce shop, you might be wondering how do I add a WooCommerce size filter to my store?
Add a WooCommerce size filter by installing the Dynamic AJAX Product Filters plugin, creating a “Size” attribute with terms like S, M, L, assigning sizes to products, enabling the filter in settings, and using the shortcode [plugincy_filters] to display it on your shop page.
Do you want to know how to set up this plugin, create size attributes, and display them on your store so customers can filter products easily? If yes, then keep reading because this article explains every step you need to understand the topic completely.
How Do I Add a WooCommerce Size Filter to My Store?
Adding a size filter in WooCommerce can make shopping easier for visitors. They can quickly select their size without going through every product. To do this, we can use a plugin that helps with more options. Let’s break it down step by step.
Step 1: Install the Plugin
A plugin is like an extra tool that you add to your WordPress site. It gives your store more features and makes it easier to manage things. To add a size filter, you will need a plugin that helps customers pick product options without reloading the whole page. For this setup, we will use the Dynamic AJAX Product Filters plugin. Adding a WooCommerce size filter like this makes shopping more user-friendly because buyers can quickly find the exact product size they want.
This plugin has both free and paid versions. Here’s how you can install both.
Free Version
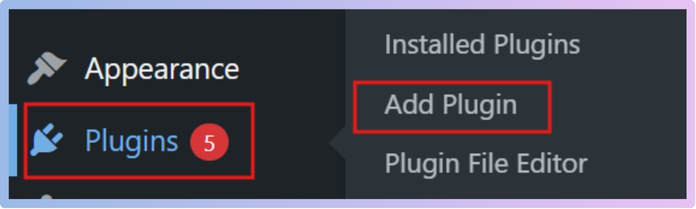
- Log in to your WordPress Admin Dashboard.
- Go to Plugins > Add New Plugin.

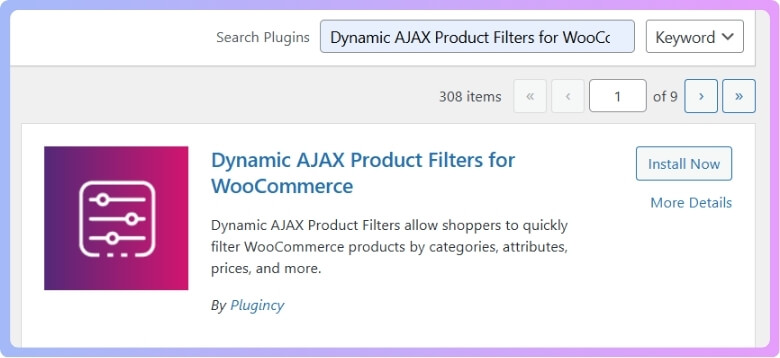
- In the search bar, type Dynamic AJAX Product Filters for WooCommerce.

- Click Install Now.
- After installation, click Activate so the plugin starts working.
Paid Version
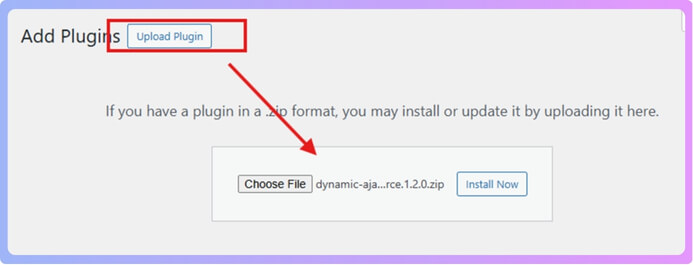
- Download the plugin ZIP file from the WordPress plugin directory or the official website.
- In your dashboard, go to Plugins > Add New Plugin.
- Click Upload Plugin.
- Select the ZIP file you downloaded.
- Click Install Now, then click Activate.

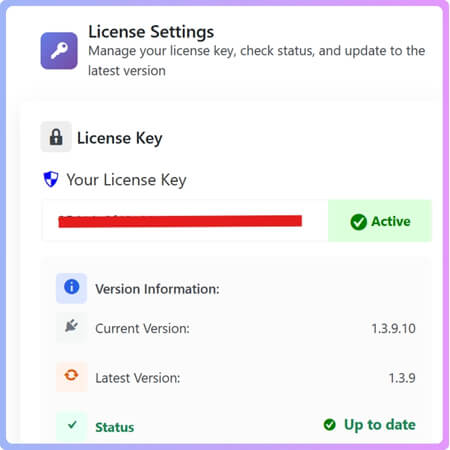
Premium Version Activation
If you bought the premium version, you will also get a license key.
- Go to Product Filters > Plugin License in your dashboard.
- Paste the license key in the box.
- Save it, and the premium features will be unlocked.

Step 2: Create Attributes and Terms
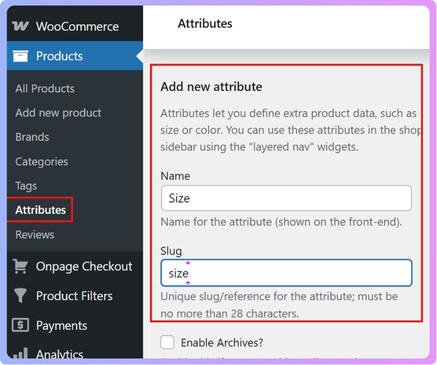
Create a New Attribute
- Go to Products > Attributes in the WordPress dashboard.
- In the Add new attribute section:
- Name: Type “Size.” This is the attribute name that will show up.
- Slug: Type “size.” A slug is just a short version used in the system.
- Click Add Attribute.

Add Terms for the Attribute
Now that the Size attribute is created, you need to add the actual sizes.
- Look to the right and find your “Size” attribute.
- Click Configure terms.
- In the Add new term section:
- Name: Type a size, like “S.”
- Slug: Type a short version, like “s.”
- Click Add New Term.
- Repeat this for all sizes you want, for example: S, M, L, XL, XXL, or even shoe sizes like 37, 38, 39, 40.


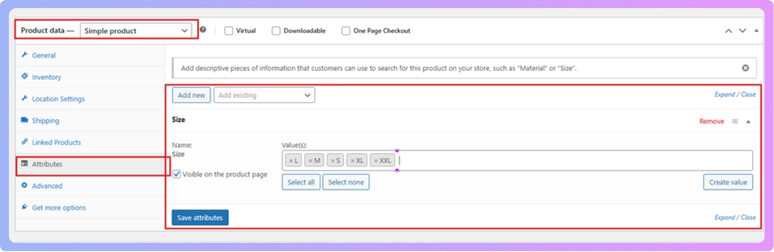
Step 3: Assign Attributes to Products
- Go to Products > All Products.
- Select a product to edit or create a new one.
- Scroll down to the Product data section.
- Click the Attributes tab.
- From the dropdown, select your attribute (Size) and click Add.
- Check the boxes for the sizes that match this product (for example, M, L, XL, XXL).
- Click Save attributes.

- Finally, click Update (for an existing product) or Publish (for a new one).
This links your products with the size options.
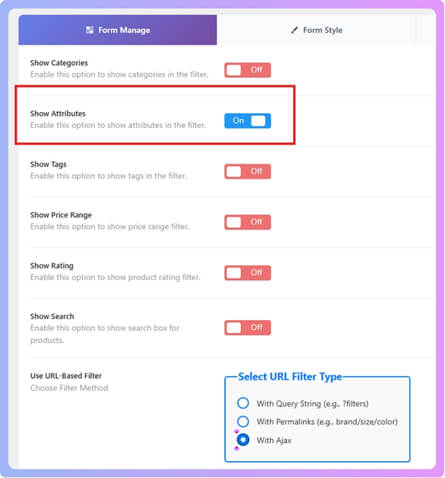
Step 4: Manage Attributes in the Filter Form
- In your dashboard, go to Product Filters > Form Manage.
- Look for the Show Attributes option.
- Turn this on or off depending on whether you want the attribute (Size) to appear in the filter widget.
- For a smoother experience when visitors filter products, click the With Ajax option. Ajax makes the page reload instantly without refreshing the whole page.

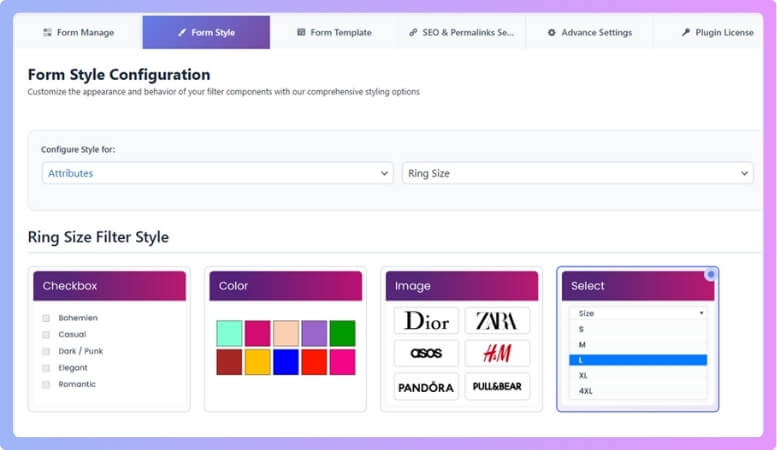
Step 5: Style and Customize the Attribute Widget
- Go to Product Filters > Form Style in your dashboard.
- In the Select Attribute dropdown, choose “Size.”
- Pick one of the available styles for how the filter will look:
- Checkbox
- Color
- Image
- Select (dropdown)

- Based on what you choose:
- If you pick Color, you can set a color for each size term.
- If you pick Image, you can upload an image for each size term.
- When you’re done, click Save to apply your changes.
Step 6: Display the Filter on Your Store Page
Now you need to place the filter where your customers can see it.
- Go to the page where you want the filter to show.
- Insert the shortcode
[plugincy_filters]where you want the filter box to appear. - If you also want to display products on the same page, add “products”.
You can put the filter in:
- A sidebar widget (so it’s always visible on the side), or
- Directly in the page content.
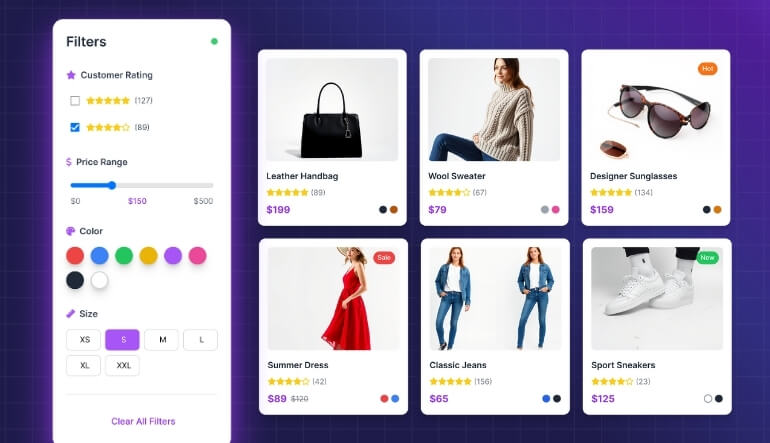
Once all steps are done, your store visitors will see the Size filter. They can choose their size, and the products will update instantly using the Dynamic AJAX Product Filters plugin.
Why Is a Size Filter Important in WooCommerce Stores?
Online shoppers usually want products that fit them perfectly, but a store with hundreds of items can feel overwhelming without the right options. A size filter removes that confusion and makes it easier for customers to find what they need. Before exploring its specific benefits, let’s understand why this feature plays such a key role in every WooCommerce store.
Quick Search
Size filters let shoppers skip the long scrolling and go straight to the products in their size. Instead of checking every item one by one, they can see only the ones that fit them. This saves time and keeps the shopping process smooth and stress-free.

Better Experience
When buyers find what they need quickly, they are more likely to enjoy their shopping. A smooth shopping experience makes people trust the store more. It also encourages them to come back again because they know it is easy to find the right product.
Right Fit
Buying the wrong size often leads to returns and exchanges. With a size filter, customers can select their exact size and avoid this issue. This gives them more confidence in their purchase and reduces the chances of buying something they can’t use.
Fewer Abandoned Carts
Many people leave their carts because they can’t find the right size or it takes too long. Size filters solve this by showing available options quickly. When buyers see their size in stock, they are more likely to complete the checkout process.
Higher Sales
Stores that make shopping easier usually see more sales. Size filters make customers happy, reduce returns, and help them buy faster. When people can easily find and buy what fits, they spend more and trust the store for future needs.
Adding a size filter is a simple step that makes shopping faster, easier, and more enjoyable. It not only helps customers but also increases sales and reduces cart abandonment for online stores.
Where Should You Place the Size Filter for Best Results?
Customers want the right size fast, and the filter’s placement makes all the difference. A visible size filter guides buyers directly to suitable products. If positioned well, it saves time, builds trust, and encourages shoppers to complete their purchase without frustration. Let’s look at some simple locations where a size filter works best.
Sidebar Placement
The sidebar is one of the most common places to add a size filter. It stays visible as shoppers scroll through different products. This makes it easy for them to click and filter without losing focus. Placing it in the sidebar or at the top of the shop page highlights the benefits of using size filter in a WooCommerce store, as it makes shopping smoother for customers.
Top Menu
Adding the size filter to the top menu works well for quick access. It helps customers apply filters before even scrolling down the product list. This is especially useful when there are many products in the store. Keeping it at the top also sets a neat structure.
Product Pages
Placing a size filter directly on product pages can help customers check availability right away. They can see if their size is in stock without browsing back and forth. This saves time and makes the shopping experience less frustrating. It also reduces the chances of cart abandonment.
Shop Page
The shop page is where customers spend most of their time looking through items. Having the size filter there ensures it gets maximum attention. When filters are clear on the shop page, customers can refine results instantly. It also reduces endless scrolling for items that may not fit.
Mobile View
Many people shop using their phones, so having the filter easily accessible on mobile is important. A dropdown or expandable option for the size filter works well. It does not take up too much space, but it still allows shoppers to use it quickly.
Placing the size filter in the right spot helps customers shop faster and with less effort. Whether it is in the sidebar, top menu, or product pages, the key is keeping it easy to see and simple to use.
Can WooCommerce Size Filter Work With Other Filters?
Yes, the WooCommerce size filter can work alongside other filters such as brand, color, price, or category. This combination gives shoppers more control and makes product searches faster. Together, these filters create a smoother shopping experience that leads to better engagement and higher sales. To understand how this works in practice, let’s look at some common filter combinations:
Size and Price
Using size filters with price filters helps shoppers stay within their budget while still finding the right fit. Someone may want a medium shirt but not spend more than a set amount. This combination saves time and keeps the shopping experience smooth.
Size and Color
When combining different filters, store owners often use WooCommerce size filter variations alongside price or color filters to create layered navigation. For example, customers looking for shoes may want size 9 in red. This pairing makes results more accurate.
Size and Brand
Many shoppers are loyal to specific brands. Combining size and brand filters makes it easier to find items that match both preferences. Customers can pick their favorite brand, then narrow down to the size that suits them. This avoids endless browsing.
Multiple Filters Together
Layered navigation allows several filters to work at the same time. Shoppers can combine size, color, brand, and price without confusion. Each choice narrows the results step by step. This creates a clear path toward finding the exact product quickly.
Benefits for Stores
For store owners, combining size filters with others improves user experience and sales. It reduces bounce rates since customers can find what they want faster. A smart filter setup makes the store look more professional and keeps buyers coming back.
Size filters can easily work with price, color, and brand filters in a layered navigation system. Together, they help customers shop faster, make better choices, and enjoy a smooth buying experience.
How Do Ajax Filters Improve WooCommerce Size Filter Performance?
Online shoppers expect speed and clarity while browsing. For clothing stores, size is often the first detail they check. If filters feel slow or confusing, buyers may leave without purchasing. Ajax filters provide instant results, keeping the shopping experience smooth and frustration-free.
Here are some simple ways Ajax filters improve WooCommerce size filter performance:
- Instant updates: When someone picks a size, the products appear right away without waiting for the entire page to reload. This saves time and keeps them interested.
- Smooth shopping experience: Instead of the page flashing or reloading, only the product section changes. This makes shopping feel more natural and less distracting.
- Less server load: Since only the product area updates, the website does not have to reload every image, script, or design, which makes it run faster.
- Better for mobile users: On phones, slow loading can be frustrating. Ajax filters reduce waiting and make it easier for people to keep browsing.
- Keeps people engaged: Quick results mean customers can try different-sized filters easily. They do not lose patience while exploring other available options.
- Helps find the right fit quickly: By instantly showing products in the chosen size, customers avoid wasting time scrolling through items that will not fit.
- Improves chances of sales: A fast and simple size filter makes people more likely to stay on the site, pick something they like, and complete the purchase.
In short, Ajax filters give customers a faster and smoother way to shop. They make filtering by size simple, quick, and more enjoyable, which helps both the shoppers and the store.
FAQs About How Do I Add a WooCommerce Size Filter to My Store?
Adding a size filter can make your store easier to use, but you may still have some questions about setup and extra details. Below are answers to common questions that store owners often ask. These will help you understand the process better.
Can I Use a Size Filter Without Coding Knowledge?
Yes, you can use a size filter without knowing coding. Most plugins, like Dynamic AJAX Product Filters, are designed with simple steps. You just need to install, activate, and configure the options in your WordPress dashboard. This makes it beginner-friendly and easy for anyone to set up.
Does a Size Filter Work With Variable Products?
Yes, size filters work well with variable products in WooCommerce. If you sell items like T-shirts or shoes in different sizes, the filter helps customers choose the right fit quickly. You just need to create attributes and assign them to products. Once done, the filter will show only the correct results.
Can I Show Different Sizes for Different Products?
Yes, you can assign different size options to different products. For example, clothing may have sizes like S, M, and L, while shoes may have numbers like 38, 39, and 40. You can manage this by adding terms for each attribute. This keeps the filter results accurate for each type of product.
Do Size Filters Work With WooCommerce Themes?
Most size filter plugins are built to work with popular WooCommerce themes. If your theme follows WordPress standards, the filter will display correctly. Some themes may need small adjustments, which can be done from the plugin settings. Always test it after setup to confirm it looks good.
Can I Place Size Filters on Multiple Pages?
Yes, you can place size filters on more than one page. Many store owners add them to the shop page, category pages, and sidebars. You just need to use the shortcodes or widgets provided by the plugin. This ensures customers can use the filter anywhere they browse.
Do Size Filters Slow Down My Website?
Good plugins like Dynamic AJAX Product Filters are built to be fast. They use Ajax to load results without refreshing the whole page. This means your site stays quick even when filters are applied. If you use too many heavy plugins, then performance could slow down, so keep your setup simple.
Can I Customize the Look of the Size Filter?
Yes, most plugins let you style your size filter. You can change how it looks by using checkboxes, dropdowns, or even images. This allows you to match the filter design with your store theme. A well-designed filter makes your shop look more professional.
Will the Size Filter Work on Mobile Devices?
Yes, size filters work on mobile devices. Many plugins create mobile-friendly filters that adjust to smaller screens. Some use dropdowns or expandable menus to save space. This makes it easy for mobile shoppers to use the filter without any problem.
Is It Possible to Track Which Sizes Are Most Popular?
Yes, you can track popular sizes with analytics tools or reporting plugins. By checking which sizes are clicked or sold the most, you can plan your stock better. This helps you avoid running out of common sizes. It also improves customer satisfaction since their preferred sizes are available.
Can I Translate Size Filters Into Other Languages?
Yes, many size filter plugins support translation. If your store serves customers in different countries, you can use translation plugins like WPML or Loco Translate. This lets you show size filters in local languages. It makes your store more friendly to global customers.
Conclusion
Adding a size filter in WooCommerce is a smart way to make shopping easier and more enjoyable for your customers. It helps people quickly find products that match their needs, while also reducing frustration and encouraging them to complete their purchase.
If you are asking, how do I add a WooCommerce size filter to my store? The answer is simple. You can install a plugin like Dynamic AJAX Product Filters, set up attributes such as sizes, assign them to products, and display the filter on your store pages.
Before wrapping up, remember to test your size filter on both desktop and mobile so it looks good everywhere. Keep the placement clear, use simple styles, and combine it with other filters for better results. Best wishes for building a smooth shopping experience.