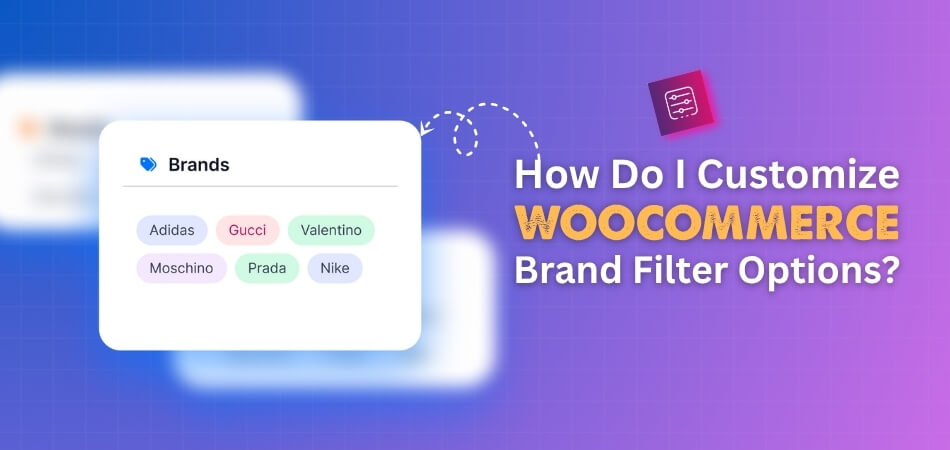
Brand filters are one of the most useful tools in any online store because they let shoppers focus only on the brands they want. Many people want their favorite labels to stand out clearly when they browse. It is common for store owners to wonder how do I customize WooCommerce brand filter options.
Customize WooCommerce brand filter options by installing Dynamic AJAX Product Filters, enabling the brand filter, selecting a style like checkbox, image, or dropdown, and adjusting settings like title, max height, or single selection. Save changes to display the custom filter on your store.
Readers often like to explore how filters can improve both design and the customer shopping experience. This article explains installation, enabling options, styling choices, placement, and the benefits of customization. By reading further, you will discover every key detail needed to set up brand filters the right way.
How Do I Customize WooCommerce Brand Filter Options?
Customizing the WooCommerce brand filter helps shoppers find items faster. It allows you to control how brand choices appear on your store. With the right changes, customers can filter products in a way that feels natural. This makes shopping easier and gives a better buying experience.
1. Installing the Plugin
Before you start customizing brand filters, you need a plugin that can handle it. One of the best options is the Dynamic AJAX Product Filters for WooCommerce, which lets you add advanced filtering without much coding. It is simple to use and offers both a free and a pro version depending on your needs. Once installed, you can easily enable and style brand filters to match your store. Choosing a reliable WooCommerce product filter plugin ensures customers can quickly find what they want, improving their shopping experience and boosting sales.
Let’s see how to install the plugin:
Free Version
- Go to your WordPress Admin Dashboard.
- Click on Plugins from the left menu.
- Select Add New Plugin.

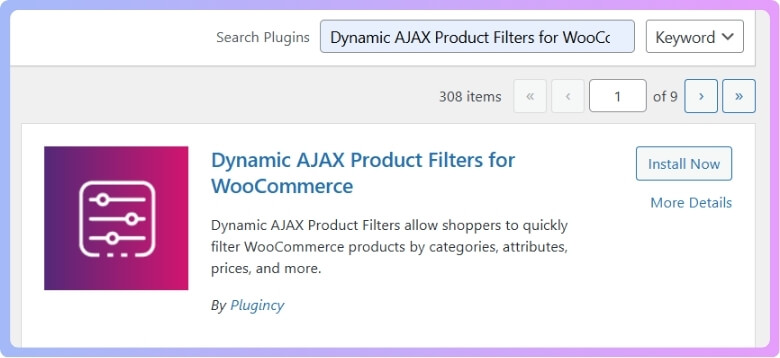
- In the search bar, type Dynamic AJAX Product Filters for WooCommerce.

- When you see it, click Install Now.
- After installation, click Activate.
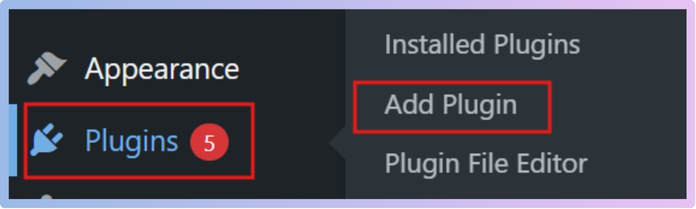
That’s it. The free version is now ready.
Pro Version
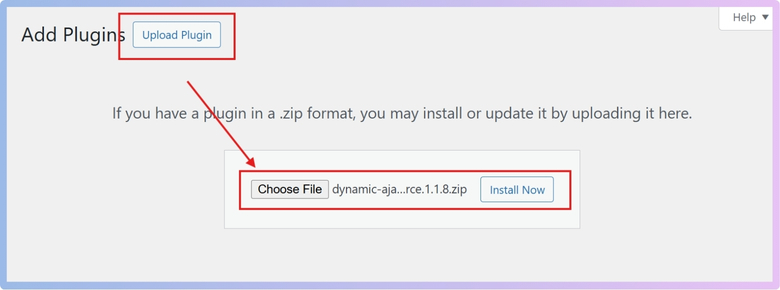
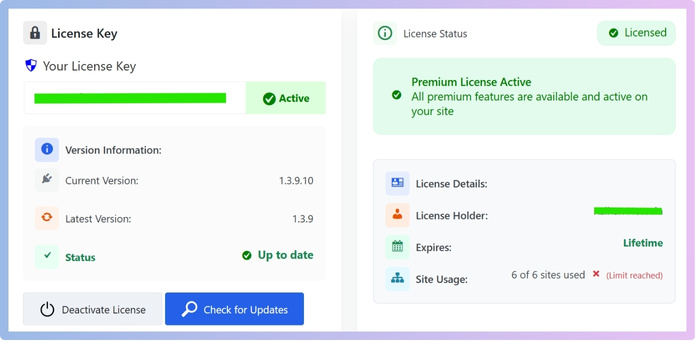
If you buy the Pro version, you’ll get a ZIP file and a license key.
- Go to your WordPress Dashboard.
- Click Plugins.
- Select Add New Plugin.
- Click Upload Plugin.
- Choose the plugin ZIP file you downloaded.
- Click Install Now.

- After it installs, click Activate.
- Go to Product Filters > Plugin License.
- Paste the license key you received.
- Click Activate License.

Now the Pro features are available.
2. Enabling the Brand Filter
After installation, you must enable the Brand filter before customizing it.
- Go to Product Filters > Form Manage in your dashboard.
- Look for the option Show Brand.
- Turn it ON.

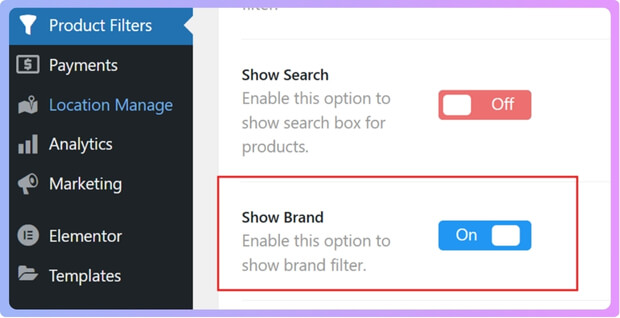
This step is important. If you don’t enable it, the brand filter won’t show up in your store.
3. Customizing the Brand Filter
Once the brand filter is enabled, you can style it.
- Go to Product Filters > Form Style.
- From the dropdown menu, choose Configure Style.
- Select Brands.

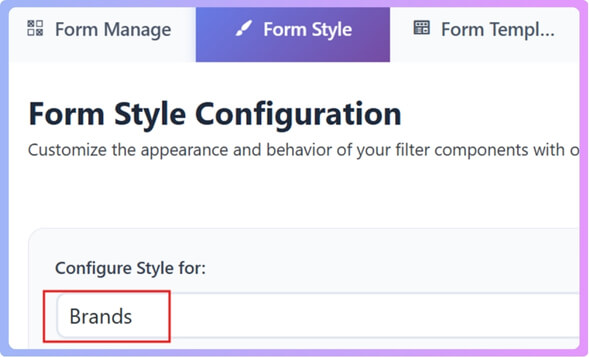
Now you’ll see the Brand filter style options
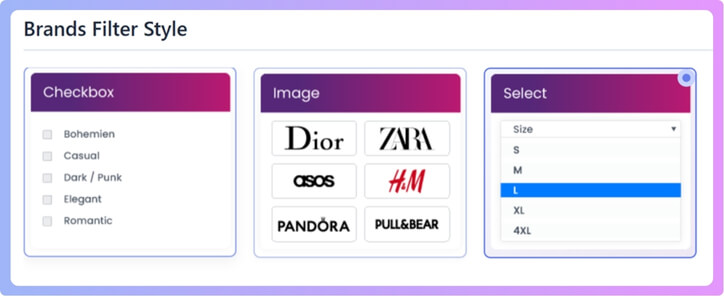
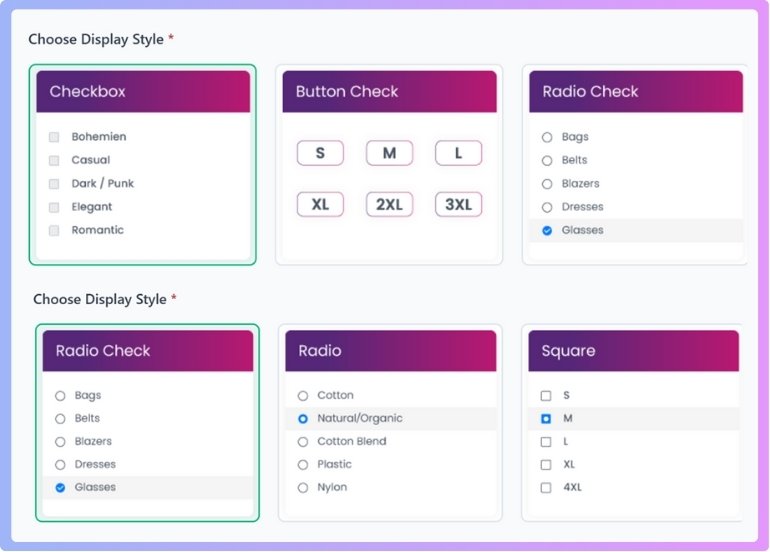
Available Filter Styles
There are 3 main styles for brand filters.
1. Checkbox Style
Here you’ll find 6 variations:
- Checkbox – simple checkboxes.
- Button Check – looks like buttons you can check.
- Radio Check – checkboxes but styled like radio buttons.
- Radio – classic radio button style.
- Square – square-shaped options.
- Checkbox Hide – hides the options until clicked.

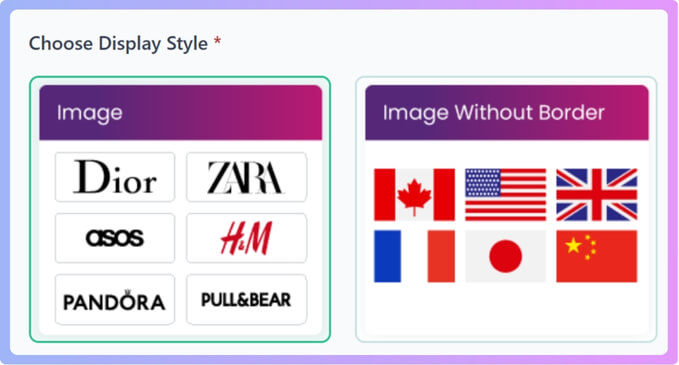
2. Image Style
Here you have 2 variations:
- Image – shows brand logos or images.
- Image without border – same as above but no border around images.

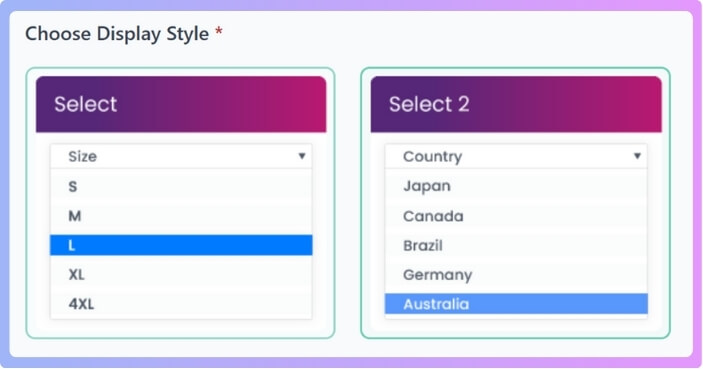
3. Select Style
Here you have 2 variations:
- Select – simple dropdown box.
- Select 2 – advanced dropdown box with better styling.

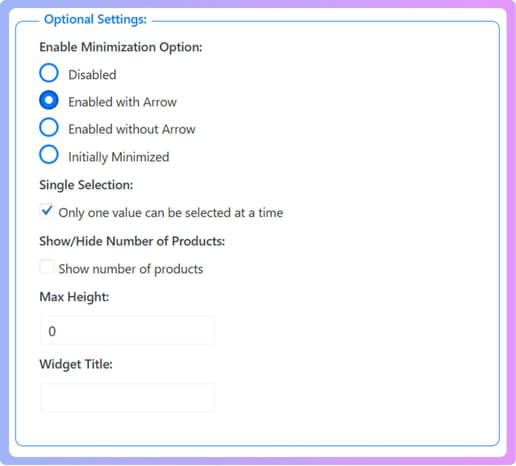
4. Extra Optional Settings
These settings help you control how the filter looks and works.
- Enable Minimization Option
- Disabled (always open)
- Enabled with Arrow (users can expand/collapse with an arrow)
- Enabled without Arrow (expand/collapse without arrow)
- Initially Minimized (starts closed and expands when clicked)
- Single Selection
- If turned on, users can only choose one brand at a time.
- Show/Hide Number of Products
- If enabled, it shows how many products are available under each brand.
- Max Height
- You can set a maximum height for the filter box. Example: If you set 200, the box won’t grow more than 200px. It will scroll if there are too many brands.
- Widget Title
- You can type a custom title for your filter box, like “Filter by Brand”.

- You can type a custom title for your filter box, like “Filter by Brand”.
After you’re done, click on Save Changes. Now your customized brand filter is live on your WooCommerce store.
Can the Dynamic Ajax Product Filters Plugin Filter by Any Product Attribute or Custom Field?
The Dynamic Ajax Product Filters plugin is very flexible and easy to use. It allows shoppers to filter products without reloading the entire page. The plugin highlights that users can filter products by almost anything. This makes it a good tool for online stores with many items.
Attribute Filters
Shoppers can easily choose product attributes such as size, color, or fabric. Instead of going through a long list, they can narrow down their search quickly. This makes shopping faster and saves time while finding the right product. It helps customers avoid confusion and improves their shopping experience smoothly.
Category Filters
Online stores often organize products into categories like clothes, electronics, or furniture. This plugin makes it simple to filter items by selected categories. Buyers can focus only on the type of product they want to see. It cuts down extra searching and helps people reach their choices faster.

Tag Filters
Tags are often used to mark items as “new,” “bestseller,” or “discounted.” With this plugin, shoppers can filter products using those tags quickly. This option is very useful when people want trending or sale items. It saves effort and directs attention to the most attractive deals instantly.
Custom Field Filters
Some stores add extra custom fields like brand, warranty, or product origin. This plugin allows filtering based on those custom fields easily. It gives store owners more freedom in how they display products. Shoppers benefit because they can filter by very specific details when needed.
This plugin makes product searching easier and faster for every shopper. It reduces the stress of scrolling through endless product pages always. People can quickly focus on details they really care about most. In short, the plugin improves the online store experience in many ways.
Why Should You Customize WooCommerce Brand Filter Options?
Customizing WooCommerce brand filter options can make a store much easier to use. Shoppers often look for products by brand, and a smart filter helps them find items faster. It also makes the store look more professional and well-organized. Custom filters give shoppers control and improve their overall shopping experience. Here are more reasons to customize your WooCommerce brand filters:
Better Navigation
When people shop online, they want to find products quickly without feeling confused. A clear and customized brand filter makes it simple for shoppers to choose exactly what they want. By saving their time and effort, it increases the chance of more sales.
Matching Design
Every online store has a special look that matches its theme and style. A customized brand filter fits into that design instead of looking plain or out of place. It keeps the shopping page neat and consistent, which makes browsing more comfortable for shoppers.
Shopper Control
People enjoy having control when they shop, especially in big stores with many products. A customized filter lets them sort, choose, and refine options in ways that feel natural. This freedom makes them stay longer and feel happier while shopping.
Customizing filters makes online shopping smooth and pleasant for every visitor. It gives buyers useful tools to sort products in a simple way. A store with good filters feels more trustworthy and easy to use. When shoppers are comfortable, they are more likely to buy again.
Where Should You Place Customized Brand Filters in WooCommerce?
When customers shop online, they often look for simple ways to sort and find the right products. One helpful option is a brand filter, which lets them pick their favorite brand easily. Let’s see the best places to show these filters for maximum results.
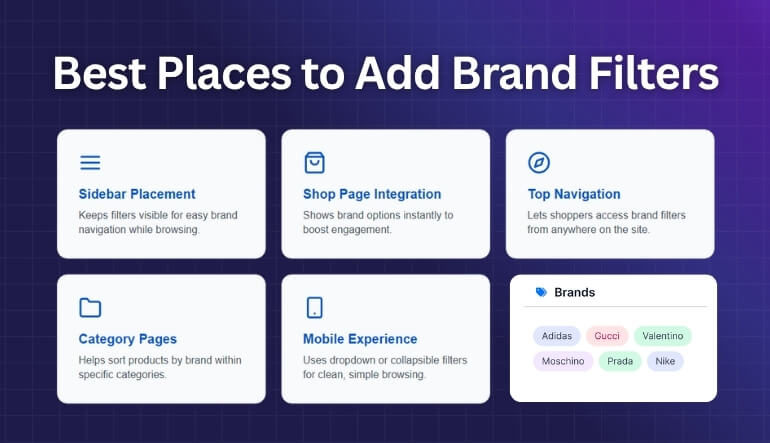
Sidebar Placement
Many store owners prefer using a WooCommerce sidebar brand filter because it keeps navigation visible while customers browse products. This makes it quick for shoppers to click between brands without losing track of where they are on the page. It keeps everything simple and user-friendly.
Shop Page Integration
Placing brand filters directly on the shop page works well for better visibility. When shoppers land here, they instantly see filter options without needing to search. This approach can encourage them to explore more products and make decisions faster.
Top Navigation
Adding brand filters in the top navigation is another smart option. It gives customers instant access from anywhere on the site. This method reduces the number of clicks needed to find products and helps with a smoother shopping experience.
Category Pages
If your store has many categories, adding brand filters on category pages can make browsing easier. Customers can sort products by brand within a chosen category. This keeps things more organized and helps shoppers focus only on what they are most interested in.
Mobile Experience
Since many people shop on phones, filters should be easy to use on small screens. A collapsible or dropdown brand filter on mobile ensures customers don’t feel overwhelmed. It also keeps the page neat while still giving quick access to filter options.
Placing brand filters in the right spot can improve customer experience and sales. Sidebar, shop page, and navigation all have their advantages. Think about your store’s layout and customer behavior to choose the best option.
How Do Customized Brand Filters Improve Customer Shopping Experience?
Shopping online can feel overwhelming when there are too many options and no simple way to sort through them. Customized brand filters help customers quickly find what they want without wasting time. Let’s look at how these filters make the process easier.
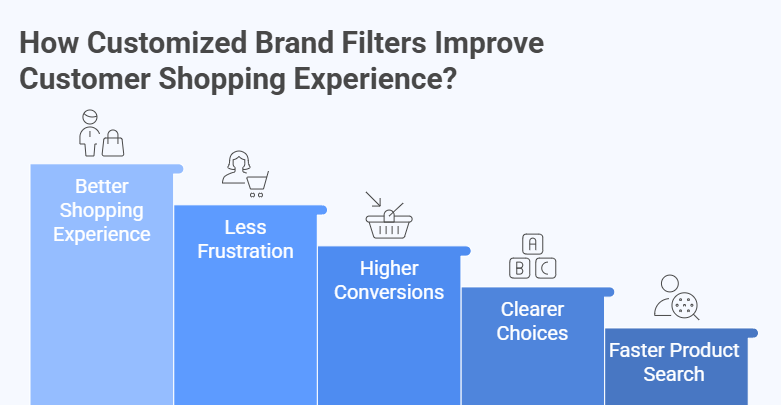
Faster Product Search
When customers visit an online store, they often know the brands they already like. Customized brand filters let them select those brands in seconds. Instead of scrolling through endless items, they get only the products that matter to them, saving time and effort.
Clearer Choices
Customized filters make the shopping page easier to read and understand. When products are grouped under well-known brand names, customers don’t feel lost. They can compare items more easily and feel confident that they are looking at the right products for them.
Higher Conversions
When shopping feels quick and simple, people are more likely to buy. Tailored filters remove barriers that slow customers down. By making it easier to find the right product, these filters turn browsing into actual purchases, which boosts sales for the store.
Less Frustration
Too many irrelevant results can annoy shoppers. Tailored filters reduce this problem by keeping the focus on choices that actually match their interests. Using visuals like brand logos in WooCommerce filter helps customers quickly recognize their favorite brands, making the shopping experience smoother and faster.
Better Shopping Experience
Customized brand filters are not just about speed; they also improve the overall shopping experience. Customers feel like the store understands their needs and gives them control. This positive feeling keeps them coming back for future purchases.
Customized brand filters are a small change that makes a big difference. They help shoppers find what they want faster, reduce stress, and improve buying decisions, all while creating a smooth and enjoyable shopping experience.
FAQs About How Do I Customize WooCommerce Brand Filter Options?
Customizing WooCommerce brand filter options can sometimes feel confusing for store owners. Many people want to know the extra details that go beyond the basic setup. These common questions will give you clearer answers and help you understand better. Each one is simple to follow and focused on useful information.
How Do I Add Brand Filter to WooCommerce Widgets?
You can add the brand filter to a widget area through the WordPress dashboard. Just go to Appearance and then Widgets, and you will see options to add the filter box. Place it in the sidebar or footer, depending on your store layout. Once saved, the brand filter will appear where you placed the widget.
Can I Use Brand Filter With WooCommerce Shortcodes?
WooCommerce shortcodes allow you to display filters in different areas of your site. Many filter plugins, including advanced ones, give shortcode support. You can copy the shortcode and paste it into any page or post. This way, the brand filter is not limited to just the sidebar or default widget areas.
How Do I Translate WooCommerce Brand Filter Into Other Languages?
If your store serves customers in multiple languages, you can translate the filter labels. Most plugins work with translation tools like WPML or Loco Translate. You can edit the filter text so customers see it in their own language. This helps make shopping easier and more comfortable for international buyers.
Can I Show WooCommerce Brand Filter Only on Certain Pages?
You can set filters to appear only on specific pages, such as the shop or category pages. This is done through display settings inside the plugin you use. Some plugins even allow you to hide the filter on mobile or other sections. This control helps you keep your store layout clean and simple.
How Do I Change the Order of Brands in WooCommerce Filter?
By default, brands may appear in alphabetical order inside the filter. But you can change the order to match your needs. Some plugins let you drag and drop the order or sort brands by popularity. This helps important brands appear first and saves time for customers.
Can I Use WooCommerce Brand Filter With Custom Product Types?
Many stores add custom product types that are not part of the standard WooCommerce. Good filtering plugins let you connect those custom types to brand filters. This means shoppers can still filter by brand even with unique product types. It helps keep your store flexible and consistent for all products.
How Do I Add Icons or Logos to WooCommerce Brand Filter?
Instead of showing plain text, you can display brand logos inside the filter. This makes the filter more visual and easier for customers to recognize. Most advanced plugins allow you to upload images and connect them to each brand. It gives the filter a more professional and attractive look.
Can I Limit The Number of Brands Shown in WooCommerce Filter?
Some stores have too many brands, and showing all of them can look messy. You can set a maximum number of brands to appear in the filter list. Extra brands can stay hidden under a “show more” option. This makes the filter cleaner while still giving shoppers full control.
How Do I Style WooCommerce Brand Filter With Custom CSS?
If you want the filter design to match your theme, you can add custom CSS. Most plugins allow custom classes so you can style fonts, colors, or layout. This helps you create a unique look without breaking your store design. With CSS, you get full creative control of the filter style.
Can WooCommerce Brand Filter Work With Search and Sorting Together?
Yes, many plugins allow brand filters to work with search bars and sorting options. This means customers can search by keyword and filter by brand at the same time. Combining both features makes product discovery much faster. It also gives shoppers a smoother and more powerful shopping experience.
Conclusion
Customizing WooCommerce brand filters is not just about looks; it is about making shopping smooth and simple. When filters are set up properly, customers save time while browsing and feel more in control of their buying choices, which always creates a positive impression.
So, how do I customize WooCommerce brand filter options? The answer is simple: install a filter plugin, enable the brand option, and then style it as you like. With these easy steps, your store can offer shoppers a more personalized and effective way to find products.
Before finishing, here are a few quick tips: always keep filters visible, use clear titles, test your changes on mobile, and avoid clutter. A neat and user-friendly design always attracts more buyers. Best wishes for making your store more useful and successful.