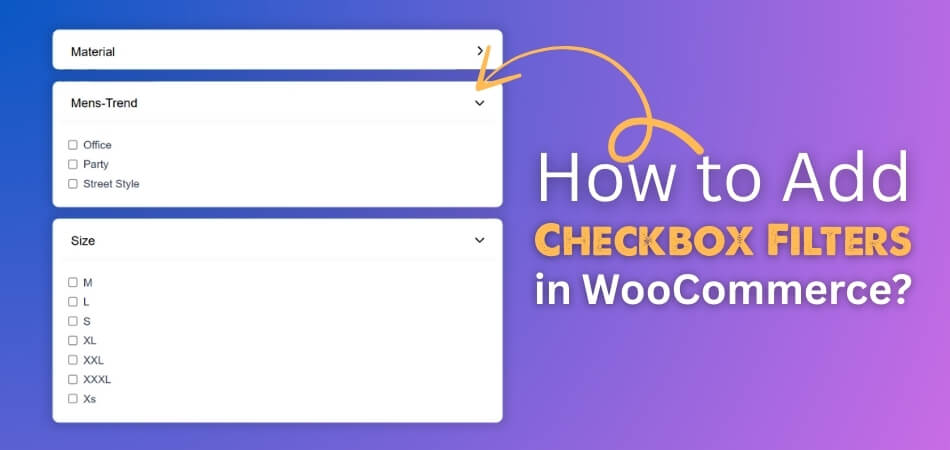
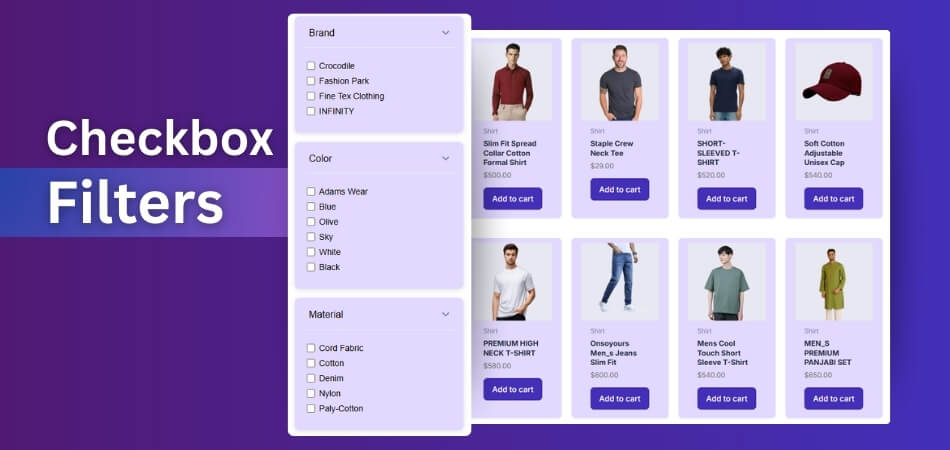
Checkbox filters are simple little boxes that people can tick when shopping online, making their search quicker and easier. Many store owners wonder about the best way to set them up and often think about how to add checkbox filters in WooCommerce.
To add checkbox filters in WooCommerce, install the Dynamic AJAX Product Filters plugin. Then go to Product Filters > Form Manage, select your filter, and choose the checkbox style in the form layout. Save changes to display checkboxes on your store.
Do you want to see how checkbox filters improve shopping, increase sales, and what common mistakes to avoid while using them? If yes, keep reading this article because you will find all the necessary details explained in clear steps.
How to Add Checkbox Filters in WooCommerce?
Checkbox filters make it easier for people to find the products they want on your store. Instead of scrolling through endless items, they can simply tick boxes for sizes, colors, or brands. Let’s see how you can set them up.
Install the Plugin
To use checkbox filters, you must first install the Dynamic Ajax Product Filters plugin. This plugin makes it easy to add filter options to your store. You can install it directly from the WordPress dashboard in just a few clicks. Another option is to install it manually by uploading the plugin file. Using an Ajax product filter for WooCommerce ensures these checkboxes work smoothly, updating results instantly without reloading the page and giving customers a faster shopping experience.
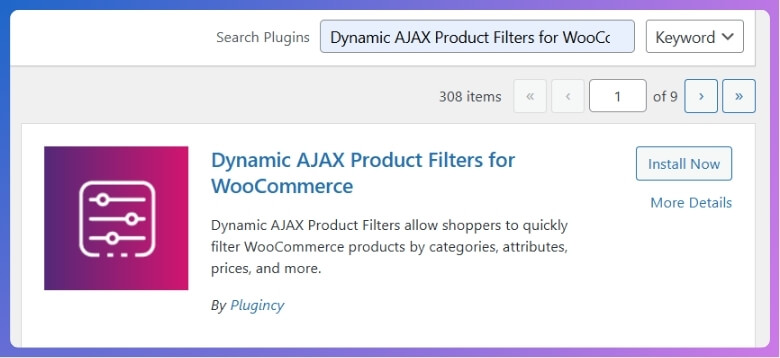
Option A: Install From WordPress Dashboard
- Go to your WordPress Admin Dashboard.
- In the left menu, click Plugins > Add New.
- In the search bar, type Dynamic AJAX Product Filters for WooCommerce.
- When you see it, click Install Now.
- After installation, click Activate.

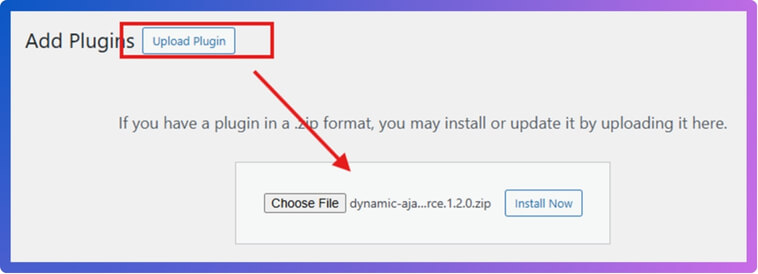
Option B: Install Manually
- Download the plugin ZIP file from the WordPress directory or the official website.
- Go to your WordPress Admin Dashboard.
- Click Plugins > Add New.
- Click Upload Plugin.
- Select the downloaded ZIP file.
- Click Install Now, then Activate.

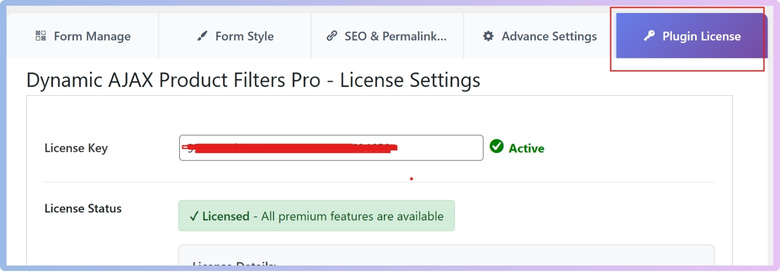
For Premium Users
The free version is good enough, but if you have a premium, you’ll need to activate it to unlock extra features.
- After purchase, copy the license key you received.
- Go to Product Filters > Plugin License.
- Paste the license key into the box.
- Save to unlock premium features.

Add Checkbox Filter
Once the plugin is active, you can set up your filter style and add checkboxes to help customers refine their product search.
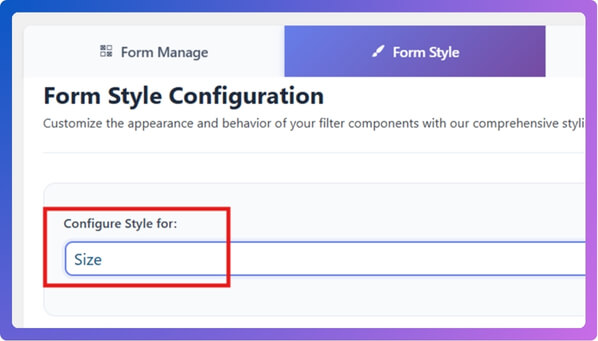
Step 1: Go to Form Style
This is where you decide how your filters will look on the store.
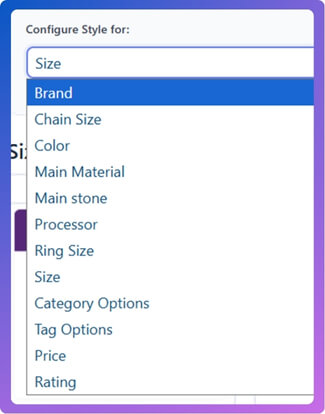
- After installing the plugin, go to Product Filters > Form Style.
- From the dropdown box, select the one you want.

- If none are available, you need to create new attributes for filters like Brand, Size, or Color.
Step 2: Create New Attribute
Attributes are the options that customers can filter by, such as size or color.
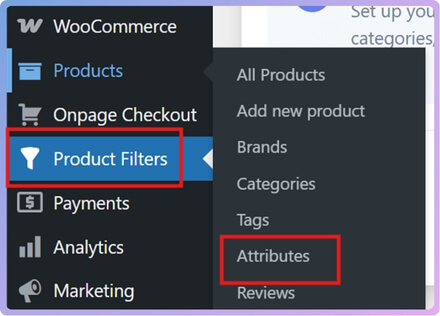
- Go to Products > Attributes.

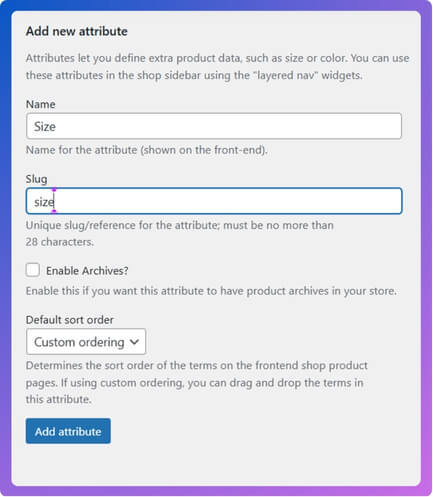
- In the Name field, type the attribute name (example: Size).
- In the Slug field, type a short version (example: size).
- Click on Add Attribute.

- On the right side, you will see a list bar.
- Find the attribute you created (example: Size).
- Click on Configure Terms.

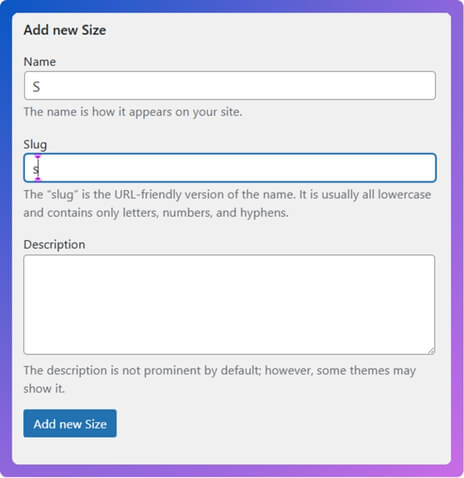
- Add variations. Example for Size:
- Name: S, Slug: s → Click Add new Size.
- Repeat for M, L, XL, XXL.

Step 3: Manage Attributes in Filters
Now you need to enable the attributes so they show up in the filters.
- Go back to Product Filters > Form Manage.
- Make sure Show Attributes is toggled ON.
- Click on Save Changes.


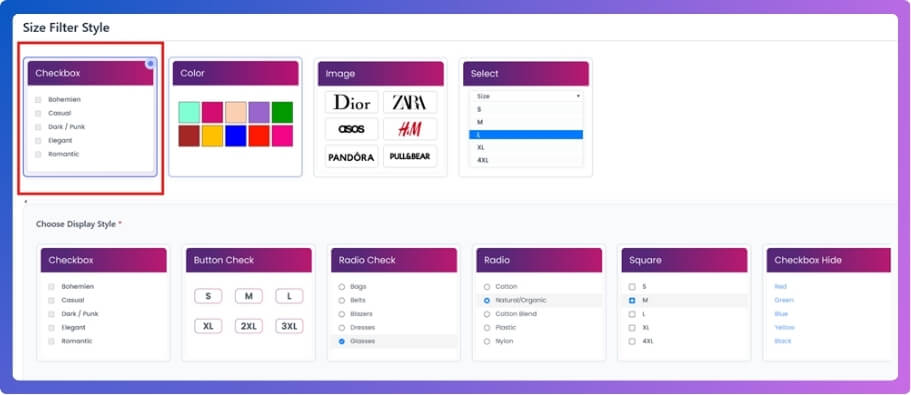
Step 4: Final Checkbox Setup
The last step is to choose the style and make the checkboxes visible on the store.
- After adding the filter you need, go to Form Style.
- Choose the one you just created.

- Find Filter Style and select Checkbox.
- Then, under Choose Display Style, select the one you prefer.

- Once satisfied, click on Save Changes.
- Done – your checkbox filter is now ready.
Adding checkbox filters in WooCommerce with this plugin is simple and quick. It gives your store a cleaner look and makes shopping easier for visitors. Once you finish setting it up, your customers will enjoy a much smoother shopping experience.
Best Categories and Attributes for Checkbox Filters
Online shopping becomes faster and smoother with the help of filters. Checkboxes let shoppers narrow down choices effortlessly and find the right items quickly. Well-chosen attributes improve the overall experience and save valuable time. Keep reading to discover which options work best.
Size
Finding the right size is often the first step for many shoppers. Instead of scrolling through items that don’t fit, checkboxes make size selection quick and stress-free. This works especially well in fashion, shoes, and even accessories. Giving clear size choices saves effort, reduces confusion, and builds a better shopping experience.
Color
Many people love searching by color because it matches their style preferences. A simple checkbox filter makes it easy to tick multiple shades quickly. This adds fun and flexibility to the buying process. Color filters also help create a more personal experience while shopping online. It keeps buyers focused on options that actually fit their style.

Brand
People often trust certain brands for quality and style when shopping online. Adding checkbox filters for brands helps buyers stick to favorites or explore new ones. Attributes like size, color, and brand are the most effective when shown as checkbox options, especially when used as left sidebar filters in WooCommerce where shoppers can see them right away.
Material
Shoppers may want to choose cotton, leather, wood, or other specific materials. Material checkboxes help narrow the search based on comfort, durability, or personal style. This makes the shopping process more efficient by skipping options that don’t match needs. Providing this filter builds confidence, especially when people care about product quality and sustainability.
Price Range
Most buyers shop with a certain budget already in their mind. Price range checkboxes like “under $50” or “$100–$200” make narrowing options much simpler. This saves time and avoids products outside someone’s budget. Offering a price filter makes shopping more enjoyable while keeping choices realistic and tailored to personal spending.
Filters with checkboxes help people find items they want very quickly. The best categories include size, color, brand, material, and price range. Each option makes the shopping process easier and much more enjoyable. Using the right filters improves results and creates happy shoppers.
How Do Checkbox Filters Improve User Experience and Conversions?
Shopping online can sometimes feel overwhelming when there are too many choices. People want to find the right products without wasting extra time or effort. Simple checkbox filters can make the whole process much smoother. Let’s explore how they improve results.
Faster Search
Instead of browsing endless pages, shoppers can tick a few checkboxes to narrow down results. This saves time and keeps them focused on products that match their needs. A fast and simple search process makes people more likely to stay and continue browsing.
Better Choices
Having clear filter options helps shoppers avoid confusion while searching for products. They can quickly compare items that fit their size, budget, or style. This keeps their shopping experience simple and enjoyable. Better choices also lead to more confidence in final purchase decisions.
Lower Bounce
When people can’t find what they want, they often leave quickly. Checkbox filters reduce this problem by guiding them to the right items instantly. Shoppers stay longer on the site when results match their expectations. Lower bounce rates usually mean higher chances of conversion.
More Sales
A smooth buying process leads to more completed purchases over time. With quick filters, people are less likely to give up halfway through. They see products they like and add them to their carts. This direct impact on sales is why checkbox filters are so effective.
Happier Customers
Easy filtering makes the shopping process feel stress-free and pleasant. Shoppers enjoy being in control of what they see while browsing online. When people leave with satisfaction, they are more likely to return. Happy customers often recommend stores to others, which also boosts sales.
Checkbox filters improve online shopping by making it fast and stress-free. They lower bounce rates because people find what they want easily. More sales happen when shoppers stay longer and buy confidently. A better experience creates lasting trust and happier customers.
Common Mistakes to Avoid With Checkbox Filters in WooCommerce
Checkbox filters can be very helpful when customers want to find products. They save time and make shopping feel simple if used correctly. But if filters are designed poorly, they create more confusion than help. Keep reading to learn about common mistakes that should be avoided.
Too Many
Having a huge list of filter options can overwhelm most shoppers quickly. Instead of improving the shopping process, it makes them feel frustrated. Keep only the most useful and popular options that match buying behavior. This way, the filters guide customers better without wasting their time.
Unclear Labels
If people cannot understand filter labels, they will avoid using them. Confusing or long words make things harder instead of easier for customers. Use short and clear labels that match everyday product names. When filters are simple to read, customers will trust and use them more.
Mobile Issues
Filters that work well on desktop screens may fail on smaller devices. Many customers shop from phones, and bad mobile filters ruin experiences. Always test checkboxes on different devices to ensure smooth use everywhere. If filters are mobile-friendly, more customers will enjoy shopping with ease.
Weak Mix
A mistake some stores make is relying only on filters without combining search and filters, which can frustrate shoppers who prefer both options together. Having both choices keeps the shopping process flexible and simple for everyone. It allows people to browse freely or find specific items quickly.
No Testing
Problems often show up only after customers begin using the filters. Testing helps spot errors early before they affect the shopping experience badly. Watch how users interact with the filters and check for difficulties. Regular updates keep filters simple, effective, and suitable for different shopping needs.
Good filters make shopping smooth and very easy for every customer. Bad filters confuse people and also waste their valuable shopping time. Always keep filters short, clear, and friendly for all device screens. Regular testing ensures filters stay useful and creates a better shopping experience.
Comparing Checkbox Filters With Other Filter Types
Filters play an important role in helping customers find what they need. Checkbox filters are one of the most common types, but they are not the only option. Let’s see how they compare with other filter types and when each works best.
| Aspect | Checkbox Filters | Other Filter Types |
| Selection Style | Allow multiple choices at the same time. | Dropdowns and radio buttons usually allow only one choice. |
| Best For | Categories with many options, like size, color, or features. | Sliders for ranges, dropdowns for long lists, and radio buttons for single-choice. |
| Ease of Use | Very clear and simple for users to understand quickly. | Dropdowns can hide options, sliders may confuse, and radio buttons take up space. |
| Space Needed | Can take more page space if too many options exist. | Dropdowns save space, sliders take less room, and radio buttons vary. |
| Flexibility | Shoppers can filter results in many ways at once. | Most other filters limit choices to a single option or a range. |
| Visual Clarity | Options are visible right away without extra clicks. | Dropdowns hide choices, sliders need interaction, and radios are visible but limited. |
Each filter type has strengths depending on the situation and design needs. Checkboxes are best when users need to pick many options easily. Dropdowns and sliders help when saving space or choosing ranges. Using the right filter makes shopping smoother and more enjoyable.
Commonly Asked Questions
Good filters bring order to busy product lists and save real time. These FAQs cover setup tips you might miss the first time. They also explain speed, links, tracking, and more practical details. Read on to build filters that feel smooth and reliable.
Will Checkbox Filters Affect Site Speed?
Checkbox filters can slow pages if they load too much data. Use Ajax loading so results update without refreshing the whole page. Limit how many results and terms load at once. A good host and a caching plugin will also help performance.
Can I Show Filters Only on Category Pages?
Yes, you can limit filters to selected pages or categories. Most filter plugins provide shortcodes and widgets with display rules. Place the widget in the sidebar of chosen templates only. This keeps other pages clean and focused on their main content.
How Do Filters Work With Pagination and Ajax?
Ajax lets results change without reloading the page. Make sure your theme supports Ajax pagination in product loops. Test moving between pages after ticking the checkboxes. If pages reset, enable the plugin’s Ajax pagination or use infinite scroll.
How Can I Make Filter URLs Shareable?
Many plugins can add choices to the page URL. Turn on the option that updates the address bar when filters change. Shoppers can copy the link and open the same filtered view later. This also helps support teams see exactly what customers see.
Are Checkbox Filters Good for SEO?
Filters are mainly for users, not search engines. Avoid letting every filter create an indexable page. That can cause many thin pages with similar content. Use noindex for filtered results or rely on Ajax states without crawlable URLs.
How Do I Track Filter Usage in Analytics?
You can track clicks on filter checkboxes as events. Add simple event tracking through Google Tag Manager. Name events by attribute so reports stay clear and useful. Over time, you will see which filters help the most with sales.
How Do I Style Checkboxes With Custom CSS?
Most plugins output classes you can target with CSS. Inspect elements in your browser to find the right selectors. Then adjust spacing, font size, and alignment to match your theme. Test on mobile so touch targets are large and easy to tap.
Are Checkbox Filters Accessible for Keyboard and Screen Readers?
Good filters should work with the keyboard and screen readers. Check that the focus order is clear and visible. Add labels and aria attributes where your plugin allows it. Test with the tab key and a free screen reader for basic checks.
Do Filters Work With Multilingual Sites?
Yes, many plugins work well with translation tools. Translate attribute names and terms so each language feels natural. Make sure URLs and slugs are also translated where needed. Test every language to confirm results match the chosen filters.
What Should I Do If Filters Stop Working?
Start by disabling other plugins to find a conflict. Switch to a default theme to rule out theme issues. Clear caches on your site and in your browser. If problems continue, check the plugin documentation and open a support ticket.
Last Words
Adding checkbox filters can transform the shopping experience by making it faster and smoother. With a simple plugin setup, attributes, and a few steps, you now know exactly how to add checkbox filters in WooCommerce.
When using filters, keep labels clear, avoid too many options, and always test on mobile for the best results. These small tips can make a big difference. Wishing you success in setting up your store and happy selling.