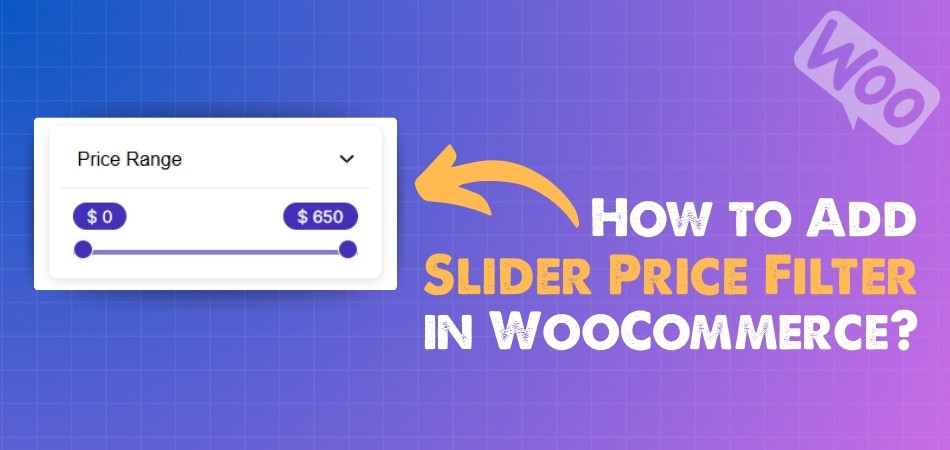
A slider price filter makes online shopping faster and smoother by letting people drag a handle to set their budget range. If you run a WooCommerce store, you may already be wondering how to add slider price filter in WooCommerce?
Add a slider price filter in WooCommerce by installing the Dynamic AJAX Product Filters plugin, setting product prices, enabling the price filter in widget settings, selecting the “Slider” style, and placing the shortcode “plugincy_filters” on your shop page.
Do you want to know how to make the slider look modern, adjust ranges correctly, or check how it works on mobile screens? If yes, then keep reading this article because it covers everything you need to understand this topic in detail.
How to Add Slider Price Filter in WooCommerce?
Adding a price filter in WooCommerce makes it easier for visitors to choose products that match their budget. You can use the default option, but it has limited features. If you want more control and styling options, using a plugin is a better choice. Let’s go step by step.
Step 1: Install the Plugin
By default, WooCommerce gives you a basic price filter, but the options for customizing it are very limited. If you want a price filter that looks better, works smoothly, and lets you use a slider, then you need a plugin. One of the best options for this is the Dynamic AJAX product filters plugin for WooCommerce. It is easy to use and comes in both free and paid versions, so you can choose according to your needs. Adding a WooCommerce price filter plugin like this helps improve the shopping experience and gives customers more control when browsing products. This plugin has both free and paid options. Here’s how you can install both.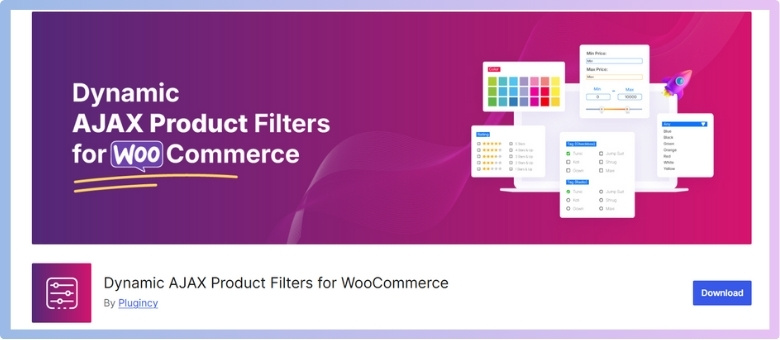
Free Version
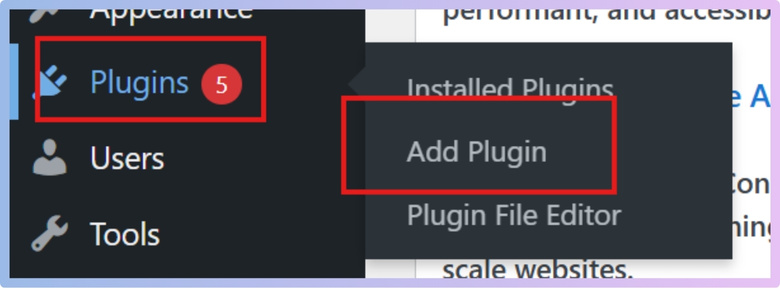
- Go to your WordPress Admin Dashboard.
- Click on Plugins from the left menu.
- Select Add New Plugin.

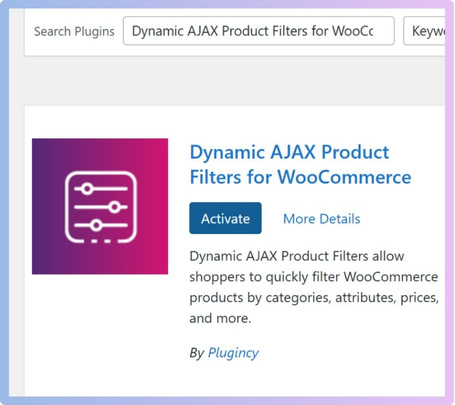
- In the search bar, type Dynamic AJAX Product Filters for WooCommerce.
- Click Install Now.
- After installation, click Activate.

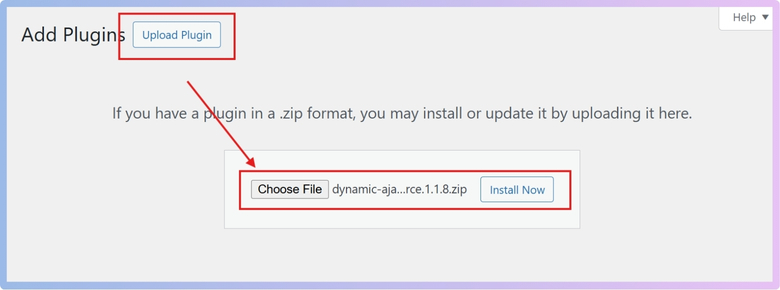
PRO (Paid) Version
- Go to Plugins.
- Click Add New Plugin.
- Select Upload Plugin.
- Click Choose File and select the plugin ZIP file you got after purchase.
- Click Install Now.

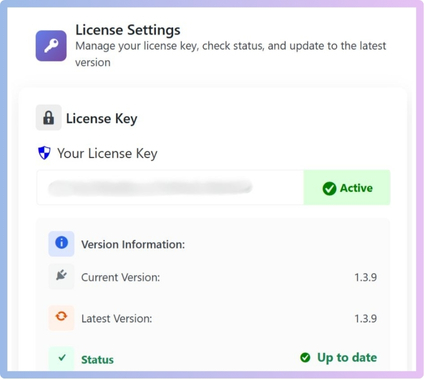
- With the premium version, you’ll also get a license key.
- Go to Product Filters > Plugin License.
- Paste the license key here.
- This will activate all premium features.

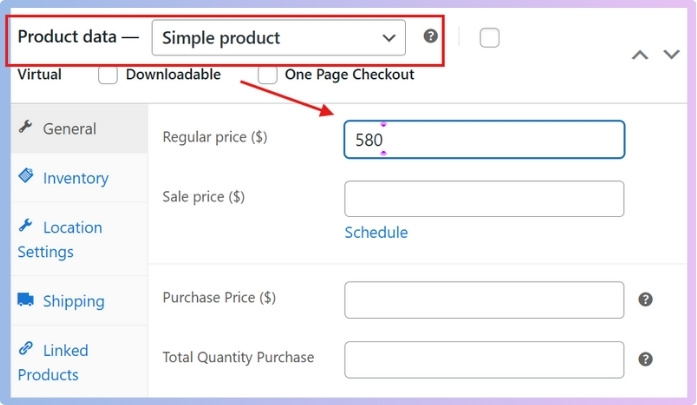
Step 2: Add Products and Set Price
- Go to Products > All Products in your WordPress dashboard.
- To edit an existing product, click on it. To add a new product, click Add New.
- In the product edit screen, scroll to the Product data section.
- Find the Regular price field and enter the price of the product.
- Click Update (for existing products) or Publish (for new products) to save.

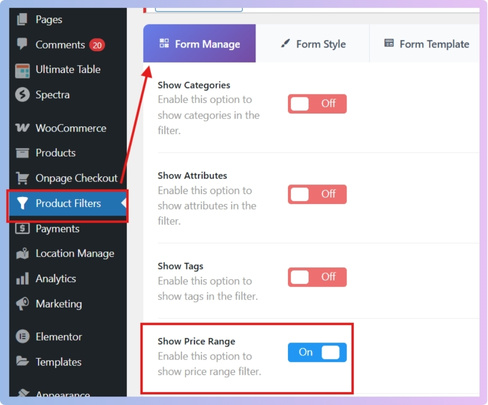
Step 3: Manage Price in the Filter Widget Form
- In the dashboard, go to Product Filters > Form Manage.
- Look for the Show Price Range option.
- Toggle this on (or off) depending on whether you want the price filter to appear in the widget.

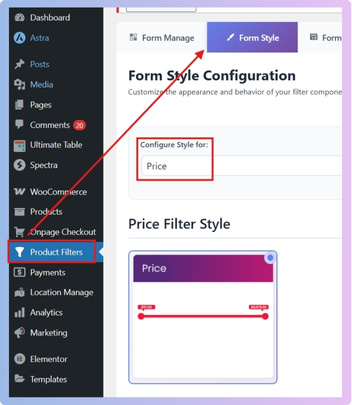
Step 4: Style/Design/Customize the Price Widget
- Go to Product Filters > Form Style.
- From the Select Attribute dropdown menu, choose Price.
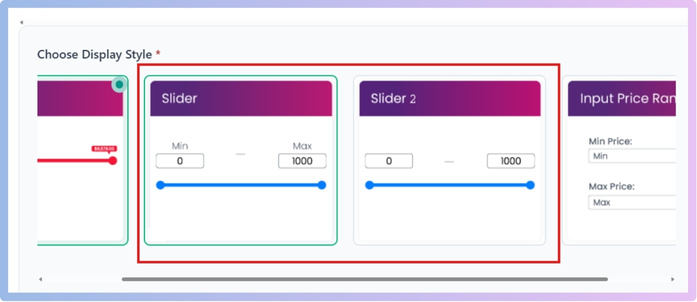
- Now choose one of the style options for price.

- If you want a slider, select the Slider option.
- Slider 1: Shows a slider with minimum and maximum levels.
- Slider 2: Shows a slider without levels. Both work the same way except for this difference.

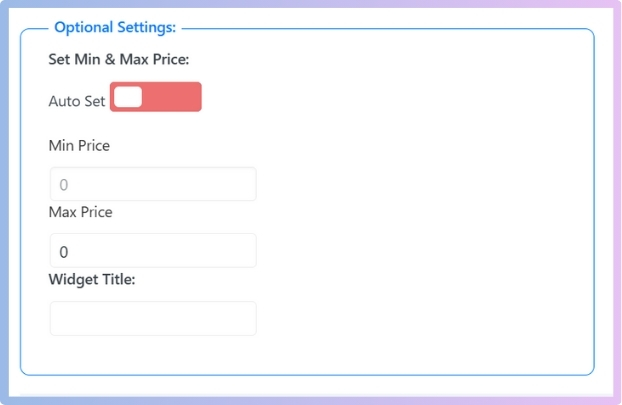
- In the Optional Settings section, the minimum and maximum prices are set to auto by default.
- If you want to set your own range, turn off auto.
- Enter your desired Min Price and Max Price.

- Click Save Changes to apply changes.
Step 5: Display the Product Filter on Your Webpage
- Go to the page where you want to show the product filter.
- Add the shortcode: [[plugincy_filters]]
- If you want to display products together with filters, also add this shortcode: [[products]]
- You can add these shortcodes inside a page, post, or even in a sidebar widget.
By following these steps, you can easily add a slider price filter in WooCommerce. Start by installing the plugin and setting product prices. Then adjust filter settings, style your widget, and display it on your site.
Why Use a Slider for Price Filters in WooCommerce?
Sliders for price filters give a simple and fast way for users to select the price range they want. Instead of typing numbers or picking from a long dropdown, a slider makes the process smooth. Let’s look deeper into why sliders are helpful.
Easy to Use
With a slider, users just drag a handle to set their minimum and maximum prices. This feels natural and does not require typing numbers or scrolling through lists. It’s a quick action that saves time while shopping online.
Better on Mobile
Typing on small screens can be hard, and dropdowns take up space. A slider fits well on mobile devices and lets people set prices with a simple swipe. This makes it far more comfortable when shopping from a phone.

Visual Control
A slider shows the full price range clearly. Users can see both the lowest and highest prices at once. This visual design makes it easier to understand what range they are choosing, instead of guessing from dropdown values.
Faster Filtering
Instead of typing numbers or clicking multiple dropdowns, sliders work instantly. Dragging the handles quickly updates the filter, giving results without extra steps. This saves effort and makes the shopping process smoother for every visitor.
Modern Look
A slider makes a website look more modern and user-friendly. It gives a cleaner design compared to dropdowns or text boxes. Shoppers are more likely to enjoy browsing when the filters look simple and attractive.
Using a slider for price filters is all about making shopping simple, quick, and comfortable. It works better on mobile, looks modern, and helps users find products faster with less effort.
How Do You Decide the Right Minimum and Maximum Range for a Slider?
Setting a price slider should always feel natural. Customers expect filters that match the actual products in your store. If the numbers are too wide, the filter loses purpose. Keep reading to see how to choose ranges that make sense.
Product Prices
Looking at the lowest and highest product prices is a smart start. A slider should match the real price range in your store. If your items fall between $15 and $700, use that. Going beyond your catalog range only makes customers feel confused or misled.
Buyer Habits
Different shoppers come with different spending habits and expectations when buying. Many focus on affordable deals, while others want premium and costly items. If you set ranges too far apart, buyers lose interest quickly. Focus on the spending pattern that matches most of your sales.
Remove Extremes
Including unnecessary extremes in your slider settings is often unhelpful. It only shows options that are irrelevant to your actual store catalog. To match your product catalog, you may need to customize WooCommerce price filter range so customers get useful and realistic price choices.
Step Sizes
Instead of flat numbers, sliders work better with logical step amounts. For cheaper items, small steps like $5 or $10 are reasonable. For costlier products, steps of $50 or $100 make more sense. These steps give customers smoother control while selecting their preferred price range.
Keep Updating
Your slider should not stay the same forever without adjustments. As you add more products, pricing patterns may change over time. Regular updates make the filter relevant and reliable for your users. Checking sales reports helps you know when changes are truly needed.
Choosing slider ranges helps customers quickly find products without feeling lost. A correct filter builds trust and makes shopping easier for your store. When customers see meaningful ranges, they spend more time browsing happily. Updating sliders regularly ensures your store always feels simple.
Do Slider Price Filters Work With Variable Products in WooCommerce?
Adding a price filter slider to a WooCommerce store may look simple at first, but things get tricky with variable products like sizes, colors, or package options. These variations often come with different prices, and how the slider works with them can affect what shoppers see.
Here are some clear points to understand:
- Variation Prices Considered: Price sliders usually check the minimum and maximum prices of all product variations, so shoppers can filter by the full range available.
- Displayed Range in Slider: The slider often shows the lowest price of the cheapest variation and the highest price of the most expensive variation.
- Filtering Accuracy: When shoppers move the slider, WooCommerce compares it with all variations’ prices. A product appears if at least one variation fits the range.
- Hidden Variation Prices: If some variations are outside the slider’s set range, those specific options will not appear, but the product may still show if another variation qualifies.
- Catalog vs. Single Product Page: On shop or category pages, filters only decide whether the product shows up, not which variation appears first.
- Plugin Enhancements: Some filter plugins handle variations better by allowing direct filtering of individual variation prices instead of just showing the parent product.
- Performance Considerations: Stores with many variations can load more slowly if sliders check every variation price, so choosing a good filtering plugin is important.
Price filter sliders in WooCommerce do work with variable products, but they mainly focus on the price ranges of variations. A shopper may see a product listed if even one of its variations matches the filter, which is helpful but sometimes confusing. Picking a reliable filter plugin can make the results more accurate and user-friendly.
How Do You Test the Functionality of a Slider Price Filter After Setup?
After setting up a slider price filter, you must test its functionality to ensure it works correctly for users. A simple and effective way to do this is by performing functional testing, which checks if the filter returns the correct products for a given price range. Here’s how you can test:

- Boundary Value Analysis: Test the filter at the extremes of the price range. For example, if the slider’s range is $0 to $1000, check the results for:
- Minimum value (e.g., sliding to $0).
- Maximum value (e.g., sliding to $1000).
- Just above the minimum (e.g., $1).
- Just below the maximum (e.g., $999).
- Both the minimum and maximum of the entire range (e.g., selecting $100 to $100).
- A value that is the minimum or maximum of a particular product (e.g., if a product costs $50, select the filter to show products from $49 to $51).
- Equivalence Partitioning: Test different valid and invalid ranges within the slider.
- Valid Ranges: Select multiple, realistic price ranges, such as a low-end range (e.g., $10-$50), a mid-range (e.g., $200-$400), and a high-end range (e.g., $800-$1000). Verify that all products displayed fall within the selected price bracket.
- Invalid Ranges: Test what happens when a user attempts to set an invalid range, like the minimum value being higher than the maximum (e.g., $500 to $100). The system should prevent this or show an error message.
- Usability and User Interface (UI): Test the overall user experience of the filter.
- Check for smooth responsiveness on different devices (desktop, tablet, mobile).
- Ensure the filter updates dynamically as you drag the slider, or after you click an “Apply” button.
- Confirm that the minimum and maximum price values are clearly displayed and updated as the slider is moved.
- If there are predefined price brackets (e.g., “$0-$50”), test that clicking these yields the correct results.
- Verify that any input fields for manual price entry work correctly and accept valid numerical inputs.
- Data Validation:
- Make sure the filter only displays products that are actually within the selected price range, including any products with decimals in their prices.
- Ensure that any applied discounts or promotions are factored into the filtered results. For example, if a product originally priced at $100 is on sale for $75, it should appear when the filter is set to the $50-$80 range.
- Test for scenarios where no products are available for a selected price range. The page should display a clear “no results found” message instead of an error.
- Cross-Browser and Compatibility Testing: Check that the price slider works correctly across different web browsers (Chrome, Firefox, Safari, Edge) and operating systems. This ensures a consistent user experience regardless of a customer’s setup.
Should You Check Price Filter Usability on Mobile Screens?
Shopping online is simple when filters work well. But sometimes, the way filters show up on different devices makes a big difference in how people shop. This is why it’s important to talk about price filter usability. Let’s look at it more closely.

User Behavior
People use their phones more than desktops when browsing online stores. A filter that looks fine on a desktop may be hard to use on small screens, so adding a mobile-ready price filter ensures accessibility. This helps users make quick choices without feeling stuck.
Screen Limitations
Mobile screens give less space, so filters can easily look crowded. If the price filter is too small or hidden, people might miss it. Making the filter simple, clear, and touch-friendly keeps shopping smooth and less frustrating.
Easy Navigation
Filters should not take too many steps to adjust. When people shop on mobile, they want to move fast. A simple slider or clear input box makes adjusting prices easy. Smooth navigation improves user satisfaction and keeps them on the site.
Better Accessibility
Not all users interact with their screens the same way. A price filter that works for everyone helps create a fair shopping experience. Large buttons, readable fonts, and a well-placed filter can support buyers with different needs.
Business Impact
If filters don’t work properly on mobile, shoppers may leave quickly. This can hurt sales and brand trust. On the other hand, a well-designed filter can increase conversions, because customers find what they want without delays.
Checking price filter usability on mobile is not just about design. It directly affects how easy shopping feels and how likely people are to buy. Small improvements can bring a big difference for both users and businesses.
FAQs About How to Add Slider Price Filter in WooCommerce?
Adding a slider price filter in WooCommerce is a smart way to improve the shopping experience. People often have questions when setting it up or using plugins. Here are some of the most common questions with simple answers to guide you better.
Can I Add a Slider Without a Plugin?
WooCommerce comes with a built-in price filter, but it is limited. The default filter does not provide a slider option for smooth control. If you want a real slider, you must use a plugin. Plugins give better design, flexibility, and features that customers appreciate.
Do Free Plugins Work Well for Price Sliders?
Yes, free plugins can work fine if you need basic features. They usually allow simple slider functions that cover most small stores. However, advanced styling and custom range settings are often locked in paid versions. Choosing depends on your store’s size and customer needs.
Can I Translate the Price Filter Slider?
Many plugins support translation, so you can display the slider in different languages. This is helpful if your store serves global customers with varied language needs. Check if the plugin is compatible with tools like WPML or Loco Translate. With translation, the filter feels more personal.
Will the Price Slider Affect Website Speed?
A price slider itself is light, but some plugins may slow things down. Heavy plugins with many extra features can affect site speed. Always pick a plugin that is optimized for performance and has good reviews. Faster filters keep shoppers engaged and prevent them from leaving.
Can I Place the Price Slider Anywhere?
Yes, most plugins allow you to place the price filter anywhere with shortcodes. You can add it to pages, posts, or sidebars depending on your layout. This gives flexibility to design the shopping experience your way. Customers should find it in a spot that feels natural.
Does the Price Slider Work With Discounts?
Price sliders normally check the current selling price, not the original. This means if a product is discounted, it will still appear in the right range. Always test to make sure sale prices are included properly. A correct filter ensures users do not miss discounted items.
Can I Use Multiple Price Sliders on One Page?
Most plugins only allow one price slider per page for clarity. Having multiple sliders can confuse shoppers and clutter the design. If you need different ranges, adjust the settings for that one slider. Keeping it simple helps customers filter faster and shop easily.
How Do I Style the Slider to Match My Theme?
Plugins often come with styling options that let you match your theme. You can change colors, shapes, and slider handles for a consistent look. Some premium plugins even let you use custom CSS. A well-styled slider blends in and improves your store’s overall design.
Is the Price Slider Compatible With All WooCommerce Themes?
Most themes support price filter sliders, but some may need adjustments. If a theme is poorly coded, the slider may not display correctly. Always test with your theme and check plugin documentation. If issues occur, a developer or plugin support can help solve them.
Can I Track How Customers Use the Price Slider?
Yes, you can track slider usage with analytics tools. Many plugins integrate with Google Analytics or other tracking systems. This helps you see what price ranges customers search most often. With this data, you can adjust pricing strategies or focus on popular price brackets.
Conclusion
Price filters with sliders make online shopping smoother and faster, especially in WooCommerce. They give shoppers a clear and simple way to choose the products that match their budget without scrolling through endless lists or typing values.
If you are wondering how to add slider price filter in WooCommerce? The process is simple. Install a reliable plugin, set product prices, customize the slider style, and display it on your site with shortcodes for a better user experience.
Before finishing, remember to test the filter well, check its usability on mobile, and adjust ranges to match your products. Keep things updated, make sure navigation is smooth, and your visitors will enjoy shopping. Best wishes!