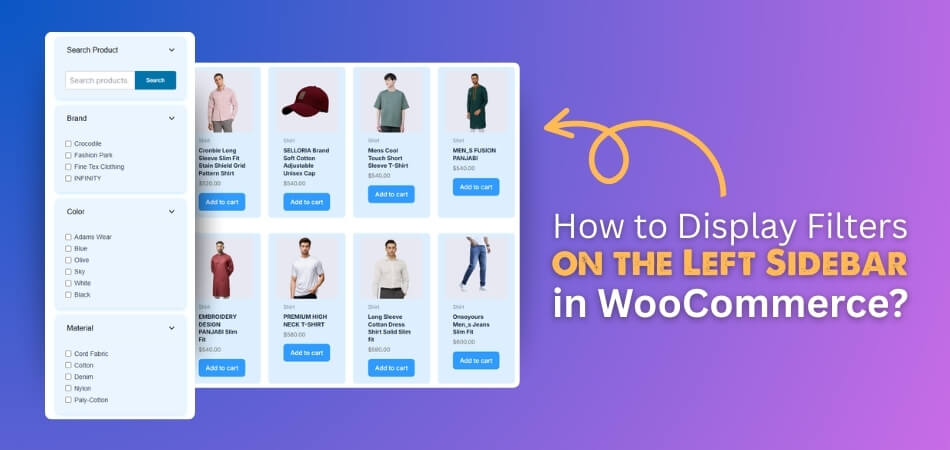
Displaying filters makes browsing products smoother and helps shoppers save time while looking for the right items. Many store owners want to keep their sites simple but also easy to use. You might already be wondering how to display filters on the left sidebar in WooCommerce?
To display filters on the left sidebar in WooCommerce, use a plugin like Dynamic AJAX Product Filters for WooCommerce. Install it, then add the filter widget to the WooCommerce sidebar and set your layout to show the sidebar on the left. Filters will now appear site-wide on the left.
If you are curious about making your store look more organized and useful, this article has everything you need. You will find clear steps for adding filters through pages or widgets, tips for the best filter types, mistakes to avoid, and comparisons for better layout choices.
How to Display Filters on the Left Sidebar in WooCommerce?
Adding product filters to the left sidebar makes it easier for visitors to find what they want. With the right setup, you can display filters on pages or sidebars using simple steps. Let’s go through everything in detail.
1) Install the Plugin
Before you can display filters, you need to install a plugin. The one we’ll use is Dynamic AJAX Product Filters for WooCommerce. It’s very simple to set up, and you don’t need any coding skills. Once installed, you can easily place filters on your store pages or sidebar.
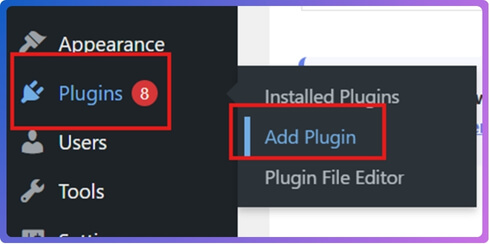
A. INstall from The Word Press Dashboard
This is the fastest and easiest way.
- Go to WordPress Admin Dashboard → Plugins.
- Click Add New Plugin.

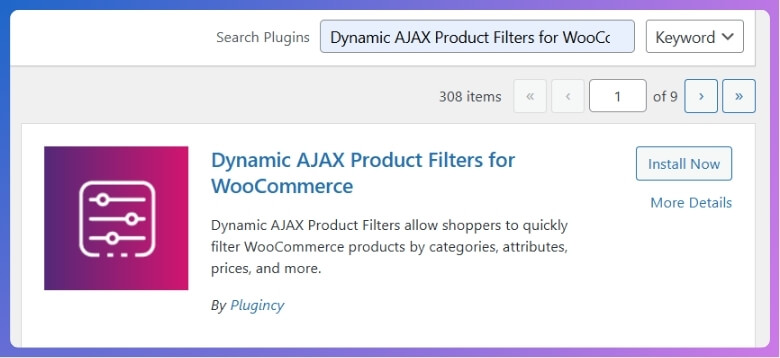
- In the search bar, type Dynamic AJAX Product Filters for WooCommerce.
- Click Install Now, then Activate.
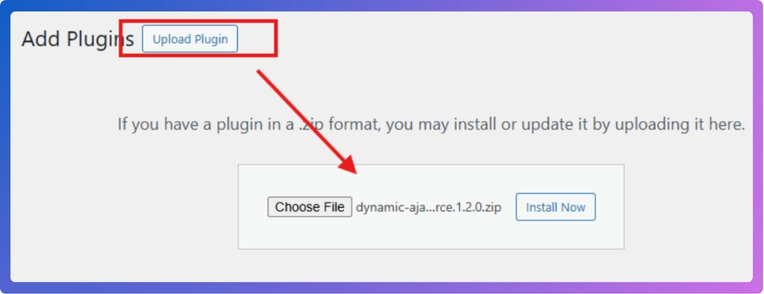
B. Install Manually
If you already downloaded the plugin ZIP, you can upload it.
- Go to Plugins.
- Click Add New Plugin.
- Click Upload Plugin.
- Click Choose File and select the plugin ZIP.
- Click Install Now, then Activate.
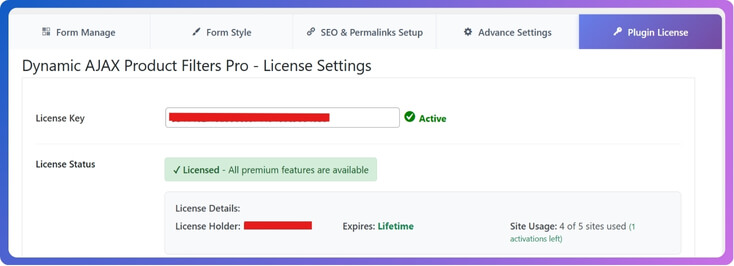
C. Activate the Pro License (optional, for Premium)
If you bought the premium version, you’ll need to activate it.
- Go to Product Filters → Plugin License.
- Paste your license key in the box.
- Click Activate.
- Premium features will now be available.
2) Method 1: Show Filters on the Left Inside a Page
This method is useful if you want to apply filters directly on a specific page, such as your shop page or a custom page.
- Open the page where you want filters, or create a new page.
- If the page opens in Classic Editor, switch to the Block Editor.

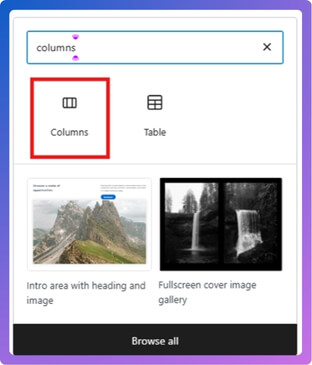
- Click the + icon and add a Columns block.

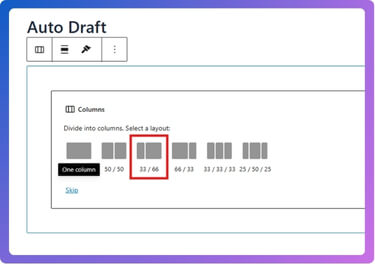
- Choose the 33/66 layout.

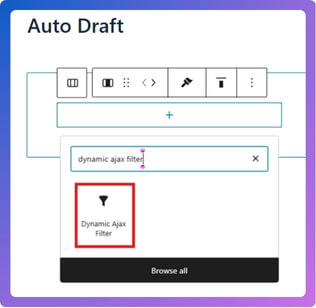
- In the left column, click + and add the Dynamic Ajax Filter block.

- On the right side, if you hover your mouse cursor, you’ll notice another column; click + and add the content you need.
- Click Save draft or Publish to view the result.
- Done — filters are now on the left.

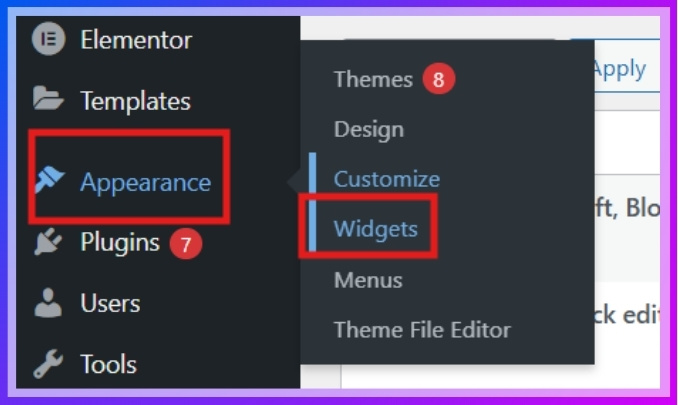
3) Method 2: Show Filters on the Left using Widgets
This method is better if you want filters to appear across your store, not just on one page.
- Go to Appearance → Widgets.

- Find WooCommerce Sidebar.
- Click the + icon, search for Dynamic Ajax Filters, and add it.
- Click Save.

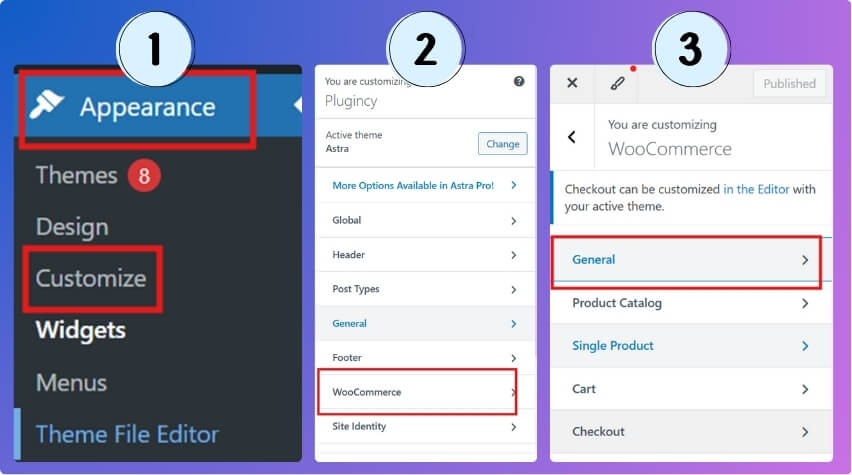
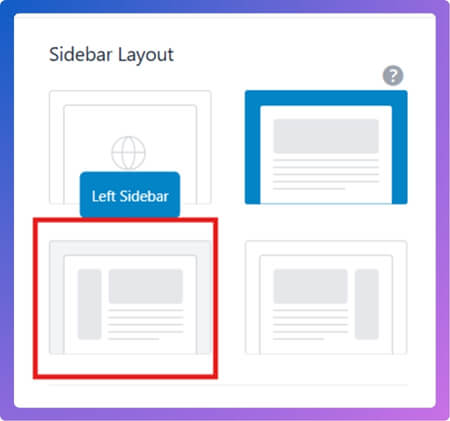
- Go to Appearance → Customize → WooCommerce → General.

- In the Sidebar layout, select Left Sidebar.

- Click Publish or Save draft.
- Done — filters will now display on the left sidebar across your store.
By following these steps, you can easily show product filters in the left sidebar of your WooCommerce store. Using the plugin and built-in WordPress tools makes the whole setup simple and effective.
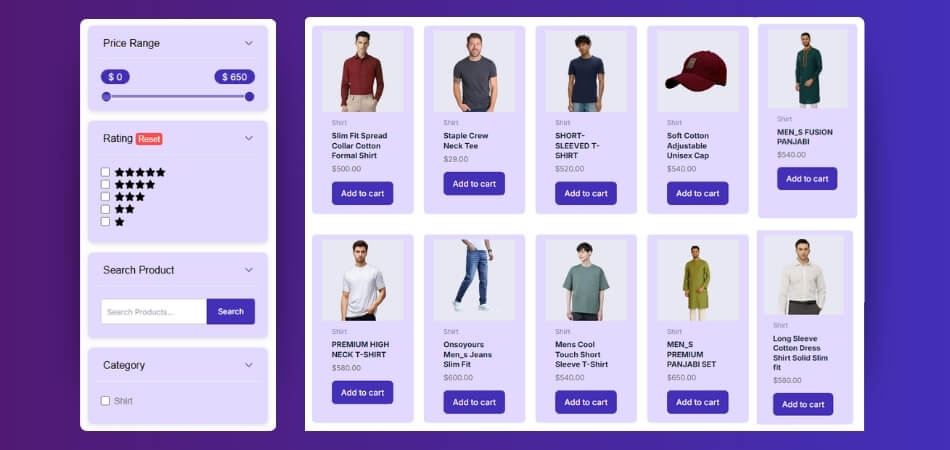
Best Types of Filters to Show in the Sidebar
When shoppers visit an online store, they often want an easy way to find what they are looking for. A sidebar filter helps narrow down products without endless scrolling or searching. Let’s explore the best filter options that work well for most stores.
Size Options
Finding the right size quickly is important for clothing and footwear stores. Shoppers want to avoid opening every page only to find their size missing. A size filter reduces frustration and makes shopping easier for everyone. Clear labels for sizes improve satisfaction and prevent unnecessary cart abandonment.

Color Choice
Many people shop with a preferred color in mind for their items. A color filter lets them instantly see products available in that shade. Some stores use swatches while others keep it simple with text. Both ways give clarity and help shoppers choose faster with less effort.
Price Range
Most shoppers already have a budget before they start browsing products. A price filter allows them to select only the range they prefer. Sliders or ranges both work well for this purpose. This filter cuts down clutter and helps buyers focus on what truly fits.
Brand Picks
Shoppers often trust certain brands and want to find them quickly. A brand filter helps display only products from their favorite makers. This builds confidence and saves time by removing irrelevant items. For many categories, such as fashion or electronics, this option is extremely valuable.
Filters such as size, color, and brand are often shown as checklists, and adding checkbox filters in WooCommerce makes it easy for shoppers to select multiple options at once. Using the right filters helps keep stores organized and makes shopping much more enjoyable.
Common Mistakes to Avoid With Sidebar Filters
Filters in the sidebar are very useful for helping shoppers find products quickly. They can make browsing smooth, easy, and less time-consuming when designed well. But some mistakes can turn a helpful tool into a confusing one. Let’s look at issues you should avoid.
Too Many Options
Overloading the sidebar with too many filters can overwhelm shoppers easily. When people see a long list of choices, they might feel lost. A filter should guide, not confuse. Keeping the number of filters simple helps users focus better and find items more quickly.
Unclear Labels
Labels must be clear and simple so shoppers know exactly what they mean. Confusing labels lead to hesitation and wasted time. For example, words like “style” may feel vague compared to “t-shirt” or “hoodie.” Always use familiar terms that make sense instantly to everyone.
Poor Placement
Placing filters in the wrong location makes them less useful overall. Filters should be easy to spot on the sidebar without extra searching. If they are hidden or scattered, people may not even notice them. Proper placement keeps the shopping process smooth and frustration-free.
Missing Priorities
Not every filter deserves the same importance on the page. Key filters like price, size, and color should appear higher in the sidebar. If these important ones are buried, shoppers might skip them. Prioritizing useful filters ensures people find the right products faster.
Technical Setup
One mistake is making the setup too technical, instead of using simpler options like product filters without coding that keep the sidebar clear and easy to use. Overcomplicated designs can slow down websites and confuse customers, while simple, ready-to-use tools improve overall usability.
Well-designed filters improve the shopping experience and guide users smoothly. Avoiding these common mistakes helps customers feel more confident during their search. When filters are clear, simple, and placed correctly, buyers enjoy browsing more. Strong filter design not only helps shoppers but also improves store sales.
Why Use a Left Sidebar for Filters in WooCommerce?
When people shop online, filters help them sort through products more easily. The position of these filters makes a big difference in how smooth the experience feels. A left sidebar is one of the most common choices. Let’s explore why it works so well.
Better Visibility
Shoppers often scan pages from left to right when browsing online. Placing filters on the left side makes them visible without effort. They become one of the first things shoppers see. This visibility helps guide users toward the right products without wasting extra time.
Familiar Layout
Many websites already use the left sidebar for filters, so people are used to it. Familiar layouts make navigation feel natural and comfortable. Shoppers know exactly where to look without learning something new. This consistency makes the shopping process smoother and less confusing overall.
Smooth Navigation
Easy movement through a store depends on filters being placed conveniently. A left sidebar keeps filters aligned with product listings, so adjustments feel quick. Shoppers can change size, color, or price without losing their spot. This setup saves time and keeps browsing stress-free.
Organized Look
Keeping filters in one side column creates a neat and structured layout. A left sidebar keeps the product grid clean and uncluttered. Shoppers focus on products while still having filter options handy. This organization balances design and usability, making the store more professional and inviting.
Higher Engagement
Clear and visible filters encourage shoppers to use them more often. A left sidebar gives people an easy way to narrow their options quickly. This not only boosts engagement but also keeps customers on the site longer. More interaction usually results in greater satisfaction and higher chances of making a purchase.
Placing filters on the left sidebar is a smart design choice for WooCommerce stores. It improves visibility, keeps layouts consistent, and helps shoppers browse smoothly. A clear and organized sidebar reduces confusion. Strong filter placement leads to better shopping experiences and improved sales.
Comparing Sidebar Filters With Top Bar Filters in WooCommerce
Choosing where to place filters changes how people shop. A left sidebar works like a menu on the side, while a top bar stretches across the page. Each style has strengths, so the best choice depends on your products and shoppers.
| Feature | Sidebar Filters (Left Side) | Top Bar Filters (Horizontal) |
| Screen Space | Takes vertical space on the side | Uses horizontal space at the top |
| Visibility | Always visible while scrolling | Can disappear when scrolling down |
| Ease of Use | Good for many filter options | Best for fewer, simple filters |
| Mobile Experience | Can feel cramped on small screens | Fits better on mobile screens |
| Layout Style | Works well for classic store designs | Matches modern, clean layouts |
| Product Focus | Products share space with filters | Products get more space below the filters |
| Best Use Case | Large stores with many categories | Small to medium stores with fewer filter needs |
Use a sidebar when you have many filter choices and deep categories. Pick a top bar when you want a clean look and quick, simple filtering on mobile. Test both with your audience, then keep the one that helps people find products faster.
FAQs About How to Display Filters on the Left Sidebar in WooCommerce?
Many shop owners want their stores to look simple and easy to use. Filters on the left sidebar are one of the best ways to help customers find what they need quickly. Below are some of the most common questions people ask about setting up and using left sidebar filters in WooCommerce. These answers will give you clear guidance and help you avoid confusion.
What Is the Benefit of Adding Filters to the Left Sidebar?
Adding filters to the left sidebar makes shopping easier for visitors. Customers can quickly choose categories, prices, or brands without scrolling too much. This saves time and makes the store look more organized. A clear filter area improves the chance of buyers finding what they want and completing their purchase.
Do I Need Any Technical Skills to Add Filters in WooCommerce?
No, you do not need technical skills or coding knowledge. Most plugins for filters are designed with simple drag-and-drop or click-to-add tools. This means even beginners can set them up in a few minutes. As long as you know how to install a plugin, you can manage filters easily.
Can Filters Be Shown Only on Specific Pages?
Yes, filters can be displayed only on specific pages if you want. For example, you may add them only to your main shop page or a category page. This gives you control over where filters appear without affecting the entire store. It also helps you keep the design cleaner on other pages.
Will Sidebar Filters Slow Down My Website?
Sidebar filters do not slow down your website if you use a good plugin. Some plugins are built to load quickly with AJAX, so filters update without refreshing the whole page. If you use too many heavy plugins, then performance might be affected. Choosing a lightweight plugin is the key to smooth performance.
Can I Customize the Look of My Sidebar Filters?
Yes, most filter plugins allow you to customize the look. You can change colors, layouts, and even the style of checkboxes or dropdowns. Some plugins work directly with your theme, so they match your website design. This makes your store look professional and consistent.
Are Sidebar Filters Mobile Friendly?
Most filter plugins are designed to work on both desktop and mobile. On smaller screens, filters may collapse into menus or buttons to save space. This makes it easy for users to still apply filters without making the page look crowded. A good plugin ensures the filters stay user-friendly across devices.
Can I Show Multiple Filter Types Together?
Yes, you can display multiple filter types at once. For example, you can let customers filter by size, color, price, and brand all together. Shoppers can select more than one option to narrow down products faster. This gives them more control and helps them find exactly what they want.
What Happens If I Remove Filters Later?
If you remove filters, your store will still work, but customers may find it harder to search. Without filters, they might need to browse through many pages to find what they want. This can increase frustration and reduce sales. It’s best to keep important filters that match your products.
Can Filters Work With Any WooCommerce Theme?
Most modern WooCommerce themes support filter plugins without problems. If you use a very old or custom theme, you may need to test it first. The good thing is, most plugins are made to fit common themes. Using a popular theme improves the chance that filters will display correctly.
How Do Filters Help Increase Sales in WooCommerce Stores?
Filters guide shoppers directly to what they want, which saves time and makes buying easier. When people find their size, color, or price quickly, they are more likely to add items to the cart. A smooth shopping experience builds trust and encourages repeat visits. This often leads to higher sales and better customer satisfaction.
Conclusion
Adding filters to the left sidebar makes any WooCommerce store easier to use and more organized. With a simple plugin setup and quick adjustments, you can give your visitors a better shopping experience. This explains exactly how to display filters on the left sidebar in WooCommerce.
To keep your store even more user-friendly, use only the most important filters like size, price, and color. Place them clearly, avoid clutter, and make sure they look neat. With these tips in mind, best wishes for building a smooth and successful store.