Product removal in WooCommerce should feel quick and smooth, not like a slow, extra step. When customers can delete unwanted items with one click, shopping becomes much easier. That’s why many store owners wonder how to enable single-click product removal in WooCommerce.
To enable single-click product removal in WooCommerce, you need to use a plugin like One Page Quick Checkout for WooCommerce. After installing and activating it, go to the dashboard, click on “On-Page Checkout,” and enable the “Remove Product Button” feature under settings. This lets users remove items directly from the checkout form. It improves speed and makes checkout more user-friendly.
Do you want to set this up in your store or see how it works in real life? If you’re curious, keep reading this article. You’ll learn each step and feature that makes the shopping experience faster, cleaner, and better for your customers.
How to Enable Single-Click Product Removal in WooCommerce?
Enabling single-click product removal in WooCommerce can make your online store easier and faster for customers to use. It helps shoppers get rid of items in their cart with just one click, which is super convenient. This feature can improve the shopping experience and reduce frustration. If you want to learn how to set it up, keep reading for simple steps and tips.
Use a Plugin to Enable Single-Click Product Removal
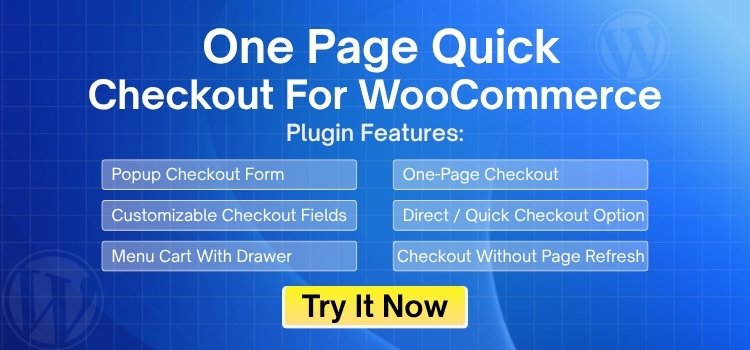
There are many plugins made for WooCommerce that let you enable single-click product removal buttons without coding. One such popular and user-friendly option is the One Page Quick Checkout for WooCommerce. You just have to install the plugin, activate it, and adjust some basic settings to enable single-click Product removal buttons.
Unique Features of One Page Quick Checkout for WooCommerce
- Popup Checkout Form: Let buyers finish orders without leaving the product page. It opens a fast popup checkout so everything stays in place.
- Complete Form Control: Customize every part of the checkout form, including fields, labels, and placeholders. You decide what to show or hide.
- Slide-Out Menu Cart: Shows a clean cart drawer from the side of the screen. Makes it super easy to view and update items anytime.
- Quick View Option: Lets customers preview product details in a pop-up. They don’t need to open a new page just to check info.
- Direct Checkout Tools: Buyers can skip the cart and go straight to checkout. Works great for fast shopping and one-click product purchases.
- AJAX-Powered Checkout: No page reloads while checking out means a faster, smoother process. Everything updates instantly without breaking the user flow.
- Trust Badge Support: Adds trust badges to the checkout area for buyer confidence. Makes the payment area look safe, clean, and secure.
- Product Display Styles: Choose how to show products: table, list, tabs, slider, and more. Helps match the layout with your store’s design.
This plugin is available in both free and PRO versions, giving you flexibility based on your needs. Here’s how you can install it:
Step 1: Plugin Installation
Free Version
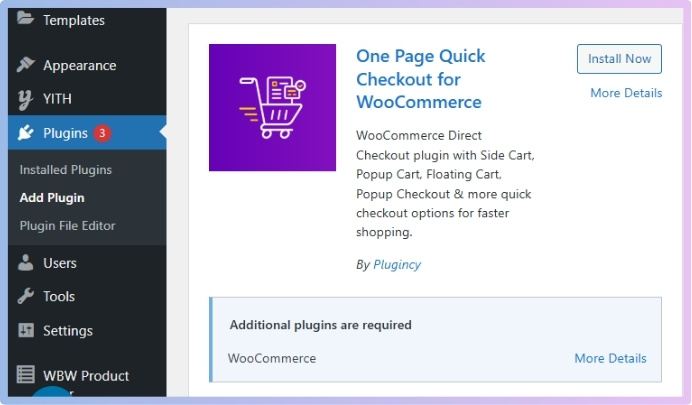
- Go to your WordPress Dashboard > Plugins > Add New
- Search for: One Page Quick Checkout for WooCommerce
- Click Install Now and then Activate

PRO Version
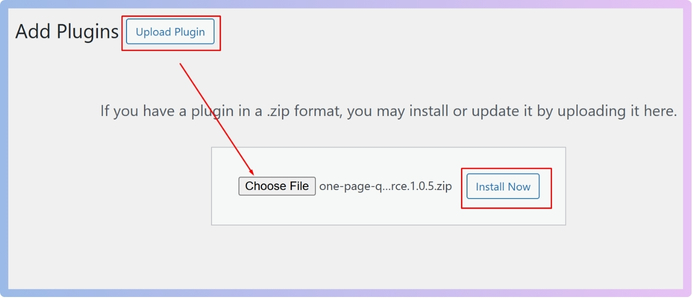
- Purchase the PRO plugin from the official website.
- Download the ZIP file from the email you received.
- Go to WordPress Dashboard > Plugins > Add New > Upload Plugin

- Upload the ZIP file, click Install Now, then Activate
- Enter the License Key under One Page Quick Checkout settings.
Manual Plugin Installation Using FTP
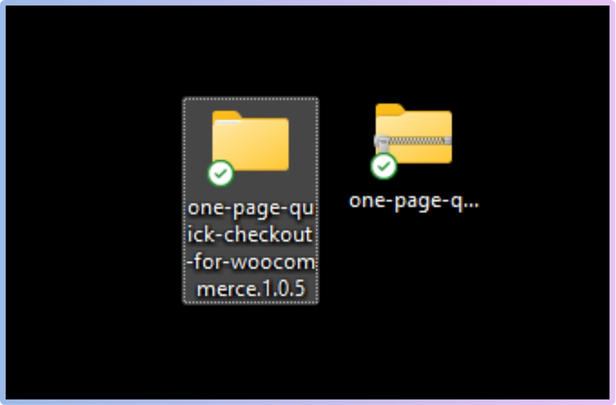
- Download the ZIP file
- Extract the ZIP file.

- Upload the extracted folder to /wp-content/plugins/ using FTP.
- Go to Plugins in the WP admin and click Activate.
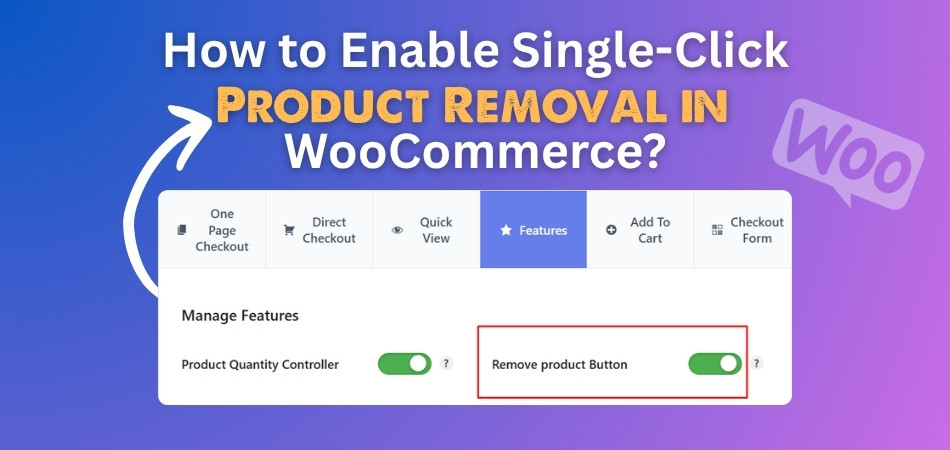
With the plugin installed, you can now enable Single-Click Product Removal in the One Page Checkout for WooCommerce page. To do so, follow the next steps.
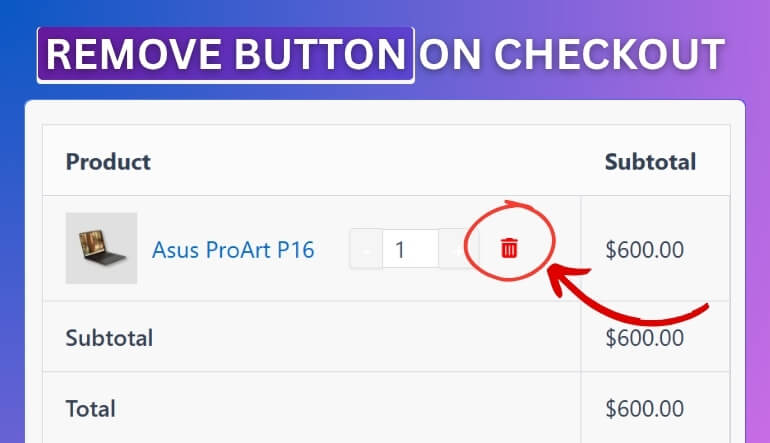
Step 2: Enable Single-Click Product Remove Button
- Go to Dashboard>On-Page Checkout.
- Click on Features.
- Enable the Remove Product Button option.

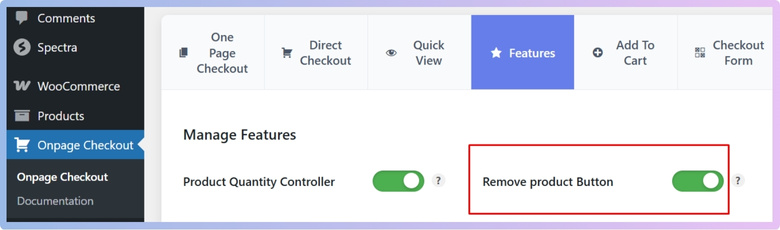
Once enabled, you will see the following result on the checkout page: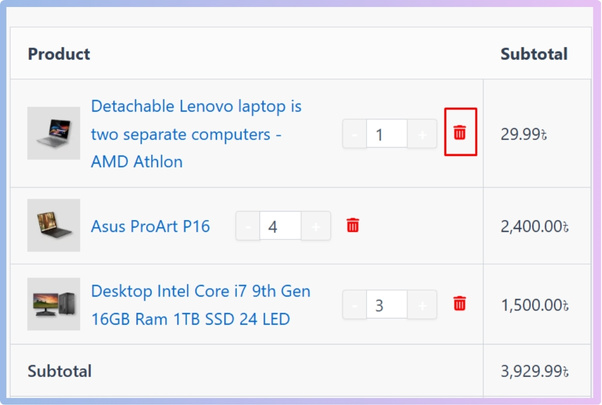
You now know how to make WooCommerce’s Single-Click Product Removal functional. With the correct plugin installed, it’s easy. These modifications provide your store with a more unique and user-friendly vibe. Give it a try and observe how it enhances the buying experience for your customers.
Why WooCommerce Site Owners Should Enable Single-Click Product Removal at Checkout?
Making the checkout process smooth is one of the best ways to keep customers happy. Small changes can make a big difference. One of those changes is the option to remove items with just one click. Let’s explore why this simple feature matters so much.
Saves Shopping Time
Customers don’t want to waste time deleting unwanted items. A single-click remove button helps them fix their cart quickly. It saves them from going back and forth between pages. Less time spent means they’re more likely to finish buying. A faster checkout is always a better checkout.
Reduces Frustration
Too many steps can annoy buyers, especially when using a phone. If they can’t remove items easily, they might leave the site. A simple remove button makes things easier and smoother. It puts users in control of their cart. That small change can lower cart abandonment.
Better Mobile Experience
Phones have small screens, so less clicking is always better. With single-click removal, users don’t need to pinch, zoom, or scroll too much. They can manage their cart with just one tap. It fits well with how people shop on mobile. Clean and easy always wins.
Cleaner Checkout Page
When buyers can remove items fast, the page stays neat. No extra items mean less confusion while paying. A tidy checkout makes buyers feel more in control. It also helps avoid mistakes like paying for something they didn’t want. Clean pages lead to clearer decisions.
Boosts User Control
People like to feel in charge when shopping online. Letting them remove products quickly gives them that control. They don’t have to search for hidden buttons or steps. Everything is right there and easy to use. That makes shopping feel simple and stress-free.
Increases Conversion Rates
A smoother checkout means more people finish their order. If they can change things easily, they’re more likely to buy. Even a small feature like this can help more sales happen. It’s a simple way to turn visits into real purchases. Less hassle brings better results.
Custom Code or a Plugin: Which One Is Best for Product Removal at Checkout?
Choosing between custom code and a plugin for removing products at checkout depends on what you need and how much effort you’re ready to put in. Both options have pros and cons. Here’s a simple comparison table to help you decide:
| Aspect | Custom Code | Plugin |
| Ease of Setup | Needs coding skills and time to build from scratch. | Quick setup with just a few clicks. |
| Time Required | Takes longer to write, test, and fix. | Can be done in minutes. |
| Technical Knowledge | Requires strong coding skills or hiring a developer. | No coding needed. Easy for anyone to use. |
| Flexibility | Fully customizable if you know what you’re doing. | Offers many features, but within plugin limits. |
| Cost | Might cost more if you hire a developer. | Many plugins are free or low-cost. |
| Updates & Support | You handle fixes and updates on your own. | Most plugins offer regular updates and help. |
| Compatibility | May break with WooCommerce updates or themes. | Built to work with WooCommerce and popular themes. |
| Speed of Implementation | Slower due to testing and debugging. | Faster since everything is pre-tested. |
| Maintenance | Needs manual care over time. | Plugins handle most of the work automatically. |
| Best for Beginners | Not beginner-friendly at all. | Perfect choice for non-tech users. |
Do You Always Need a Plugin to Enable Product Removal at Checkout?
Not every WooCommerce site needs a plugin to remove products at checkout. Some themes or custom setups already include this option by default. But most store owners use plugins because they save time and work well. If your theme doesn’t have the feature, a plugin makes it easier.
Plugins are simple tools made for non-coders who want fast results. You don’t need any special skills to use them right. Just install, turn on the feature, and you’re done in minutes. They also come with updates and support, so your store stays smooth.
Using custom code is also an option, but it needs care and testing. One small mistake in the code can break things fast. You also have to fix it yourself if anything goes wrong later. So while plugins aren’t always needed, they’re often the better choice.
What Are Some Overlooked Checkout Enhancements in WooCommerce?
Improving checkout doesn’t always require major action. Sometimes, small changes can improve the whole shopping process in a big way. Many useful features get missed simply because they’re not turned on. Let’s look at a few that can really make a difference.
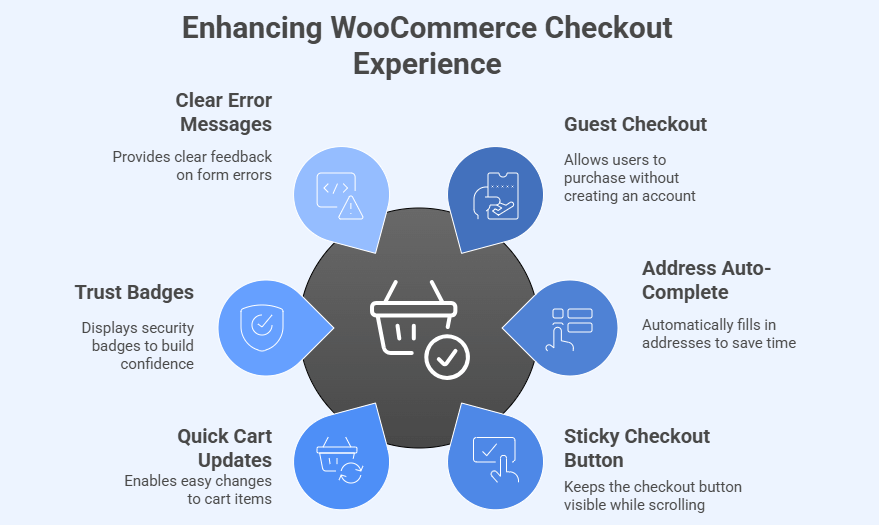
Guest Checkout Option
Not everyone wants to create an account just to buy something. Allowing guest checkout saves time and keeps things simple. It helps users who only want to shop once. This small change can reduce cart abandonment. People enjoy a faster way to check out.
Address Auto-Complete
Typing full addresses can be slow and boring. With auto-complete, buyers just type a few letters, and the form fills itself. It’s a fast and smart way to save time. It also lowers typing mistakes. Most users love anything that makes checkout quicker.
Sticky Checkout Button
Sometimes, the “Place Order” button is hard to find, especially on phones. A sticky button stays visible as users scroll. This makes it easier to complete the order without searching the screen. It helps save time and avoids confusion. Mobile users find this super helpful.
Quick Cart Updates
Shoppers may want to change item numbers or remove something quickly. If they can’t do that easily, they might leave. Letting them update the cart from the checkout page saves time. You can also set up add to cart notifications in WooCommerce to show quick alerts when items are added. One-click controls always improve the user experience.
Trust Badges Display
Many people worry about online payments. Adding trust badges like “Secure Checkout” can make users feel safer. It builds confidence right before they pay. Even a small icon can have a big impact. A safer look can lead to more orders.
Clear Error Messages
When users fill something wrong, they should know what to fix. Clear error messages help them do that right away. If they don’t understand the problem, they might quit. Use simple red messages near the field. It’s a small detail that helps a lot.
Tips on Restoring a Product After Accidental Cart Removal
Removing a product from the cart by mistake happens more often than you think. Luckily, there are simple ways to fix it. Here are some quick tips to help shoppers restore their items without any trouble.
- Undo Button Option: Some stores offer an undo button right after removing an item. Clicking it puts the product back into the cart instantly.
- Use Cart History: Certain plugins keep a short history of cart actions. You can restore a removed product by clicking the “restore” or “back” button.
- Enable Save Cart: Allow users to save their cart before leaving. If they remove something by mistake, they can reload the saved cart later.
- Auto-Restore Popup: A small popup can appear when someone removes a product. It gives them the option to undo the action right away.
- Session-Based Cart Restore: Use session-based tools that remember cart activity during the visit. It allows quick recovery of removed products before the session ends.
- Product Reminder Message: Display a small message showing the last removed product. Add a “restore” link that brings the item back into the cart.
How Do Visual Tweaks Support Better Interaction with the Remove Button on Checkout?
A small design change can make a big difference in how people use your checkout page. The remove button is easy to miss if it doesn’t look right. Good visuals help shoppers act fast without thinking too much. Let’s look at how simple visual tweaks can help.
Button Size and Shape
Tiny buttons are hard to tap, especially on phones. Making the remove button a bit larger helps people click it easily. A round or square shape with padding works well. It also makes the button stand out. The right size feels better to use.
Color That Stands Out
If the button blends into the page, shoppers may not see it. Using a strong color like red or orange makes it pop. But make sure it still matches the overall site look. A bright button tells users what it does. Good color choices guide people clearly.
Icon With Text
Adding a small trash can icon next to the word “Remove” helps people understand its use faster. Icons make the meaning clear even without reading. Together with text, it works better for all users. It also adds a cleaner design. The button becomes more user-friendly.
Clear Button Placement
The button should be in the same spot for all items in the cart. If it moves around, users might get confused. Keeping it near the product image display at checkout or the name makes it easy to find. A clean layout helps users act faster. The right spot means less thinking.
Hover and Click Effects
A small color change or shadow when hovering over the button gives feedback. It tells users the button is active. A quick animation when clicked also feels satisfying. These effects improve user experience. Simple changes make the button feel more responsive.
Space Around the Button
Crowded designs make it harder to tap the right thing. Give the remove button some breathing space. Extra space keeps people from clicking the wrong item. It also looks less messy. A little room makes the page easier to use.
Frequently Asked Questions
When you’re managing a WooCommerce store, small features can make a big impact on how customers interact with your checkout. Single-click product removal is one of those smart, time-saving features. Here are some helpful answers to common questions you might have before setting it up.
How Can I Add a Confirmation Message Before Removal?
You can use a plugin or custom script to show a small popup asking users to confirm before they remove a product. This is helpful when users accidentally click the remove button. It gives them a chance to cancel the action. It adds safety without slowing things down.
How Do You Test If the Remove Button Works Correctly?
Test the remove button by adding items to the cart, using different devices, and removing them during checkout. Check if the cart updates instantly and if the item disappears without errors. Also test on both desktop and mobile. Always review behavior after plugin updates.
What Happens If the Remove Button is Clicked by Mistake?
If the feature includes undo support or a restore popup, the item can be added back instantly. Without that, the product is gone until re-added. Using plugins with restore features helps prevent frustration. Always choose a plugin with this safety option.
Which Button Text Works Best for Better Understanding?
Simple words like “Remove” or “Delete Item” work best because they are clear to all users. Avoid confusing terms like “Edit” or “Change.” Pairing the text with an icon improves clarity. Use short and direct wording that matches your site’s tone.
How to Place the Remove Button Without Breaking Layouts?
Most plugins place the button near the product name or image, which is ideal. Avoid hiding it in dropdowns or far edges. A clean spot keeps it accessible. Testing layout on desktop and mobile helps confirm it looks and works right.
Does Button Placement Change on Different Devices?
In most cases, the button will adapt based on screen size using responsive design. A good plugin makes sure it stays usable on both mobile and desktop. Test across devices to be sure. Mobile users especially benefit from centered or large-tap buttons.
Will Product Removal Trigger Any Backend Actions?
In most setups, removing a product simply updates the cart. However, advanced setups may connect it to stock updates, tracking, or analytics. It depends on your configuration. Check plugin docs to be sure what happens behind the scenes.
Final Thoughts
Making your WooCommerce store easier to use is all about small changes that make a big impact on your shoppers. Enabling single-click product removal is one of those features that feels simple but creates a much smoother and faster checkout experience. Happy customers are more likely to finish their orders and come back to shop again.
If you ever wondered how to enable single-click product removal in WooCommerce, the good news is that it’s much easier than it sounds. With the right plugin, you can set it up quickly and give your customers the freedom to manage their carts with just one click. You don’t need to be a tech expert to make your checkout page user-friendly.
This small tweak makes the checkout feel cleaner, faster, and more enjoyable. It helps reduce mistakes, builds trust, and encourages buyers to complete their purchase with ease.