WooCommerce powers many online stores, helping sellers manage products, orders, and customer interactions. One small feature that makes a big difference in user experience is the Add to Cart notification. It tells shoppers their action worked and keeps them moving forward. That’s why many store owners want to know how to set up add to cart notifications in WooCommerce.
Set up Add to Cart notifications in WooCommerce by installing the “One Page Quick Checkout for WooCommerce” plugin. Go to Onpage Checkout > Add to Cart > Button Behavior, then choose a style like popup or toast. Customize the message and save changes.
If this topic interests you and you want to create a better shopping flow, this article has everything you need. It covers plugin setup, notification styles, best placement spots, and common problems with solutions. Keep reading to explore all the ways you can make your store smoother and more helpful for your buyers.
How to Set Up Add to Cart Notifications in WooCommerce?
Add to Cart notifications in WooCommerce are alerts or messages that show up when a customer adds a product to their cart. These messages provide confirmation of the action, reduce user confusion, and guide users toward the next step, usually the checkout. You can set up these notifications in two main ways:
Method 1: Custom Code (Advanced Method)
This method involves adding code manually to your WordPress theme. Specifically, you edit your theme’s functions.php file or a child theme.
Tools Used:
- WooCommerce hooks, such as woocommerce_add_to_cart
- Custom PHP code
- Possibly JavaScript for popups
What It Can Do:
- Trigger custom messages when a product is added to the cart
- Show popups or other types of frontend feedback
Important Note:
This method is not beginner-friendly. It requires:
- A good understanding of PHP
- Familiarity with JavaScript
- Comfort with editing theme files
While it gives you full control, it’s more complex and better suited for developers.
Method 2: Plugin (Beginner-Friendly)
If you’re not comfortable with editing code or just want a faster, hassle-free way to set up Add to Cart notifications, using a plugin is the best option. Plugins are built to simplify complex tasks and make WooCommerce customization more accessible for beginners. They often come with user-friendly interfaces, built-in features, and no risk of breaking your site with code errors.
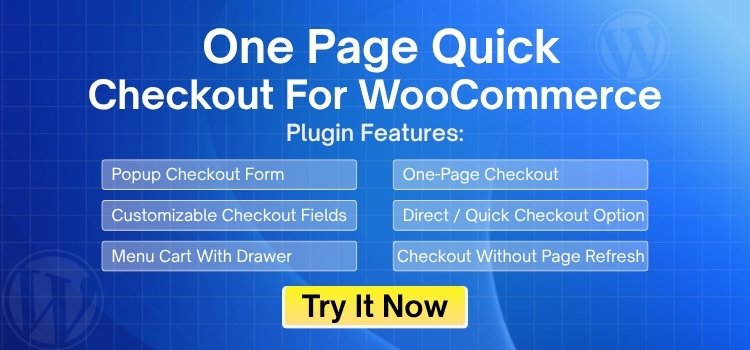
One of the most efficient and easy-to-use plugins for this purpose is One Page Quick Checkout for WooCommerce, which is designed to simplify the buying process and includes features. It enhances both the cart experience and overall checkout flow for anyone looking for a reliable, quick checkout for woocommerce solution.
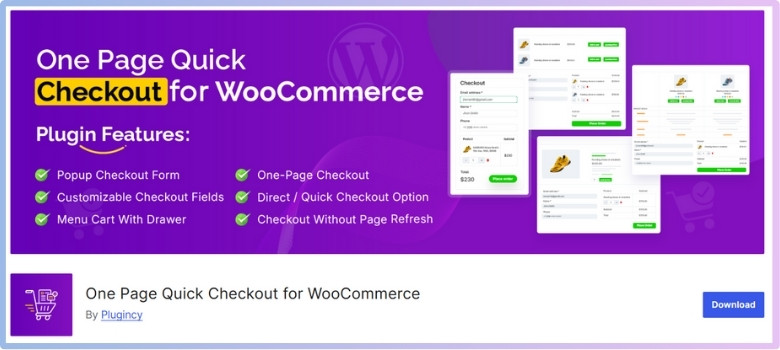
Key Features of One Page Quick Checkout for WooCommerce:
- Checkout without page refresh for a smoother, uninterrupted user experience
- Direct checkout button on product pages for faster conversions
- Built-in Elementor widgets and Gutenberg blocks for seamless page builder integration
- Fully responsive design that works flawlessly across all devices — desktops, tablets, and smartphones
This plugin is available in both Free and Pro versions, making it suitable for all types of stores — from small startups to larger businesses. Now, let’s walk through how to install it.
Installation – Free Version:
Here’s how to quickly install the free version of the plugin directly from your WordPress dashboard.
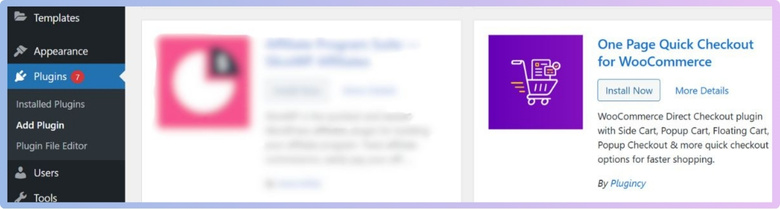
- Go to WordPress Admin Dashboard → Plugins
- Click “Add New Plugin”
- Search for: One Page Quick Checkout for WooCommerce
- Click “Install Now”
- Click “Activate”

Installation – PRO Version:
To unlock more advanced features, you can install the PRO version after purchasing it from the plugin’s official site.
- Purchase the PRO Version
– Visit the official website and complete your purchase. - Download the PRO Plugin
– After purchase, you’ll receive a ZIP download link via email. - Install the Plugin
- Log in to WordPress Admin Dashboard
- Go to Plugins > Add New
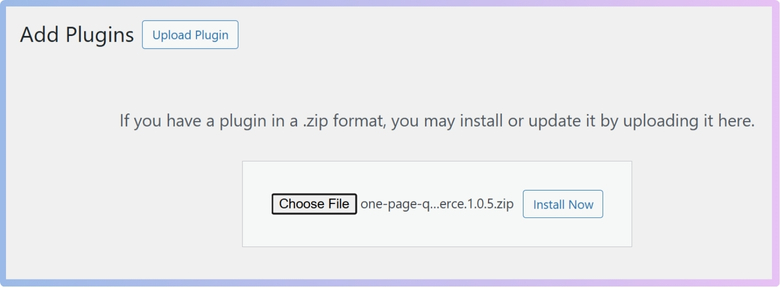
- Click Upload Plugin
- Select the ZIP file you downloaded
- Click Install Now

- Activate the Plugin
- After installation, click the Activate button
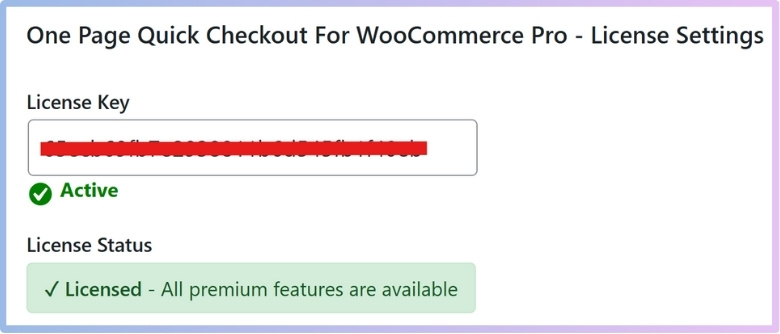
- Enter License Key
- Navigate to Onpage Checkout > Plugin License
- Enter your license key to unlock PRO features

Set Up Add to Cart Notifications (After Plugin Installation)
Once the plugin is installed and activated, follow these steps to enable and customize Add to Cart notifications:
Step-by-Step Process:
Navigate through the plugin settings to locate the notification options and start configuring them to your liking.
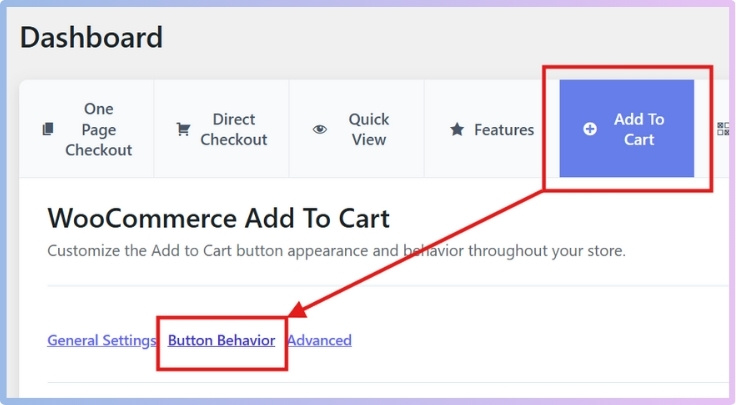
- Log in to your WordPress dashboard
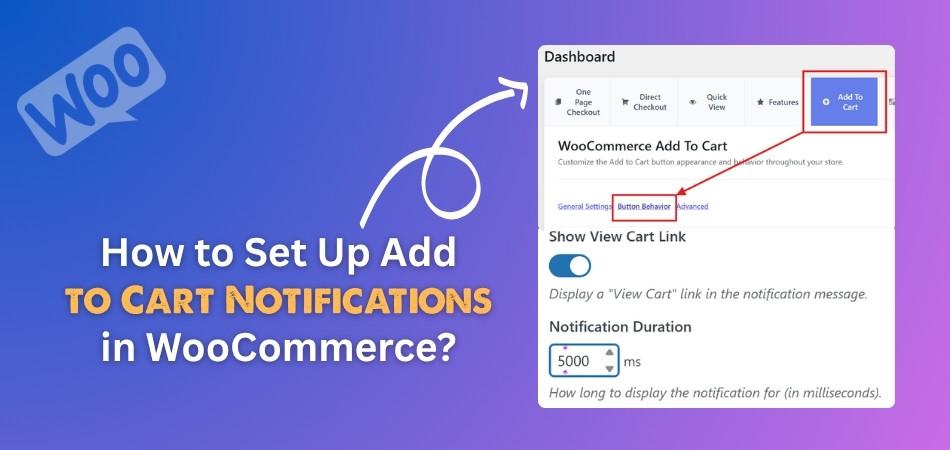
- Click on Onpage Checkout in the menu
- Go to the Add to Cart tab
- Click on Button Behavior
- Scroll down to find the Notification Panel

Notification Settings Available:
Customize the look, message, and behavior of your notifications using the following available settings:
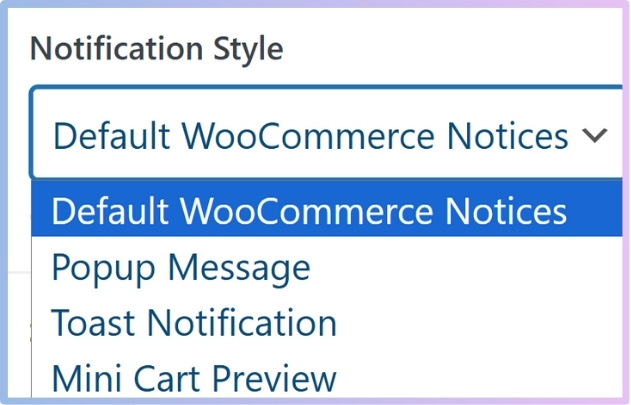
- Notification Style:
Choose how the alert appears when a product is added to the cart:- Default WooCommerce Notices
- Popup Message
- Toast Notification
- Mini Cart Preview

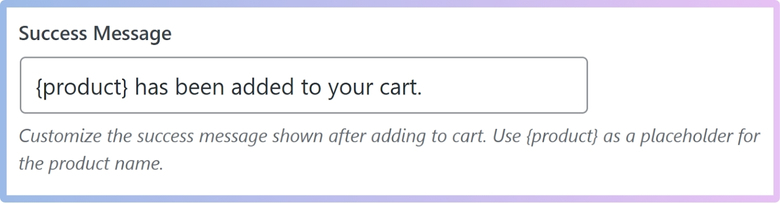
- Success Message:
Customize the message shown after adding a product to the cart.
You can use {product} as a placeholder for the actual product name.
Example: “{product} has been added to your cart!”
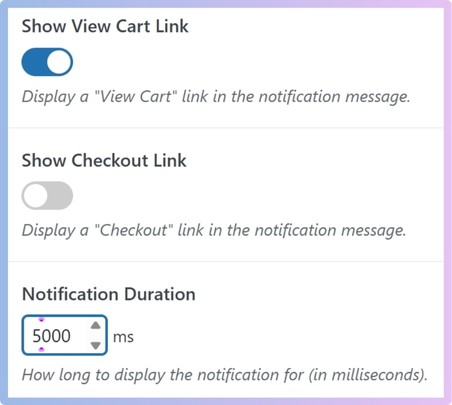
- Show View Cart Link:
Option to display a “View Cart” link within the notification. - Show Checkout Link:
Option to display a “Checkout” link in the notification for easy access. - Notification Duration:
Set how long the notification should appear (in milliseconds).
Example: 5000 = 5 seconds
After adjusting all notification options to your preference, click “Save Changes”. You’ve now successfully set up Add to Cart notifications in WooCommerce using either:
- Custom code (if you’re advanced), or
- A plugin (if you prefer a beginner-friendly, no-code solution).
This ensures better user feedback and a smoother shopping experience.
Add to Cart notifications help improve user experience by confirming actions and guiding customers toward checkout. Whether using custom code or a beginner-friendly plugin, setting them up is simple with the right approach. Choose the method that suits your needs and make your WooCommerce store more engaging.
Why Add to Cart Notifications Matter for User Experience?
When you’re shopping online, especially on a phone, it’s easy to miss small details. You tap a button, but you’re not always sure if it worked. That’s why cart notifications are more helpful than you might think. Keep reading to find out why they really matter.
Instant Confirmation
Every time someone taps the “Add to Cart” button, they expect something to happen. If there’s no response, it feels broken or confusing. A quick animation or message tells users, “Yes, your item is in the cart.” This is especially helpful on mobile screens where things are smaller and easier to miss. Simple cues like this stop people from clicking over and over, which can cause unwanted duplicate items or even frustration.
Visual Feedback
A small pop-up, sliding banner, or mini cart that appears after adding an item helps show something changed. These visual signs don’t just confirm the action—they guide what to do next. Some stores even go further and add product images to checkout forms so users feel confident they’re buying the right item. That small touch makes the experience feel more complete and organized, without the user even thinking about it.
Avoiding Mistakes
Sometimes, users accidentally tap the same button twice if they don’t see anything change. Without a clear message, they might think nothing happened. This can lead to extra charges or cart confusion. A quick notification helps prevent this by confirming the action right away. It’s like a small sign that says, “Got it!”—and that makes a big difference in keeping things simple and error-free.
Better Mobile Flow
Mobile shopping means smaller screens and slower taps. A user might not notice tiny changes or hidden carts. With a clear cart notification, the app or website lets them know their item is safely stored. This keeps the flow smooth without having to reload the whole page. It’s also super useful for stores using AJAX, where the page doesn’t reload after clicking. A quick notice makes sure users don’t feel lost.
Builds Trust
When people shop online, they want to feel sure about what they’re doing. A simple cart message makes the store feel more reliable. It shows that the site is working and paying attention to each click. These little feedback signals—especially when they’re smooth and fast—build trust without needing to say much. Shoppers feel more comfortable moving forward with their purchase when things just “click” in the right way.
Cart notifications might seem small, but they play a big role in making online shopping feel smooth. They help people know their actions are working without needing to guess. This keeps everything clear and avoids extra clicks or mistakes. When a store feels easy to use, people are more likely to keep shopping and come back again.
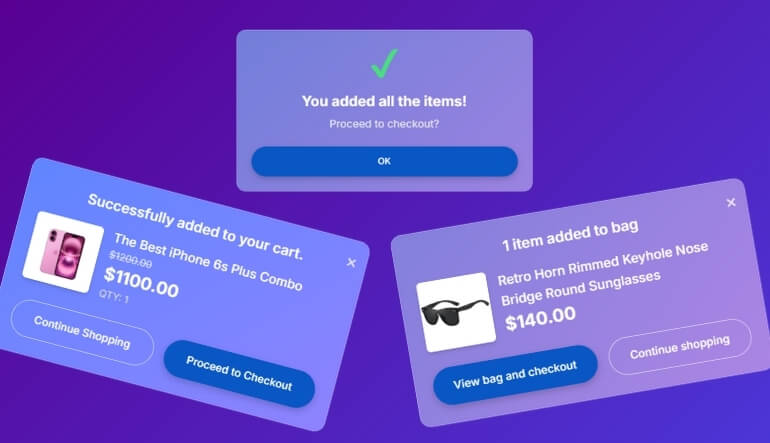
Types of Add to Cart Notifications You Can Use in WooCommerce
Adding products to the cart is a big part of online shopping. When someone clicks “Add to Cart,” it’s important to show them something right away, so they know it worked. There are different ways to do this. Let’s check them out below.
Inline Messages
Inline messages appear right inside the page, usually near the “Add to Cart” button. They’re simple and don’t interrupt the shopper. This style is great for stores that want to keep things calm and fast. But sometimes, shoppers miss the message if they scroll too fast or aren’t looking at that area. Still, it’s a neat and clean choice for most websites.
Toast Notifications
Toast notifications pop up for a few seconds on the side or corner of the screen. They tell the shopper that the item was added to the cart and then fade away. These are great for quick alerts without stopping someone’s shopping. But if the shopper doesn’t notice it quickly, it disappears. These work well for trendy or fun-looking stores.
Modal Popups
Modal popups show up in the center of the screen and block everything else. They’re good because they grab attention right away. You can show cart details or suggest other products too. But they can be annoying if they show up too often. They’re best for stores that want to upsell or guide shoppers carefully.
Sidebar Cart
Sidebar carts slide in from the side and show what’s in the cart. They let shoppers check things without leaving the current page. That’s useful and saves time. Some people love this style because it’s smooth and helpful. But on small screens, it can look messy. These work best for stores with lots of products or deals.
Full Cart Redirect
This style sends shoppers straight to the cart page after clicking “Add to Cart.” It makes sure they see what’s in the cart and can check out fast. But it also stops them from browsing more. That’s why this style works well for stores that sell fewer items or products that don’t need much thinking.
Each style of Add to Cart notification has its own benefits and works best in different types of stores. Some are simple and quiet, while others grab more attention. Think about what kind of shopping experience you want to give. Try a style that fits your store’s look and makes things easy for your shoppers.
Where Should Add to Cart Notifications Be Displayed on Your Site?
Clicking the “Add to Cart” button should always trigger a clear message for the shopper. But the placement of that message can make a big difference. The right spot helps users stay focused and shop with ease. Let’s look at where it works best!
Top of The Screen
Placing the add to cart message at the top of the screen is a common choice. It pops up quickly and is easy to spot without covering the whole page. This spot works well on both desktop and mobile. But if it’s not bright or bold enough, some people might miss it. Still, it keeps the shopping page clean and easy to look at.
Near the Button
This is one of the best places to show the message. Since people just clicked the “Add to Cart” button, their eyes are already there. Seeing the message right next to it makes sense and feels smooth. It helps them feel sure their item was added. On mobile, this also works nicely without hiding anything else on the screen.
Floating sidebar
A floating sidebar can slide in from the side of the screen and stay in place. It’s great for showing more details like what’s in the cart and the total price. It doesn’t interrupt the shopping, but still grabs attention. On mobile, though, it needs to be small so it doesn’t cover too much. This spot is helpful for quick updates.
Center of The Page
Putting the message right in the center of the screen makes it hard to miss. It gets attention fast and clearly shows that the item was added. But it can also block the rest of the page. This can feel annoying if someone is still shopping. It’s best to use this only for big updates or offers, not every time.
Bottom of The Screen
A small message at the bottom of the screen is a quiet way to show the update. It doesn’t block anything and works well on both big and small screens. But sometimes people might not look down there. To make it work well, the message should slide up or have a fun animation so people don’t miss it.
Choosing the right spot for your add to cart message can make a big difference. It helps people know their action worked without any confusion. A clear and well-placed message can improve the shopping experience. Try out different spots and see which one your visitors like the most.
Common Problems With WooCommerce Add to Cart Notifications (and Fixes)
Sometimes, even small issues in your online store can leave shoppers confused or stuck. Add to Cart notifications are one of those little things that need to work smoothly. Let’s take a look at what could go wrong and how to fix it.
Common Problems
Add to Cart notifications may seem simple, but many things can go wrong behind the scenes. These issues can confuse shoppers or make the site feel broken. Let’s look at what could be causing the trouble below.
- Add to Cart message doesn’t appear after clicking the button
- AJAX Add to Cart isn’t working on product or archive pages
- Notification disappears too quickly for shoppers to see
- Conflict with caching plugins hides or delays the message
- Theme styles break the layout or positioning of the notification
Ways to Fix It
Good news—most Add to Cart problems have clear and simple fixes. You just need to follow the right steps and test things properly. Check out the solutions below to get everything working smoothly again.
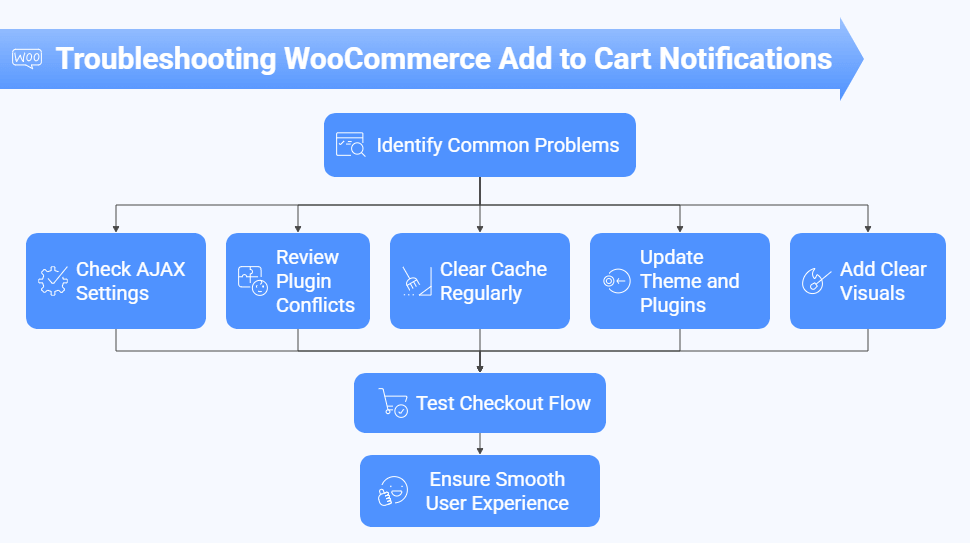
Check AJAX Settings
Some themes or plugins may turn off AJAX automatically. Without AJAX, cart updates won’t happen in real-time, and the shopper may not see the notification. You can go to the WooCommerce settings and make sure AJAX is turned on for both product and archive pages. Once that’s enabled, test again and see if the message shows properly when clicking “Add to Cart.”
Review Plugin Conflicts
A plugin could block or change how your cart notification appears. Start by disabling all extra plugins and test if the message works. Then, turn them on one by one to spot which plugin causes the issue. Caching and performance plugins are often the troublemakers. When you find the one causing problems, try changing its settings or looking for an alternative plugin.
Clear Cache Regularly
When a cache plugin is active, it may show old versions of your site. That can stop new cart messages from showing up. You should clear the site cache and also the browser cache after making changes. This makes sure everyone sees the latest version. If the problem goes away after clearing the cache, try adjusting the plugin’s rules to skip caching cart parts.
Update Theme and Plugins
Old versions of your theme or plugins can cause bugs with notifications. If something breaks after an update, it might also be because your theme isn’t made to support newer WooCommerce versions. Always keep your theme and plugins up to date. That way, the Add to Cart system can work the way it’s supposed to with all the latest features.
Add Clear Visuals
Sometimes the notification is working, but it’s hard to notice. The color, font size, or position might be weak. You can use a small design update to make it stand out. Add a border, change the background color, or use bold text. This doesn’t require a lot of coding, and it helps shoppers see what just happened after clicking the button.
Test Checkout Flow
While broken or delayed cart notifications can confuse users, friction can also arise later in the flow. For example, failing to autofill address for checkout in WooCommerce might slow down conversions—even if your add to cart alerts work perfectly. So, after fixing cart messages, test the entire flow from adding items to completing the purchase. Every step should feel smooth and easy.
Fixing Add to Cart notifications may take a few steps, but it’s worth the time. These messages help shoppers feel sure about their clicks. Once things work right, your store becomes much more user-friendly. Small fixes lead to big wins.
Frequently Asked Questions
These FAQs will guide you through setting up Add to Cart notifications in WooCommerce. These questions cover things that might come up but haven’t been mentioned yet. If you’re feeling stuck or curious, you’ll find clear and simple answers below.
Can I Add Sounds to the Notification?
Yes, you can add sounds when someone adds a product to their cart. This makes the shopping experience more fun and lets the user know something happened. You’ll need a plugin or a bit of custom code to do it. Just make sure the sound is soft and doesn’t play too often, so it doesn’t annoy people.
How Can I Show Product Details in the Notification?
You can include product names, prices, or even small images in your cart notifications. Many plugins let you customize this without needing to code. Showing product details helps users feel sure they added the right item. It also makes the alert more useful and less boring.
Will the Notification Work With Variable Products?
Yes, Add to Cart notifications work with variable products like size or color options. As long as the product is added to the cart, the message will show up. Some plugins even show which variation was chosen. This helps avoid confusion, especially if shoppers pick different styles or sizes.
Can I Hide Notifications on Certain Pages?
Yes, you can hide Add to Cart messages on specific pages, like the homepage or blog. Some plugins give you settings to control where notifications show up. This helps you keep things clean and less crowded. You decide where the message makes the most sense to appear.
Can I Use Emojis in the Notification Message?
Yes, you can add emojis to the text that appears in the Add to Cart notification. It adds a fun touch and makes the message feel friendly. Emojis help catch the user’s eye and make the store feel more personal. Just don’t use too many, or it can feel messy.
How Do I Test If the Notification Works?
To test your notification, just go to any product page and click the Add to Cart button. Check if the message appears where you expect it. Also, try it on different devices like phones or tablets. If something doesn’t show up, you may need to check your theme or plugin settings.
Can I Set Different Messages for Different Products?
Yes, with the help of some plugins, you can set custom messages for different products. For example, you could say “T-shirt added!” for one item and “Book in your cart!” for another. This adds a nice personal touch to your store. It also helps shoppers feel more connected to what they’re buying.
Does the Notification Slow Down My Website?
In most cases, Add to Cart notifications do not slow down your website. They are usually small features that don’t use much space or memory. But if you use too many fancy effects or heavy plugins, it might cause a slight delay. Always test your site speed after adding new features.
Can I Translate the Notification Into Another Language?
Yes, you can translate the cart message into any language you want. Most WooCommerce plugins support translation plugins like Loco Translate. This is helpful if your store serves different regions or countries. Your customers will understand the message better when it’s in their language.
How Can I Style the Notification With My Theme?
You can change the colors, fonts, and layout of the notification to match your theme. Some plugins offer style options built right in, while others may need a bit of CSS. Styling it the right way helps keep your store’s look clean and professional. Just make sure it’s easy to read and stands out enough.
Conclusion
Making your WooCommerce store easier to use starts with simple steps, like showing clear messages when someone adds an item to the cart. Whether you choose to use a plugin or go the custom code route, both methods work well depending on your skill level. The plugin option is quicker and perfect for most users, while coding gives more control. So if you’re still asking how to set up add to cart notifications in WooCommerce, just pick your method, follow the steps, and you’ll be all set in no time.
Before you go, here are a few helpful tips—keep your messages short, test them on mobile, and use a style that fits your store’s look. Also, make sure your cart and checkout pages are working smoothly to avoid confusion. Small design touches can make a big difference. We hope your store runs great and your customers love the shopping experience. Best of luck with your WooCommerce journey!