The checkout page in WooCommerce is where everything comes together before a customer places their final order. It’s the last step, but that doesn’t mean it should look plain or dull. Many store owners want to improve how this page looks and works, and one thing they often think about is how to show product images in WooCommerce checkout page.
To show product images on the WooCommerce checkout page, you need to install a plugin like One Page Quick Checkout for WooCommerce. After installing and activating the plugin, go to your dashboard, open the Onpage Checkout settings, click on “Features,” and enable the “Add Image Before Product” option. This will display product images directly on the checkout page without any coding needed.
Are you wondering how this works step by step or what to do if images don’t show up? Then keep reading—you’ll find all the answers and helpful tips in this article.
How to Show Product Images in WooCommerce Checkout Page?
Sometimes, when people shop online, they like to see what they’re buying—even at the final step. Showing product images on the checkout page makes the shopping feel better. It also helps avoid mistakes. If you’re running a WooCommerce store, this is something you might want to set up. Let’s look at how you can do it, step by step.
Utilize Plugin to Show Product Images in WooCommerce Checkout Page
The easiest way to show product images on the checkout page is by using a plugin. There are free and paid options available, and they work without needing any coding. Just install the plugin, turn on the settings, and it will start showing the images. One popular and beginner-friendly plugin is One Page Quick Checkout for WooCommerce. It saves time and makes the checkout process easier. Below is a quick guide on how to install the plugin and show product images on the checkout page:
Step 1: Install One Page Quick Checkout Plugin
Free Version
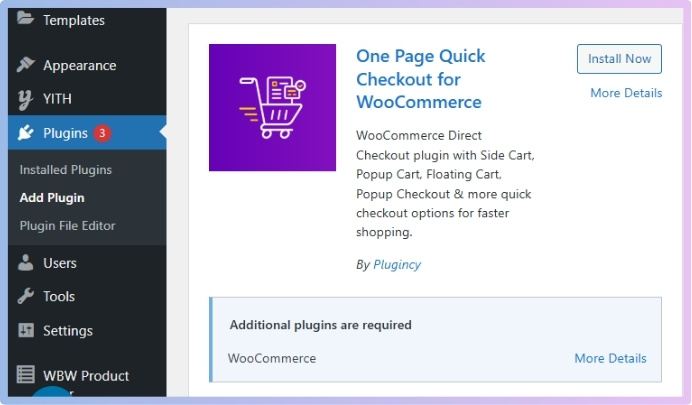
- Go to your WordPress Dashboard > Plugins > Add New
- Search for: One Page Quick Checkout for WooCommerce
- Click Install Now and then Activate

PRO Version
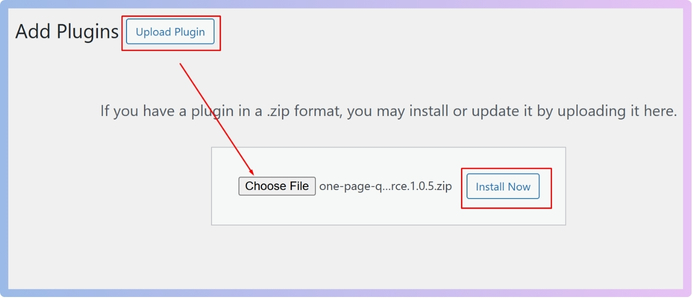
- Purchase the PRO plugin from the official website.
- Download the ZIP file from the email you received.
- Go to WordPress Dashboard > Plugins > Add New > Upload Plugin

- Upload the ZIP file, click Install Now, then Activate
- Enter the License Key under One Page Quick Checkout settings.
Manual Plugin Installation Using FTP
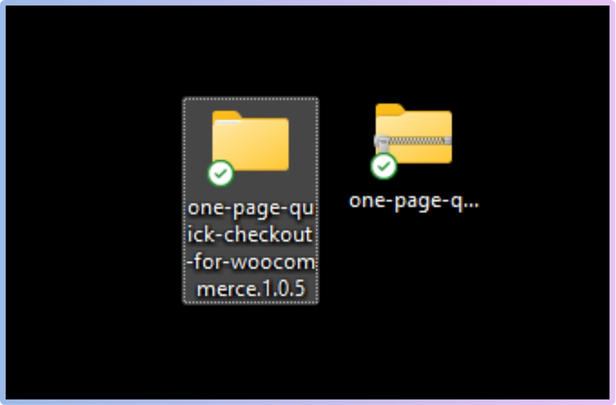
- Download the ZIP file
- Extract the ZIP file.

- Upload the extracted folder to /wp-content/plugins/ using FTP.
- Go to Plugins in the WP admin and click Activate.
With the plugin installed, you can now show product images in the One Page Checkout for WooCommerce page. To do so, follow the next steps.
Step 2: Show Product Images in Checkout Page
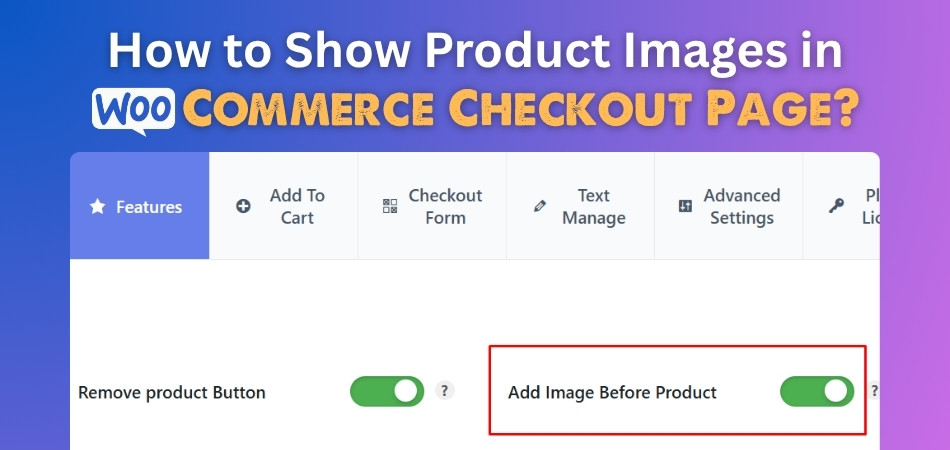
- Go to Dashboard> Onpage Checkout.
- Click on Features.
- Enable the Add Image Before Product option.

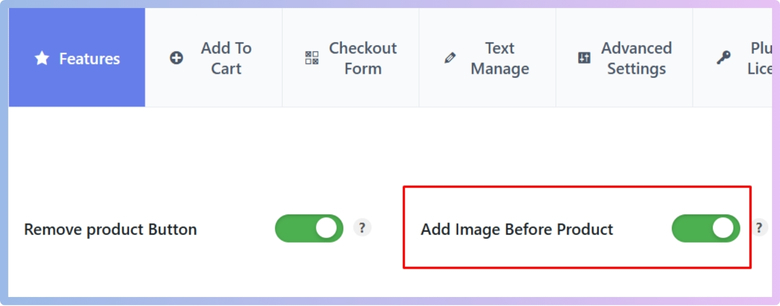
Once enabled, you will see the following result on the checkout page: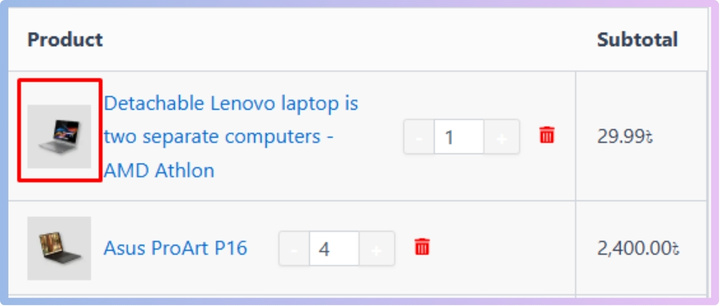
With these simple steps, your checkout page now clearly shows product images. This small change can make a big difference in how your store feels to shoppers.
Why Display Product Images on the Checkout Page?
Buying something online usually ends at the checkout page, but that final step can shape the whole experience. It might seem simple, but what shows up there matters more than you think. Even small touches, like showing product images, can make a big difference. Let’s explore why that helps.
Clear Purchase Reminder
Seeing the product image on the checkout page reminds the buyer of what they are getting. It’s like a final look before paying. This helps people feel sure they picked the right item. If they see something wrong, they can fix it quickly. That way, there’s less chance of buying the wrong thing.
Builds More Trust
When a shopper sees the same image they saw on the product page, it builds trust. It tells them, “Yes, this is the same item you chose.” It makes the website feel honest and clear. People like to feel safe when they give their money online. A product image can help do that.
Fewer Mistakes
Sometimes, people add the wrong product or size by accident. A product image can help them spot those mistakes. If they see something that doesn’t look right, they can go back and change it. That means fewer returns or complaints later. It saves both time and effort for everyone.
Better Shopping Feel
A checkout page with product images looks nicer. It doesn’t feel plain or boring. When things look good, people enjoy the shopping process more. That good feeling can even make them want to shop again. A happy buyer is more likely to come back.
Makes It Faster
Seeing the image can help people check their order faster. They don’t have to read long product names to understand what they added. Just a quick glance at the image is enough. That means less confusion and a quicker checkout. It’s simple and saves time.
Helps First-Time Buyers
New buyers might feel unsure while shopping online. But if they see the image during checkout, it gives them confidence. It tells them, “You’re buying the right thing.” That small image makes a big difference. It’s a friendly way to make the process easier.
Best Method to Display Product Thumbnails in Checkout: Custom Code or Plugin?
Choosing the right way to show product thumbnails during checkout can boost user trust and clarity. It also helps reduce cart abandonment and keeps your store experience smooth. This guide compares using a plugin versus custom code, making it easier to choose the best fit. So look below:

Ease of Implementation
Plugins often require little effort to install and activate. Most come with user-friendly settings panels and helpful documentation. Even beginners with no coding knowledge can use them easily. This makes plugins ideal for quick and simple integration.
Custom code gives full control over how thumbnails are shown. It’s best for those with development skills or access to a developer. While it may take more time initially, the outcome is more tailored. You can fine-tune every detail to match your checkout layout.
Design Flexibility
Plugins usually offer preset designs and limited customization options. Some paid versions unlock more control, but limits still exist. You may have to compromise on layout or styling. If unique branding is essential, plugins might fall short.
With custom code, you decide exactly how thumbnails appear. You can match fonts, sizes, and positions with your theme. This flexibility ensures a consistent and polished design. It helps maintain brand identity across every step of the customer journey.
Performance Impact
A lightweight plugin won’t slow down your checkout page. Reputable plugins are built with performance in mind. However, some plugins may load extra files. These can cause slower loading times and affect user experience.
Custom code can be optimized for performance. You only add what’s necessary and avoid bloated scripts. This keeps your checkout fast and responsive. A better-performing site means fewer cart drop-offs.
Maintenance and Updates
Plugins are regularly updated by their developers. This includes security patches and compatibility updates with WordPress or WooCommerce. However, relying on plugins means trusting third-party maintenance. If updates stop, you may face issues.
Custom code requires personal or team oversight. You must update it for theme or platform changes. This takes more responsibility and time. Still, you avoid dependency on outside developers.
Cost Consideration
Most plugins offer free versions with core features. Premium upgrades often include better support and added options. The cost is usually predictable and budget-friendly. It’s a solid choice for store owners on a budget.
Custom development can be expensive upfront. Hiring a developer or freelancer increases the cost significantly. However, it pays off in long-term flexibility. You invest once and own the complete solution.
Best Fit for Your Store
Small businesses benefit most from plugin simplicity. They save time, reduce cost, and are easy to manage. Plugins handle the basic needs efficiently. It’s a safe and practical route.
Larger stores or brands with complex needs should consider custom code. It allows high customization and seamless integration. If your brand experience is crucial, custom coding wins. Just be ready to invest in proper development support.
Other Visual Enhancements You Can Add Alongside Product Images at Checkout
A checkout page doesn’t have to look plain or boring. Adding a few small touches can make it feel nicer and easier to use. These little changes help shoppers feel more confident before placing an order. They also make the whole process smoother. Want to see what else you can add? Keep reading:
Trust Badges
Trust badges are small icons that show the site is safe. You might see ones like “Secure Payment” or “Money-Back Guarantee.” These badges help people feel better about entering their card details. They act like a friendly promise from the store. Adding them near the payment section works best.
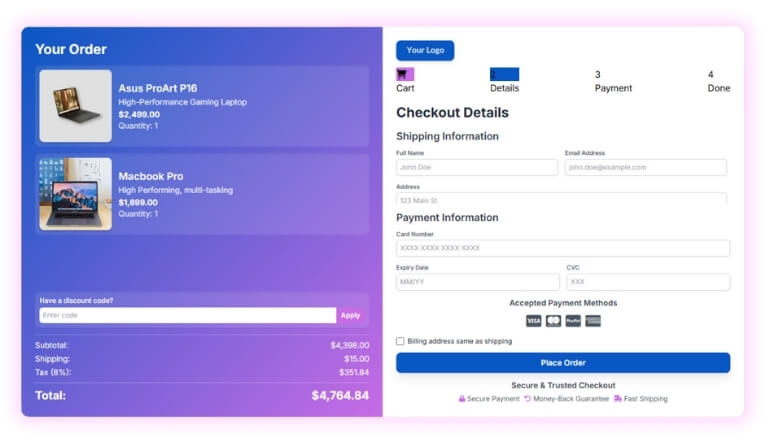
Order Summary Box
An order summary box shows everything you’re buying in one place. It lists each product, the total price, and shipping cost. It makes things clear and helps avoid confusion. If something looks wrong, it’s easy to go back and fix it. A clear summary means fewer mistakes.
Small Brand Logo
Placing a small brand logo on the checkout page can remind people where they’re shopping. It makes the page feel more official and trusted. It also adds a clean and nice look. Just keep it small so it doesn’t distract from the checkout details. A touch of branding goes a long way.
Clean Payment Icons
Icons like Visa, MasterCard, and PayPal show what payment options are allowed. They help people feel safe and save time. The icons should be small and look tidy. You can also customize the Add to Cart button style and text to match the icons and keep the page neat. Small changes like this can make the checkout page look much better.
Progress Steps Bar
A steps bar shows how far along you are in the checkout. For example Cart > Details > Payment > Done. It helps people understand what’s next. This makes them less worried about how many steps are left. A simple bar with 3–4 steps works really well.
Product Thumbnails
Showing small pictures of the products in the order helps people double-check their choices. It’s like a quick visual reminder. This works well for clothes, gadgets, or anything with different colors or sizes. Just one small image beside each item is enough. It makes checkout feel more complete.
Discount Code Section
If there’s a spot to add a coupon or discount code, make it look easy to find. A clean box with “Apply Coupon” or “Have a Code?” works great. People love using deals when shopping. A clear spot for it can make checkout feel more fun. Plus, it may help boost sales.
Does Adding Product Images Affect Checkout Performance?
Yes, adding product images can affect checkout performance, but it mostly depends on how it’s done. Images make the checkout page more helpful by showing what the shopper picked. This helps people feel sure about their order. It also makes the page look nice and clear. But if images are too large, they might slow down loading.
A slow page can make someone leave before buying anything. That’s why it’s important to keep image sizes small and light. Using simple formats like JPG or WebP can help pages load faster. So, the key is using images in a smart and simple way.
When done right, images don’t hurt performance—they help people shop better. They reduce mistakes and build trust with shoppers. That means fewer returns and happier customers overall. Just make sure the checkout stays clean, fast, and easy to use.
What to Do If Images Don’t Show Up After Adding Them
After setting everything up, the product images just don’t appear on the checkout page sometimes. It can be confusing and a little frustrating. But don’t worry—it usually happens because of a small issue. A few simple checks can fix the problem. Let’s go through some easy steps to help you sort it out quickly!
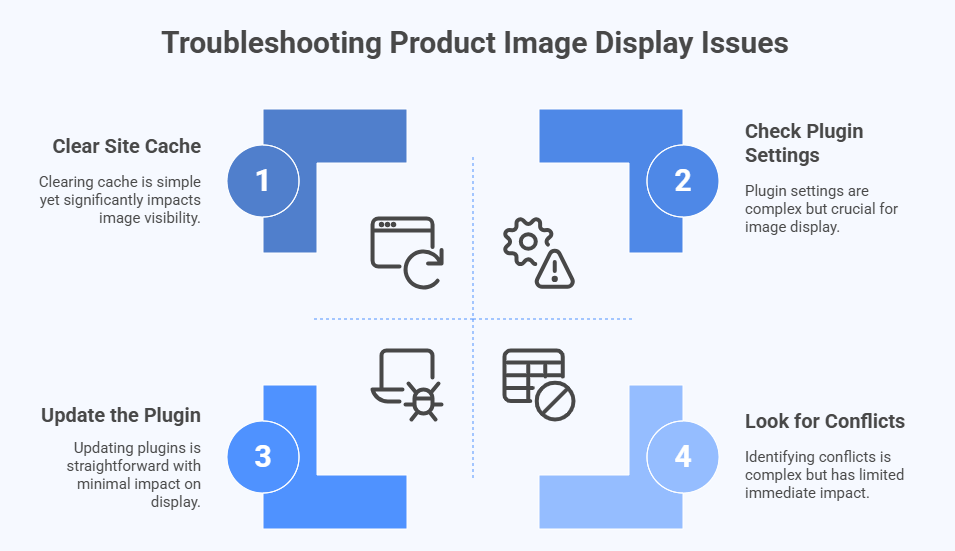
Check Plugin Settings
Start by checking if the plugin you’re using is turned on properly. Some plugins need you to enable image display manually. Look through the plugin settings for anything related to product thumbnails. Make sure the right box is ticked or switch is turned on. A small setting can be the reason why images are missing.
Clear Site Cache
Sometimes, changes don’t show up right away because your site is loading old data. Try clearing the website cache using a cache plugin or your hosting tools. After that, refresh the page to see if the images show up. This step fixes most display issues. It’s like giving your site a quick refresh.
Update the Plugin
If the plugin is outdated, it might not work well with your site. Go to the plugin section and see if there’s an update available. Updating the plugin can fix bugs and bring new features. After updating, check the checkout page again. It’s always a good idea to keep plugins up to date.
Check Theme Settings
Sometimes the theme can block or hide images without you knowing. Look through your theme settings to see if there’s anything about product display. If you recently changed themes, that could be the reason. Switching back to your old theme can help you find the problem. Theme settings can affect many parts of your page.
Try Another Plugin
If nothing works, the plugin itself might not be a good fit. Try using a different plugin that also shows product images. Some plugins are better for certain websites. A fresh install of a trusted plugin might fix the issue. Always choose plugins with good reviews and regular updates.
Look for Conflicts
Other plugins on your site might be causing a problem. Try turning off other plugins one by one to see if the images show. If they do, you’ve found the one causing trouble. Some plugins may even affect features like the option to remove items with one click in WooCommerce, so it’s worth checking closely. Plugin conflicts are common but easy to fix.
Ask for Help
If you still can’t figure it out, don’t stress. Most plugins offer support through email or help forums. You can explain your issue and get a quick solution. It’s okay to ask for help when you’re stuck. Many people face the same issues, and support teams are there to help.
Frequently Asked Questions
You might still have a few more questions about adding product images to the WooCommerce checkout page. This section answers the most common queries, covering everything from styling, plugin choices, display options, and technical tips. Explore the questions below for more helpful ideas and solutions.
Can I Choose Where the Images Appear on the Checkout Page?
Yes, in most plugins, you can choose the image position. Some let you show the image before or after the product name. This makes it easy to match your store’s design. Always check the plugin’s settings to adjust the display as you like.
Will Product Images Show on Mobile Devices?
Yes, if your theme and plugin are mobile-friendly, the product images will show properly on phones and tablets. Make sure your images are not too large. Test the checkout page on a mobile screen to see how it looks before going live.
What Image Size Works Best for Checkout Display?
For the best results, use images that are around 100×100 pixels. They’re small enough to load fast but still clear to see. Large images can slow things down. Keeping them light and square-shaped usually gives a clean look on most themes.
How Do I Fix Blurry Product Images?
Blurry images happen when the uploaded image size is too small or stretched. Always upload clear images with a decent resolution. Then, make sure your WooCommerce image settings and theme aren’t resizing them badly. Regenerating thumbnails also helps fix this issue.
How Can I Test Image Display Without Going Live?
You can test everything using a staging site or maintenance mode plugin. It lets you make changes privately before showing them to customers. This way, you can test image display, layout, and speed. It’s a smart way to avoid mistakes on your live store.
What Theme Works Best With Image Display at Checkout?
Themes made for WooCommerce, like Astra, Storefront, or Flatsome, usually work best. They’re built to handle product layouts smoothly. These themes also avoid conflicts with plugins. A good theme keeps your product images sharp and well-placed during checkout.
Which File Format Should I Use for Product Images?
JPG or WebP are great choices because they load quickly and still look sharp. PNGs are also okay if you need transparency. Avoid using heavy files like TIFF. The right format keeps your checkout page looking nice without slowing it down.
How Do I Reorder Product Info and Images?
You can reorder elements on the checkout page using page builder plugins or hooks if you’re using custom code. Some checkout plugins even let you drag and move things around. This helps match the layout to your style or branding.
What Happens If My Hosting Is Too Slow?
If your hosting is slow, even small images might load poorly. Slow hosting affects the whole checkout page. You might see missing thumbnails or delays. Upgrading your plan or using a content delivery network (CDN) can help improve image loading speed.
Final Thoughts
Making your checkout page better isn’t hard—it just takes a few small tweaks. One of the simplest and most useful changes is showing product images. It helps shoppers feel more confident and reduces the chance of mistakes.
If you’re wondering how to show product images in WooCommerce checkout page, the good news is that it’s easier than you think. With the help of a beginner-friendly plugin and a few quick settings, you can set it up in minutes—no coding needed!
A clean and clear checkout page makes people more likely to complete their purchase. Try it out, and you’ll see how much smoother the shopping experience feels—for both you and your customers.