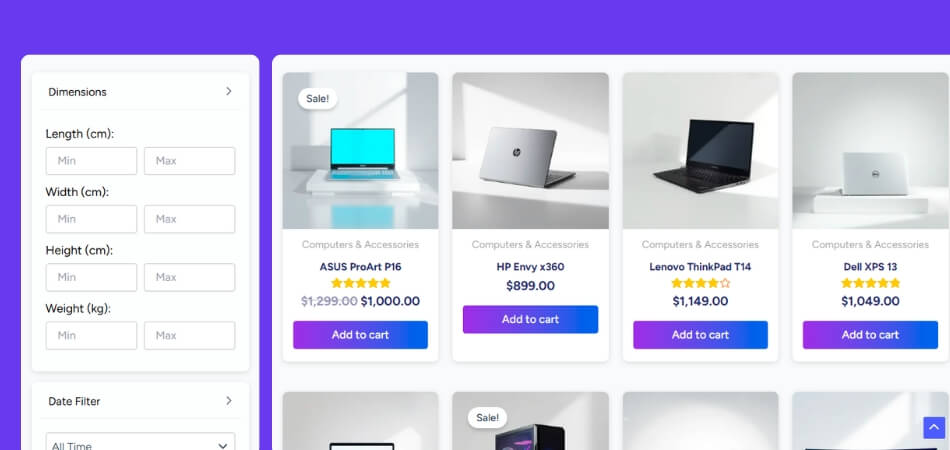
Filtering products by dimensions in WooCommerce is not available as a built-in front-end feature by default, but it is completely possible with the right setup. To add a filter by product dimensions in WooCommerce, store owners usually use a filter plugin, create product attributes for dimension ranges, add custom fields for exact values, or use custom code for advanced filtering logic.
In this guide, we’ll break down how to add filter by product dimensions in WooCommerce step by step, explain when to use it, and highlight usability details that matter before adding dimension filters to your WooCommerce store.
Quick Answer
To add a WooCommerce filter by stock status, first make sure stock management is enabled, and your products have the correct stock values assigned. After that, you can use WooCommerce’s built-in hide setting, a URL-based filter, an AJAX filter plugin, or custom code depending on how much control you need.
Before you choose a method, start with these basics:
- Enable stock management in WooCommerce
- Make sure products have the correct stock status values
- Choose a filter method that supports stock status
- Add the filter to shop or category pages
- Test filtering for in-stock, out-of-stock, and backorder products
What Counts as Product Dimensions in WooCommerce?
Product dimensions usually refer to the physical measurements of an item in WooCommerce. This most often includes the values shoppers or store owners use to understand how large a product is, how it fits in a space, or how it should be compared against other products.
- Length: Measurement from one end of the product to the other
- Width: Measurement across the product from side to side
- Height: Vertical measurement from bottom to top
- Depth: Extra front-to-back measurement some stores use when relevant
- Not Weight: Weight is stored separately and is not part of product dimensions
- Not Variation Size: Options like small, medium, or large are usually variation choices, not physical dimension values
What Do You Need Before Setting the Filter?
Product dimension filters only work when your store already has clean, usable dimension data. If product measurements are missing, mixed, or stored in different formats, the filter may return weak results or miss products that should appear.
Before setting the filter, make sure:
- Relevant products already have dimension values added
- One unit format is used across the full catalog
- Length, width, height, or depth values are entered consistently
- Dimension data is stored where your filter method can read it
- You know which dimension shoppers actually need to filter by
- A few live products have been checked for accuracy
How to Add Filter by Product Dimensions in WooCommerce?
Adding a product dimension filter in WooCommerce depends on how your dimension data is stored and how precise you want the filtering to be. Some stores only need simple dimension ranges, while others need exact values or a setup that works with custom fields and more advanced filter logic. Here we’ll explore some useful methods so you can decide which one fits your store well.
Method 1: Use Product Attributes for Dimension Ranges
Using product attributes is a simple way to add a filter by product dimensions in WooCommerce when you do not need exact numeric filtering. Instead of filtering by raw measurements, this method groups products into practical dimension ranges that shoppers can understand quickly.
Step 1: Plan the Dimension Ranges
Start by deciding how you want to group product dimensions. Keep the ranges practical and easy to scan.
- Under 50 cm
- 50 to 100 cm
- Over 100 cm
You can do this for width, height, length, or any other dimension that matters for your catalog.
Step 2: Create a Product Attribute
Go to Products → Attributes and create a new attribute for the dimension you want to filter by.
Examples:
- Width Range
- Height Range
- Length Range
- Product Size Range
After creating the attribute, add the terms that represent your chosen ranges.
Step 3: Assign Range Values to Products
Open each product and assign the correct dimension range under the attribute you created. This is the most important part, because the filter will only work well if products are grouped consistently.
For example:
- A product with a 45 cm width can go under 50 cm
- A product with an 80 cm width can go under 50 to 100 cm
Step 4: Make the Attribute Available for Filtering
Once products have the right attribute values, make sure that the attribute is used as a filter on the front end. Depending on your setup, this may be done through your WooCommerce filter widget, block, theme settings, or filter plugin.
Step 5: Add the Filter to the Shop Page
Place the attribute filter where shoppers can use it easily, such as the sidebar, shop page, or category page. Keep the title clear so users immediately know what the filter means.
Examples:
- Filter by Width
- Filter by Height
- Filter by Size Range
Step 6: Test the Filter Results
Check the filter on the front end and make sure products appear under the correct ranges. Also review whether the ranges feel useful enough to help shoppers narrow down products without confusion.
Method 2: Use Dynamic AJAX Product Filters for WooCommerce
Using a dedicated WooCommerce product filters plugin is one of the easiest ways to add a filter. This method works best when you want a faster setup and more control over how filters appear on the shop page. Here we’ll use Dynamic Ajax product filters for WooCommerce to show the process.
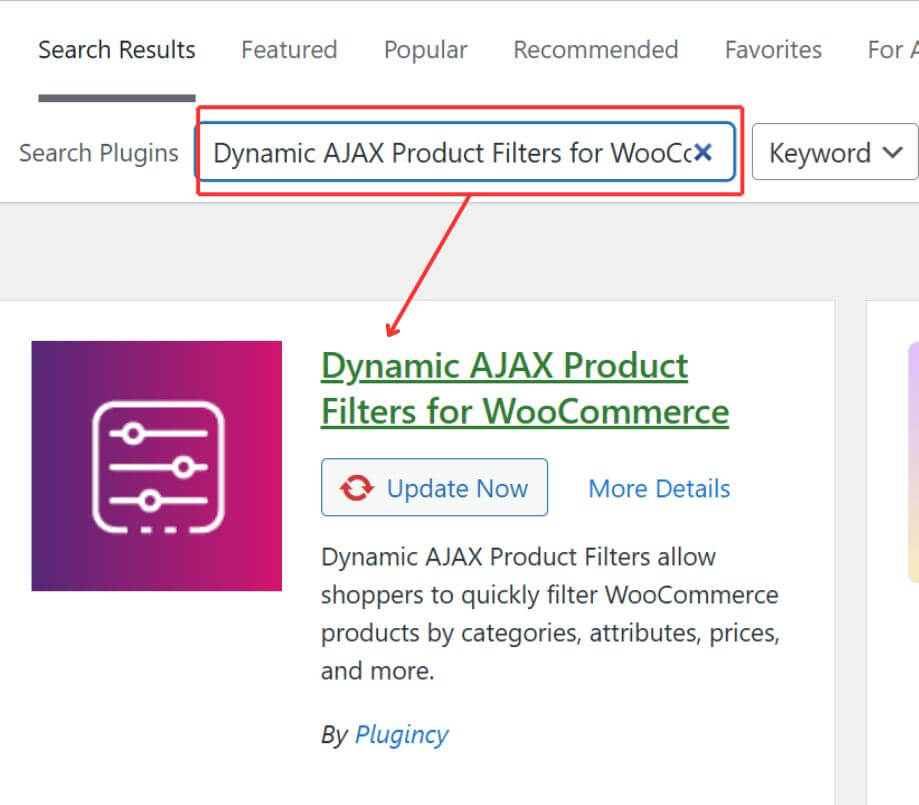
Step 1: Install and Activate the Plugin
Before setting up dimension filters, install Dynamic AJAX Product Filters for WooCommerce on your WordPress site.
- Free Version: Go to WordPress Dashboard → Plugins → Add New, search for Dynamic AJAX Product Filters for WooCommerce, click Install Now, then click Activate.

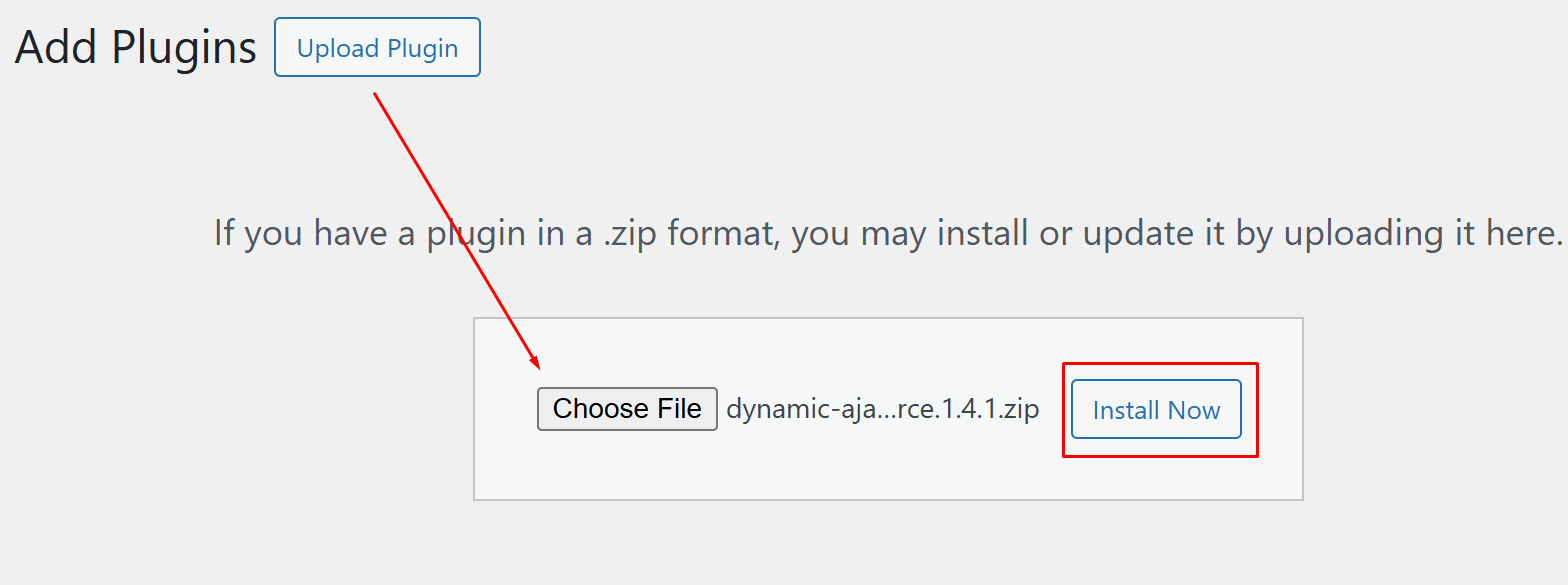
- Paid Version: Download the premium plugin ZIP file from your account after purchase. Then go to WordPress Dashboard → Plugins → Add New → Upload Plugin, upload the ZIP file, click Install Now, and activate it.

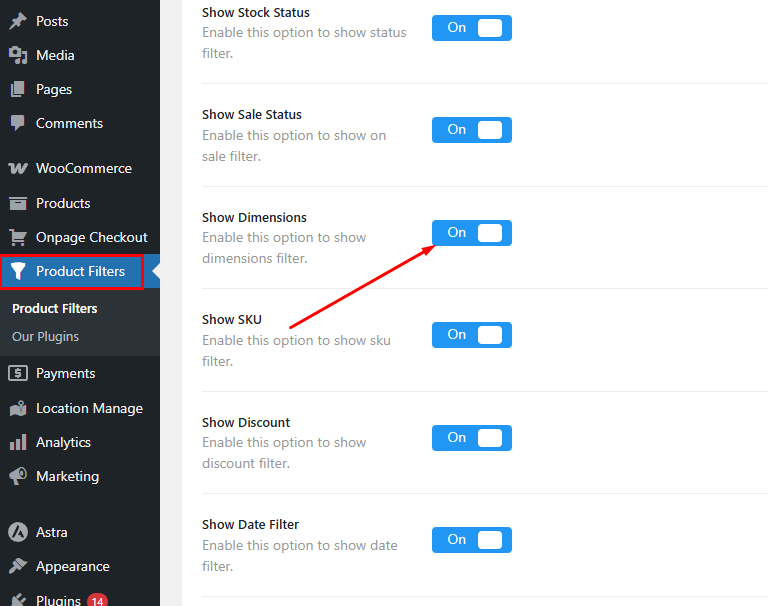
Step 2: Enable the Dimensions Filter
Go to Product Filters → Form Manage and enable Dimensions. This is the main step that adds dimension-based filtering to your filter form.
Step 3: Customize the Dimensions Filter
Open Product Filters → Form Style and choose Dimensions from the attribute dropdown. From there, adjust how the filter looks on the front end.
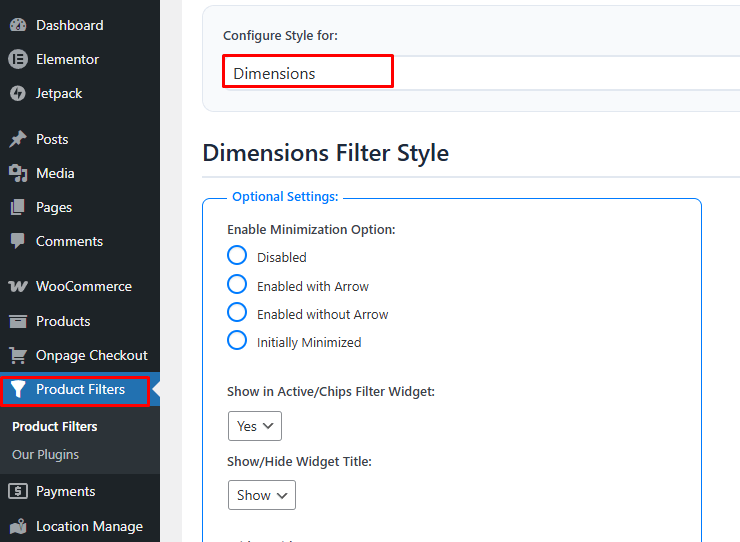
Step 4: Adjust the Optional Settings
Fine-tune the filter based on how you want shoppers to use it. You can control things like collapse behavior, active filter display, widget title, and the labels for length, width, height, or weight.
Step 5: Save the Filter Settings
After making the changes, save the form so the dimension filter is ready to use.
Step 6: Test the Front-End Filter
Check the filter on the live page to make sure the labels are clear, the layout feels clean, and shoppers can narrow products without confusion.
Method 3: Use Custom Fields for Exact Dimension Values
Using custom fields is a better option when your store needs more precise dimension filtering. Instead of grouping products into broad ranges, this method lets you store exact values for length, width, or height and then use those values in a compatible filter setup.
Step 1: Create Custom Fields for Dimensions
Start by creating separate custom fields for the dimension values you want to filter by.
Examples:
- Length
- Width
- Height
- Depth
You can create these fields with a custom field plugin or another product data solution that supports WooCommerce.
Step 2: Add Exact Values to Products
Open your products and enter the exact dimension values into the custom fields. Keep the format consistent across the whole catalog.
For example:
- 45
- 80
- 120
It is usually better to keep the number clean and use one unit format across all products.
Step 3: Standardize the Unit Format
Before building the filter, make sure all products use the same unit, such as cm or inches. Mixing units can make dimension filters inaccurate and confusing.
Step 4: Connect the Custom Fields to a Filter System
Once the values are stored, connect those custom fields to a filter system that can read custom field data. This is the step that turns the stored values into usable front-end filters.
Step 5: Build Dimension Filters From the Stored Values
Create the actual filter using the custom field data. Depending on your setup, you may use exact values, slider-style filters, or defined numeric ranges.
Step 7: Test the Filter
Check whether products appear correctly based on the entered values. Also test for edge cases like missing values, inconsistent entries, or overly narrow filter combinations.
Method 4: Use Custom Code for Advanced Dimension Filtering
Custom code makes sense when your store needs more control than plugins, attributes, or basic custom fields can offer. It is usually the best option for stores that want exact dimension filtering, custom range logic, or a filter setup built around a specific catalog structure.
Step 1: Store Dimension Values in Product Meta
Start by saving length, width, or height in custom product fields. Keep the values numeric and use one unit across the store.
Examples:
- _product_length
- _product_width
- _product_height
Step 2: Add Simple Filter Inputs to the Shop Page
Next, add basic min and max fields so shoppers can enter a dimension range.
add_action(‘woocommerce_before_shop_loop’, function () {
echo ‘<form method=”get”>
<input type=”number” name=”min_width” placeholder=”Min Width”>
<input type=”number” name=”max_width” placeholder=”Max Width”>
<button type=”submit”>Filter</button>
</form>’;
});
Step 3: Filter the Product Query
Use the submitted values to filter products by width.
add_action(‘woocommerce_product_query’, function ($q) {
if (!empty($_GET[‘min_width’]) || !empty($_GET[‘max_width’])) {
$q->set(‘meta_query’, [[
‘key’ => ‘_product_width’,
‘value’ => [floatval($_GET[‘min_width’] ?: 0), floatval($_GET[‘max_width’] ?: 999999)],
‘compare’ => ‘BETWEEN’,
‘type’ => ‘NUMERIC’,
]]);
}
});
Step 4: Expand It for Other Dimensions if Needed
You can repeat the same logic for length or height, or replace free input fields with fixed range links like:
- Under 50 cm
- 50 to 100 cm
- Over 100 cm
That makes the filter easier for shoppers to use.
Step 5: Test Before Using It Live
Before publishing the filter, check that:
- values are stored consistently
- products appear in the right range
- empty results do not become a problem
- filter queries do not slow down large product catalogs

Which Method Is Best for Your Store?
Choosing a method is really about how people shop in your catalog. In some stores, shoppers only need a few clear size brackets to narrow things down quickly. In others, a difference of a few centimeters can decide whether a product fits or not. That is why there is no single best setup for every WooCommerce store.
- Dynamic AJAX Product Filters for WooCommerce: Strong fit for store owners who want the easiest working setup with less manual work. It is a practical choice when you want to add dimension filtering faster and manage it from the dashboard.
- Product Attributes for Dimension Ranges: Good option for stores that only need broad measurement groups like under 50 cm or 50 to 100 cm. It is easier to manage, but not ideal if shoppers need very exact values.
- Custom Fields for Exact Dimension Values: Better match for stores where measurements need to be more precise. This works well when shoppers care about specific width, height, or length values rather than general size brackets.
- Custom Code for Advanced Dimension Filtering: Best reserved for stores with very specific filtering rules or a custom WooCommerce setup. It offers the most control, but also takes more technical work to build and maintain.
Can You Combine Dimension Filters With Other Filters in WooCommerce?
Yes, dimension filters can be combined with other WooCommerce filters, and in many stores that makes the filter setup far more useful. On their own, dimension filters only narrow products by size-related values, but when paired with other filters, they help shoppers reach more relevant results with less effort.
Dimension filters usually work well with these filter types:
- Price Filters: Pairing dimension and price filters helps shoppers find products that fit both their space and their budget, which is especially useful in comparison-heavy product categories.
- Category Filters: Category filters keep dimension filtering focused on the right product type, so shoppers do not mix unrelated items while narrowing by width, height, or length.
- Stock Status Filters: Stock filters make dimension filtering more practical by removing unavailable products, which helps shoppers focus on items that actually fit and can still be purchased.
- Brand Filters: Brand filters work well with dimension filters when shoppers already prefer certain manufacturers and only want products that match both size requirements and brand preference.
- Rating Filters: Rating filters help shoppers narrow results to products that meet dimension needs and already have stronger buyer feedback, which makes product selection feel more confident.
- Attribute Filters: Attribute filters, such as color, material, or use case, can work alongside dimension filters to narrow results more precisely without relying only on physical measurements.
- Custom Taxonomy Filters: Stores that use a custom taxonomy filter in WooCommerce for special product groupings can combine it with dimensions to create more tailored filtered views.
SEO Considerations for Product Dimension Filters
Product dimension filters can improve navigation, but they can also create duplicate URLs, thin pages, and crawl waste if handled poorly. In WooCommerce, dimension-based filter pages should only support SEO when they match real search intent and give shoppers a useful set of results.
- Index Only Valuable Filter Pages: Keep only those filtered pages indexable that target real searches and show enough useful products.
- Avoid Thin Result Pages: Very narrow dimension combinations can create pages with little value for both users and search engines.
- Watch Duplicate URL Paths: Different filter combinations may lead to nearly identical product pages, which can weaken SEO clarity.
- Control Filter URL Parameters: Dimension filters often create parameter-based URLs, so they need careful crawl and index management.
- Use Noindex for Low-Value Pages: Filter pages without a unique search value are usually better left out of the index.
- Keep Labels Clear and Search-Relevant: Dimension names and ranges should make sense to shoppers and reflect how people actually search.
- Be Careful With Combined Filters: Layering dimension filters with price, stock, brand, or even setups that add filter by SKU in WooCommerce can create too many low-value URL combinations if left unmanaged.
- Focus on Useful Search Paths: Pages built around meaningful size or dimension intent are more likely to support SEO than random filter combinations.
- Make Sure Filtered Pages Still Help Users: Even when a filtered page is indexable, it should still feel useful and relevant when someone lands on it from search.
Commonly Asked Questions
Adding filters by product dimensions in WooCommerce can make a big difference in how people shop on your site. Still, many users face small problems or have questions along the way. These FAQs cover useful things that haven’t been talked about yet. Let’s answer them clearly so you can set up your filters with confidence.
Can Product Dimension Filters Work With Variable Products in WooCommerce?
Yes, but only if the dimension data is stored consistently. If variations carry different physical sizes, the filter setup needs to read the correct values from the variation or product data source.
Should I Use Exact Measurements or Dimension Ranges for Filtering?
That depends on how people shop in your store. Exact measurements make more sense when buyers need precision, while ranges work better when shoppers just want to narrow products down quickly.
What Unit Should I Use for Product Dimension Filters?
Use one unit format across the entire catalog. Mixing cm, mm, and inches can confuse shoppers and make dimension filters less reliable.
Why Are Some Products Missing From Dimension Filter Results?
This usually happens when products have missing dimension data, inconsistent values, or dimensions stored in a field the filter cannot read properly.
Can Product Dimension Filters Slow Down a WooCommerce Store?
They can, especially on large catalogs or poorly optimized setups. Performance usually depends on how the data is stored, how the filter is built, and whether too many complex filter combinations are being loaded at once.
Should Every Dimension Filter Page Be Indexed in Google?
No. Most filtered pages do not need to be indexed. Only pages with real search value and useful product results should be considered for indexation.
Are Dimension Filters Better in a Sidebar or Above the Product Grid?
That depends on the layout, but they should appear where shoppers naturally expect to refine products. On many stores, sidebar placement works well on desktop, while a compact filter drawer works better on mobile.
Can I Combine Dimension Filters With Price, Category, or Stock Filters?
Yes, and in many stores, that makes the shopping experience more useful. The main thing to watch is whether those combinations still return meaningful results instead of creating empty or overly narrow filtered pages.
Final Words
By now, how to add filter by product dimensions in WooCommerce should feel much clearer. The right setup depends on how your store handles dimension data, how precise the filtering needs to be, and how much control you want over the front-end experience.
Some stores do well with simple dimension ranges, while others need exact values, custom fields, or more advanced filtering logic. What matters most is keeping the filter easy to understand, consistent with your product data, and useful enough to help shoppers narrow products without confusion.