WooCommerce is a powerful and flexible eCommerce platform that helps businesses build and manage online stores with ease. However, even with great products and traffic, many stores lose potential customers at the final step—checkout. So, how to optimize your WooCommerce checkout page for conversions?
Optimize your WooCommerce checkout page for conversions by minimizing fields, enabling guest checkout, emphasizing security, and providing clear shipping information. A smoother, faster checkout leads to fewer cart abandonments and more completed purchases.
In this blog, we’ll walk you through practical, effective strategies to turn your checkout page into a conversion machine. Keep reading to discover how small tweaks can lead to big gains in your WooCommerce sales.
How to Optimize Your WooCommerce Checkout Page for Conversions?
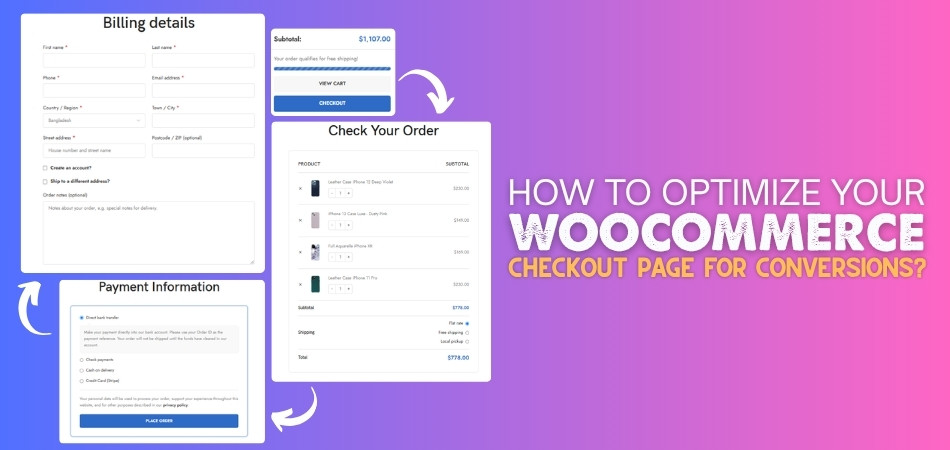
The checkout page is the final step before a customer buys something from your online store. If it’s too slow or confusing, people might leave without buying. That’s why this step needs to be simple and clear. Want to know how to make it better? Let’s go over some smart tips below.
Make It Simple
A long and messy checkout can make people leave. Try to keep only the fields that are really needed. Using WooCommerce one page checkout can help keep everything on a single screen, making the process quicker. The less typing a person has to do, the better. Keep the layout clean and easy to understand.
Allow Guest Checkout
Not everyone wants to create an account just to buy something. Letting people check out as guests saves time. This also helps new buyers finish their purchase faster. Later, you can give them the option to create an account. But first, let them buy with fewer steps.
Show You’re Safe
People need to feel safe when sharing personal details online. Add security badges or trust seals on the checkout page. Also, show that you use secure payment methods. A short line saying “Your information is safe” can help too. These small things build trust quickly.
Clear Shipping Info
Don’t keep shipping details a surprise. Show delivery options, times, and costs before the final step. If something takes longer to deliver, let them know early. People like to plan, and clear info helps them decide faster. Hidden shipping info can make them leave.
Use Auto-Fill
Typing everything from scratch takes time. Auto-fill helps people fill forms quickly using saved info. Many browsers already offer this, so your form should support it. It also cuts down on typing mistakes. A faster form means a faster checkout.
Keep It Mobile Friendly
Lots of people shop on their phones. Your checkout page should look good and work well on small screens. Buttons should be easy to tap, and text should be easy to read. Make sure nothing gets cut off or looks weird. A smooth mobile checkout can enhance your sales.
Show a Progress Bar
A progress bar lets buyers know how many steps are left. It makes the process feel shorter and more organized. When people know where they are, they feel more in control. Use simple labels like “Shipping,” “Payment,” and “Confirm.” It helps reduce stress and confusion.
Give Easy Support
Sometimes, buyers have questions or get stuck. Add a chat option or a help link nearby. A quick way to ask for help can stop someone from quitting. Even an FAQ link can do the trick. Support should be just a click away.
Why Checkout Optimization Matters in WooCommerce?
You may have a great online store, but if your checkout isn’t smooth, people might not complete their purchase. A tricky or slow checkout can make buyers leave fast. That’s why it’s important to look at this step closely. Here’s why it’s worth improving.
More Completed Orders
More people finish their purchases when checkout is easy. If it takes too long or asks too much, they may just quit. A short and simple process keeps them moving. The faster they buy, the happier they feel. And happy buyers usually come back again.

Less Cart Abandonment
Many people add things to their cart but never buy. One big reason is a bad checkout experience. If it feels confusing or too slow, they just leave. A clear and smooth checkout can stop that from happening. It helps turn more visitors into real customers.
Better User Experience
People want shopping to be quick and easy. If they get stuck or confused, they may not return. A well-designed checkout makes things simple for everyone. It feels better, works better, and looks better. That makes customers trust your store more.
Works on All Devices
Lots of people shop using their phones or tablets. If your checkout doesn’t work well on these, you’ll lose buyers. A good checkout should look and work great on any screen. That way, no one gets left out. Every customer gets the same smooth experience.
Builds Trust
When people are ready to pay, they want to feel safe. A checkout that looks clear and secure builds confidence. Showing payment options and security signs really helps. People are more likely to buy if they feel everything is safe. Trust is a big reason why checkout matters.
Increases Sales
Better checkout means more money at the end of the day. When more people finish their orders, your sales go up. Even small changes can make a big difference. It’s a smart way to grow your store. A few fixes now can lead to more success later.
Best Way to Add SSL and Let Your Customers Know It is Secure
Keeping your website safe is very important, especially when people enter personal or payment details. One simple way to do this is by adding SSL. But just having it isn’t enough; your customers need to see it too. Let’s go through how to set it up and show it clearly.

Choose a Certificate Authority
A Certificate Authority, or CA, gives you the SSL certificate. Some are free, like Let’s Encrypt, while others are paid. Paid ones might offer more features or checks. Pick one that’s trusted and works for your website. Both free and paid options can make your site secure.
Get Your SSL Certificate
After choosing a CA, it’s time to get your certificate. If you choose a free one, you can request it online easily. Paid ones might need a few more steps or checks. Either way, follow the steps given by your CA. Soon, you’ll have the file you need.
Create a CSR File
Before the CA gives you the final certificate, you need a special file called a CSR. This file has your website’s name and some other basic info. Your server usually creates this for you. Once it’s ready, send it to the CA. They’ll use it to make your SSL certificate.
Upload the Certificate
Once you get the SSL certificate, you need to upload it to your website. Go to your web hosting control panel or server area. Find the place for SSL and upload the file there. This tells your site to start using the secure connection. Don’t forget to save the changes.
Set Up Your Server
Your server needs to know how to use the SSL certificate. If you use Apache, Nginx, or another system, you’ll need to adjust a few settings. This lets your site load with HTTPS. Some hosting services do this step for you. If not, follow their guide or ask for help.
Check If It Works
Now, visit your site and look at the address bar. If everything worked, it should show “HTTPS” at the start. You’ll also see a small padlock icon beside the website address. This means your connection is secure. If you don’t see it, something might still need fixing.
Use Trust Seals
To make people feel even safer, you can add trust seals on your site. These are small images or badges from security companies. They tell visitors that your site is protected. Put them in places like the footer or checkout page. They help build confidence in your store.
Tell Visitors Clearly
Don’t be shy, let your customers know their data is safe. Write a short line saying your site uses SSL and is secure. You can also mention that their information won’t be shared. When people feel safe, they’re more likely to stay and buy. Simple messages go a long way.
How Plugins Can Help You Optimize the Checkout Page?
Plugins are helpful tools you can add to your WooCommerce store without needing to code. They make your checkout faster and easier. Let’s look at how these plugins can make a big difference.
- Faster Form Filling: Auto-fill plugins save customers time by completing their details quickly. This cuts down typing and helps avoid spelling mistakes.
- One Page Checkout: Combining all checkout steps on one page reduces clicks. It keeps the process short and stops users from getting confused.
- Guest Checkout Options: Letting people buy without creating accounts makes the process quicker. Many buyers prefer checking out as guests for convenience.
- Multiple Payment Gateways: Offering more payment options through plugins improves user comfort. Customers feel more confident when they see familiar payment choices.
- Live Cart Updates: These plugins update prices and totals instantly when something changes. It removes the need to reload the page again.
- Trust and Security Badges: Security plugins display seals or icons that show the site is safe. These signs help boost buyer confidence during checkout.
- Mobile-Friendly Layouts: Plugins adjust the checkout page to work well on phones. This makes it easy to buy even on small screens.
- Custom Thank You Pages: Some plugins let you show a personalized message after checkout. It adds a friendly touch and improves the overall experience.
Top Checkout Plugins You Can Use to Optimize WooCommerce Checkout Pages
Online shoppers benefit greatly from a smooth checkout page. The good news is, you don’t need to do it all by yourself. With the right plugins, you can make the process better and easier. Want to know which plugins help the most? Let’s check out some great options below.
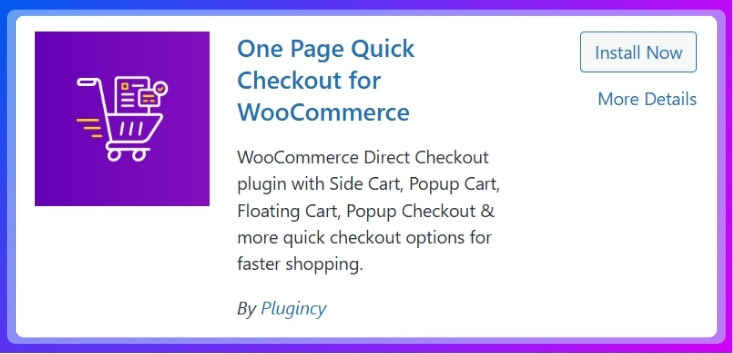
One Page Quick Checkout
One Page Quick Checkout for WooCommerce by Plugincy simplifies and speeds up the entire checkout process for customers. It includes features such as a pop-up checkout form, direct checkout buttons, and checkout without refreshing the page. Store owners can customize checkout fields, control product quantities, and integrate with any page builder, including Elementor and Gutenberg. With a mobile-friendly layout and flexible design options, this plugin boosts sales and reduces cart abandonment.
CheckoutWC
CheckoutWC replaces the default WooCommerce checkout with a smoother, faster layout. It’s one of the essential WooCommerce checkout plugins because it includes express pay, address auto-complete, and a side cart to speed things up. Users often see better conversions after adding it. You can also change the design to match your store’s style. It’s a solid choice for simple, clean checkouts.
Fluid Checkout
Fluid Checkout turns the regular WooCommerce checkout into a step-by-step process that’s easier to follow. It checks for form errors in real time and includes coupon fields. It also works great on phones, which helps mobile buyers. The layout is neat and helps build trust. It’s simple to use and improves the buying flow.
Flexible Checkout Fields
This plugin lets you add, change, or hide fields on your checkout page. You can also make fields appear only when needed. It helps stores that need special information from buyers. You don’t need to know any coding to use it. It’s flexible and easy to manage.
YITH Checkout Manager
YITH WooCommerce Checkout Manager helps you change how your checkout page looks and works. You can add or remove fields, change the order, and set rules. It’s helpful if your store needs more custom options. You can also add small tips or labels to guide buyers. It makes the checkout page more user-friendly.
Should You Use a Single or Multi-Step Checkout Layout?
Choosing between a single-step or multi-step checkout layout can affect how many customers finish their purchase. Both have pros and cons depending on your store’s needs and customer behavior. Here’s a table to help you compare them clearly:
| Aspect | Single-Step Checkout | Multi-Step Checkout |
| Layout Style | All fields are shown on one page. | Steps are split into multiple pages or sections. |
| Speed | Faster for users who want to check out quickly. | Slower, but can feel more organized for some people. |
| Ease of Use | Simple and quick, fewer clicks. | Easier for beginners, one step at a time. |
| User Focus | Can be overwhelming with too many fields at once. | Keeps users focused by showing fewer fields at each step. |
| Mobile Friendly | Works well on small screens with proper design. | Might need more scrolling or tapping on mobile devices. |
| Customization | Harder to guide users through each stage. | Easier to track and guide customers at each point. |
| Abandonment Rate | Lower if the form is short and clean. | Can be higher if the steps are too many or confusing. |
| Analytics Tracking | Harder to track where people drop off. | Easier to see which step causes the drop-off. |
| Look and Feel | Feels fast and direct, good for repeat buyers. | Feels smoother for first-time users or detailed orders. |
| Best For | Stores with quick purchases or fewer checkout fields. | Stores that need to collect more information or guide users carefully. |
Tips For Optimizing Image Sizes and Scripts for Better Checkout Flow
People are more likely to complete their purchases if the checkout process is fast and smooth. Slow pages can make visitors leave, especially when loading takes too long. Large images and heavy scripts are often the cause. Want to fix this and keep things quick? Here are some easy tips that can help.
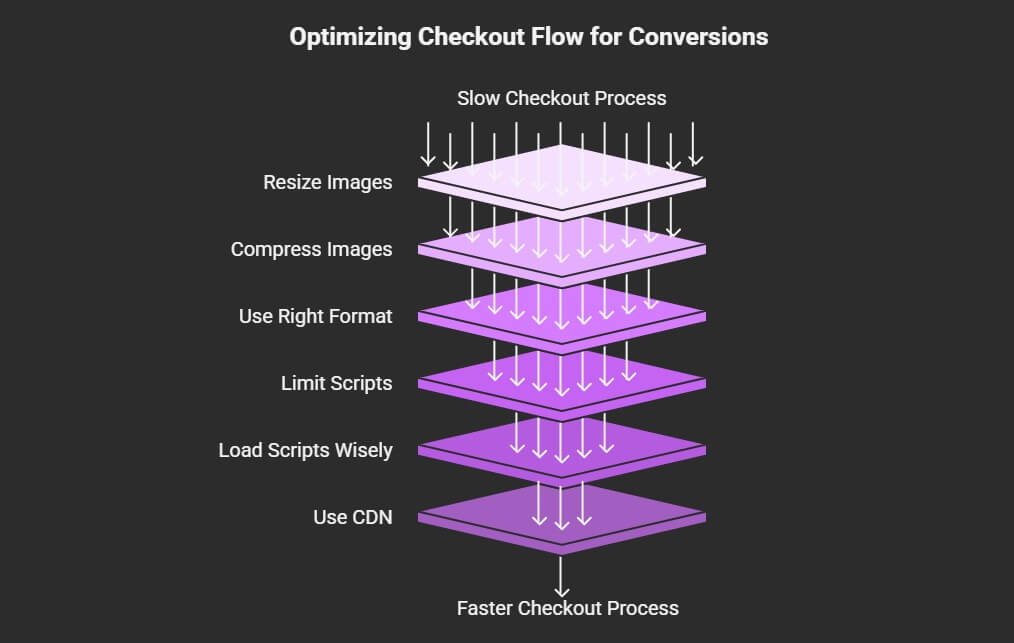
Resize Your Images
Big images take longer to load. Always resize them to fit the space where they will appear. If your checkout logo is small, don’t upload a giant file. Use an image editor to shrink it down before uploading. This helps the page load faster.
Compress Image Files
Even small-looking images can be heavy in file size. Use tools like TinyPNG or ImageOptim to compress images without losing quality. Compressed images load much quicker and use less internet data. This helps customers with slower connections. Faster loading means fewer people quit halfway.
Use the Right Format
Different image formats are better for different needs. Use JPG for photos and PNG for graphics with sharp edges or clear backgrounds. WebP is a newer format that loads faster and still looks great. Choose the best format to keep things smooth. The right format saves space and time.
Limit Script Usage
Too many scripts running on your site can slow it down. Remove any that you don’t really need during checkout. Only keep the scripts that help with forms, payment, or security. Each extra script adds load time. Clean code means a faster checkout.
Load Scripts Wisely
You don’t have to load all the scripts at once. Use “lazy loading” or move less important scripts to the bottom of the page. This lets important parts show up first. That way, users don’t have to wait to start checking out. It keeps the page feeling fast and snappy.
Use a CDN
A Content Delivery Network (CDN) helps load files from servers closer to the user. This makes images and scripts load faster, no matter where someone is. Many good CDNs are free or cheap to use. It’s an easy way to speed up your site. Faster sites keep more buyers.
Test Page Speed
Always check how fast your checkout page loads. Use tools like Google PageSpeed Insights or GTmetrix to test it. These tools suggest ways to speed up WooCommerce checkout and help you fix what’s slowing things down. Fix the problems step by step. Testing helps you see if your changes are working.
Frequently Asked Questions
You’ve already seen the main tips, tricks, and tools to improve your WooCommerce checkout page. But there are still some small, important things that people often ask about. Here are answers to common questions that can help you go even further.
How Can I Make Checkout Load Faster Without Changing Hosting?
To make your checkout load faster without switching hosts, reduce image sizes, remove unused scripts, and use a caching plugin. Keep the checkout page clean by limiting heavy features. Use tools like GTmetrix to spot what’s slowing things down. Even small fixes can greatly speed up your page.
What’s the Role of Caching in Checkout Optimization?
Caching helps your website load quickly by saving parts of the page in advance. However, for checkout, dynamic content like cart totals should not be cached. Use smart caching rules to avoid errors. A good setup makes the rest of your site fast without breaking checkout.
How Does Auto-Save Help During Checkout?
Auto-save features store a user’s input as they go through the form. This is useful if their internet cuts off or they reload the page. It saves time and avoids frustration. Some plugins can help you add this easily for a smoother checkout.
Can Social Logins Improve Checkout Speed?
Yes, social logins like Google or Facebook let users sign in faster with one click. They don’t need to create or remember another password. This saves time and helps prevent drop-offs. It’s a simple way to make checkout feel easier and quicker.
Should I Show Reviews Near the Checkout Page?
Yes, showing quick product reviews or ratings near the checkout can help. It reminds people that others liked the product too. This builds confidence and can push them to finish buying. Just keep it short and not too distracting.
Is It Good to Add a Countdown Timer for Offers?
A countdown timer can add urgency and encourage people to buy before time runs out. This works well for special deals or flash sales. Just don’t overuse it or make it look fake. It should feel like a real deal, not pressure.
How Can I Reduce Form Errors at Checkout?
To reduce form errors, use clear labels, real-time error checks, and tooltips. Tell users what’s wrong before they submit the form. This saves time and prevents frustration. A smoother form makes customers more likely to finish buying.
Do Payment Icons Make a Difference?
Yes, showing small icons of trusted payment methods like Visa, PayPal, or Stripe builds trust. People feel better when they see brands they recognize. It’s a simple visual that helps reassure customers their payment will be secure.
Can I A/B Test My Checkout Page?
A/B testing is a smart way to see what works best. Try two versions of your checkout and compare the results. You can test button color, layout, or number of steps. The version with better conversions tells you what users prefer.
Bottom Line
No matter how good your products are, a clunky checkout can still drive your customers away. That final step should feel smooth, simple, and safe. A few small changes can turn confusion into confidence and clicks into conversions.
If you’ve ever wondered how to optimize your WooCommerce checkout page for conversions, now you’ve got a clear path. From trimming unnecessary fields to boosting speed, adding trust signals, and using smart plugins, every improvement adds up. It’s not about making it perfect, just better than yesterday.
Start with one tip, test what works best for your store, and build from there. Your customers will notice the difference, and your sales will too. A great checkout isn’t fancy; it’s fast, friendly, and gets the job done.