Location plays a big part in how stores manage stock and serve customers better. Many shop owners want to know how to track stock levels separately for each location in WooCommerce? It’s something that makes running multiple stores easier and more organized for both online and offline business owners.
Track stock levels separately in WooCommerce by using a plugin like Multi Location Product & Inventory Management. Assign each product to store locations, set stock quantities per location, and manage them from the dashboard. This setup helps prevent overselling and improves inventory control across multiple warehouses or branches.
Are you curious about making your WooCommerce store more organized and reliable? Keep reading, because this article explains every step in detail to help you manage inventory, set up locations, and keep your stock accurate across all stores.
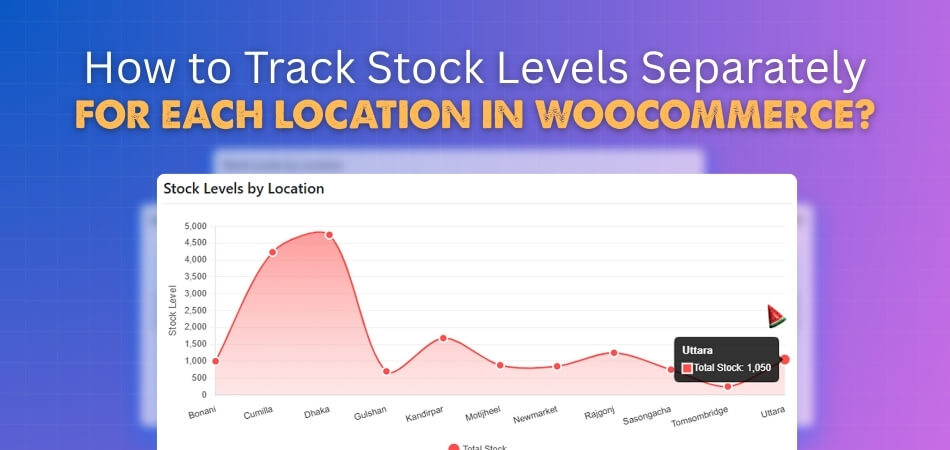
How to Track Stock Levels Separately for Each Location in WooCommerce?
If you manage more than one store or warehouse, keeping track of stock for each location can be a challenge. WooCommerce on its own doesn’t handle this by default, but with a few settings and a plugin, you can easily manage inventory for each location separately. Let’s break it down clearly.
Step 1: Add or Edit a Product
Start by opening your WordPress dashboard. Go to Products > All Products.
Here, you can either edit an existing product or create a new one. Once you’re on the product edit page, scroll down to the Product Data section.
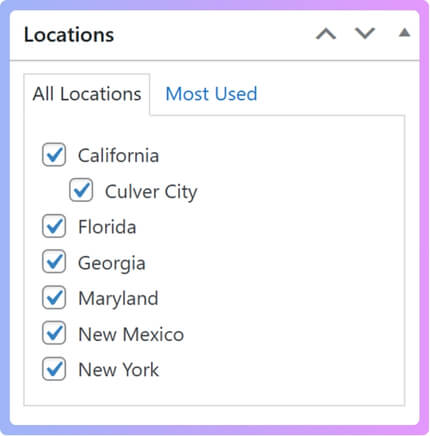
On the right-hand side, you’ll find an option called Location. This section is where you assign the product to one or more store locations. If you haven’t created any locations yet, you’ll need to add them first before you can link them to products.
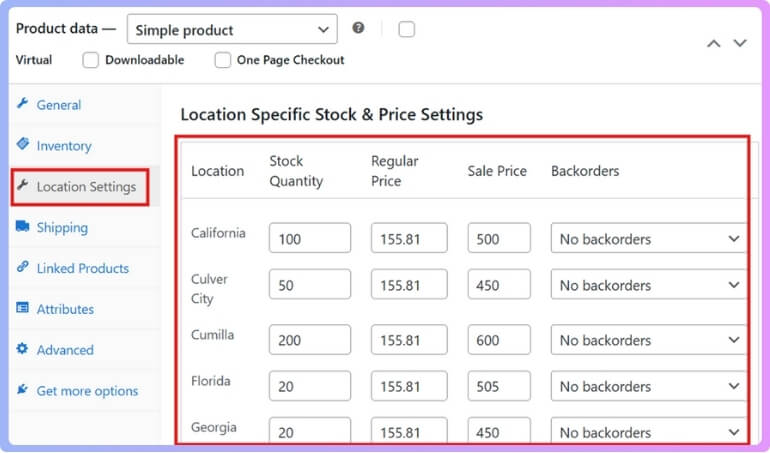
Step 2: Set Up Inventory Details
Once the product is linked to one or more locations, you’ll need to set the inventory numbers for each of them.
In the Product Data section, click the Inventory tab. Go to Inventory and add the total stock quantity for the product. This number represents your total stock across all locations.

Now scroll down a bit more and find the Location Setting section. Here, you’ll see the list of locations you selected earlier. Each one will have its own row of fields to fill in.
For every location, you’ll need to provide:
- Stock Quantity: The number of items available at that particular location.
- Regular Price: The normal selling price for that branch.
- Sale Price: A discounted price if any promotions are running.
- Backorders: Choose whether customers can place orders when the item is out of stock.
Once you finish filling in the details for each location, click Update or Publish to save the product. Now you can track the stock levels separately.
Step 3: Use a Plugin for Easier Management
Doing this manually can be a bit time-consuming if you have many products or store locations. That’s why it’s smart to use a plugin that can handle everything in one place. A great option for this is Multi Location Product & Inventory Management for WooCommerce.
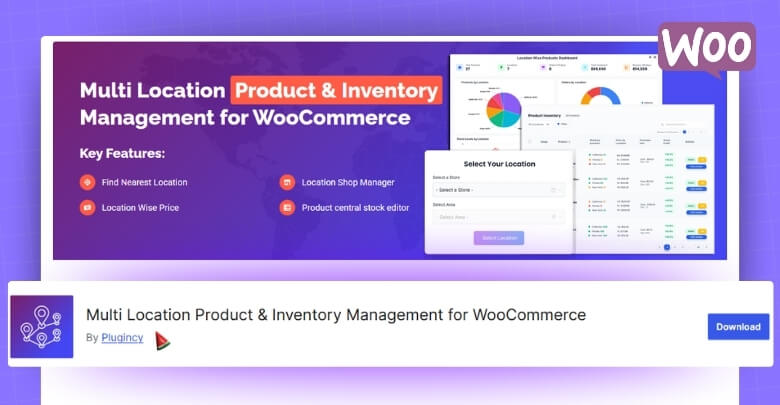
This plugin makes it simple to manage inventory for different branches, warehouses, or outlets. You can track stock levels, set prices, and view reports for each location separately—all from your WordPress dashboard. It also supports both free and pro versions, so you can start with the basic features and later upgrade to more advanced tools like automated stock syncing, detailed stock analytics, and location-based pricing.
After you install and activate the plugin, go to Location Manage > Stock Central in your dashboard. Here, you’ll see a clean overview of all your products along with their stock quantities at each location. You can even update stock numbers and prices directly from this screen without having to open each product one by one.
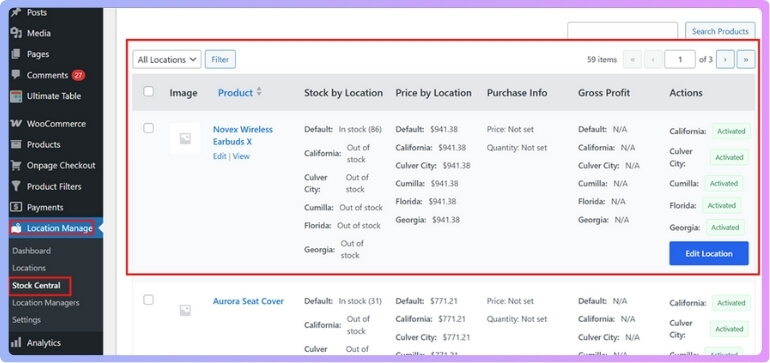
If you want a simple and effective way to organize your store’s inventory across different areas, this plugin is one of the best options for multi location product management for WooCommerce. It saves time, keeps your records accurate, and helps you avoid stock-related problems in your online store.
Step 4: Monitor and Update Stock Regularly
Once your setup is ready, make it a habit to keep your stock information up to date. You can:
- Adjust quantities when new stock arrives or products sell out.
- Check which locations are running low on stock.
- Use the plugin’s reports (if using the pro version) to see which branches sell faster or need restocking more often.
By following these steps, you’ll always have a clear picture of your inventory at every store or warehouse. This not only helps prevent stockouts or overselling but also makes managing multiple store locations much simpler and more organized.
Best Plugin to Manage Stock by Location in WooCommerce
The Multi Location Product & Inventory Management plugin for WooCommerce helps online stores handle stock, pricing, and orders across different locations. It keeps everything synced between warehouses or branches and gives customers a faster, location-based shopping experience with real-time inventory, pricing, and automatic nearest-store features.
| Free Version | Pro Version |
| Manage multiple store locations | Auto order fulfillment rules |
| Basic stock management | Location-wise pricing |
| Location selection for users | Location-specific shipping |
| Centralized stock dashboard | Location-specific payment methods |
| Manual nearest location choice | Automatic nearest store detection |
| Real-time stock view | Import/export stock via Excel |
| Basic product management | Role-based location manager |
| Simple setup via WordPress | Full reporting and analytics |
Step-by-Step Guide to Setting Up Locations in WooCommerce
If you run a business with multiple stores or warehouses, setting up locations in WooCommerce helps you manage your stock more accurately. There are two ways to do it: manually (without a plugin) or using a plugin that automates most of the process. Let’s go through both methods.
Method 1: Without a Plugin
You can set up locations directly in WooCommerce without installing any plugin, though it’s more basic and may take a bit more time.
From your WordPress dashboard:
- Go to Products > All Products.
- You can either edit an existing product or click Add New to create a new one.
- On the right side of the product editor, look for the Location option.
If you don’t see any locations listed:
- Click Add New Location.
- Enter the location name, for example, “New York Store” or “Main Warehouse.”
- Optionally, you can also set a Parent Location if you want to group several branches under one main location.
Once you’ve added the location, click Add New Location to save it. If the new location doesn’t appear right away, refresh the page once — it should show up then.
This method is simple and doesn’t require any extra tools, but it’s limited in features. You’ll need to manage stock levels manually for each product, which can be slow if you handle many products.
Method 2: With a Plugin (Easier and More Efficient)
Using a plugin makes location management much easier and faster. One of the best plugins for this job is Multi Location Product & Inventory Management for WooCommerce. It’s user-friendly, requires no coding skills, and comes with both free and paid versions.
After you install and activate the plugin, you’ll see a new menu in your dashboard called Location Manage. Here’s how to add a location using the plugin:
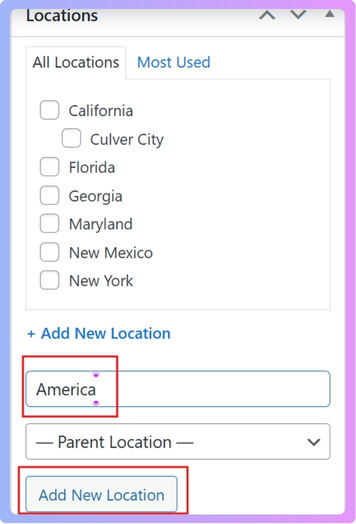
- Go to Location Manage > Locations.
- Fill in the details for your location:
- Location Name: Example: “America”
- Slug: Example: “america”
- Parent Location: Choose one if this location is part of a larger branch
- Description: (Optional) Add any notes or details about the location
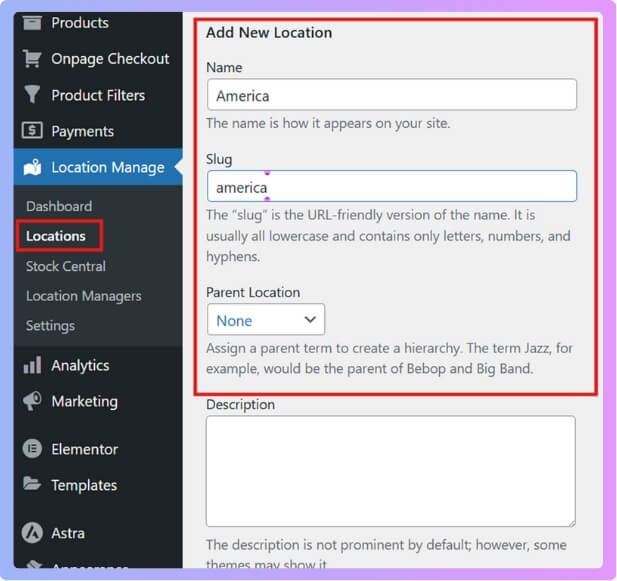
You’ll also see additional fields that help you manage your locations more accurately:
- Street Address
- City
- State
- Postal Code
- Country
- Phone Number
Fill in as much information as you can. This makes it easier to identify each location and manage them separately in reports and inventory tracking.

Once all the information is filled out, click Add New Location, and your new location will be saved instantly.
Benefits of Using the Plugin Method
While the manual method works, the plugin method gives you more control and flexibility. You can:
- Add unlimited locations with detailed contact info.
- Manage inventory for each branch directly from your dashboard.
- Generate reports showing stock per location.
- Easily edit, move, or remove locations later.
If you want to keep things organized and save time, using the plugin is definitely the better option.
Tips to Keep Multi-Location Stock Level Accurate in WooCommerce
Keeping stock levels accurate in a WooCommerce store with many locations can be tricky. Mistakes can cause shortages or extra items. By following simple steps, you can easily keep your inventory organized and running smoothly across all stores.
- Use Barcodes for Every Product: Barcodes make tracking simple and fast. Staff can scan items during sales or transfers, which helps reduce errors and keeps stock data updated across all store locations.
- Set Low-Stock Alerts Per Location: Each store sells differently. Setting alerts for every location helps you reorder before running out and keeps popular products available without overstocking.
- Sync Inventory with a Central System: Using one central system keeps all stock updates in sync. When one location sells something, it automatically updates in your WooCommerce dashboard in real time.
- Schedule Regular Stock Audits: Doing manual stock checks helps find mistakes early. Regular audits ensure that physical stock matches the records, keeping everything accurate and dependable.
- Track Transfers Between Locations: Always record product transfers between stores. This prevents double-counting or missing items and helps you know exactly where your stock is at any moment.
- Train Staff on Inventory Handling: Teach your team how to correctly update stock. A small error can cause big mismatches, so proper training keeps your records clean and reliable.
- Use Reports to Spot Patterns: Check your reports to see what sells fast or slow. This helps you plan restocks smartly and avoid keeping slow-moving products for too long.
To keep your stock levels accurate across different stores, it’s important to choose the right plugin setup for multi-location management so updates happen automatically when sales or returns occur.
Common Mistakes to Avoid When Managing Stock by Location in WooCommerce
Managing stock by location in WooCommerce sounds easy, but it can get messy fast. A few small mistakes can cause big stock problems later. Staying alert helps keep your business running smoothly without stress. Let’s look at the common mistakes and how to avoid them below.
Duplicate SKUs
Using the same SKU for different products causes big confusion. Your system may not know which item was sold or where it belongs. Always give each product a unique SKU, even if it’s similar to another. This keeps your reports clean and avoids wrong stock updates across locations.
Outdated Inventory Plugins
Old or unsupported plugins often cause syncing errors or wrong stock counts. Always update your WooCommerce plugins to the latest version. Updated tools fix bugs and improve compatibility between systems. This helps your store run smoothly and keeps your inventory data accurate across every connected location.
Forgetting to Sync Online and Offline Data
Many store owners forget to sync stock between online and physical stores. When that happens, your website may show stock that isn’t really available. Always set automatic syncs to keep your counts updated. This prevents customer complaints and saves you from unnecessary refunds or order delays.
Skipping Regular Stock Checks
Not checking your stock often leads to wrong data. Schedule simple weekly or monthly checks to compare real stock with WooCommerce records. This helps you catch errors early. Even a small routine check can make your stock data more trustworthy and easier to manage long-term.
Ignoring Staff Training
Sometimes, staff make stock errors by mistake because they don’t understand the system well. Teach them how to add, move, or reduce stock correctly. Training avoids double entries or missed updates. A few short training sessions can save you from hours of fixing wrong numbers later.
Keeping stock accurate across locations takes attention and simple habits. Small errors can cause big confusion, but most are easy to prevent. Stay updated, stay organized, and check your system often. Following these steps will make your WooCommerce stock easy to handle.
Challenges Businesses Face Without Location-Based Inventory
When businesses don’t use location-based inventory, many small issues start to grow. Stock numbers get confusing, and customer trust begins to drop. Orders take longer, and staff spend extra time fixing mistakes. Let’s look at the common challenges businesses face and how they can avoid them below.
Confusing Stock Counts
Without clear tracking by location, stock numbers often don’t match. One store may show products that are actually in another branch. This causes mix-ups when fulfilling orders. Using tools that update inventory by location helps keep your system clean and prevents these frustrating stock mismatches.
Delayed Order Fulfillment
When inventory isn’t split by store, staff might send orders from the wrong place. This adds shipping time and creates unhappy customers. Having a proper system to show where stock is available helps orders move faster and smoothly, keeping your delivery promises reliable and easy to meet.
Poor Customer Experience
Customers expect fast updates and correct product availability. When your system isn’t linked by location, they might order something already sold out. This leads to refunds or late deliveries. A clear, location-based setup ensures customers see real stock levels, improving trust and satisfaction with every order.
Higher Operation Costs
Running all stock under one system causes confusion that costs money. Staff waste time finding products, and mistakes lead to extra shipping fees. When stock is organized by location, everything runs smoothly. This saves time, cuts errors, and keeps your team focused on the right work.
Wrong Pricing and Planning
Without local stock tracking, pricing often gets messy as well. Stores may use the same prices in very different markets. A good location-based pricing strategy in WooCommerce ensures that each store’s prices match its local market while still keeping inventory levels accurate. This supports both sales and fair stock control.
Managing inventory without location tracking can cause serious business problems. Customers get frustrated, and staff waste time fixing errors. Simple planning and good systems can prevent these issues easily. When inventory and pricing fit each location, your store runs smoothly every day.
FAQs About How to Track Stock Levels Separately for Each Location in WooCommerce?
Managing products across different stores or warehouses can be tricky. Many store owners want to know how to keep their stock records clear, how WooCommerce handles updates, and how to make sure customers see accurate stock levels. These FAQs explain some of the most common questions people have about setting up and running multi-location inventory in WooCommerce.
Can I Track Stock Levels Separately Without Using a Plugin?
WooCommerce doesn’t support location-based stock tracking by default. You can only track total product stock. To manage stock per store or warehouse, you’ll need a plugin designed for multi-location inventory management. It makes tracking faster, easier, and more accurate.
How Does WooCommerce Know Which Location to Use for Orders?
WooCommerce alone doesn’t assign orders to a specific location. A multi-location plugin does this automatically based on customer’s address or your rules. It chooses the nearest store or warehouse, which helps save shipping time and cost.
Can Customers See Which Store Has the Product in Stock?
Yes, with a multi-location plugin, customers can view stock availability by store. Some plugins even let customers select their preferred branch for pickup or delivery. This improves shopping convenience and builds customer trust through real-time stock display.
Can Each Location Have Different Prices for the Same Product?
Yes, advanced inventory plugins let you set different prices for each store. Prices can vary by location based on local demand, delivery cost, or taxes. It helps maintain fair pricing while keeping all data under one system.
Can I Import or Export Stock Data for All Locations at Once?
Yes, most inventory plugins allow importing and exporting stock using CSV or Excel files. You can easily update quantities for all locations at once. It saves time and keeps your WooCommerce stock records consistent and accurate.
What Happens If One Location Runs Out of Stock?
If a location runs out of stock, your plugin can send orders from another store automatically. You can also display “Out of Stock” only for that location. This prevents lost sales and ensures a smooth customer experience.
Can I Use Reports to See Which Store Sells the Most Products?
Yes, multi-location plugins offer detailed sales and stock reports. You can track which branch sells faster and which needs restocking. These reports help you plan better and manage your inventory efficiently across all locations.
Is It Possible to Limit Staff Access to Certain Locations Only?
Yes, plugins with role-based access allow you to restrict staff to specific branches. This prevents them from changing other stores’ data. It improves security, reduces errors, and makes managing multiple store staff easier and safer.
Can I Use Barcode Scanners to Update Stock by Location?
Yes, some plugins support barcode scanning for quick stock updates. Staff can scan items during restocking or sales. It reduces mistakes and speeds up updates, making inventory tracking faster and more reliable in every store.
Can I Show the Nearest Store Availability on the Product Page?
Yes, advanced plugins can show the nearest store with available stock using the customer’s location. This helps customers choose the closest branch for purchase or pickup. It saves time and improves their overall shopping experience.
Conclusion
Managing stock across many locations in WooCommerce becomes much easier when you have a proper system in place. Instead of dealing with confusing numbers or manual updates, using a plugin like Multi Location Product & Inventory Management helps you keep everything in sync. It makes it simple to see what’s available at each branch, update stock quickly, and maintain smooth operations across all your stores.
So, how to track stock levels separately for each location in WooCommerce? The answer is to set up multiple locations and use a plugin that connects them with your products. This setup allows you to add, view, and update inventory for every store or warehouse directly from your dashboard, saving time and avoiding stock errors.
Before you finish, here are a few quick tips: always keep your plugins updated, train your staff to manage stock correctly, and do regular stock checks to stay accurate. Keeping your system organized will save time and reduce mistakes. Wishing you all the best in managing your WooCommerce stores successfully and keeping your customers happy.