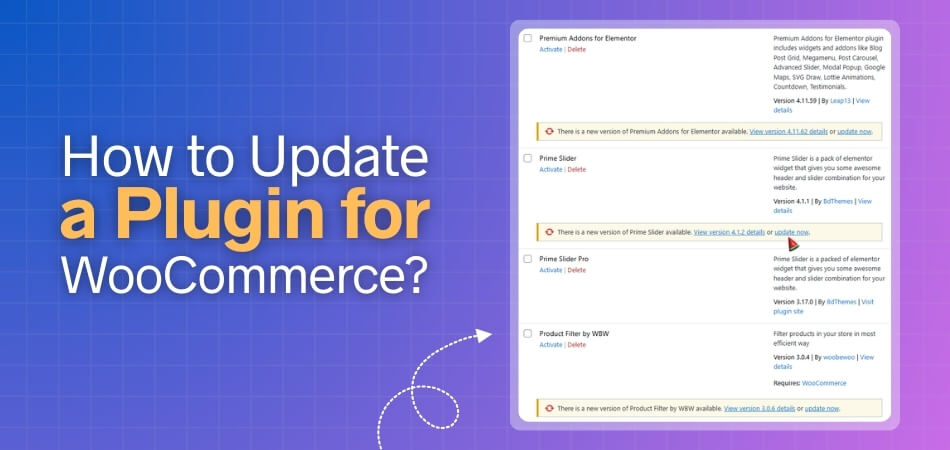
Keeping your WooCommerce store running smoothly means making sure every plugin is up to date. Plugin updates not only improve performance but also fix bugs, patch security vulnerabilities, and ensure compatibility with the latest version of WordPress. Ignoring updates can cause your site to slow down or even break key features.
If you’re wondering how to update a plugin for WooCommerce, it’s simple. Go to your WordPress dashboard, click on Plugins → Installed Plugins, and look for the “Update Now” button. Click it to install the latest version. You can also enable auto-updates for trusted plugins or, if needed, delete the old version and upload a new ZIP file.
Ready to learn everything about it? Let’s walk through each step in detail below.
How to Update a Plugin for WooCommerce?
Updating a WooCommerce plugin is important to keep your store secure, fast, and compatible with the latest WordPress features. If you want to keep your plugin updated, follow these simple steps to make sure your store runs smoothly and stays up to date.
Step 1: Enable Automatic Updates (Recommended for Trusted Plugins)
WordPress supports auto-updates for plugins. You just need to:
- Go to Dashboard > Plugins > Installed Plugins.
- Find your WooCommerce plugin.
- Click Enable auto-updates next to it. Future updates will install automatically.
Note: Only enable for reliable plugins to avoid untested changes breaking your site.
Step 2: Manual Update via Dashboard (Easiest Method)
This is the standard way for most plugins. Follow if you do it manually.
- Log in to your WordPress admin dashboard.
- Go to Dashboard > Updates to see available plugin updates, or directly to Plugins > Installed Plugins.
- If an update is available, click Update Now for individual plugins, or select multiple and choose Update from the bulk actions dropdown.
- Update one at a time to easily identify issues.
For free WooCommerce extensions, no subscription is needed; updates appear here automatically.
Step 3: Manual Upload (For Troubleshooting or Custom Installs)
If dashboard updates fail (e.g., due to file permissions), follow these steps:
- Download the latest plugin version from the developer’s site or WooCommerce.com (for their extensions).
- In WordPress admin, go to Plugins > Installed Plugins, deactivate the old plugin, then delete it.
- Click Add New > Upload Plugin, select the new ZIP file, and install/activate it.
- Alternatively, use FTP/SFTP: Upload the new plugin folder to /wp-content/plugins/, overwriting the old one.
Precautions Before Updating
Before any update:
- Back up your site: Create a full backup of your WordPress site, including the database and files (wp-content folder). Use plugins like Duplicator or services like Jetpack for automatic backups. This allows you to restore if something goes wrong.
- Review the changelog: Check what’s changing in the update. Look for security fixes (apply immediately) or major changes. Wait a week for non-critical updates to ensure bugs are ironed out.
- Test on a staging site: Duplicate your live site to a staging environment (via your host or tools like Jetpack). Update there first, test functionality (e.g., checkout, custom features), and check for errors. Only proceed to live if all is well.
For high-traffic stores, consider putting your site in “Coming Soon” mode during updates to prevent orders.
Specifics for WooCommerce.com Extensions
If the plugin is purchased from WooCommerce.com Marketplace (paid or some free ones):
- Connect your store to your WooCommerce.com account: Go to WooCommerce > Extensions > WooCommerce.com Subscriptions.
- Ensure the subscription is active (toggle if needed for paid ones; free ones don’t require this).
- This enables update notifications and downloads. Check compatibility with your WooCommerce version in the Plugin and “Tested up to” columns.
- Updates will then appear in the standard WordPress updates section.
Not all plugins are updated directly through your WordPress dashboard. For third-party WooCommerce plugins (those not purchased from WooCommerce.com), you’ll need to contact the plugin developer for updates and follow their instructions carefully. Many developers provide downloadable ZIP files or direct update links through their official websites.
For example, if you’re using a WooCommerce One Page Checkout plugin, the developer might offer updates through their support portal or email notifications. Always verify the source before installing to avoid security risks. Once you have the latest version, you can upload it manually by deleting the old plugin and installing the new ZIP file, ensuring your WooCommerce store continues to run smoothly and securely.
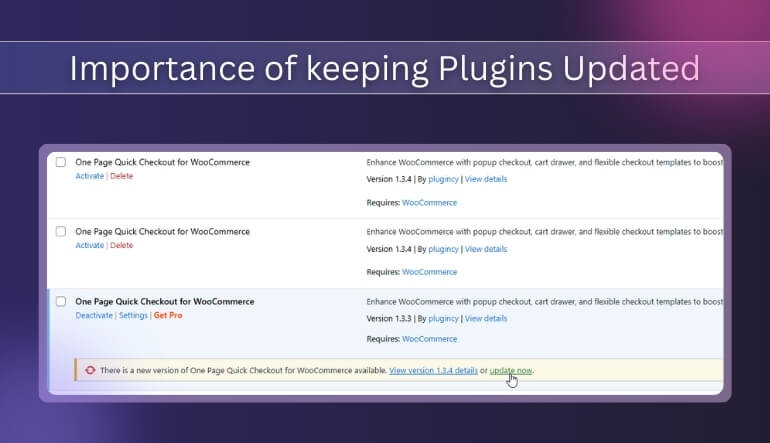
Why It’s Important to Keep WooCommerce Plugins Updated?
Keeping your WooCommerce plugins updated might sound like a small thing, but it makes a big difference. Updates help your website work better and stay safe from problems. Without them, even simple things can go wrong in your store. Let’s find out why updating really matters.
Better Security
Old plugins can have weak spots that hackers love to find. Updates fix those weak spots and keep your store safe. It’s like locking your doors before leaving the house small action, big protection. Regular updates make sure your customer data stays private and secure.
Smooth Performance
When you update plugins, your website runs faster and smoothly. Old versions can slow down your store and cause glitches. With the latest updates, your WooCommerce shop loads quickly and gives customers a better shopping experience. A fast site keeps visitors happy and coming back.
New Features
Updates often bring new tools and cool features that make managing your store easier. You might get better layouts, extra settings, or improved checkout designs. These changes can help you save time and make your store look more professional. Staying updated means you always get the best version.
Bug Fixes
No plugin is perfect, and sometimes errors happen. Developers fix these bugs in new updates so your store works properly. If you skip updates, small bugs might turn into big problems later. Updating ensures everything runs without random crashes or broken pages.
Compatibility
WordPress and WooCommerce themselves get updates often. When your plugins aren’t updated, they might stop working well with the newer versions. This can cause display issues or stop features from working. Updating makes sure all parts of your website work together perfectly.
Better Speed
Updates don’t just fix things; they can make your site faster. Developers often improve code to make plugins lighter and more efficient. A faster website means happier customers and possibly better sales. It’s a simple way to keep your store performing its best.
Professional Look
When everything runs smoothly and fast, your store looks trustworthy and well-managed. Customers notice when a website is clean and easy to use. Updated plugins help you keep that professional feel. It shows you care about quality and your customer’s experience.
Best Practices Before Updating WooCommerce Plugins
Updating your WooCommerce plugins is not just about clicking a button; it’s about keeping your store safe and steady. Many people rush the process and miss a few simple steps that matter the most. Taking time before an update saves big trouble later. Let’s see what to do before updating your plugins.
Create a Backup
Before doing anything, always make a full backup of your website. This keeps all your data safe in case something goes wrong. If the update causes an error, you can easily restore your site. It’s like saving your work before turning off the computer.
Check Plugin Details
Take a minute to read the plugin’s changelog or update notes. These tell you what’s new, fixed, or changed. You’ll know if the update might affect other parts of your site. Understanding what’s being updated helps you avoid surprises later.
Test on Staging Site
Use a test or staging site before updating the live one. This lets you see how the update works without risks. If something breaks, you can fix it privately. Once everything looks good, you can safely update your real store.
Confirm Compatibility
Always check if the plugin works with your current WooCommerce and WordPress versions. Some updates may not fit older setups. Compatibility ensures your website functions smoothly after the update. This quick check can prevent unwanted crashes or errors.
Disable Cache Temporarily
Caching plugins can sometimes block new updates from showing correctly. Turn off caching before updating to avoid confusion. Once the update is done, you can turn it back on. This helps your site display the latest version properly.
Update One by One
Don’t update all plugins at once, even if it seems faster. Update them one at a time to spot issues quickly. If something stops working, you’ll know which plugin caused it. This simple step makes troubleshooting much easier.
Keep Notes
Write down the plugins you update and when you did it. Keeping a short record helps you track changes later. If a problem shows up, you’ll know which update caused it. This habit makes managing your site much easier.
Following these simple steps before updating your WooCommerce plugins keeps your store safe and working well. Before you setup WooCommerce plugin in WordPress or make any updates, take a few minutes to check everything carefully. These small efforts now can prevent major issues later and keep your site running smoothly.
Common Mistakes to Avoid While Updating Plugins in Your WooCommerce Store
Updating plugins in your WooCommerce store sounds easy, but it’s something you must do carefully. A small mistake can break your site. Many store owners skip small steps that lead to big troubles later. Let’s look at the most common mistakes to avoid.
- Skipping Backup: Always make a full backup before updating. Without one, you can lose data or settings if something goes wrong.
- Updating Everything Together: Update one plugin at a time to find problems easily. Doing it all at once makes it harder to know what broke.
- Ignoring Changelog: Read the changelog to see what’s new. It tells you about fixes, features, and possible issues before updating.
- Using Old Themes: Old themes may not support updated plugins. Keep your theme updated to avoid display or layout problems after updates.
- No Testing Area: Use a test site before updating the live store. It helps you catch issues safely without affecting customers.
- Poor Internet Connection: Don’t update plugins when your internet is weak. A broken connection during an update can corrupt important plugin files.
- Forgetting Compatibility Check: Make sure the plugin works with your WooCommerce version. Ignoring this can cause sudden crashes or missing features on your site.
Tips for Updating a WooCommerce Plugin Manually via FTP
Updating a WooCommerce plugin manually through FTP might sound tricky, but it’s actually simple once you know the steps. Sometimes, auto-updates don’t work, and that’s when manual updates save the day. It gives you more control and ensures everything installs correctly. Let’s go through some easy tips to make it smooth and safe.
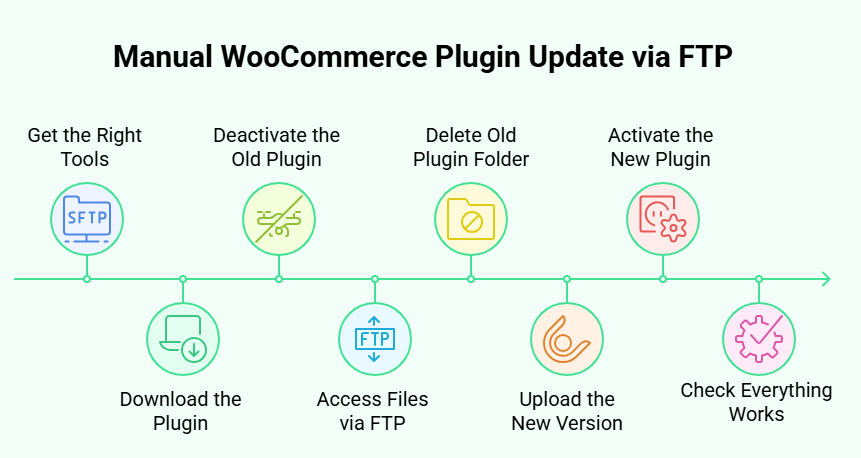
Get the Right Tools
Before you start, make sure you have an FTP client like FileZilla installed on your computer. This software helps you connect to your website files directly. You’ll also need your FTP login details from your hosting provider. Having these ready makes the process faster and easier.
Download the Plugin
Go to the plugin’s official source and download the latest version as a ZIP file. Always download from trusted sites to avoid unsafe files. For example, when updating a must-have WooCommerce plugin, ensure it’s from a verified developer. Keeping the right version helps avoid errors or broken features later.
Deactivate the Old Plugin
Before uploading the new one, go to your WordPress dashboard and deactivate the old plugin. This step stops conflicts during the upload. It also prevents any sudden changes from affecting your live website. A simple deactivation can save you from technical issues later.
Access Files via FTP
Open your FTP client and log in using your FTP details. Once connected, go to the “wp-content/plugins” folder. This is where all your plugins live. You’ll upload the new plugin files here after deleting the old version.
Delete Old Plugin Folder
Find the folder for the plugin you’re updating and delete it carefully. Don’t worry, your settings are usually saved in the database. Deleting only removes the old plugin files, not your data. Make sure not to delete the wrong folder by mistake.
Upload the New Version
Now, upload the new plugin folder you downloaded earlier into the same “plugins” directory. The upload may take a few minutes. Once done, go back to your WordPress dashboard and activate the plugin again. Your plugin should now be updated successfully and ready to use.
Check Everything Works
After activating, check your website pages and store functions to make sure everything runs properly. Look for broken layouts or missing features. If you find anything off, clear your cache or reinstall the plugin. Testing helps confirm that the update went smoothly.
FAQs About Updating WooCommerce Plugins Safely
Updating WooCommerce plugins can feel confusing at first, especially if you’re new to WordPress. But once you understand how it works, it becomes quick and easy. Here are 10 simple FAQs to help you handle plugin updates with confidence.
How Often Should I Check for Plugin Updates in WooCommerce?
It’s best to check for updates at least once a week. WooCommerce and its plugins receive frequent fixes and improvements. Regularly updating keeps your store secure, smooth, and compatible with the latest WordPress version.
Can I Schedule Automatic Updates for WooCommerce Plugins?
Yes, you can enable automatic updates directly from your WordPress dashboard. Go to “Plugins,” then click “Enable Auto-Updates” beside each plugin. It’s a simple way to keep your store always updated without manual effort.
Will Updating Plugins Affect My Store Settings?
Usually, updating a plugin doesn’t change your saved settings or data. However, making a backup before any update is smart. Backups protect your website in case something goes wrong during the installation process.
What Should I Do If a Plugin Update Fails?
If a plugin update fails, don’t panic. Deactivate the plugin, delete it, and reinstall the latest version manually. You can also contact the plugin developer for help or check your hosting logs for error messages.
How Can I Know If a Plugin Is Safe to Update?
Always read the update notes and reviews before updating. Check if the plugin is tested with your current WordPress and WooCommerce versions. Updates from trusted developers are usually safe, stable, and performance-boosting.
Is It Necessary to Update Free and Paid Plugins Alike?
Yes, both free and paid plugins need regular updates. Paid plugins often get faster support and frequent fixes, but free ones also improve security and features. Keeping all plugins updated helps your entire WooCommerce store run properly.
What Happens If I Skip Plugin Updates for a Long Time?
Ignoring plugin updates can cause security risks, slower performance, and broken features. Over time, outdated plugins may stop working with WooCommerce. Regular updates prevent these problems and keep your website strong, secure, and smooth for users.
Can I Roll Back to an Older Plugin Version After Updating?
Yes, you can use a rollback plugin like WP Rollback to return to a previous version. This helps if the latest update causes problems. However, always test rollbacks carefully to avoid breaking your site further.
Should I Disable My Site During Plugin Updates?
For most small updates, you don’t need to disable your site. But for big updates, it’s safer to use maintenance mode. This avoids customer interruptions and keeps your store looking professional during changes.
What Is the Safest Time to Update WooCommerce Plugins?
The best time to update is during low-traffic hours when fewer customers are shopping. This gives you time to test and fix issues quietly. Always check your backup before updating to stay safe and ready.
Concluding Thoughts
Keeping your WooCommerce plugins updated helps your store work better and stay safe. Updates fix problems, improve speed, and keep everything running smoothly with WordPress. When you know how to update a plugin for WooCommerce, it becomes simple and less scary.
You can do it through your dashboard, manually, or using FTP if needed. Always make a backup before updating so you can fix things if something goes wrong. Checking each update and testing it helps avoid errors. By following these small steps, your WooCommerce store will stay fast, safe, and ready for your customers every day.