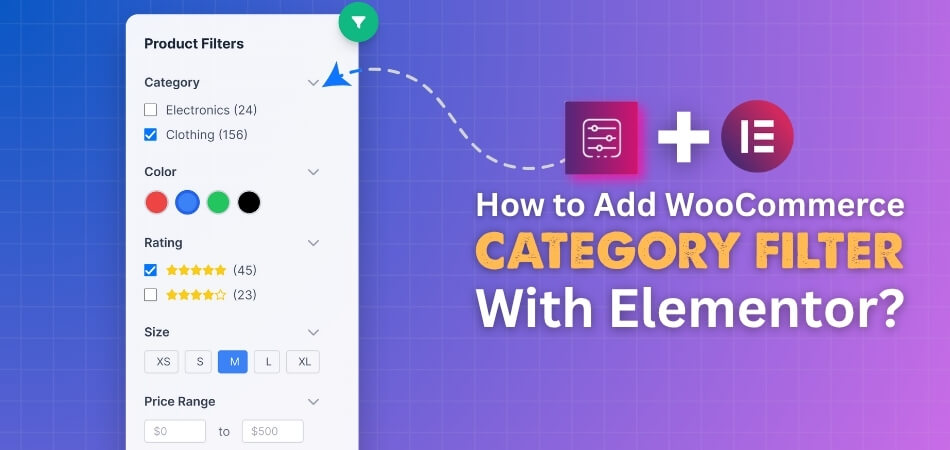
A category filter makes online shopping simple by letting people sort products in a neat way. It organizes items into groups so visitors do not waste time scrolling through endless products. Many store owners often wonder how to add WooCommerce category filter with Elementor?
To add a WooCommerce category filter with Elementor, install Elementor and the Dynamic AJAX Product Filters for WooCommerce plugin. Create product categories, activate the Show Categories option in the filter settings, and customize the filter style. Then, drag the Dynamic Ajax Filter widget into your Elementor layout and update the page.
Do you want to know the complete steps of adding filters and where to place them for the best results? If yes, then keep reading because in this article, you will find everything you need to make your WooCommerce store easier to browse with Elementor.
How to Add WooCommerce Category Filter With Elementor?
When you have many products on your WooCommerce store, finding the right item can be hard for visitors. A category filter makes browsing easy and quick. If you are using Elementor, you can add this feature smoothly. Let’s look at how it works.
Step 1: Install Elementor Plugin
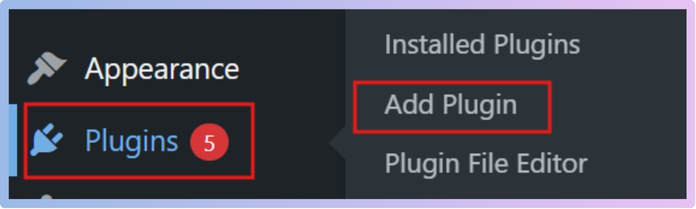
- Go to your WordPress Admin Dashboard.
- From the left menu, click Plugins > Add New.

- In the search bar, type Elementor Website Builder.

- Click Install Now.
- After installation, click Activate.

Now Elementor is ready. Move to the next step and install the filter plugin.
Step 2: Install the Plugin for Category Filter
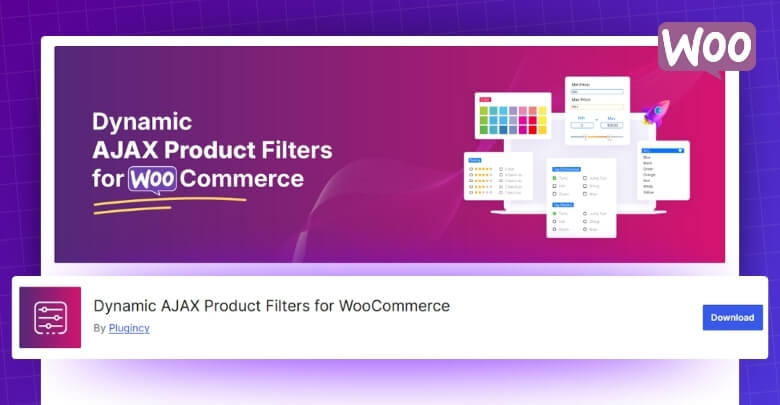
To add a category filter in WooCommerce with Elementor, you need a plugin that can handle product filters. WordPress by default doesn’t have advanced filtering options, so a plugin is needed to make this possible. The plugin we will use is Dynamic AJAX Product Filters for WooCommerce. This plugin comes with a free version that gives you the basic filter setup and a pro version that unlocks advanced filter features. You can choose either one based on your needs
Free Version Installation
- Go to your WordPress Admin Dashboard.
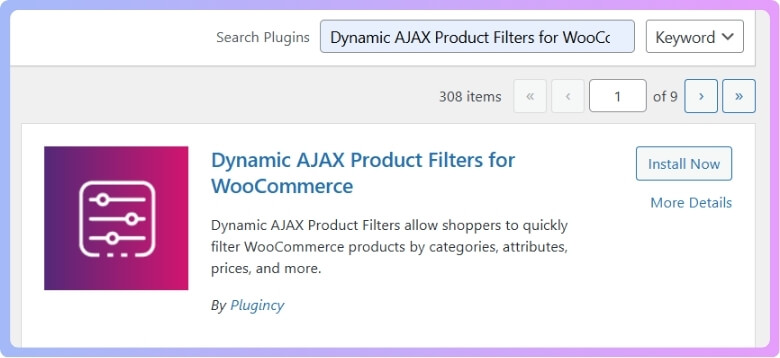
- From the left menu, click Plugins > Add New.
- In the search bar, type Dynamic AJAX Product Filters for WooCommerce.

- Find the plugin in the results and click Install Now.
- After installation, click Activate.
Now the free version is ready with basic filter features.
Pro Version Installation
- Purchase the Pro version from the official website.
- You will get a ZIP file and a license key after purchase.
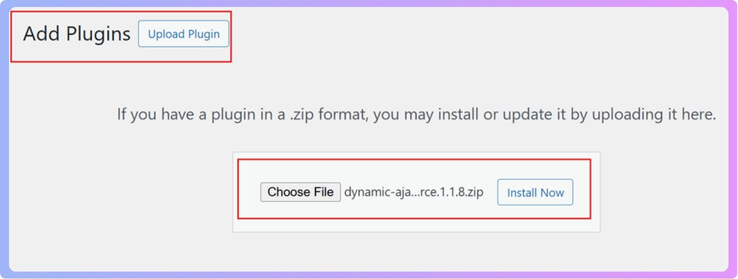
- In your WordPress dashboard, go to Plugins > Add New > Upload Plugin.
- Select the ZIP file you downloaded.
- Click Install Now.
- After installation, click Activate.

- Go to Product Filters > Plugin License.

- Paste the license key you received.
- Click Activate License.

Now the Pro version is fully active with all advanced filter options.
Step 3: Create Categories for Products
- In your dashboard, go to Products > Categories.
- Type the Category Name.
- Add the Slug (URL-friendly name).
- Write a Description (optional).
- Upload a Category Image (optional).
- Click Add New Category.

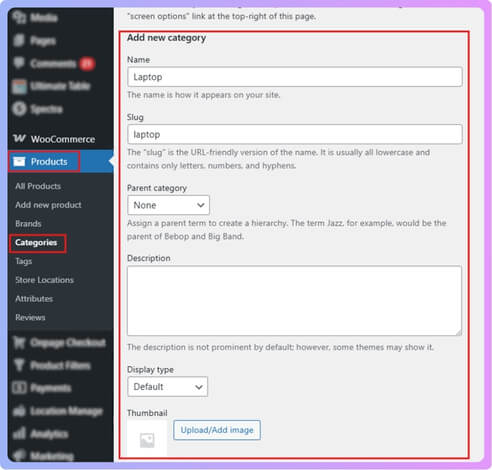
Repeat these steps for each product group you want to filter.
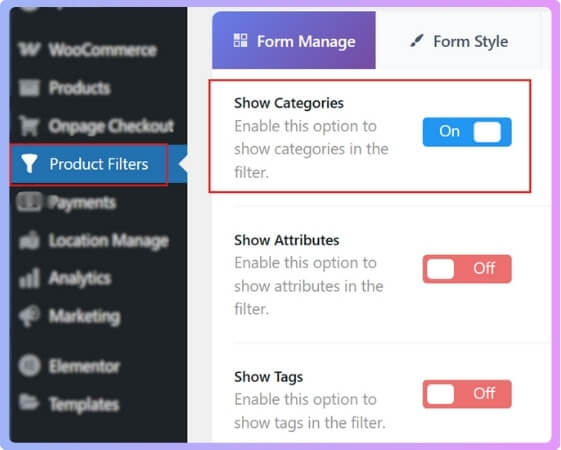
Step 4: Activate Category Filter
- Go to Product Filters > Form Manage.
- Look for the option Show Categories.
- Make sure it is turned ON.
- Click Save Changes.
This will make sure the category filter is active.
Now you have to add a category to products. This is how you can do it:
- Go to Products > All Products.
- Edit an existing product or click Add New to create one.

- On the product edit page, find the Categories section on the right.
- Check the box next to the category you want.

- Click Update or Publish.

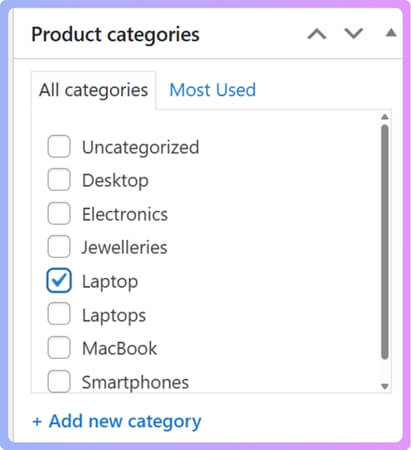
Your product is now assigned to a category. Do this for all your products to make filtering work well.
Step 5: Active Filter and Customize Filter Style
- Go to Product Filters > Form Manage, and here make sure to turn on the Show Category option and click on Save Changes.

- Go to Form Style in the plugin settings.
- Select Configure Style as Category Options.
- You will see two style options:
- Checkbox (shows all categories with checkboxes).
- Select (shows categories in a dropdown menu).
- Choose the one you prefer.
- Click Save Changes.

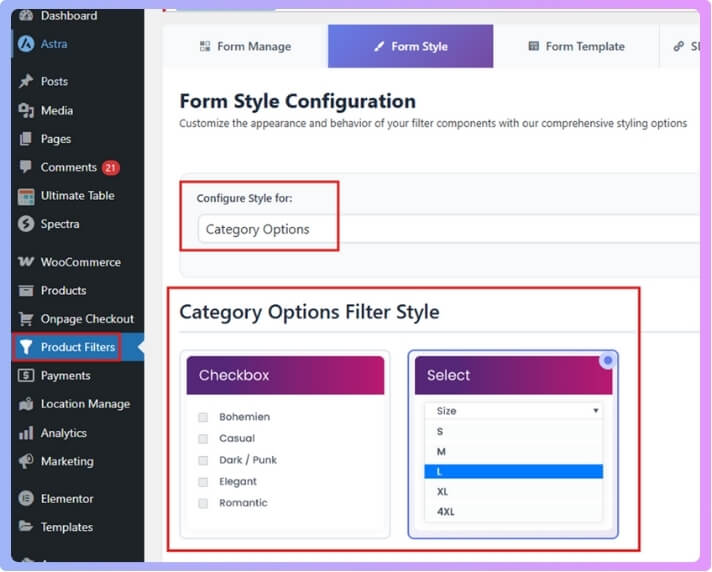
Now your filter design is ready.
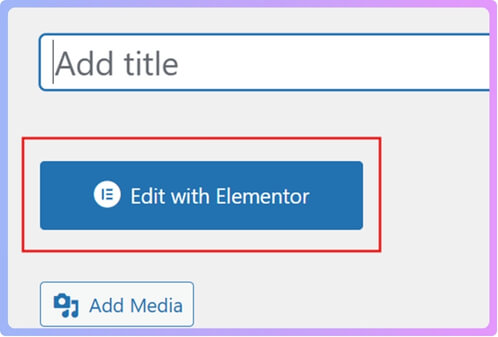
Step 6: Add Category Filter with Elementor
- Open the page or post where you want the filter.
- Click Edit with Elementor.

- On the left panel, go to Widgets.
- Search for Dynamic Ajax Filter.

- Drag and drop it onto your page.
- From Form Manage, choose the filters you want to show.
- Click Update to save the page.
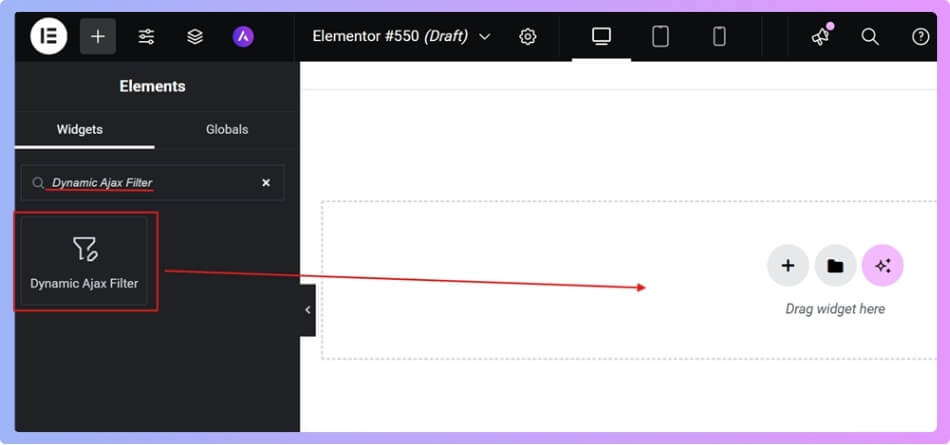
Now the category filter is live on your site.
Where Should You Place Category Filters in Elementor WooCommerce Pages?
Placing filters in the right spot helps shoppers navigate faster and creates a smoother buying experience. Good placement helps customers find products faster and makes shopping feel smooth. Let’s look at some common positions and see which works best.
Sidebar Placement
Many store owners prefer a sidebar category filter in WooCommerce because it stays visible as customers scroll through products. This option works best for shops with many product categories. It keeps the layout clean and lets users adjust their choices without losing their place.

Top of Page
Placing filters at the top of the shop page makes them the first thing people see. This works well if your store has fewer categories or if you want to highlight certain filters like price or size. It can save users a click since options are upfront.
Inside Product Grid
Some stores add filters inside the product grid as dropdown menus or small buttons. This saves space and gives a modern look. It’s best for stores with limited categories or when you want to keep the page design minimal while still being functional.
Mobile Experience
On mobile devices, space is limited, so placement becomes more important. A collapsible sidebar or top filter menu works best here. This makes it easy for users to open filters when needed and keep the focus on products when browsing.
User Preference
The best choice often depends on your customers. If your audience prefers quick browsing, top filters may help. If they like to explore options slowly, sidebars are better. Testing both layouts can show which one improves clicks and sales.
Placing category filters in Elementor WooCommerce pages depends on store design and customer needs. Whether you choose sidebar, top, or inside the grid, the main goal is to keep shopping simple and clear.
Can You Combine Category Filters With Other WooCommerce Filters in Elementor?
Building an online shop requires smart use of filters to help buyers find what they need. Elementor lets you mix different filters together to improve shopping experiences. Let’s look at how these filters can work in simple ways.
Layered filtering
Layered filtering means customers can use more than one filter at the same time. For example, they can select a category and then narrow it down with price or brand filters. This makes browsing simple and shortens the search process.
Price filters
Price filters are very common and help shoppers set their budget quickly. When used with category filters, they make it easy for someone to look at only the products they can afford. This avoids wasting time on items out of range.
Brand filters
Brand filters are useful for stores that sell different labels or product makers. Customers can choose a brand they trust while still keeping category and price options. This mix saves time and improves the shopping experience on your site.
Size filters
Size filters are important for stores selling clothing, shoes, or products that vary in measurements. Adding them alongside category and price filters gives a complete shopping setup. It ensures customers find what matches their exact needs in a short time.
Category filters
By combining price, brand, and category filters, you can create a more advanced WooCommerce category filter navigation system that helps shoppers refine results quickly. Elementor setups make it simple to design these tools without needing complex technical changes.
Using Elementor with WooCommerce filters gives you flexible options to make online shopping easier. Mixing categories with price, brand, and size filters helps buyers narrow choices fast, creating a smoother shopping experience for everyone.
What Problems Can Occur When Adding Category Filters in Elementor?
When you add category filters in Elementor, things don’t always go smoothly. Filters are useful to help users find what they need faster, but sometimes they act up. These problems can happen for different reasons, and knowing them helps fix them faster. Let’s go over the common ones in detail.
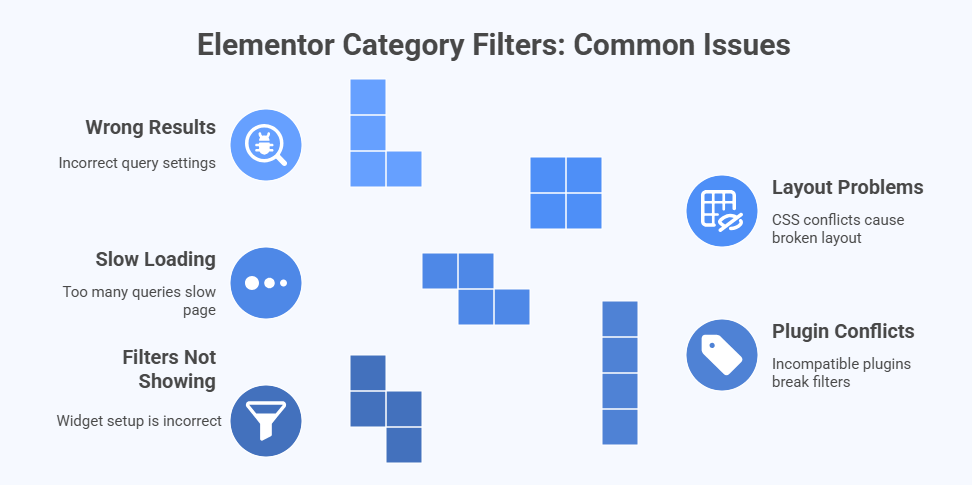
Filters Not Showing
One of the most common issues is when the filters do not appear on the page at all. This can happen if the widget is not set up properly or if the wrong display conditions are used. Sometimes filters stay hidden because the page template is missing important elements. Checking the widget settings carefully often solves this.
Plugin Conflicts
Elementor works with many plugins, but not all of them get along. If you are using a filter plugin that is not fully compatible, it may break the filters. This can show up as filters not loading, design breaking, or filters working only halfway. Updating both Elementor and the plugin or changing the plugin usually helps.
Slow Loading
Another big issue is when filters make your page load very slowly. This happens if there are too many queries or if the filter plugin is heavy. Slow loading not only annoys visitors but can also affect your site ranking. Using caching or choosing lightweight plugins often makes things smoother.
Layout Problems
Sometimes filters show up, but the layout looks broken. The buttons may overlap, the spacing may look odd, or the filter bar may not match the design of the site. This is usually caused by CSS conflicts between Elementor and the filter plugin. Adjusting CSS or using Elementor’s style controls can fix this.
Wrong Results
Filters may show, but they don’t always give the correct results. For example, a user may choose a category, but unrelated items still appear. This usually happens because the query settings are not set correctly. Checking filter rules and testing each category one by one usually clears this up.
Adding category filters in Elementor is helpful, but small mistakes or conflicts can cause problems. The good news is that most of these issues have simple fixes once you know what to check.
How Do Ajax Features Work With Elementor Category Filters?
Users expect instant changes after clicking a filter, not a full page reload. Without this, the page reloads completely, which takes more time. Ajax helps make this process smooth and quick for category filters in Elementor. Here is how it works with Elementor category filters.
- Instant Updates: Ajax loads only the filtered content instead of refreshing the entire page, which makes the results appear much faster and saves extra waiting time.
- Better User Experience: People can keep scrolling and clicking filters without being interrupted by full-page reloads, keeping the browsing process smooth and simple.
- Reduced Server Load: Instead of reloading all page elements like menus and headers, Ajax only fetches the needed content, which reduces strain on the server.
- Dynamic Category Filters: When filters are applied, Ajax communicates with the server in the background and returns only items that match the selected category.
- Smooth Visuals: With Ajax, filtered results often load with animations or fade-in effects, which makes the content change look neat and engaging.
- Mobile Friendly: Ajax filters adjust quickly on smaller screens as well, so users on mobile devices can switch categories without facing delays or reloads.
- SEO Benefits: Since Ajax reduces unnecessary page reloads, the site speed improves, which can help with better performance in search engines.
In short, Ajax makes Elementor filters work instantly and smoothly. It keeps the page active, avoids reloads, and ensures a faster and more comfortable browsing experience for everyone.
FAQs About How to Add a WooCommerce Category Filter With Elementor?
When setting up a WooCommerce store using Elementor, many people have extra questions about category filters. These filters can seem tricky at first, but with the right answers, things get clear and simple. Below are some of the most common and helpful questions with detailed answers.
How Do I Show Category Filter Only on Shop Page in Elementor?
You can show the category filter only on the shop page by editing that specific page in Elementor and adding the filter widget there. This way, it won’t appear on other pages like the homepage or blog. Some filter plugins also allow you to set display conditions, so the filter will only show on certain pages. Always double-check settings to avoid filters showing where they are not needed.
Can I Add WooCommerce Category Filter Without Using Coding in Elementor?
Yes, you can add a WooCommerce category filter without writing any code. Elementor and filter plugins are built to give you ready tools with drag-and-drop options. This means you don’t need technical skills to use them. Just follow the plugin steps, and the filter will be live on your page.
How Do I Make WooCommerce Category Filter Look Modern in Elementor?
You can style the category filter with Elementor’s design tools to make it look modern. Most filter plugins allow custom colors, fonts, and layouts that match your shop theme. You can also adjust spacing and alignment for a clean look. A neat design helps customers use the filter easily.
Can I Add WooCommerce Category Filter to a Custom Elementor Template?
Yes, you can add the category filter to a custom Elementor template. Simply open the template in Elementor and place the filter widget where you want it to appear. Once saved, the filter will show on all pages using that template. This helps keep your store design consistent across many pages.
How Do I Show WooCommerce Category Filter Only for Selected Products?
You can set filters to show only for certain products by assigning those products to specific categories. When visitors use the filter, only those products appear. Some filter plugins also give advanced rules to control which products show under a filter. This makes your shop more organized and easier to browse.
Is It Possible to Add WooCommerce Category Filter in a Popup With Elementor?
Yes, you can place the filter inside a popup using Elementor’s popup builder. This way, customers can click a button and open the filter without it taking up space on the main page. It gives a modern look and saves space in your design. Popups also work well for mobile users who need quick access to filters.
How Do I Add WooCommerce Category Filter to a Sidebar Widget Area in Elementor?
You can add the filter to a sidebar by using Elementor’s widget areas. Most filter plugins come with widget options, so you can drag the filter into the sidebar. This keeps the filter visible while customers scroll through products. It is a simple way to make browsing smoother.
Can I Add WooCommerce Category Filter to Elementor Header or Footer?
Yes, you can place the filter in the header or footer by editing those parts in Elementor. However, this is less common because filters usually belong near products. Still, if you want quick access from anywhere, the header or footer can work. Just be careful not to make the design too crowded.
How Do I Add WooCommerce Category Filter With Icons in Elementor?
Some plugins allow you to add icons next to category names in the filter. This makes the filter more attractive and easier to understand. For example, a t-shirt icon can go with clothing, or a shoe icon with footwear. Elementor’s style tools let you adjust the size and placement of these icons.
Can I Add WooCommerce Category Filter in a Separate Filter Page With Elementor?
Yes, you can create a separate page just for filters and link it from your menu or shop. This page can have all your filters in one place, including category filters. Customers can select filters and then move to the results page. It is a good option for stores with many categories and filters.
Conclusion
When you run an online shop with many products, adding category filters makes it easier for visitors to find what they need quickly. Elementor, along with a filter plugin, gives you the tools to set up smooth filtering. This is the simple answer to how to add WooCommerce category filter with Elementor?
To keep things running smoothly, always check plugin compatibility, test filter placement, and use Ajax for faster results. Try different layouts like sidebar or top filters and see what your audience likes best. Wishing you success in building a smooth and user-friendly store.