Price-driven shoppers usually want the fastest path to products that are already marked down. A discount filter in WooCommerce helps surface sale items right away, so visitors can focus on active offers instead of scanning full-price products one by one.
This guide walks through how to add filter by discount in WooCommerce, choosing the right setup for your store, and what to watch for if the filter does not behave properly on shop pages.
Quick Answer
WooCommerce can show sale items through its built-in On Sale product visibility, but it does not offer a full discount filter by default. To let shoppers narrow products by discount more directly, you usually need a filter plugin or custom setup that can detect sale pricing and display discounted products on shop or category pages.
Here’s the basic process:
- Apply sale prices to the right products
- Choose a method that supports discount-based filtering
- Place the filter where shoppers can use it easily
- Test it with active discounted products
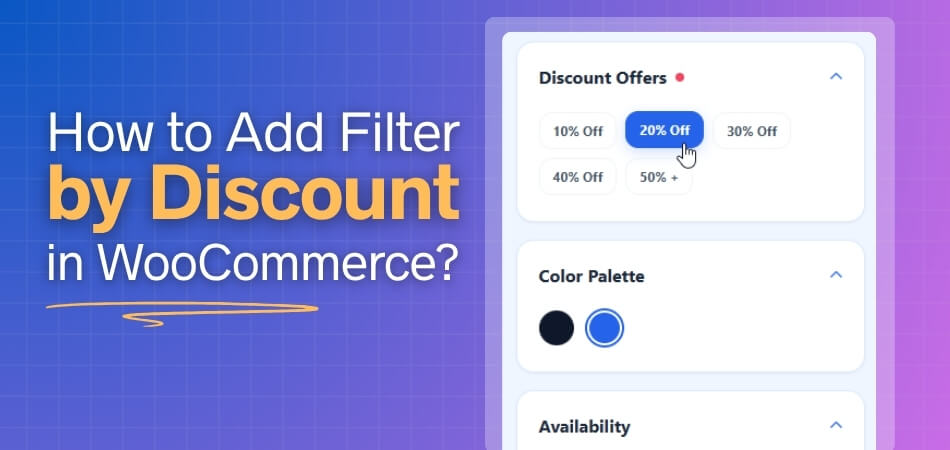
What A Discount Filter Does In WooCommerce?
Discount filters help shoppers narrow the catalog to products with active price reductions. Rather than browsing every item in the store, visitors can move straight to products that already carry a sale price or promotional offer.
This kind of filtering is especially useful for deal-focused browsing. It brings discounted items to the front, shortens the path to purchase, and makes promotional products easier to find during sales, seasonal offers, or limited-time campaigns.
When Discount Filters Are the Right Choice
Discount filters make the most sense in stores where promotions play a visible role in how shoppers buy. When sale pricing is used often enough to influence browsing behavior, giving visitors a direct way to view discounted products can make the path to purchase much shorter.
They are a strong fit when:
- Promotions run regularly
- Shoppers often compare deals first
- Large catalogs make sale items harder to find
- Campaign timing matters
- Savings influence conversion more than product novelty
How to Add Filter by Discount in WooCommerce: Simple Methods That Work
WooCommerce does not offer a full discount filter out of the box, so adding one usually means using sale visibility, an advanced Ajax product filters plugin, or custom logic, depending on how your store handles promotions. Below, you will see the main methods that can be used to show discounted products more clearly and make deal-focused browsing easier for shoppers.
Method 1: Use Built-In “On Sale” Visibility (Limited)
WooCommerce can surface discounted products without extra filtering logic, but this works more like sale visibility than a true discount filter. Core WooCommerce supports showing on-sale items with the [products] shortcode using on_sale=”true”, while its built-in product filter blocks focus on price, attributes, stock, and rating rather than a dedicated sale filter.
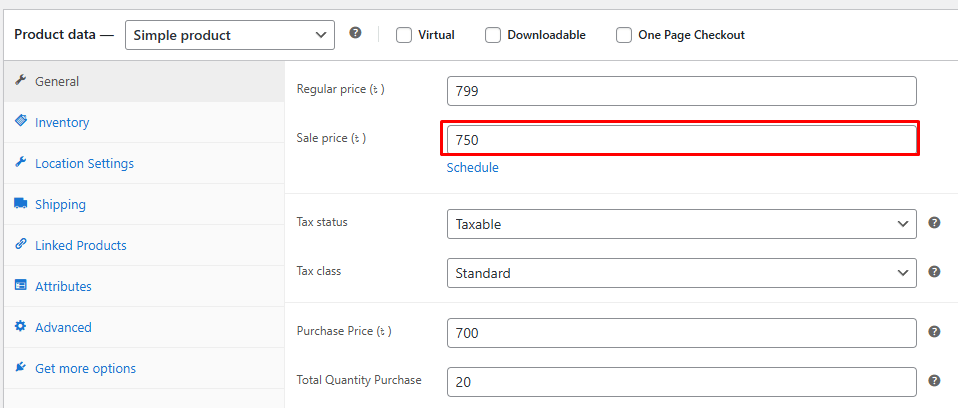
Step 1: Make Sure Products Have Active Sale Prices
- Open a product in WooCommerce
- Go to Product Data → General
- Enter a Regular price
- Enter a lower Sale price
- Update the product

Step 2: Create a Simple On-Sale Product View
- Add a page or section where you want sale products to appear
- Insert a Shortcode block
- Use the WooCommerce shortcode below:
[products on_sale=”true”]
Core WooCommerce documents on_sale as a supported [products] shortcode attribute for retrieving products on sale.
Step 3: Place It Where Shoppers Can Find It
- Add the sale page to your menu, banner, or shop navigation
- Or place the shortcode in a sidebar, landing page, or promotional section
- Make sure the location matches how shoppers browse your deals
Step 4: Test the Sale Product Display
- Open the page on the front end
- Confirm discounted products appear
- Check that full-price items are excluded
- Verify recently ended sales no longer show
Limitations Of This Method
- Not a true interactive filter
- No dedicated discount filter UI
- Cannot filter by discount percentage
- Less flexible with other filter conditions
- Better for sale listings than real discount filtering
Method 2: Add Discount Filter Using AJAX Filtering (Recommended)
AJAX filtering is the strongest way to turn discounts into a real storefront filter in WooCommerce. Instead of sending shoppers to a separate sale page, it lets them narrow products by sale or discount status and update results instantly without a full page reload. Dynamic AJAX Product Filters for WooCommerce supports AJAX filtering, sale status filtering, shortcode placement, and filter styling from the plugin settings.
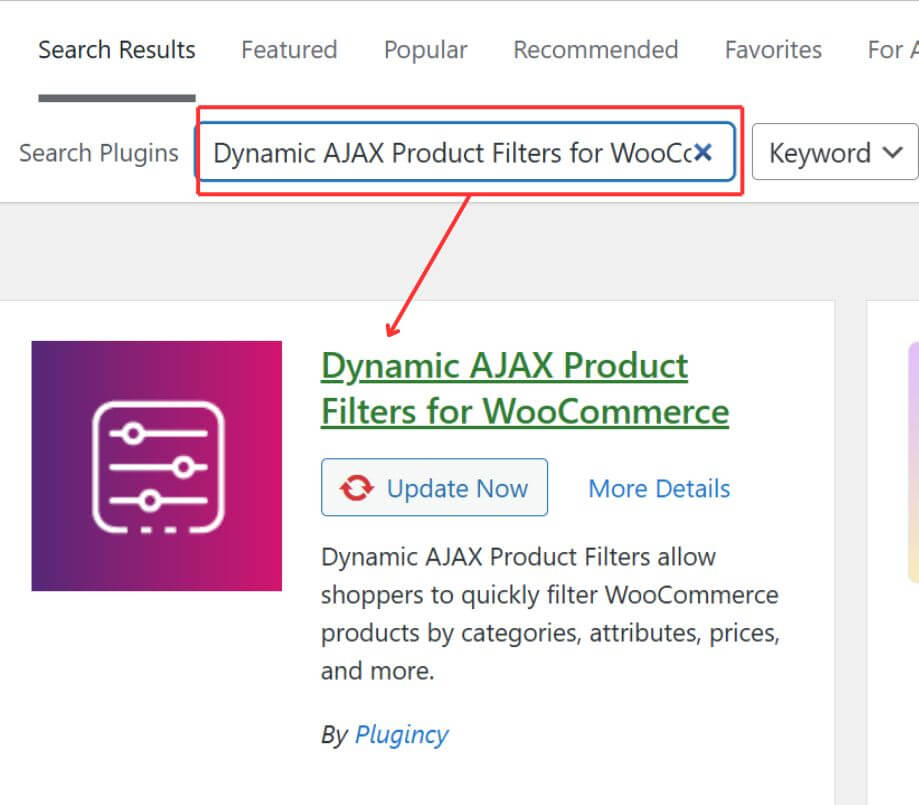
Step 1: Install And Activate Dynamic AJAX Product Filters For WooCommerce
- Go to Plugins → Add New Plugin
- Search for Dynamic AJAX Product Filters for WooCommerce
- Click Install Now
- Click Activate after installation finishes
Step 2: Open The Filter Settings
- Go to Product Filters → Form Manage from your dashboard
- Stay in the filter form settings area
- Toggle on the Show Sale Status option
- Save the filter settings

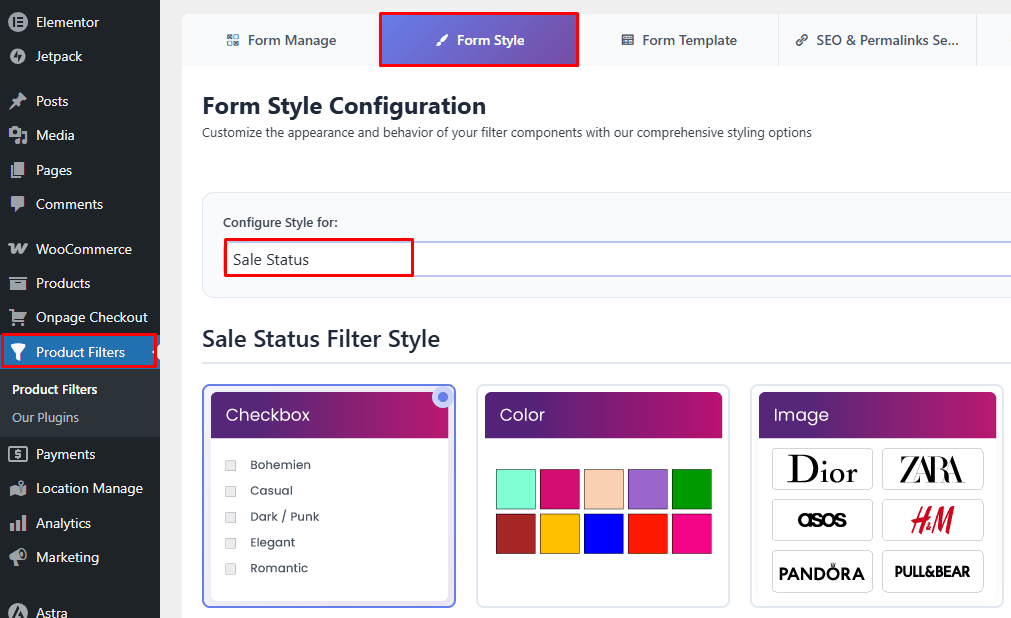
Step 3: Style The Filter If Needed
- Open the Form Style tab and select the Sale Status filter
- Adjust the filter style and choose how you want to display
- Configure optional and advance setting
- Save Changes
Step 4: Display The Filter On Shop Or Category Pages
- Copy the shortcode [plugincy_filters]
- Paste it into your shop page, category page, sidebar, or filter area
- Use a Shortcode block if you are working in the block editor
- Or place it with an Elementor shortcode widget if needed
Step 5: Test The Discount Filtering
- Visit the shop page
- Apply the discount or sale filter
- Confirm that only discounted products appear
- Check that product results update instantly
Step 6: Style The Filter If Needed
- Open the Form Style tab
- Adjust the filter appearance to match your shop layout
- Save the style settings
Step 7: Test The Discount Filtering
- Visit the shop page
- Apply the discount or sale filter
- Confirm that only discounted products appear
- Check that product results update instantly
Method 3: Use A Category-Based Sale Page (Manual Method)
Manual sale pages give you a simple way to group discounted products without relying on automatic discount logic. Instead of building a true filter, this method creates a dedicated sale category that shoppers can open to browse selected discounted items in one place.
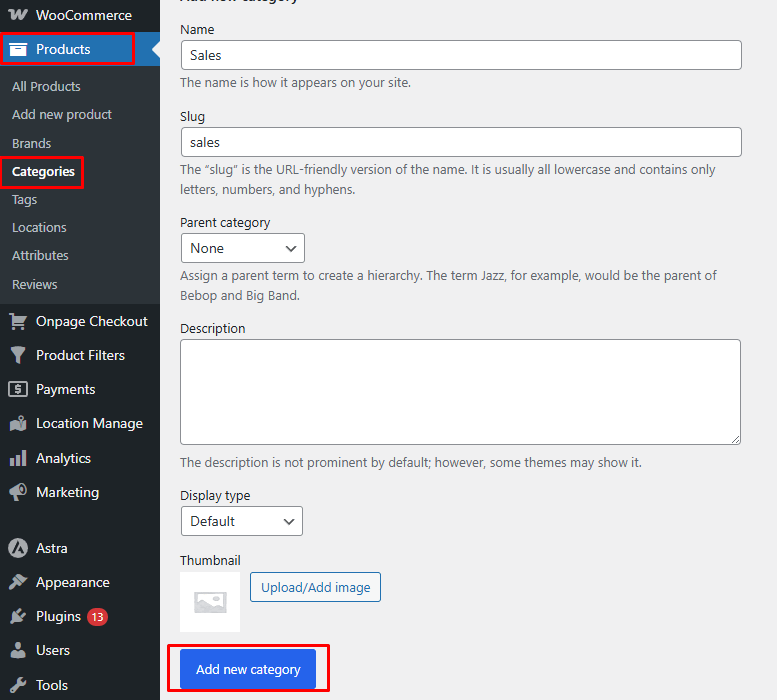
Step 1: Create A Sale Category
- Go to Products → Categories
- Create a category such as Sale or Discounted Products
- Save the category
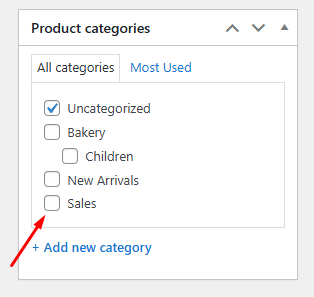
Step 2: Assign Discounted Products Manually
- Open the products you want to include
- Add them to the Sale category
- Update each product
Step 3: Show The Sale Page In Your Store Navigation
- Add the sale category page to your menu, banner, or homepage section
- Place it where deal-focused shoppers can find it easily
Step 4: Keep The Category Updated
- Remove products when discounts end
- Add newly discounted products regularly
- Review the category often so it stays accurate
Limitations Of This Method
- Requires manual updates
- Does not detect discounts automatically
- Can become outdated quickly
- Works more like a curated sale page than a true filter
- Less practical for stores with frequent promotions
Method 4: Use Discount Percentage Filtering (Advanced Logic)
Some stores want shoppers to browse products by how much they are saving, not just whether an item is on sale. Discount percentage filtering makes that possible by showing products that meet a specific threshold, such as 10% off or more or 20% off or more.
Step 1: Decide The Discount Threshold
- Choose the percentage you want to use
- Set a rule such as 10% off, 20% off, or more
- Keep the threshold clear and consistent
Step 2: Use A Setup That Supports Percentage Logic
- Choose a plugin or custom setup that can calculate discount percentage
- Make sure it can compare regular price and sale price
- Confirm it can apply that rule on the shop page
Step 3: Apply The Rule To Product Display
- Show only products that meet the selected discount threshold
- Exclude products with smaller discounts
- Keep the same logic across shop or category pages
Step 4: Test The Results
- Check products with different discount levels
- Make sure the right items appear
- Review variable products and scheduled sales if your store uses them
Method 5: Use Admin-Only Discount Filtering (Back-End)
Back-end discount filtering can help you review discounted products inside WooCommerce, but it is not a shopper-facing solution. This method is useful when you want to check sale items for store management, campaign prep, or inventory review.
Step 1: Open The Product List
- Go to Products → All Products
- Open the main product management screen
Step 2: Review Discounted Products
- Look through products with active sale prices
- Use available admin sorting or product details to identify sale items
- Check which products are currently part of a promotion
Step 3: Use It For Internal Tasks
- Review discounted items before a campaign goes live
- Check which products need updated sale pricing
- Manage promotional inventory more easily
Which Method Is Better for Different Store Types?
Each discount filtering method solves a different need. This comparison shows which option works on the storefront, combines with other filters, and suits your store best.
| Method | Frontend | Combines With Other Filters | Best Use Case |
| On Sale visibility | ✔ | ❌ | Simple sale listing |
| Sale category | ✔ | ✔ | Curated campaigns |
| Percentage logic | ✔ | ✔ | Deal-focused stores |
| AJAX discount filter | ✔ | ✔ | Best overall |
| Admin-only filter | ❌ | ❌ | Internal management |
Best Use Cases for Discount Filters to Increase Conversions
Discount filters do not create the same impact in every WooCommerce store. They tend to perform best in situations where savings strongly influence browsing behavior, and shoppers want a faster way to reach products already marked down. Here are the best use cases for discount filters to increase conversions.
Seasonal Sale Campaigns
Seasonal campaigns are one of the strongest use cases for discount filters because shoppers often arrive expecting to see promotions first. A discount filter makes that path clearer, helping visitors move directly to sale items instead of spending extra time sorting through full-price products.

Flash Deals And Limited-Time Offers
Short-term promotions benefit from discount filters because urgency matters most when products are easy to find. When shoppers can isolate discounted items quickly, they are more likely to engage with the offer while it is still active and make faster buying decisions.
Large Catalog Stores
Larger stores often struggle to keep discounted products visible because sale items can get buried under regular listings. A discount filter becomes even more useful when paired with a multi-select filter in WooCommerce, allowing shoppers to narrow discounted products by category, size, brand, or other product details.
Mobile Shopping Sessions
Mobile shoppers usually want a quicker route to relevant products with fewer taps and less scrolling. A discount filter helps simplify that journey by showing sale items sooner, which can reduce friction, improve product discovery, and support stronger conversion rates on smaller screens.
Deal-Focused Shopping Behavior
Some visitors enter the store with a strong interest in savings before they look at anything else. For those shoppers, a discount filter acts as a direct shortcut to the types of products they are already more likely to consider, compare, and purchase.
SEO Rules for Discount Filters in WooCommerce
Discount filters can help shoppers find deals faster, but they should not become pages you expect search engines to rank. Since discounts change often, discount-filtered URLs are usually better treated as navigation tools rather than stable SEO pages.
Practical Indexing Rule
- Do not index discount-filtered URLs
- Keep product pages and core category pages indexable
- Use AJAX-based filtering when possible to reduce crawlable filter URLs
What to Index vs What Not to Index
| Scenario | Index | Noindex | Why |
| Product pages | ✔ | Core SEO pages | |
| Category pages | ✔ | Structural value | |
| Discount-filtered URLs | ✔ | Time-sensitive intent | |
| AJAX discount views | ✔ | Navigation only |
Best Practices to Make Discount Filters Convert Better
Shoppers usually respond fast to deals when the path feels simple. When discounted products are easy to find, easy to refine, and easy to trust, the filter becomes more than a sale shortcut; it becomes part of what moves people closer to checkout. Use these best practices to make the discount filters convert better.
- Show Savings Clearly: Use sale badges, crossed-out regular prices, or visible discount labels so shoppers can spot value right away
- Keep Placement Visible: Put the discount filter where it is easy to notice on shop and category pages
- Combine Filters Thoughtfully: Let shoppers narrow discounted products by category, brand, stock, or even a filter by new arrivals in WooCommerce when fresh deals matter
- Test Real Sale Products: Check the filter with active discounted items so users do not land on empty or misleading results
- Support Mobile Browsing: Make sure the discount filter stays easy to use on smaller screens without extra taps or layout issues
- Avoid Filter Clutter: Too many filter options can make deals harder to find and slow down decisions
- Keep Sale Logic Accurate: Remove expired discounts and confirm sale prices stay updated so the filter remains trustworthy
How to Fix a Discount Filter That Is Not Working in WooCommerce
Most discount filter problems come from sale pricing, filter placement, or setup logic that does not match the way discounted products are being shown. A quick check of the common issues below usually makes it easier to spot what is going wrong.
| Problem | Likely Cause | Fix |
| No products appear | No products have active sale prices | Add valid sale prices to discounted products |
| Filter shows but stays empty | Sale dates have expired or discounts are inactive | Review sale schedules and update pricing |
| Full-price products still appear | Filter logic is not tied to sale status correctly | Recheck the sale or discount filter settings |
| Filter works on one page only | Placement is limited to a specific layout or template | Add the filter to the correct shop or category page |
| Filter does not appear at all | Shortcode, widget, or block is placed in the wrong area | Move it to a visible filter section |
| Page reloads instead of filtering live | AJAX is disabled or not supported in that setup | Enable AJAX or use a compatible filtering method |
| Variable products behave unexpectedly | Sale pricing is missing on variations or product setup is incomplete | Check variation pricing and confirm discounts are active |
| Mobile layout looks broken | Theme or filter placement is conflicting on smaller screens | Test mobile display and adjust the filter area or styling |
FAQs: WooCommerce Discount Filter
Discount filtering often raises a few follow-up questions once the basic setup is done. These answers cover practical details store owners often run into when deciding how sale-based filtering should behave across different product types, campaigns, and storefront layouts.
Can A Discount Filter Work Alongside Scheduled Sales In WooCommerce?
Yes, a discount filter can work with scheduled sales as long as the sale pricing becomes active at the right time. Once the scheduled discount starts, eligible products can appear in the filter automatically if the filter is tied to sale status or discount logic.
Is A Discount Filter Useful For Small WooCommerce Stores?
Yes, it can still be useful in smaller stores, especially during promotions or short-term sales. Even with a smaller catalog, a discount filter gives deal-focused shoppers a quicker way to reach sale items without scanning through regular product listings.
Can I Show A Discount Filter Only During Campaign Periods?
Yes, many store owners choose to display discount filters only during active promotions, seasonal events, or clearance campaigns. This can keep the shop layout cleaner during normal periods and make discount browsing more visible when offers matter most.
Does A Discount Filter Work The Same Way For Simple And Variable Products?
Not always. Simple products usually follow their own regular and sale price directly, while variable products depend on the pricing setup of their variations. That means discount behavior can look different if variation pricing is incomplete or inconsistent.
Can A Discount Filter Be Used On Landing Pages Instead Of The Main Shop Page?
Yes, a discount filter can also be placed on campaign pages, category pages, or promotional landing pages if that fits the store structure better. This is often useful when you want discounted products to support a specific campaign instead of appearing only in the main shop layout.
Final Thoughts
Adding a discount filter can make sale products much easier to find, especially for shoppers who come to your store already looking for deals. Once the setup matches your promotion style and product structure, discounted items become easier to surface without making the shop feel crowded.
If you have been looking into how to add filter by discount in WooCommerce, the most reliable approach is usually the one that keeps sale products visible, easy to refine, and simple to manage over time. The right method depends on your store, but the goal stays the same: help shoppers reach the best offers faster.