Category filters play a big role in online stores because they help people sort through products quickly and easily. Many store owners often wonder about creating their own filters, and the question comes up, Can I create custom category filters in WooCommerce?
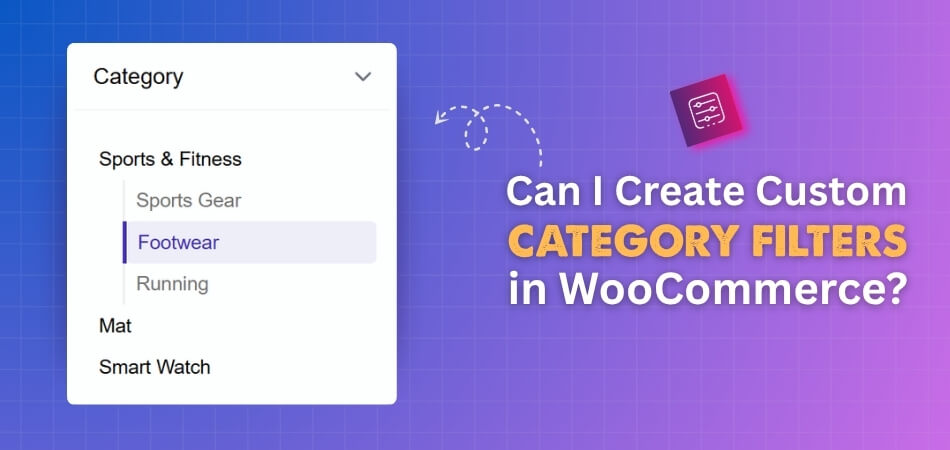
Yes, you can create custom category filters in WooCommerce using the Dynamic AJAX Product Filters plugin. Set up categories, assign them to products, enable filters in widget settings, choose display styles, and use the shortcode “plugincy_filters” to show them on your shop page.
Do you want to know how to set up these filters step by step and understand their benefits? In this article, you’ll find everything you need, from installing the plugin to customizing filters, handling nested categories, fixing problems, and testing them for accuracy.
Can I Create Custom Category Filters in WooCommerce?
Setting up category filters in WooCommerce makes it easier for visitors to browse and find the right products. You can do this with built-in options, but plugins give you more flexibility. Let’s go step by step so you can set everything up without confusion. Keep reading to see the full process explained clearly.
Step 1: Install the Plugin
WooCommerce does give you some built-in product filtering and options with Gutenberg blocks, but they are very limited. You don’t get much flexibility to customize the filters the way you want. That’s why it’s better to use a dedicated plugin.
A good choice here is Dynamic Ajax Product Filters for WooCommerce. This plugin is simple to use and comes in both free and paid versions, so you can pick the one that suits your needs. With this plugin, you can create advanced category filters that look modern and work smoothly with AJAX (meaning customers won’t need to reload the page when they filter products). Adding a WooCommerce Ajax category filter improves navigation, saves time for shoppers, and makes the buying process more enjoyable.
Now let’s see how to install it.
Free Version
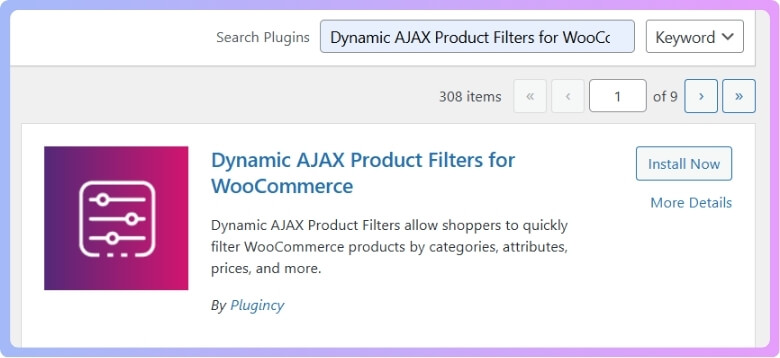
To install the free version, first log in to your WordPress Admin Dashboard. From the left menu, click on Plugins, then choose Add Plugin. In the search bar, type Dynamic AJAX Product Filters for WooCommerce and wait for it to appear in the search results.
Once you find it, click Install Now to begin the installation process. When the installation is done, click Activate to turn on the plugin and start using it on your website.
PRO (Paid) Version
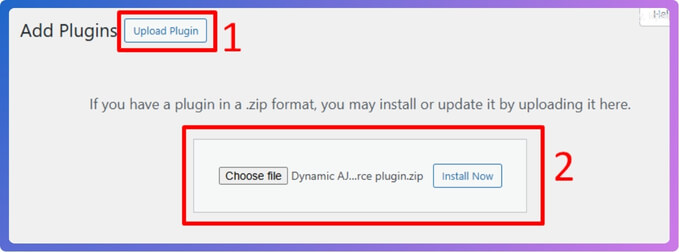
For the PRO version, go to your WordPress Dashboard and click on Plugins. Then select Add New Plugin and choose Upload Plugin. Click Choose File and upload the ZIP file that you received after purchasing the plugin. Once uploaded, click Install Now to complete the installation.
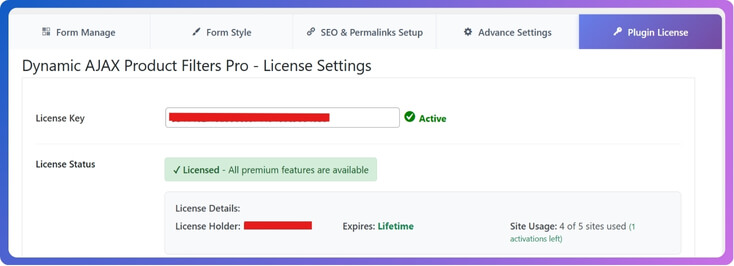
After the installation, you will get a license key. To activate all premium features, go to Product Filters > Plugin License in your dashboard. Paste the license key in the given box and save it. This will unlock all the PRO features of the plugin.
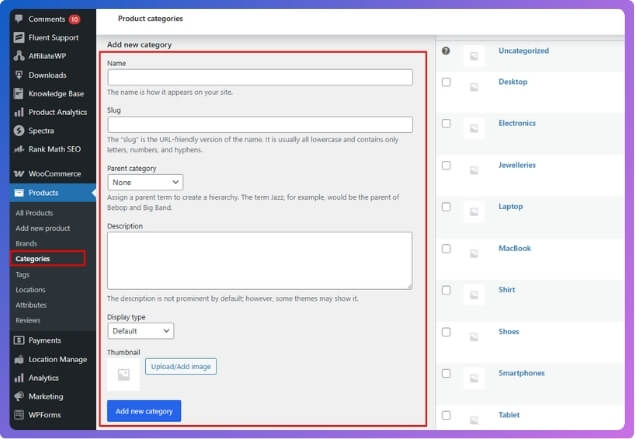
Step 2: Create Custom Categories
- From the dashboard, go to Products > Categories.
- On the Product Category page, you’ll see an option to Add New Category.
- Fill in the details:
- Name: Example – Laptops
- Slug: Example – laptops
- Description (optional): Add if needed
- Thumbnail (optional): Click Upload/Add Image > Upload Files, select an image from your computer, and upload it. Then click Use Image.

- When you’re done, click Add New Category.
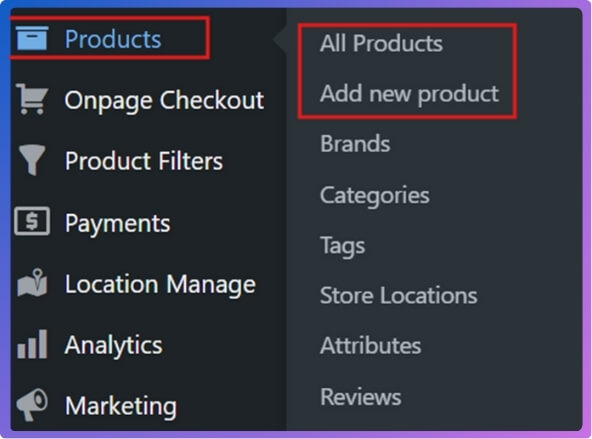
Step 3: Assign a Category to Products
- Go to Products > All Products.
- You can either:
- Edit an existing product, or
- Click Add New to create a new product.

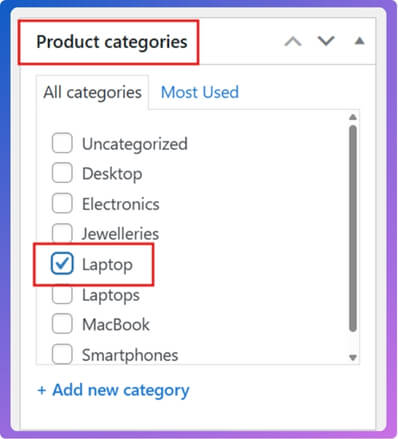
- After opening the product page, in the right-hand panel, look for the Categories section.
- Check the box next to the category you want to assign. Or click Add New Category if you want to create another category directly from here.

- Click Update (if editing) or Publish (if adding new).
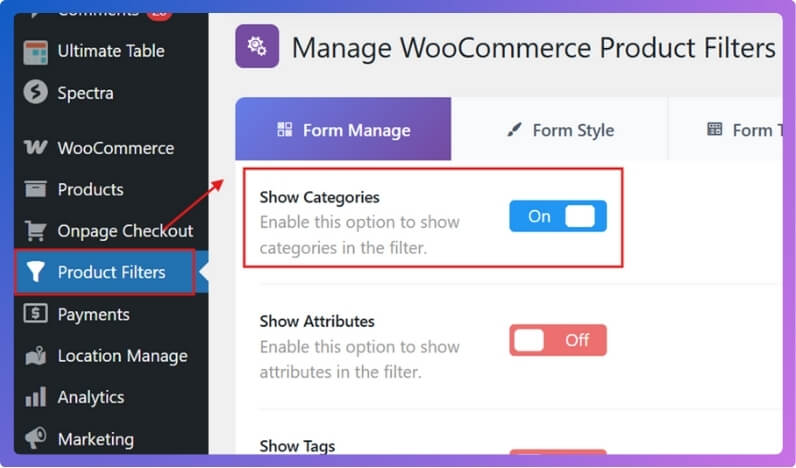
Step 4: Manage Categories in the Filter Widget
- Go to Product Filters > Form Manage.
- Look for the option Show Categories.
- Toggle it On/Off depending on whether you want categories to appear in the filter widget.

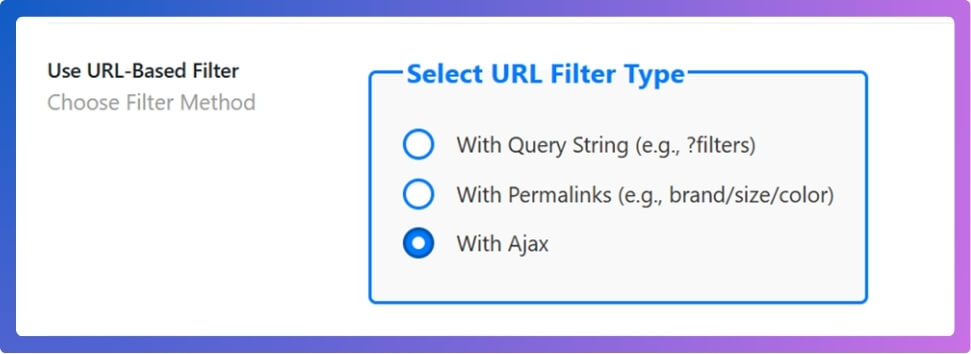
- If you want an Ajax-powered filter, scroll down and you’ll see a box named “Select URL Filter Type” here, choose the “With Ajax” option.

- After you’re done, click on Save Changes.
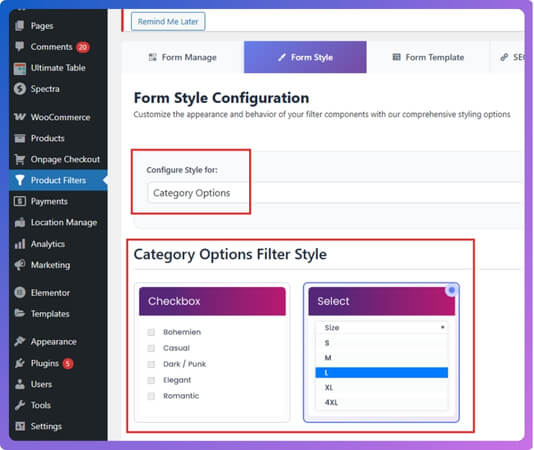
Step 5: Customize the Filter Widget (Style and Design)
- Go to Product Filters > Form Style.
- From the Select Attribute dropdown, choose Category.

- Choose how you want categories to look in the filter:
- Checkbox
- Select
- Depending on the option you pick, configure the sub-options .
- Click Save after finishing.
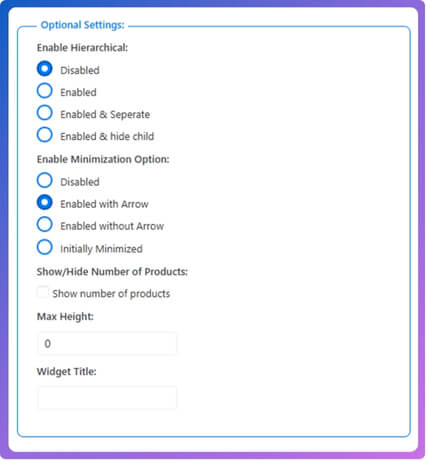
Step 6: Enable Hierarchical Options (Optional)
This controls how parent and child categories appear.
- In Form Style Settings, look for Enable Hierarchical.
- Choose one option:
- Disabled: No hierarchy.
- Enabled: Show parent and child categories together.
- Enabled & Separate: Show parent and child separately.
- Enabled & Hide Child: Show only parent categories, hide children.

- After you’re done, click on Save Changes.
Step 7: Display the Product Filter on Your Website
- Go to the page where you want to show the filter.
- Add the shortcode:
“plugincy_filters”
Place it where you want the filter to appear (page, widget, sidebar, etc). - (Optional) If you want to display products with the filter, add the shortcode:
“products”
When pasting the shortcode, remove the inverted comma and use square brackets [ ]
After you have set everything up, your visitors will see a custom category filter on your shop page. They can click on categories like Laptops, Shoes, or Accessories, and the plugin will use AJAX to filter products instantly without reloading the page. This makes shopping smoother and helps customers find what they want faster.
Why Should You Create Custom Category Filters in WooCommerce?
People shopping online want to find the right product quickly. If it takes too long, they may leave without buying. That’s why better filters in WooCommerce can make a real difference. Let’s explore the key benefits these filters bring to both customers and store owners.
Better Navigation
One of the key reasons store owners build custom filters is to improve store navigation with WooCommerce category filter, allowing customers to browse products in fewer clicks. Shoppers can sort by colors, sizes, prices, or features they want. This makes finding items faster and easier.
Improved User Experience
A smooth shopping experience keeps people happy. With custom filters, customers don’t need to scroll through endless products. Instead, they can narrow down results to match their needs. This saves time and creates a shopping flow that feels natural and stress-free.

Higher Conversions
When buyers can find products quickly, they are more likely to make a purchase. Custom category filters guide them straight to what they want. This reduces confusion, builds trust, and often leads to more items being added to the cart.
Flexible Options
Default filters in WooCommerce are limited. Custom filters let you create specific categories for your business. For example, if you sell electronics, you can filter by brand, storage size, or battery life. This flexibility makes your store stand out compared to generic layouts.
SEO Benefits
Custom filters can also help with search engines. When filters are set up well, they create clear product pages that are easier to index. This can increase visibility in search results and bring more visitors to your store, which can boost sales.
Custom category filters are more than just a design feature. They improve navigation, make shopping easier, and can increase conversions. Adding them is a smart way to grow your WooCommerce store and keep customers coming back.
How Do Custom Category Filters Handle Nested Categories in WooCommerce?
Handling nested categories in WooCommerce requires smart filtering. These filters organize products in a way that keeps shopping simple. When categories are nested, the filters manage them differently. Keep reading to understand how parent and child categories work together.
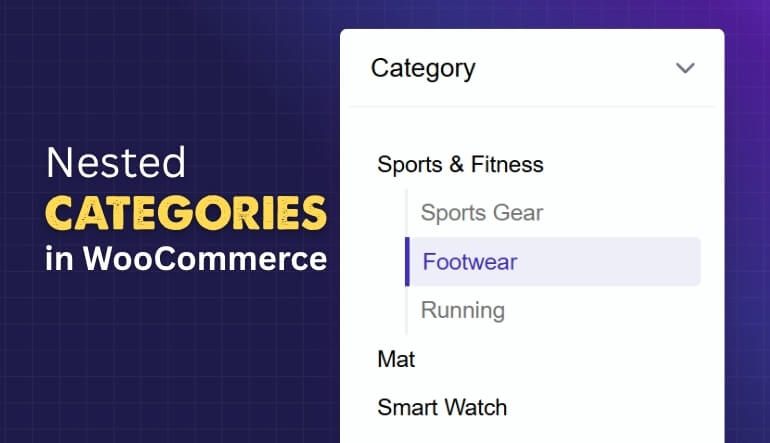
Parent Categories
These act as the top-level groups that hold related products. When a filter shows a parent category, it usually includes every product under it and its child categories. This lets shoppers see the full range of products without needing to select each child category separately.
Child Categories
Placed under parent categories, these make product selection more specific. Filters often display them as smaller groups, so customers can drill down into the exact products they want. For example, a “Shoes” parent category may have child categories like “Sneakers” and “Sandals” for detailed browsing.
Expand Lists
Filters often keep the layout neat by showing only parent categories first. Shoppers can click or tap to expand them and see child categories. This style prevents a cluttered sidebar and makes the shopping experience more comfortable, especially when many categories exist.
Filter Actions
When shoppers use the filters, the results depend on the setup. Selecting a parent category often shows all products, including those in its children. Some stores allow combining both parent and child filters, while others keep the selection separate for cleaner browsing.
Display Choices
Shop owners can adjust how filters appear in their store. Some plugins let child categories show up only after clicking a parent. Others reveal every category at once. These choices affect how smooth the browsing feels and how quickly customers find products.
Nested categories in WooCommerce filters make product browsing much easier. Parent and child categories work together to keep products well organized. Shoppers can explore broadly or focus more closely on details. A smart setup improves shopping and keeps customers coming back.
What Common Problems Arise With Custom Category Filters?
Custom category filters are helpful for organizing products and making shopping easier. But sometimes, they don’t work the way they should, and this can cause problems for both store owners and customers. Let’s look at the most common issues.
Filter Not Showing
Sometimes filters do not appear at all. This usually happens when a filter only has one option, so it doesn’t really narrow down results. Other times, the store’s settings may hide filters for certain categories. Special characters in category names can also cause them not to show up.
Few Results Shown
A common frustration is when filters give very few results. This often makes visitors feel that products are missing, even if they exist. The issue usually happens when counts do not update as filters are applied. Clear numbers and updated results can solve this problem.
Too Many Categories
When stores add too many categories, users end up confused. Similar items can get separated, making them harder to compare. This overcategorization makes the shopping experience less smooth. Keeping categories simple and straightforward helps users find what they need faster.
Technical Errors
Filters can sometimes act strangely because of system settings. For example, wrong steps in price filters can cause odd ranges. In other cases, plugin or theme conflicts make filters stop working. One common issue store owners face is when filters don’t display results correctly, and knowing how to fix WooCommerce category filter not working can save time and improve the shopping experience.
SEO and URLs
Dynamic filter URLs can confuse search engines. If search engines cannot read the results, products may not show up in rankings. Using static and clean URLs makes filters easier for both users and search engines to understand. Proper configuration is key to avoiding these conflicts.
Custom category filters are useful, but problems like hidden filters, wrong results, or URL errors can hurt user experience. With the right setup and fixes, you can keep filters working smoothly for both visitors and search engines.
How Do You Test Custom Category Filters for Accuracy in WooCommerce?
Testing custom category filters in WooCommerce is an essential step to ensure a smooth and accurate shopping experience for your customers. If your filters don’t work correctly, customers may not be able to find the products they’re looking for, leading to frustration and lost sales.
Here’s a step-by-step guide to testing custom category filters for accuracy in WooCommerce, covering how to check if filters are showing the correct products and catching all relevant items.
Pre-Testing Checklist
Before you begin testing, make sure your setup is correct:
- Proper Taxonomy and Attributes: Ensure that your custom categories and attributes are correctly set up under Products > Categories and Products > Attributes in your WooCommerce dashboard.
- Products are Assigned: Double-check that all products have been correctly assigned to the relevant categories and have the necessary custom attribute terms.
- Filter Configuration: Verify that the filter widget or plugin you are using is configured to display the correct categories and attributes. Pay close attention to settings like “Hide terms without products” or “Show product counts,” as these can affect what the customer sees.
- Clear Cache: Always clear your site’s cache (server cache, plugin cache, and browser cache) before testing. Caching can sometimes display outdated product data, leading to inaccurate test results.
- Staging Site: Whenever possible, perform your testing on a staging or development site. This prevents you from making changes or encountering issues on your live store.
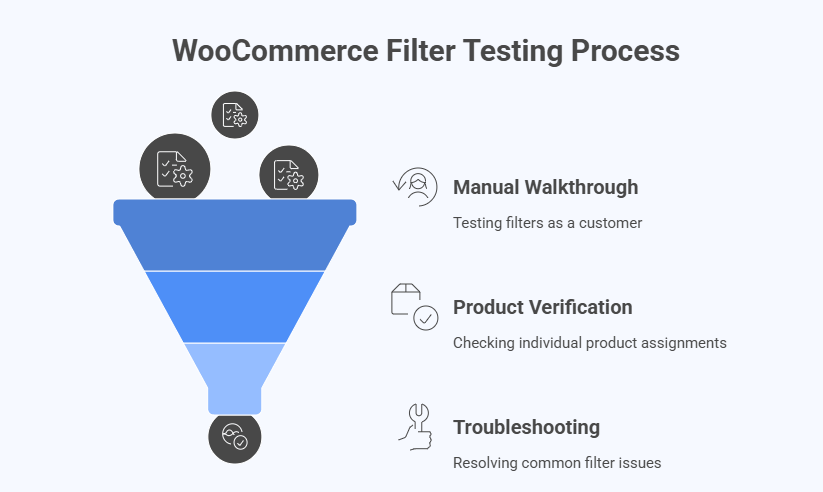
Step 1: The Manual Walkthrough (The User Experience Test)
This is the most direct and effective way to test. Put yourself in the shoes of a customer and browse your store.
- Select a Filter: Go to a shop page or category page where your custom filters are displayed. Select one of the custom category filter options (e.g., “T-Shirts”).
- Verify the Results:
- Are the Correct Products Shown? Scroll through the filtered product list. Manually check if every product displayed belongs to the category you selected.
- Is the Filter Catching All Products? Go to the backend of your site and find the category you just filtered by. Manually count the number of products assigned to that category. The number of products on the front end after applying the filter should match the number you see in the backend.
- Test Multiple Filters: Repeat the process by combining multiple filters. For example, filter by “T-Shirts” and then by a custom attribute like “Color: Red.” The results should show only red t-shirts. Again, verify the accuracy of the product list.
- Test for “No Results”: Select a combination of filters that you know should return no products (e.g., a “Red” t-shirt category that you haven’t assigned to any products). The page should correctly display a “No products found” message.
- Test “Clear Filters”: After applying several filters, test the “Clear All” or “Reset” button. The page should revert to showing all products for that category, with no filters applied.
Step 2: Product-by-Product Verification
This method is more granular and helps you catch subtle errors.
- Identify a Problem Product: Find a specific product in your store that you want to test.
- Check its Data: In the WordPress dashboard, go to Products > All Products and edit that product.
- Note the categories and custom attributes assigned to it.
- For example, a “Blue Jean” product might be assigned to the “Jeans” category and have a “Color” attribute with the term “Blue.”
- Front-End Test: Go to your live shop page.
- Apply the filter for “Jeans.” Does the “Blue Jean” product appear? It should.
- Apply the filter for “Blue.” Does the “Blue Jean” product appear? It should.
- Now apply both filters. Does the product still appear? It must.
- Now, test a filter; it shouldn’t appear under. For example, filter by “Jackets.” The “Blue Jean” product should not be in the results.
- Check Product Counts: As you test, keep an eye on the product counts next to the filter options. If your filter plugin shows the number of products in each category or attribute term, verify that this number is accurate. For instance, if you have 15 products assigned to the “Blue” attribute, the filter option for “Blue” should show a count of 15.
Step 3: Troubleshooting Common Issues
If you find that your filters are not working as expected, consider these common troubleshooting steps:
- Check for Plugin Conflicts: Deactivate all other plugins except WooCommerce and your filter plugin. If the filters start working correctly, reactivate the other plugins one by one to identify the one causing the conflict.
- Theme Compatibility: Your WordPress theme might be overriding WooCommerce templates, which can break filters. Switch to a default WordPress or WooCommerce theme (like Storefront) and test again. If the filters work, your theme is the source of the problem.
- Permalinks: Go to Settings > Permalinks in your WordPress dashboard and click “Save Changes.” This can help resolve issues with filter URLs.
- Developer Tools: Use your browser’s developer tools (right-click on the page and select “Inspect,” then go to the “Console” tab) to check for JavaScript errors. These errors can often stop filters from working correctly without a page reload.
By following these steps, you can thoroughly test your WooCommerce custom category filters and ensure they are accurate, providing a reliable and user-friendly experience for your customers.
FAQs About Can I Create Custom Category Filters in WooCommerce?
Custom category filters in WooCommerce can make a store much easier to use. They help shoppers find products faster, make browsing smoother, and improve overall sales. Below are some common questions and answers that clear up important details.
Can I Use Custom Filters Without Coding in WooCommerce?
Yes, you can. Many plugins are built for users who don’t know coding. These plugins have simple settings where you can pick how the filters should look and work. This means you can set up advanced filters without touching a single line of code.
Do Custom Filters Work With Any WooCommerce Theme?
Most modern WooCommerce themes support custom filters. However, sometimes the design may look slightly off, depending on the theme’s style. In such cases, small adjustments in settings or CSS can fix the issue. It’s always smart to test filters with your theme first.
Can Filters Show Multiple Categories at Once?
Yes, they can. Shoppers can choose more than one category while filtering, like “Shoes” and “Bags” together. This helps them compare items across groups without needing to go back and forth. It makes browsing smoother and keeps customers more engaged.
Do Custom Filters Slow Down My Website?
If you use a well-coded plugin, they usually don’t. Many good plugins use AJAX, which updates results without reloading the whole page. This makes the filter faster and smoother for shoppers. Picking a lightweight plugin ensures your site speed stays strong.
Can I Create Filters for Attributes Like Color or Size?
Yes, you can create filters not only for categories but also for attributes like color, size, and price. This gives shoppers more control when searching. They can mix categories with attributes, such as “Shoes” in “Red” color. This makes product discovery much easier.
Do Custom Filters Work on Mobile Devices?
Yes, most plugins are designed to be mobile-friendly. They adjust the layout so filters are easy to use on smaller screens. This is important because many customers shop from their phones. A mobile-ready filter ensures a smooth experience for all visitors.
Can I Hide Empty Categories From Filters?
Yes, many filter plugins let you hide categories that have no products. This prevents customers from clicking on options that don’t show results. It keeps the filter clean and saves shoppers from wasting time. A tidy filter always improves the user experience.
Are Custom Filters Useful for Large Stores?
Definitely. The bigger your store, the more important filters become. With hundreds of products, it’s impossible for shoppers to browse them one by one. Custom filters organize large catalogs into clear sections, helping customers reach the right products in seconds.
Can I Place Filters Anywhere on My Store Page?
Yes, you can. Most plugins allow filters to be placed in sidebars, headers, or even directly on product pages. Some even let you use shortcodes to control where filters appear. This flexibility helps you design your store layout the way you prefer.
Do Filters Work With Search Engine Optimization (SEO)?
Yes, when set up correctly, they can. Clean filter URLs and well-structured categories make it easier for search engines to understand your site. This can increase product visibility in search results. A good filter setup supports both customers and search engines.
Conclusion
Setting up custom category filters in WooCommerce is one of the simplest ways to make your store more user friendly. Filters help customers find products faster, reduce confusion, and make browsing smooth. A well-designed filter setup can truly improve the shopping experience.
So, can I create custom category filters in WooCommerce? Yes, you can. With the right plugin, you can design flexible filters, organize categories, and even add AJAX for faster results. This gives you complete control over how products appear to visitors.
When building your filters, remember to keep categories simple, test everything properly, and avoid overloading customers with too many choices. A clean and easy filter system will save time, keep shoppers happy, and encourage more sales. Best of luck with your store setup.