Adding a filter by color in WooCommerce makes shopping smoother and faster. It helps people find what they like without scrolling through every product. If you’re building an online store, you might already be thinking about how to organize your items better, and maybe you’re wondering how to add filter by color in WooCommerce?
Add a color filter in WooCommerce using the Dynamic AJAX Product Filters plugin. Create a “Color” attribute, assign it to products, and enable it in plugin settings. Customize the swatch style, then paste the shortcode to show the filter on your site.
If this is something you’ve been trying to figure out, then you’re in the right place. This article explains every step clearly so you can set it up without any confusion. From plugin setup to filter design and mobile tips, everything you need is right here.
How to Add Filter by Color in WooCommerce?
Letting customers filter products by color is a smart way to improve browsing on your WooCommerce store. Instead of making users scroll endlessly, color filters help them find exactly what they want, faster and easier. While this can be done through code, there’s a more convenient way that doesn’t require technical skills.
Why Use a Plugin for Color Filtering?
Plugins simplify the process of adding filters and allow you to control how they look and work, without touching any code. They also save time, prevent errors, and make your filters mobile-friendly and customizable. One of the most reliable tools for this task is Dynamic AJAX Product Filters for WooCommerce, which lets you build powerful color filters in just a few clicks. Many users prefer this kind of WooCommerce AJAX product filter because it updates results instantly without page reloads, making the shopping experience smooth and modern.
Step 1: Install the Plugin
From your WordPress dashboard:
- Go to Plugins > Add New
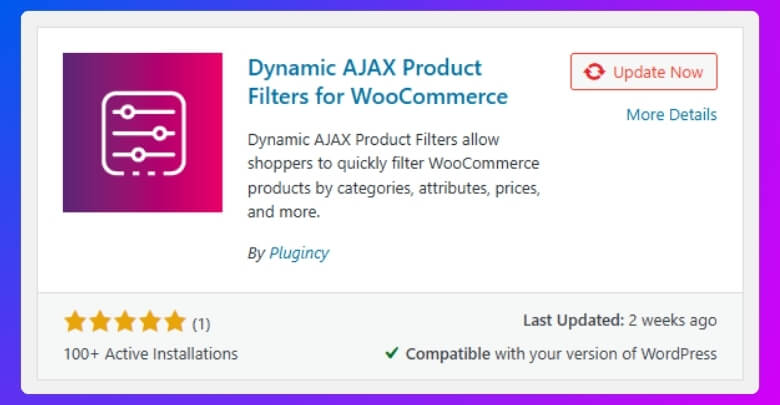
- Search for Dynamic AJAX Product Filters for WooCommerce
- Click Install, then Activate
- Head to WooCommerce > Product Filters to configure the settings
Step 2: Create Categories, Tags, or Attributes
Before you can filter by color, you need to set up product data that the filter can use.
A. Create Categories (Optional for Color Filter)
- Navigate to Products > Categories
- Fill in the fields:
- Name (e.g., “Laptops”)
- Slug (e.g., “laptops”)
- Parent (optional)
- Description (optional)
- Click Add New Category
- Assign the category to your products under Products > All Products

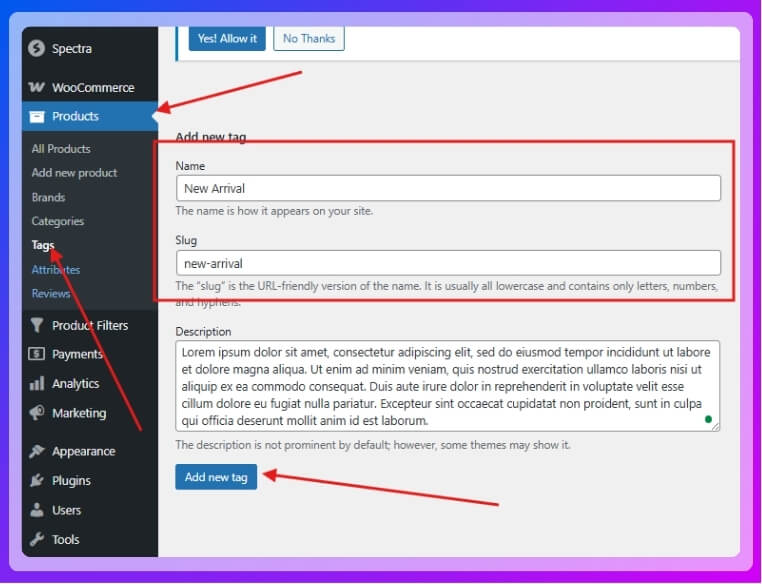
B. Create Tags (Optional for Additional Filters)
- Go to Products > Tags
- Add a new tag (e.g., “New Arrival”)
- Assign tags to products under Products > All Products
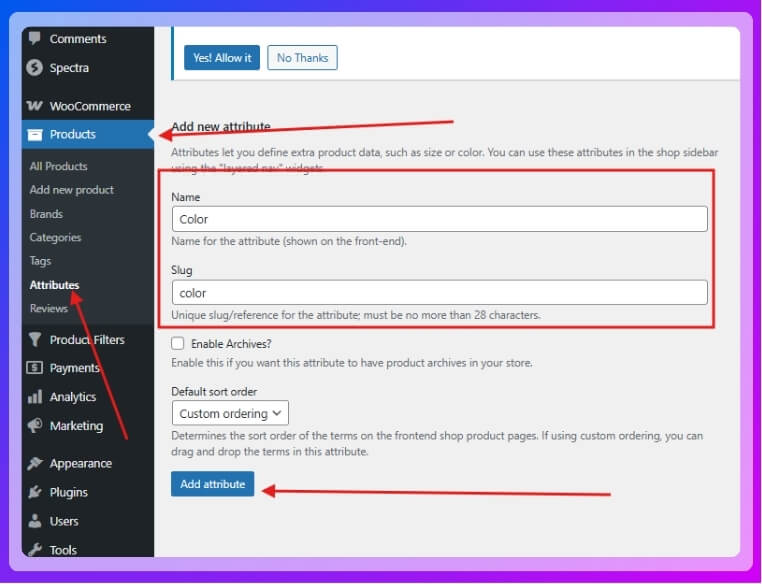
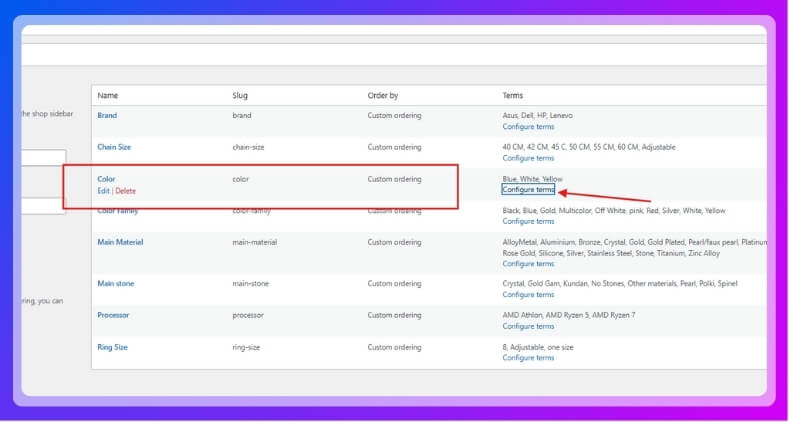
C. Create Attributes for Colors
- Go to Products > Attributes
- Under Add new attribute, enter:
- Name: “Color”
- Slug: “color”
- Click Add Attribute

- Click Configure terms beside the Color attribute

- Add terms like Red, Blue, Green, etc.


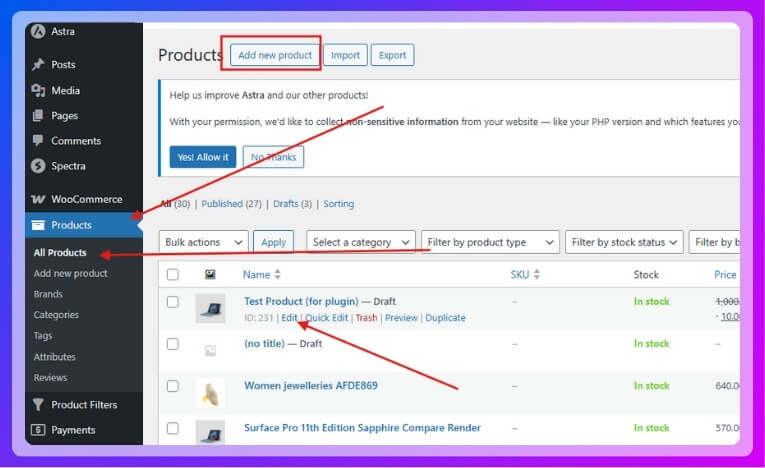
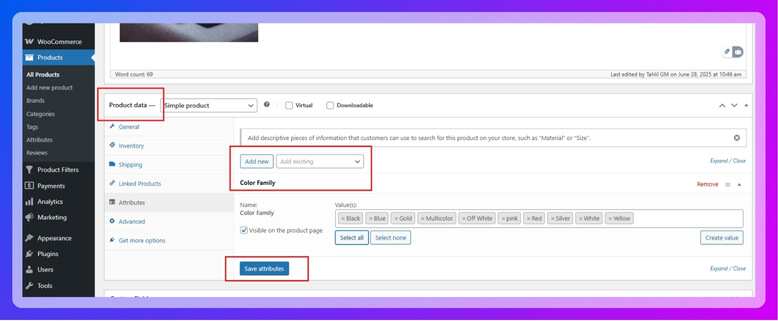
D. Assign Attributes to Products
- Go to Products > All Products
- Edit a product or add a new product
- Scroll to Product data > Attributes
- Select “Color,” click Add
- Choose color terms and click Save attributes
- Click Update/Publish

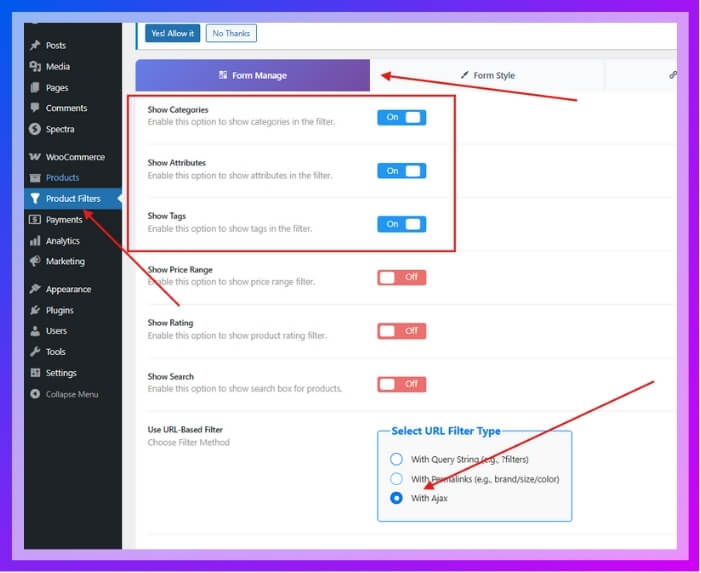
Step 3: Customize Filter Form (Add Color Filter Widget)
Access Form Settings
- Go to Product Filters > Form Manage
- Make sure the relevant filters (Categories, Tags, Attributes) are enabled
- Click the “With Ajax” box for better reloading.

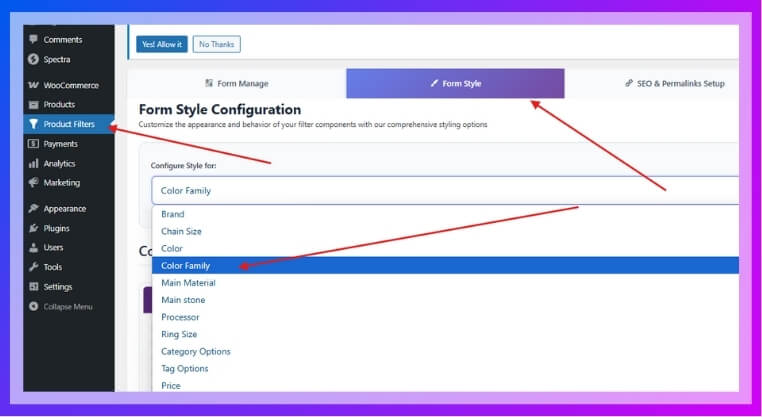
Customize Style for Color Filter
- Go to Product Filters > Form Style
- From Select Attribute, choose Color Family

- Under style options, pick:
- Color
- Color without border
- Color circle
- Color with value
- Save your changes
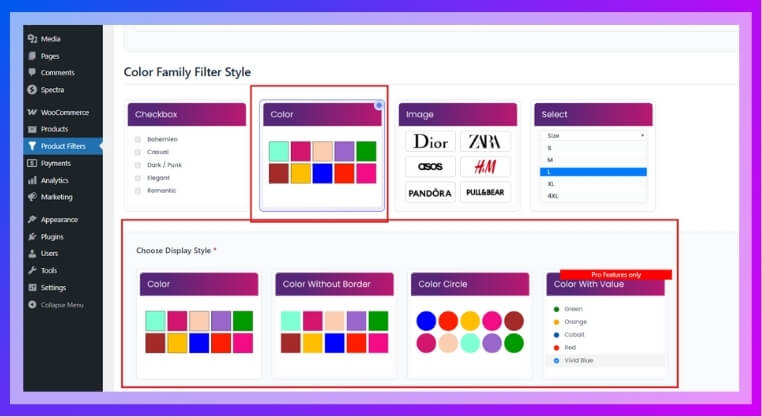
Step 4: Set Up Color Swatch Filter
- In the same Form Style section, under the “Color” attribute:
- Choose Color as the display type
- Select swatch sub-options (like circle or color with value)
- Assign visual color values to each term (if not auto-filled)
- Click Save
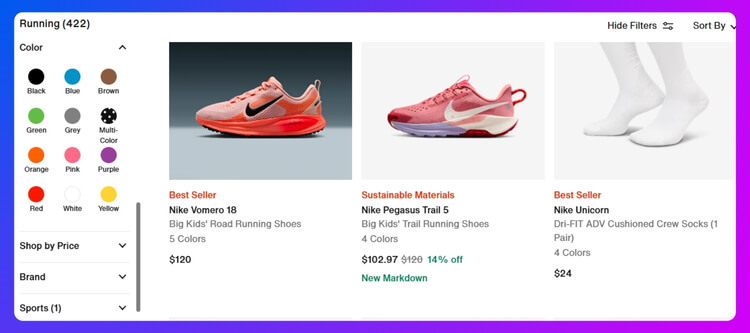
Step 5: Display the Filter on Your Site
- Use the shortcode (Paste the shortcode inside the square bracket [ ] and remove the inverted comma):
“plugincy_filters” — to display the filter form
“products inside the 3rd bracket [ ]” — to show products alongside filters - You can add these shortcodes:
- On a page
- Inside a widget area
- In the sidebar
To further enhance your store, you can also consider using WooCommerce product filter plugins to allow filtering by other product attributes like size, price, and tags. This makes it easier for users to find exactly what they’re looking for.
How to Make Sure Your Color Filters Work on Mobile Devices?
Color filters help shoppers quickly find the products they want, but getting them to work smoothly on mobile devices takes a bit of planning. Since more people shop on their phones now, this part really matters. Let’s explore how to make it work well.
Responsive Design
Your color filter needs to adjust properly to different screen sizes. It shouldn’t break or look weird when opened on a small screen. Use layouts that stretch and shrink based on screen width. Try testing it on different phones and screen types to check how it looks. If the filter moves too much or hides behind other items, it can confuse users. A smooth layout helps everything feel easier to use.
Touch-Friendly Elements
Mobile users tap, not click. That’s why the filter buttons should be large enough to tap easily without zooming in. Avoid tiny checkboxes or crowded color options. Make sure each color swatch has space around it, so it doesn’t feel hard to use. If it takes too much effort to select a color, most people will leave instead of trying again.
Sticky Filter Bar
Sometimes people scroll down and forget where the filter is. A sticky filter bar that stays visible at the top or bottom of the screen can solve that. It keeps the filter handy without taking up too much space. This way, they don’t have to scroll back up every time they want to change something. It’s a small change, but it really helps.
Speed and Load Time
Mobile users often deal with slower internet. If your color filters take forever to load, shoppers may not wait. Use lightweight code and avoid too many effects or animations. Keep it simple and fast. Check how long your page takes to load after adding the filter. If things slow down, try removing extra design features that aren’t really needed.
Test Before You Launch
Don’t just guess that it works—test it out. Try different phones, browsers, and screen sizes. Ask friends or team members to check the filter too. Sometimes things work perfectly on one phone but act strangely on another. Testing helps you find problems early, before customers do. A few extra checks now can save lots of trouble later.
Making sure your color filters work on mobile devices is all about keeping things simple, touch-friendly, and easy to use. If something feels slow or confusing, people might leave the site without buying anything. A smooth filter experience can make shopping more enjoyable. Take time to test everything so your filters feel just right on every phone.
Common Issues When Adding Color Filters (and How to Fix Them)
Sometimes, color filters don’t work exactly the way you expect, even when your products have all the right tags. These small issues can be frustrating. Keep reading to understand what’s really going wrong and how to fix it fast.

Filter Not Showing
Many users face a situation where their color filter doesn’t show up at all. This usually happens when the filter widget isn’t placed in the right sidebar or if the filter type isn’t properly linked to your product attributes. Go to your product settings and double-check if the color attribute is set as “visible” and “used for variations.” Also, make sure the widget area supports WooCommerce elements and isn’t hidden by your theme settings.
Filter Shows Empty
There are times when the color filter appears but doesn’t show any options to click. This mostly means your products don’t actually have the color attribute selected or saved correctly. Open one or two product pages and see if colors are set under attributes. If not, update your products with the correct values. Always refresh the permalinks too—go to Settings > Permalinks and click “Save Changes” without editing anything.
Doesn’t Update Results
It can be confusing when someone clicks a color, but the page either reloads with no changes or shows no filtered results. This often happens because AJAX isn’t enabled or your plugin conflicts with your theme. If your color filter isn’t showing or updating correctly, try using WooCommerce product filter tools that support AJAX and offer flexible design compatibility to fix these common issues without custom coding.
Conflicts With Themes
Sometimes, everything is set up right, but the filters still don’t behave well because of your theme. Some custom or premium themes override default WooCommerce features. If your color filter layout looks broken or doesn’t respond, switch to a basic WooCommerce-supported theme like Storefront and test the filter again. If it works fine there, you may need to adjust your theme settings or contact the theme developer for better support.
Wrong Attribute Type
One common mistake is using the wrong type of attribute for colors. Instead of selecting “Select” as the attribute type, many accidentally leave it as “Text.” This prevents the filter from working the way it should. Always set your color attribute type as “Select” or “Color Swatch,” depending on your plugin. This will make the filtering more accurate and display the color choices properly in your sidebar or filter area.
Color filters might seem tricky at first, but once you know what’s causing the issue, fixing it becomes pretty easy. Keep things simple and test your changes often.
Best Filter Combinations With Color Filter for a Smooth WooCommerce
Sometimes customers know what they want, but they don’t want to scroll forever to find it. That’s why mixing smart filters can help. Want to make your store easier to browse? Let’s look at a few filter combos that work well.
Color + Size
Most people pick products based on looks and fit. That’s why using both color and size filters works so well. When someone is looking for a red shirt, they also want to make sure it’s available in their size. This filter combo helps narrow down choices fast, especially for clothing or shoes. Customers don’t need to open every product—they can just filter by what they want and get quick results.
Color + Brand
There are shoppers who already trust a specific brand. If you sell multiple brands, combining color filters with brand filters can really help. For example, someone might want a black backpack, but only from Nike. Using both filters together means they’ll only see products that match both needs. It saves time and avoids any frustration that might happen while browsing through unrelated products.
Color + Category
Let’s say someone is looking for a blue item, but they don’t know if it’s a t-shirt or a hoodie. That’s where color and category filters work nicely together. Many store owners also choose to add filter by categories in WooCommerce alongside color filters, as this combination helps users narrow down products more effectively without overwhelming them. It keeps everything simple and makes the shopping process much smoother.
Color + Price
Shoppers often have a budget in mind. If they’re looking for a green dress under $50, using both color and price filters will give them just what they need. They don’t have to click around or open products they can’t afford. This combo is helpful for almost any kind of product, especially when your store has a wide price range. It makes the whole shopping experience faster and more pleasant.
Color + Rating
Sometimes, people want the best-rated version of a product in a specific color. When you let them filter by both color and rating, they can easily find what’s popular and matches their taste. For example, a highly rated blue water bottle will show up faster. This kind of filtering helps build trust and saves people from guessing which products are worth checking out. It’s a small feature that makes a big difference.
Mixing filters the right way helps your store feel clean, simple, and easy to shop. It also shows that you care about making things convenient for your visitors. Try out a few combos and see what works best!
Tips to Organize Products by Color Without Confusing Shoppers
Color is one of the first things people notice when shopping online. It can make products stand out or even change how they feel. But if things look messy or confusing, shoppers might leave. Here’s how to keep things clear.
- Group Similar Shades: Put light and dark versions of the same color together so users don’t have to search all over the place.
- Use Clear Labels: Instead of just showing swatches, add color names like “Sky Blue” or “Mint Green” to make it more user-friendly.
- Avoid Too Many Options: Having 30 color choices on one product can feel overwhelming. Stick to your most popular or important shades.
- Stay Consistent: Make sure red looks the same across all product images and filter swatches so shoppers don’t get confused.
- Add Filters by Color: Let users quickly pick what color they want without scrolling through everything. It saves time and keeps them happy.
- Use Real-Life Photos: Try showing clothes or products in real scenes so colors look more accurate, not too bright or fake.
- Don’t Mix Color with Style: Keep color options separate from size or design filters so people don’t end up choosing the wrong product by mistake.
Keeping your products organized by color helps people find what they like faster. It also makes your store look cleaner and easier to use. When things feel simple, shoppers are more likely to stick around.
FAQs About How to Add Filter by Color in WooCommerce?
Adding a color filter to your WooCommerce store sounds simple, but there are lots of small things people get confused about. These FAQs can help clear up common questions that don’t always get explained clearly in setup guides. Whether you’re just getting started or fixing a few issues, the answers below can make things easier.
What If My Color Filter Doesn’t Look the Way I Want?
Sometimes your color filter looks boring or not well-designed. You can fix this by changing the display style inside your filter settings. Try using color swatches with circles or boxes for a cleaner look. Also, check the spacing so that each option is easy to tap.
Can I Change the Order of Color Options?
Yes, you can. Go to Products > Attributes > Configure Terms and drag the colors in the order you prefer. This lets you show popular or seasonal colors first. It helps guide the shopper better and gives your page a cleaner layout.
How Do I Add Color Filters to Specific Pages Only?
If you don’t want the color filter to show on every page, just use the shortcode on selected pages or sidebars. For example, you can create a page for clothing and add the color filter there only. This keeps your layout simple and doesn’t overwhelm visitors with too many filters everywhere.
Can I Use Images Instead of Plain Colors?
Yes, many plugins allow image-based swatches too. Instead of just color blocks, you can upload textures or patterns like denim or floral print. This is helpful when your products have prints or unique finishes that aren’t shown well in plain colors. Just make sure your images are small and clear.
How Do I Add Multicolor Products to Filters?
If one product has more than one color, you can assign multiple color terms to it under the attributes section. For example, a shirt with red and black stripes can show up under both red and black filters. This helps users see everything that matches their interest, even if the product has more than one color.
Can I Show the Filter in a Dropdown Style?
Yes, most filter plugins offer dropdown options. This is helpful if you don’t want to use too much space. Just switch the display type in your settings from “Color swatch” to “Dropdown.” It’s neat, especially when you have many colors.
What If My Theme Hides the Filter?
Sometimes themes block or hide widgets. If your filter isn’t showing, try switching to a basic WooCommerce-friendly theme like Storefront to test it. If it appears there, then your main theme might be the issue. You may need to adjust theme settings or ask the developer for help.
Can I Translate Color Names for Other Languages?
Yes, you can use translation plugins like Loco Translate or WPML to change color names into different languages. This helps if your store has international visitors. Just make sure your translated names still match the color swatches shown. It makes the shopping experience smoother for everyone.
Is It Possible to Show Color Filters Only When Needed?
Yes, you can create filter groups that appear only on certain product categories. For example, show the color filter on clothing but hide it on electronics. Most advanced filter plugins let you control where and when filters appear. This keeps things clean and useful.
How Do I Know If My Filters Are Working?
The best way is to test them like a customer. Try clicking different filters and see if results show up correctly. Also, test on mobile phones to make sure everything looks good. If anything feels slow or broken, go back and check the settings again.
Conclusion
Color filters can truly level up how easy it is for people to find what they want on your WooCommerce store. You don’t need to worry about writing code or dealing with complex tools—just follow a few simple steps and use the right plugin settings. If you’ve been wondering how to add filter by color in WooCommerce, it’s all about setting attributes, choosing a good filter tool, and displaying it smartly.
Now that you’ve got the basics, keep things simple, test your filters on mobile, and use clear color names. Avoid clutter and always check that your filters load fast and work smoothly. With everything set up right, your store will be easier to shop in—and that means happier customers. Good luck with your WooCommerce setup!