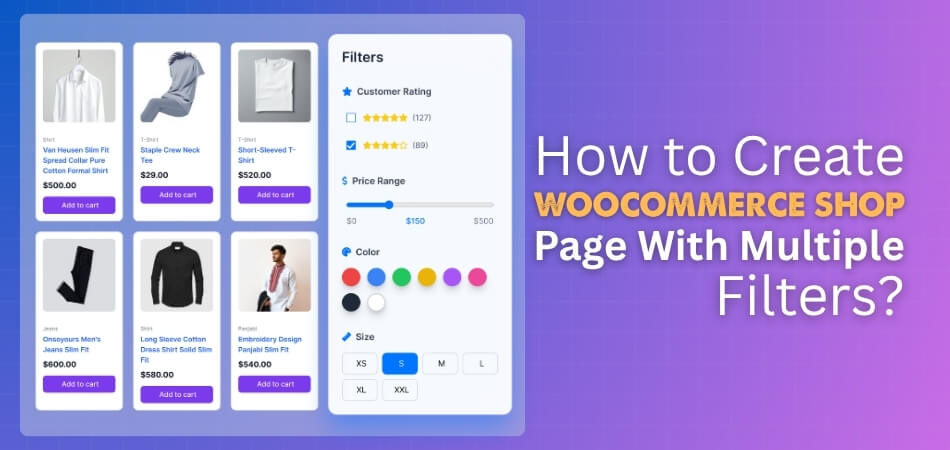
WooCommerce shop page becomes more useful when it includes multiple filters for users. Filters like price, size, category, or color help customers find products quickly. This makes shopping easier and also helps boost your store’s sales. Setting up filters is simple and doesn’t need any coding knowledge.
In this article, you’ll learn how to create WooCommerce shop page with multiple filters in a few easy steps. We’ll use built-in options, popular plugins, and design tips to make filters work smoothly. Just follow the steps below to build a better shopping experience on your WooCommerce store.
Why Product Filters Matter for a Shop Page?
Before you jump into the setup, let’s understand why filters are important:
- Improve Customer Navigation: Product filters make it easier for customers to move through large product lists. They can instantly find items that match their specific needs.
- Save Time for Shoppers: Filters reduce the time users spend searching through pages. Visitors can select preferred options and see exact matches right away.
- Boost Conversion Rates: When products are easier to find, customers are more likely to buy. Faster navigation often leads to more completed checkouts and sales.
- Keep the Store Organized: Filters arrange products neatly into categories and options. This organization creates a cleaner layout that feels professional and user-friendly.
- Enhance User Experience: Smooth filtering gives customers control over how they view products. It creates a satisfying experience that encourages repeat visits and trust.
- Support SEO and Ranking: Filtered pages with clean URLs can rank better on Google. They also help search engines understand your store’s product structure clearly.
How to Create Woocommerce Shop Page With Multiple Filters?
Creating a WooCommerce shop page with multiple filters is simple. Just install WooCommerce, add filters using built-in widgets or a plugin, and customize how they look. Once set up, your customers can quickly sort products by price, size, color, or category. Below is a step-by-step guide to help you set it up easily.
Step 1: Install and Set Up WooCommerce
To start, make sure you have WooCommerce installed on your WordPress website. Go to Plugins > Add New in your WordPress dashboard and search for WooCommerce. Click Install Now and then Activate. Follow the setup wizard to add your products, payment options, and shipping details. Once WooCommerce is ready, it automatically creates a default shop page where your products will appear.
Step 2: Using Built-in Widgets (for Basic Filters)
You can start by using the built-in WooCommerce widgets for simple filtering options.
- Go to Appearance > Widgets in your WordPress dashboard.
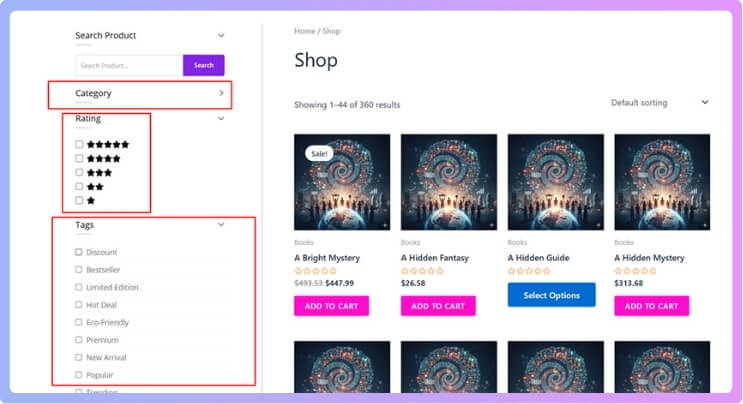
- From the available widgets, find “Filter by Price,” “Filter by Attribute,” or “Filter by Rating” widgets.
- Drag and drop these widgets into a sidebar on your shop page.
- Configure each widget as needed. For example, you can set the attributes for your “Filter by Attribute” widget.
While this method is simple, these filters are basic, require a full page reload when applied, and may have a limited user experience.

Step 3: Choose a Suitable WooCommerce Filter Plugin (for Advanced Features)
WooCommerce does not come with advanced filtering options by default. To add multiple filters, you’ll need a plugin. Here are some popular and reliable choices:
- Dynamic AJAX Product Filters for WooCommerce – Provides fast and smooth filtering using AJAX without refreshing the page. It’s great for modern stores that want quick results and an improved user experience.
- Filter Everything – Simple to use and works with most themes.
- WOOF – WooCommerce Products Filter – Offers filters by price, color, tags, and attributes.
- YITH WooCommerce Ajax Product Filter – Adds live filtering without reloading the page.
- JetSmartFilters (for Elementor users) – Great if your shop is built with Elementor.
Pick one that suits your store layout and design.
Step 4: Install and Activate the Filter Plugin
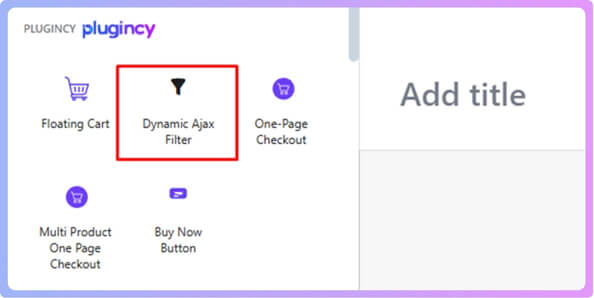
Once you’ve chosen a plugin, it’s time to activate it. You can activate either the free version or the pro version, depending on your needs. Here, we’ll use Dynamic AJAX Product Filters for WooCommerce as an example.
For the Free Version
Step 1: Go to Plugins
Start by logging into the admin panel of WordPress. On the left sidebar, click Plugins > Add Plugin. This section lets you install and manage plugins directly from the WordPress plugin library.
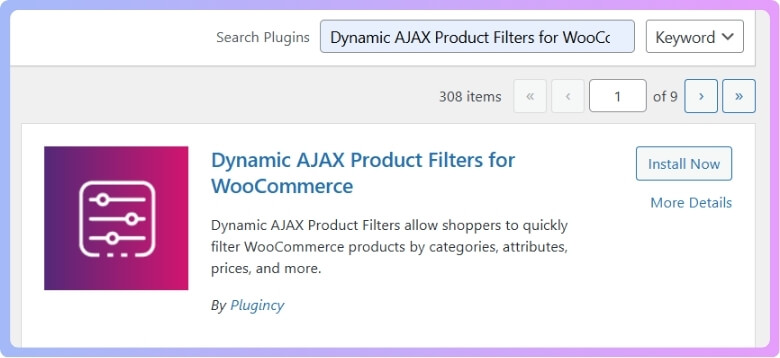
Step 2: Search for the Plugin
In the search box at the top right, type Dynamic AJAX Product Filters. You’ll see it appear in the results. To begin the installation process, click Install Now. This adds the plugin files to your website automatically.
Step 3: Activate the Plugin
When the installation is complete, the button will change to Activate. Click on it to turn on the plugin. After activation, a new menu item called WooCommerce product filters will appear in your dashboard. Now you can begin adjusting it to meet the requirements of your store.
For the Pro Version
Step 1: Download the ZIP File
If you bought the premium version from the Plugincy website, log in to your account and download the plugin ZIP file to your computer. The Pro version gives you extra features like advanced filter styles and more control options.
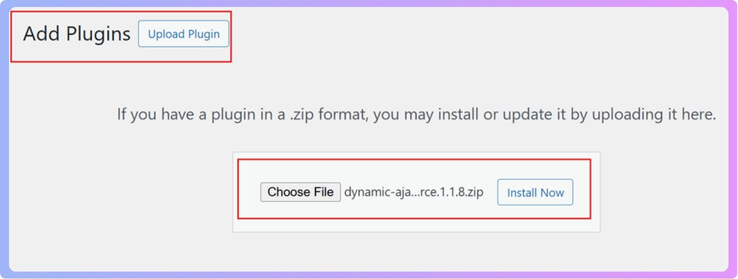
Step 2: Upload the Plugin
Return to your WordPress admin area, click Plugins > Add Plugin, then select Upload Plugin at the top. Choose the ZIP file you just downloaded and click Install Now. WordPress will upload and unpack the plugin for you.
Step 3: Activate and Set Up
After installation, click Activate Plugin. All of the Pro features are accessible through the Product Filters menu once activated. From here, you can customize filter options like color filters, price sliders, or category filters to suit your online store.
Step 5: Displaying Filters on Your Store
Once the plugin is active, you need to decide where and how to show the filters on your site. You can do this in three main ways: using a widget, a page builder, or a shortcode.
Option 1: Display with a Widget
- Go to Appearance > Widgets in your WordPress dashboard.
- Find the Dynamic AJAX Product Filter widget in the list.
- Drag and drop the widget into your preferred sidebar or widget area.
- Adjust the settings, such as which filters to show or how they should look.
- Click Save to confirm your changes.
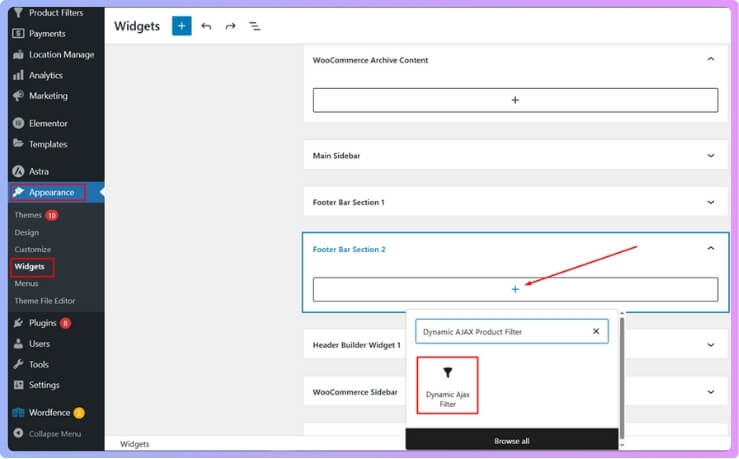
This method is great if you want the filters to appear on the side of your shop page.
Option 2: Display With a Page Builder
You can add filters visually if you use a page builder like WPBakery or Elementor.
- Open the page or post where you want the filters to appear.
- Add a new section or element to your layout.
- Search for Dynamic AJAX Product Filters in the elements panel.
- Drag and drop the filter block into the section.
- Customize the settings, such as filter type or design, inside the page builder.
- Click Save or Update to make the changes live.
This option gives you more control over where and how the filters look on your page.
Option 3: Display With a Shortcode
Additionally, you can use this shortcode [[plugincy_filters]] to add filters to any page or post. Just copy and paste it wherever you want the filters to show up.
Step 6: Manage and Activate Filters
- Go to Dashboard → Product Filters → Form Manager.
- A list of available filter types will appear, such as Category, Attributes, Price, and Tags.
- Select your filter method — Query String, Permalinks, or Ajax.
- Turn on the filters you want to show on your store.

- Click Save Changes to confirm.

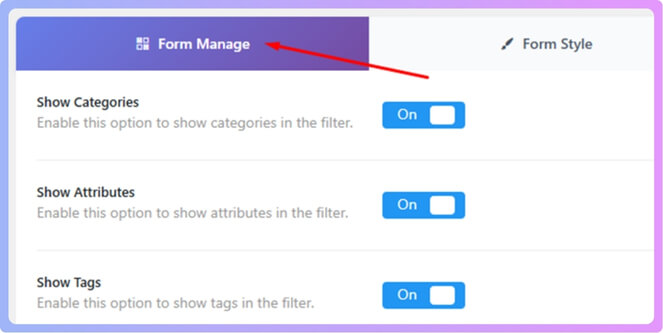
Once saved, your chosen filters will be displayed on your storefront.
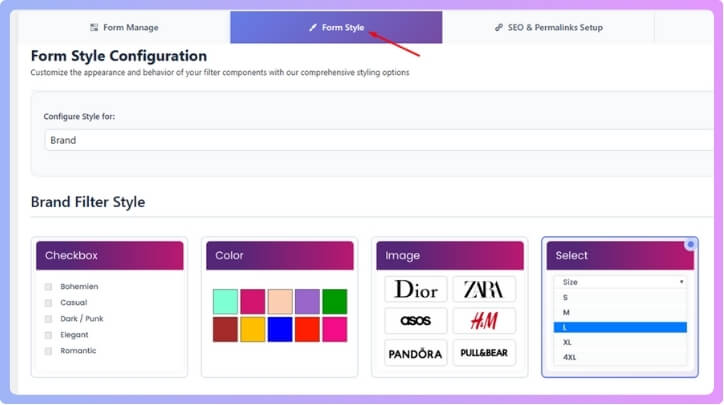
Step 7: Customize the Filter Widget Design
- Navigate to Dashboard → Product Filters → Form Style.
- In the Select Attribute dropdown, choose the filter you want to style.
- Choose a display type — Checkbox, Color Swatch, Dropdown, or Image-based.

- Adjust spacing, layout, and colors to fit your theme.
- Click Save to apply your changes.
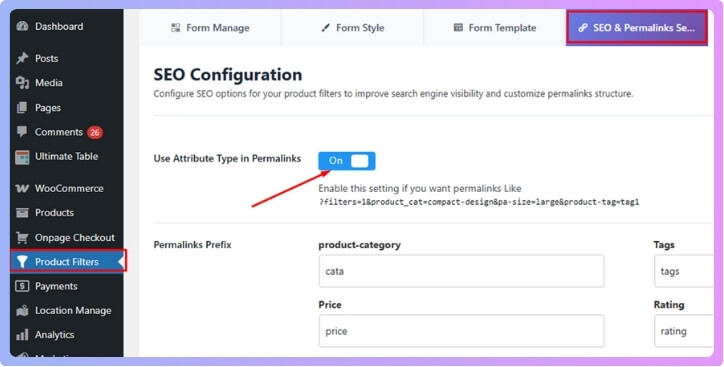
Step 8: Set Up SEO and Permalink Options
- Go to Dashboard → Product Filters → SEO & Permalink Setup.
- Turn on Use Attribute Type in Permalinks to create cleaner, structured URLs.

- If you’re using permalink-based filtering, enable Make Filter Links Indexable.
- Click Save when done.
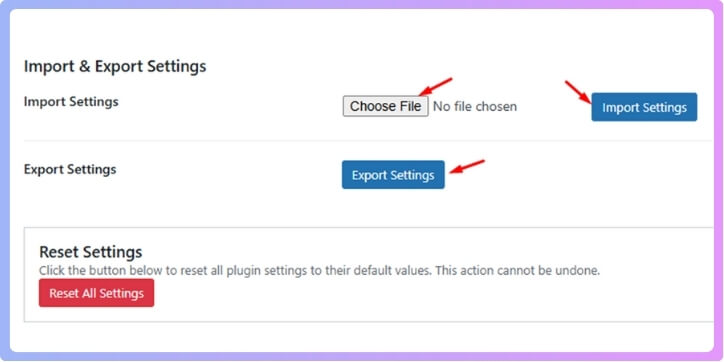
Step 9: Backup or Export Your Filter Settings
- Navigate to Dashboard > Product Filters > Advanced Settings > Export Settings.
- Click Export Settings to download your current setup as a JSON file.
- Save it safely in case you want to restore or move it later.

- To restore settings, go to the same section, click Import Settings, and upload your JSON file.
Step 10 : Test the Filters
Open your shop page and test all the filters.
Make sure:
- They work correctly with your product attributes.
- The results load properly.
- Mobile users can use filters easily.
If something doesn’t work as expected, check the plugin settings or your theme compatibility.
Step 11: Optimize for SEO and Speed
To make sure your filtered pages help with SEO and don’t slow down your site:
- Avoid duplicate URLs – Some filters create multiple pages with the same content.
- Use clean permalinks – SEO-friendly URLs like /shop/color/red/ look better.
- Optimize speed – Use caching plugins like WP Rocket or LiteSpeed Cache.
- Add structured data – This helps Google understand your product pages.
Step 12: Design Tips for a Better Filter Layout
A clean layout improves usability. Here are some tips:
- Keep filters visible on the left sidebar.
- Use dropdowns or checkboxes for clear options.
- Add a “Clear All” button for easy reset.
- Test your filter placement on mobile devices.
Step 13: Final Check and Launch
Before going live, test your shop page on desktop and mobile to ensure all filters work properly. Try different combinations to confirm products show up correctly. Check the page speed and overall performance. Once everything runs smoothly, your WooCommerce shop page with multiple filters is ready to launch.
Common WooCommerce Filter Problems and How to Fix Them
Sometimes WooCommerce filters don’t work as expected. They may load slowly, show wrong products, or stop working after theme or plugin updates. These small issues can confuse visitors and lower sales. Read below to learn simple ways to fix common WooCommerce filter problems easily.
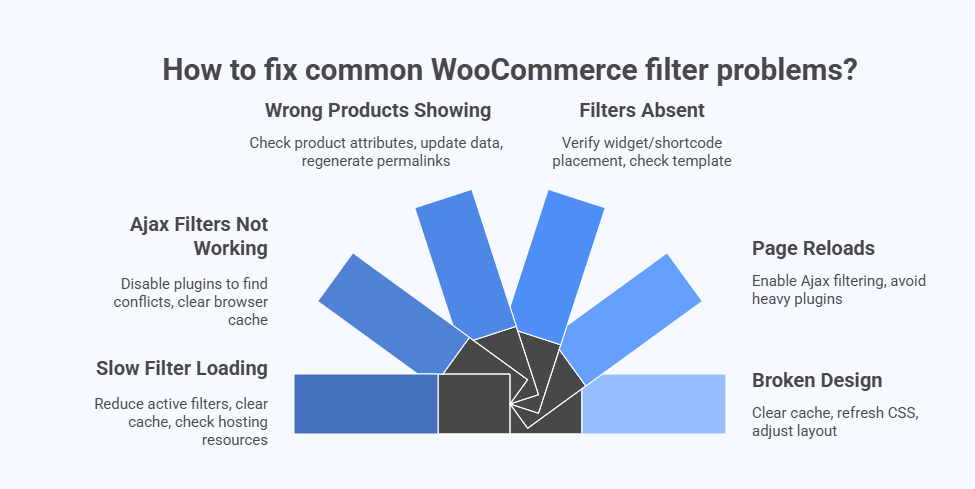
Slow Filter Loading
When your filters take too long to load, it can hurt user experience. Try reducing the number of active filters on one page. Clear your site cache using a plugin like WP Rocket. Also, check if your hosting plan has enough server resources for WooCommerce to run smoothly.
Ajax Filters Not Working
Ajax filters help load results without refreshing the page. If they stop working, disable all plugins except WooCommerce and your filter plugin. Turn them back on one by one to find the conflict. Always clear the browser cache after making changes to see updates correctly.
Filters Showing Wrong Products
If filters show unrelated or missing products, check your product attributes. Make sure every product has correct tags, categories, and variations. Update your product data and regenerate permalinks from the WordPress settings. Doing this keeps your filters accurate and up to date.
Absence of Filters on the Shop Page
When filters don’t appear, check your widget or shortcode placement. Go to Appearance > Widgets and make sure the filter widget is active. If you use a page builder, verify that the filter block is visible. Also, check if your shop page uses the correct WooCommerce template.
Filters Causing Page Reloads
If every filter click reloads the full page, Ajax might be off. Open your filter plugin settings and enable Ajax filtering. This makes results appear faster without reloading. For better speed, avoid using too many heavy plugins that can slow down the loading time.
Filter Design Looks Broken
Sometimes filters look misaligned or messy after theme updates. Clear the website cache and refresh CSS files. If the issue remains, adjust the filter layout in your plugin’s style settings. Always use themes and plugins that are fully compatible with WooCommerce’s latest version.
Which Filters Should You Add First When You Have Few Products?
When your WooCommerce store has only a few products, start simple. Use filters that fit your products and are easy to manage. A few well-chosen filters can help visitors find what they need faster and make your store look clean and easy to use.
Start with a price filter because it helps buyers stay within their budget. Add a category filter if your products belong to different groups or types. You can also include a rating filter if you have customer reviews. These filters give your visitors clear choices and make product browsing quick and smooth.
As your store grows, slowly add more filters like color, size, or brand. You can also enable WooCommerce Multiple Categories Filter to help users sort products across different categories at once. Keep them easy to understand and well-organized. Check your filters often to make sure they still match your products. Starting small and improving over time helps your store stay fast, simple, and user-friendly.
Which Product Filter Do Customers Use the Most?
Every online shopper wants to find products fast and easily. Filters make that simple by helping people narrow down what they need. Some filters are used more often because they save time and give quick results. Let’s look at the most common product filters that customers love to use the most.
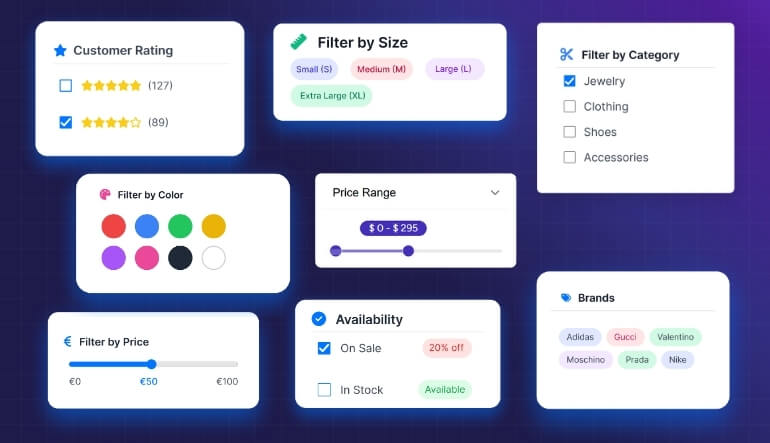
Price Filter
Many shoppers start with a price filter when browsing online. It helps them stay within their budget and quickly skip overpriced items. This simple feature builds trust and keeps people focused on what they can afford. Every WooCommerce shop should have a clear and working price filter.
Category Filter
People often shop by product type, making the category filter a favorite. It organizes products into easy-to-browse sections like shirts, shoes, or accessories. This saves time and keeps your store layout simple and clean. Adding categories also improves your site’s structure and helps with SEO rankings.
Rating Filter
Buyers trust reviews before making any purchase. The rating filter lets them see top-rated products with one click. This helps customers choose items that others liked and rated highly. It’s an easy way to build confidence and increase sales through positive customer feedback.
Color Filter
When customers care about style, the color filter becomes very helpful. It lets them view products only in the colors they like. For example, someone searching for a red dress doesn’t want to see black or blue ones. Color filters improve shopping speed and visual appeal.
Size Filter
Clothing and footwear stores rely heavily on the size filter. It helps shoppers quickly find what fits without browsing through all sizes. A well-set size filter reduces returns and makes buying smoother. This small feature improves user experience and saves both time and effort.
Brand Filter
Shoppers who trust certain brands use this filter the most. It lets them find known labels and compare them with similar ones. A brand filter also helps stores show variety and build loyalty. Adding this option gives users confidence and makes their choices more personal.
Is Using Too Many Filters Bad for SEO?
Yes, using too many filters on a shop page can hurt SEO when not handled the right way. Each filter can create many extra URLs that confuse search engines. When this happens, your site may show duplicate content, which lowers rankings and makes it harder for people to find your store online.
Too many filters can also slow down your website and make users wait longer for results. A slow shop page pushes visitors away and affects user trust. Instead of loading many filters, focus on only the ones your customers actually use for faster performance.
You can still use filters without hurting SEO by setting clear rules. Keep your URLs short, block useless filter pages from indexing, and link only to important ones. Doing this not only protects your rankings but also helps in improving WooCommerce search performance naturally.
Default vs. Plugin: Which is Better for Creating a WooCommerce Shop Page With Multiple Filters
Here’s a comparison table showing Default vs. Plugin for creating a WooCommerce shop page with multiple filters:
| Aspect | Default WooCommerce | Plugin |
| Filter Options | Limited types (price, rating, basic sorting) | Many types (color, brands, category, tags) |
| Page Load / Performance | Often reloads full page when filter applied | Support Ajax for instant results without reload |
| Customization | Minimal styling and layout control | High control over layout, style, placement |
| Filter Combinations | Few or no multi‑filter combinations | Supports complex combinations (e.g., size + color + brand) |
| SEO & Clean URLs | Basic permalink handling, less control | Better URL control, SEO friendly filter pages |
| Mobile / Theme Support | Works generically but may feel basic | Personalized support for mobile, page builders, and themes. |
| Cost & Setup Time | Built‑in, no extra cost, quick setup | May involve cost and a bit more setup time |
Frequently Asked Questions
Are WooCommerce Filters Compatible With Caching Plugins?
Most modern filter plugins support caching tools like WP Rocket or LiteSpeed Cache. You may need to exclude AJAX filter URLs from caching. Doing so keeps real-time results working smoothly while still improving your site’s overall loading speed.
How Can I Make Filters Load Faster Without AJAX?
If you’re not using AJAX, you can still speed up filters by optimizing your site. Reduce the number of active filters, use caching, and compress images. These small steps make your page faster even with traditional full-page reload filtering.
Can I Track Which Filters Lead to More Sales?
Yes, you can connect your store with Google Analytics or WooCommerce reports. These tools show how customers interact with filters before buying. Tracking this data helps you identify which filters drive the most conversions and improve your layout.
Do Filters Affect the Shopping Cart or Checkout Page?
No, filters only affect product listings, not the cart or checkout pages. They help users find items but don’t change anything once products are added. This keeps your checkout process safe and consistent for all customers.
What Happens If Filters Don’t Match Any Products?
If no results match the selected filters, most plugins show a “No Products Found” message. You can customize this message to suggest other related categories or clear filters. This prevents confusion and keeps users engaged on your site longer.
Are WooCommerce Filters Useful for Digital Products?
Yes, filters work great for digital items like eBooks, courses, or software. You can create filters by category, price range, or file type. This makes it easy for users to quickly find digital products they want to download or purchase.
How Often Should I Update My Product Filter Settings?
You should review your filters every few months or after adding new products. Keeping filters updated ensures users always find the correct options. Regular updates also prevent broken filters and improve your store’s overall performance and organization.
Conclusion
Knowing how to create WooCommerce shop page with multiple filters can make a big difference in how your online store performs. Filters help shoppers quickly find the right products, improve user experience, and make your site look well-organized. Whether you use built-in WooCommerce widgets or a powerful plugin, setting up filters the right way helps increase sales and keep customers happy.
To get the best results, focus on what truly matters for your users. Avoid adding too many filters that can slow your site or affect SEO. With smart planning, clean URLs, and optimized filter settings, you can create a fast, user-friendly WooCommerce shop page that ranks better and delivers a smooth shopping experience.