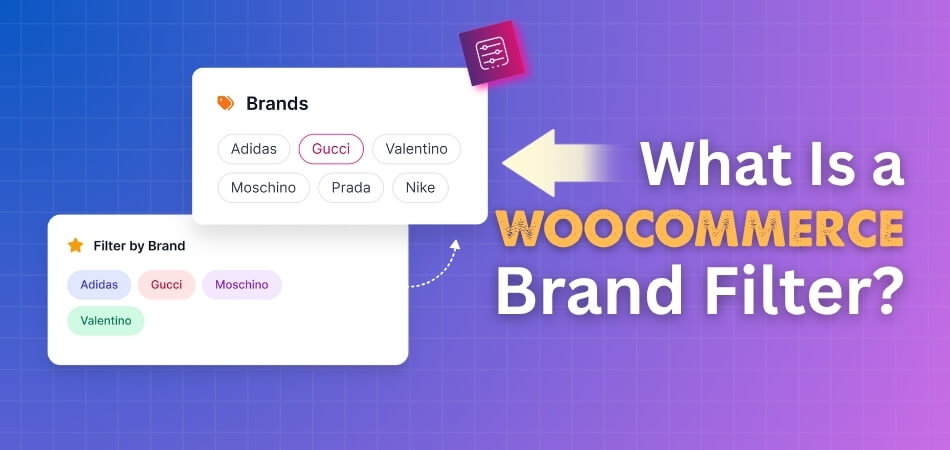
People can quickly find products from brands they know and trust by using a brand filter. It saves time, keeps browsing smooth, and gives stores a neat look. Many shoppers may already be thinking, what is a WooCommerce brand filter?
A WooCommerce brand filter lets customers view products by specific brands. It improves navigation, reduces search time, and supports brand loyalty. Shoppers can quickly select trusted brands, compare options, and enjoy a smoother, more organized shopping experience, especially in large stores.
Do you also want to learn how this filter works or where you can display it in your store? If yes, then keep reading because this article shares every important detail about WooCommerce brand filters, including setup, plugins, benefits, and possible issues.
What Is a WooCommerce Brand Filter?
When people shop online, it is common to get lost in too many product options. Everyone likes to find their favorite brands quickly without wasting time scrolling through endless pages. Let’s see how this feature helps customers shop better.
Easy shopping
Customers often look for items from brands they already trust. With a brand filter, they can easily click on the name they want and see only those products. This makes shopping simple and avoids the need to search through unrelated items.
Faster browsing
Time is very important while shopping online. Instead of checking every product, the filter lets shoppers narrow down the list right away. It removes the extra steps and makes sure they only see what they want in seconds.
Better product choice
Having all products from one brand in one place helps people compare styles, prices, and quality more easily. It saves effort and makes choosing the right product smoother, especially for those who prefer sticking to a single brand.
Sidebar tool
Most online stores show the brand filter in the sidebar or top menu. This position is easy to notice, so shoppers can quickly select a brand. It keeps the shopping page neat and gives a better user experience.
Brand loyalty
Many people like to stick with one brand because of trust or satisfaction. The filter supports this habit by showing only that brand’s products. This keeps buyers happy and encourages them to come back for more shopping.
Organized display
Shops that use filters give a cleaner and more organized look. Customers see fewer random products and more focused options. A neat layout not only looks good but also builds confidence that the store values user comfort.
Flexible options
The filter does not limit buyers to one choice. They can pick multiple brands if they want to compare. This flexibility adds more control and makes online shopping more personalized and satisfying for each user.
Helpful for big stores
Large e-commerce websites have thousands of items. Without filters, shopping would feel overwhelming. That is why tools like the WooCommerce brand filter are often added, as they handle huge product lists in a simple and user-friendly way.
Smooth updates
As soon as a shopper clicks on a brand, the product list updates instantly. This smooth process makes the store feel modern and easy to use. Quick updates keep people engaged and prevent them from leaving the website.
Here are a few of the best brand filter plugins for WooCommerce that can improve shopping experiences and make product browsing much easier:
Dynamic AJAX Product Filters for WooCommerce
This plugin is a great option for stores that want flexible filtering, including by brand. It ensures a smooth browsing experience with instant updates and no page reloads.
Key Features:
- Filter products by brand, price, category, rating, and attributes
- Unlimited filter combinations with custom options
- Works with widgets and shortcodes for easy placement
- SEO-friendly filter URLs to improve visibility
- Mobile-friendly design with multiple responsive layouts

YITH – WooCommerce Ajax Product Filter
With this plugin, customers can filter products by brand and other attributes in just a few clicks. It supports different filter styles to match your store’s layout.
Key Features:
- Add filters for brand, category, price, stock, and ratings
- Flexible styles such as checkboxes, dropdowns, and color swatches
- Create unlimited filter presets for shop or category pages
- Mobile-ready design with responsive layouts
- Extra options like reset buttons and adaptive filtering
Premmerce Brands for WooCommerce
This plugin is built mainly for managing and displaying brands in WooCommerce stores. It helps you create dedicated brand pages and showcase products in a structured way.
Key Features:
- Create, edit, and manage unlimited brands with logos and descriptions
- Separate brand pages with product listings
- Widget and shortcode support for brand display
- SEO-friendly taxonomy for brand optimization
- Works well with multilingual and SEO plugins
Smart Brands for WooCommerce
By focusing on brand identity, this plugin makes stores look professional and trustworthy. It also offers modern ways to present brands across product and archive pages.
Key Features:
- Add unlimited brands with custom details and logos
- Show brands on product and archive pages
- Dedicated brand archive pages for grouped products
- Responsive brand carousel with customization options
- Compatible with multilingual setups and SEO plugins
Shopping online becomes much easier when stores add simple tools like a brand filter. It saves time, keeps things organized, and helps people find what they want without stress. Every store benefits by making customers feel more comfortable.
How Does a WooCommerce Brand Filter Work?
Shopping online can feel confusing when too many products appear at once, making it harder to decide. A smart way to make browsing easier is to use a tool that helps organize items neatly. Let’s look at how it works.
Brand Setup
To make this filter possible, store owners first create a “Brand” attribute in the backend. Just like products can have colors or sizes, they also get tagged with brands. This step builds the foundation so customers can later sort products by their favorite brands.
Easy Display
Once brands are added, the store shows them through a filter widget or block on the shop page. The list appears clearly on the side or top of the page. This way, shoppers can instantly see which brands are available to choose from.
Smooth Clicks
When a shopper clicks a brand like Nike, the page refreshes automatically to show only Nike products. There’s no need to scroll through endless options. This quick change makes shopping less stressful and helps people stay focused on what they want.
Live Updates
The filter works in real time, meaning the product list updates immediately without needing to reload the whole page. This live filtering feels fast and smooth. It saves time and gives customers a clean way to spot what interests them right away.
Clear Benefits
It’s also useful to consider the overall benefits of a WooCommerce brand filter, since a working filter naturally improves browsing. Customers enjoy a faster shopping experience, products are easier to find, and stores build trust by presenting items in a more organized and friendly way.
A brand filter in WooCommerce makes shopping simple, quick, and organized. It saves time for customers and makes stores look more professional. Adding this feature can improve both the shopping process and customer satisfaction.
How to Add a Brand Filter in WooCommerce?
Adding a brand filter in WooCommerce makes it easier for shoppers to browse products by brand, which improves the shopping experience. It is simple to set up and can be done in a few different ways. Let’s look at the details.
Step 1: Install a Plugin
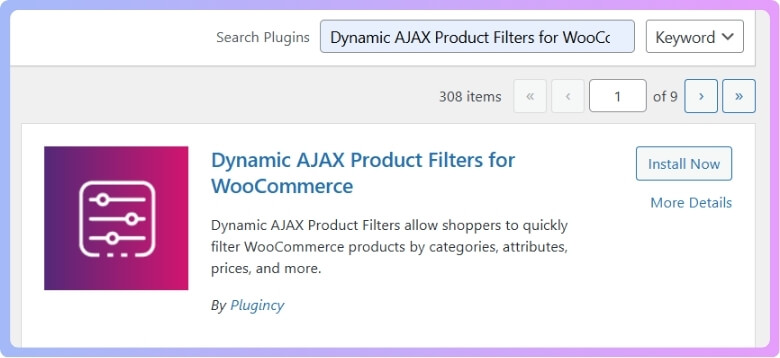
To add a brand filter in WooCommerce, you need a tool that makes the process simple. Without such a tool, you would need custom coding, which is hard for beginners. The easiest way is by using a plugin. A good choice is Dynamic AJAX Product Filters for WooCommerce because it works smoothly, requires no coding, and has both free and paid versions.
You can install it in three different ways:
Free Version From the Dashboard
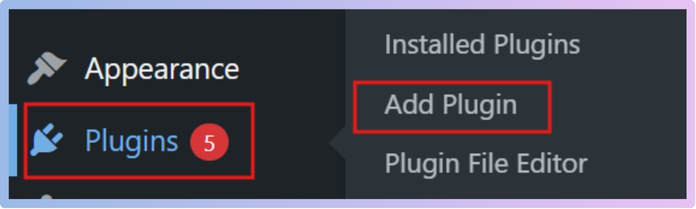
- Open your WordPress Admin Dashboard.
- Go to Plugins.
- Click Add New Plugin.

- In the search bar, type Dynamic AJAX Product Filters for WooCommerce.

- Click Install Now.
- Click Activate.
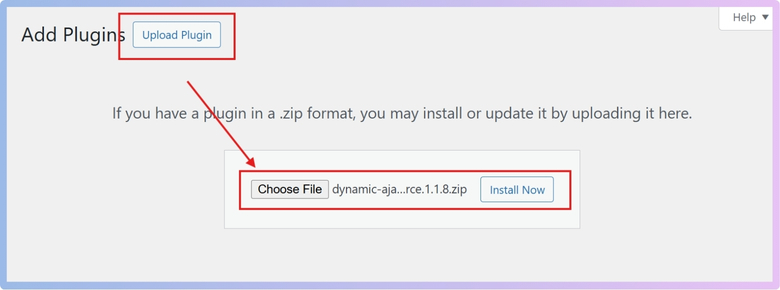
PRO Version by Uploading a ZIP
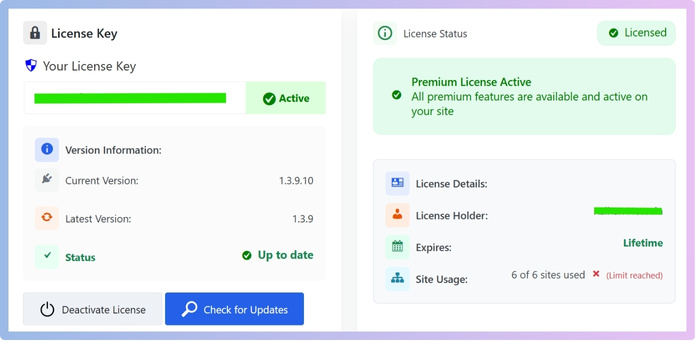
- When you purchase the PRO version, you’ll get a zip file with a license key to activate premium features. To use it, go to Plugins.
- Click Add New Plugin.
- Click Upload Plugin.
- Click Choose File and select the plugin ZIP file.
- Click Install Now.

- Click Activate.
- Now go to Products > Plugin License and paste the license key to activate all the premium features.

Manual Install Using FTP
- Download the plugin ZIP from the WordPress repository or from your account.
- Extract the ZIP on your computer. You will see a folder.

- Connect to your server via FTP using a program like FileZilla. Enter your FTP host, username, password, and port.

- Upload the plugin folder:
- On the server, go to /wp-content/plugins/.
- Upload the extracted folder, dynamic-ajax-product-filters, here.
- Activate the plugin:
- In WordPress, go to Plugins > Installed Plugins.
- Find Dynamic AJAX Product Filters for WooCommerce.
- Click Activate.


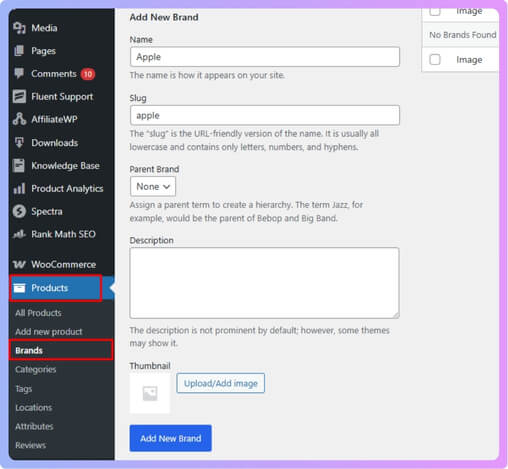
Step 2: Create Your Brands
- In the dashboard, go to Products > Brands.
- Fill in the brand details:
- Name: for example, Apple.
- Slug: for example, apple.
- Parent brand: choose one if you need it. If not, leave it.
- Description: add one if you want.
- Thumbnail: Click Upload/Add Image, then go to Upload Files. Select Files and choose your image. Once uploaded, open the Media Library, select the image, and click Use Image.
- Click Add New Brand.

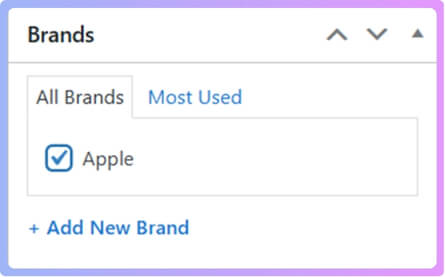
Step 3: Assign Brands to Products
- Go to Products > All Products.
- Open a product to edit, or click Add New Product to make a new one.

- On the right side, find the Brand option.
- Select the brand you created.

- Click Publish for a new product, or Update for an existing product.

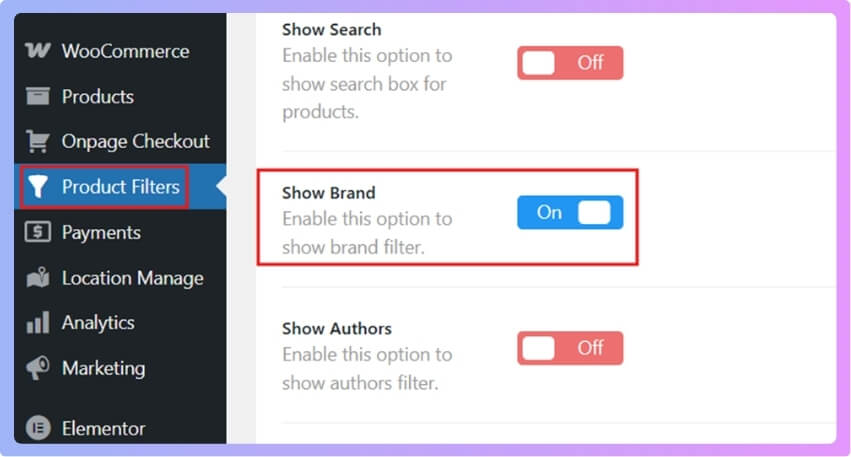
Step 4: Turn on the Brand Filter
- Go to Product Filters > Form Manage.
- Find the Show Brand and turn it on.
- Click Save changes.

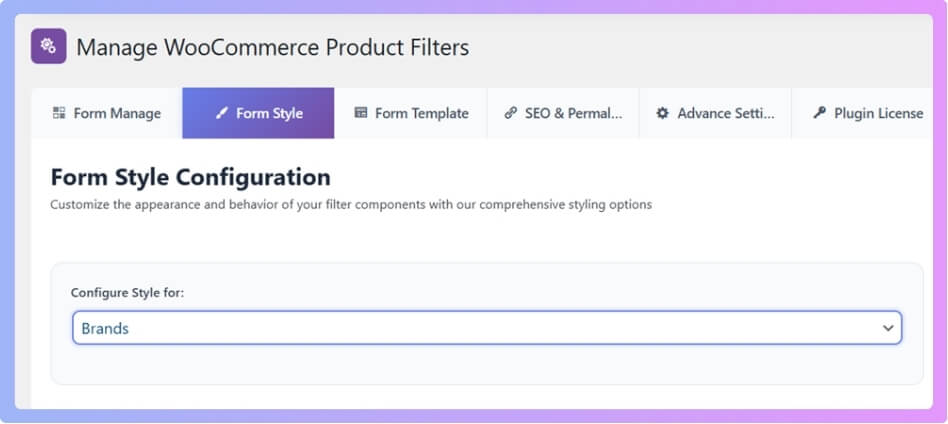
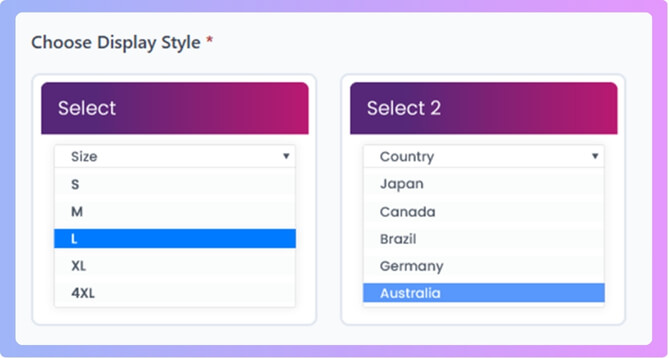
Step 5: Style How the Brand Filter Looks
- Go to Product Filters > Form Style.
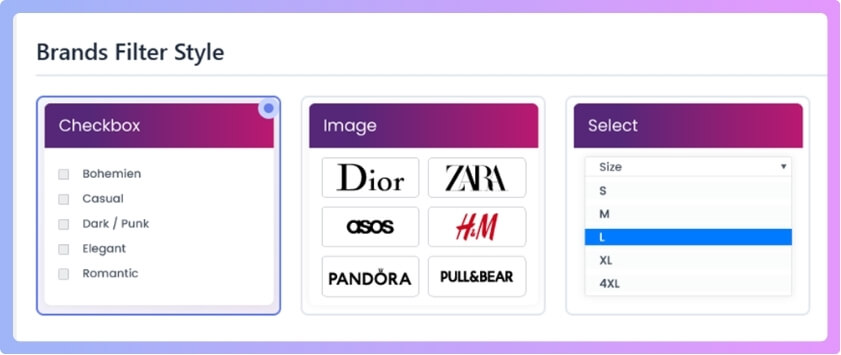
- In the dropdown, choose Brands.

- Choose a Brand Filter Style type and style: (Checkbox, Image, Select)

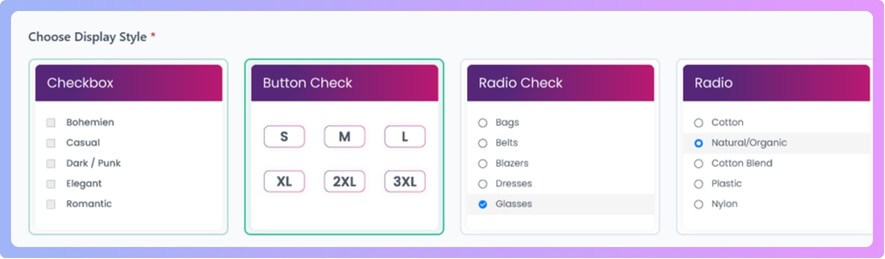
- Checkbox type:
- Styles: checkbox, button check, radio check, radio, square, checkbox hide

- Styles: checkbox, button check, radio check, radio, square, checkbox hide
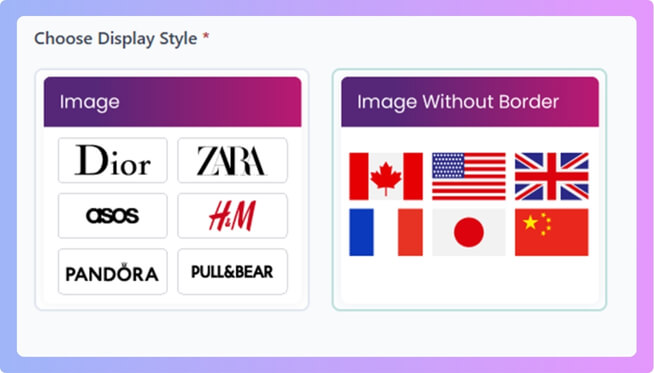
- Image type:
- Styles: image, image without border

- Styles: image, image without border
- Select type:
- Styles: select, select 2

- Styles: select, select 2
- Checkbox type:
- Click Save changes.
Where Can You Display a WooCommerce Brand Filter on Your Store?
Making it easy for visitors to find products from their favorite brands can improve the shopping experience. A brand filter helps buyers save time and explore items they actually want. Let’s look at the best places to display it.
Sidebar Placement
The sidebar is one of the most common spots for a brand filter. It stays visible as people scroll through the shop page, making it easy to click a brand anytime. This works best if your store has many brands, because it keeps navigation simple without cluttering the main page.
Top of Shop Page
Placing a brand filter at the top of your shop page makes it the first thing visitors see. It grabs attention right away and helps shoppers start narrowing their search instantly. This spot works well for stores where brand selection is the main focus.
Dropdown Menu
A dropdown menu keeps the filter clean and organized. Instead of taking up space, shoppers can click the menu when they need it. This design works well if you want a neat look while still offering brand-based sorting in just one click.
Built-In Option
Some store owners rely on the built-in WooCommerce brand filter, but its display options are often limited, so many choose plugins for more flexibility. With plugins, you can control how and where the filter shows up, offering a better match for your store design.
Mobile Friendly
Mobile shoppers need easy navigation as well, and filter placement makes a big difference. Adding the brand filter in collapsible menus or at the top of mobile shop pages ensures quick access without making the layout look crowded. This creates a smoother shopping flow.
Choosing the right spot for your brand filter depends on your store’s style and how customers shop. Test placements like sidebar, top, or dropdown menus to see which setup guides your visitors best.
What Problems Can Happen With the WooCommerce Brand Filter?
WooCommerce brand filters are a helpful way to let shoppers sort products by brand. But sometimes these filters do not work as expected. There can be several reasons behind this. Let’s look at some common problems and simple fixes.

Filters Not Showing
A common issue is when the brand filter does not appear at all. This usually happens if the widget is not placed in the right sidebar or menu. Double-check your widget settings, and make sure the brand filter is active in your shop pages.
Not Working After Updates
After a WordPress theme or plugin update, filters may suddenly stop working. This is often due to changes in compatibility. Clearing your website cache and updating your brand filter plugin usually solves the issue. Always keep plugins updated together.
Theme Conflicts
Some themes may not fully support brand filters, causing them to display incorrectly or not function. Switching to a default WordPress theme can help test the problem. If the filter works there, you may need theme-specific fixes or custom code adjustments.
Slow Loading
At times, brand filters can make product pages load slowly. This happens if there are too many brands or if the plugin is heavy. Reducing unnecessary brands, using a caching plugin, or checking with your hosting provider can help speed things up.
Plugin Conflicts
Conflicts between plugins can break the brand filter. If it stops working suddenly, try disabling other plugins one by one to spot the issue. Once you know which plugin is causing trouble, you can replace it or ask the developer for support.
WooCommerce brand filter issues are common but usually easy to fix with a few checks. From updates to conflicts, knowing the root cause saves time and keeps your store running smoothly.
FAQs About What Is a WooCommerce Brand Filter?
Shoppers often have questions about how brand filters in WooCommerce really work and why they matter. To make things clear, here are some common questions and answers that explain this feature in simple words.
Why Is a Brand Filter Important in WooCommerce?
A brand filter is important because it helps shoppers find products from brands they already know and trust. Instead of wasting time browsing through everything, they can quickly see the items they care about. This builds confidence in shopping and reduces frustration. Stores also benefit by making their products easier to explore.
How Does a Brand Filter Improve User Experience?
A brand filter improves user experience by giving people faster and cleaner navigation. Shoppers don’t have to scroll endlessly to reach their favorite products. They can narrow choices with a single click, which saves time and effort. A smooth shopping process makes people more likely to return.
Can a Brand Filter Help Small Stores?
Yes, a brand filter can help small stores even if they don’t have thousands of products. It gives a professional touch and shows that the store values customer comfort. Even with a small product range, filters keep the shopping page organized. Customers enjoy browsing more, and this can increase sales.
Does a Brand Filter Work on Mobile Devices?
A brand filter works very well on mobile devices if set up correctly. Most plugins make sure the filter is mobile-friendly, using dropdowns or collapsible menus for small screens. This helps mobile users find what they want without confusion. Since many people shop on phones, this feature becomes very useful.
Is a Brand Filter Good for SEO?
Yes, a brand filter can also support SEO when used with the right plugin. Some plugins create clean and SEO-friendly URLs for filtered pages. This means search engines can index those pages and bring in more visitors. A store can gain better visibility by offering brand-specific product links.
Can Customers Select Multiple Brands at Once?
In most cases, yes, customers can select more than one brand at a time. This feature is useful when shoppers want to compare products between brands directly. Instead of checking brands separately, they see them side by side. It makes shopping more flexible and personalized.
How Does a Brand Filter Affect Store Sales?
A brand filter can improve sales because it helps customers shop faster and with more focus. When buyers see products from brands they already like, they are more likely to purchase. It reduces decision stress and builds trust in the store. A smoother experience often leads to repeat buying.
Do Brand Filters Slow Down a Website?
A well-designed brand filter will not slow down a website. Modern plugins use AJAX technology, which updates results without reloading the whole page. This makes filtering fast and smooth. However, if a store has poor hosting or too many heavy plugins, performance can drop.
Can a Brand Filter Be Customized?
Yes, most WooCommerce brand filters can be styled and customized. Store owners can change how the filter looks, whether as checkboxes, dropdowns, or even image buttons. Some plugins also let you add brand logos for a better design. Customization ensures the filter matches the overall store layout.
Is a Brand Filter Easy to Set Up?
Yes, a brand filter is easy to set up using WooCommerce plugins. Store owners don’t need advanced coding skills because plugins handle most of the work. The setup usually involves adding brand attributes and placing the filter widget. Within a few steps, the filter is live and ready to use.
Conclusion
Adding a WooCommerce brand filter makes shopping smooth, quick, and enjoyable by letting buyers find products from their favorite brands without confusion. It keeps stores more organized, builds customer trust, and improves the overall experience. So, if you are still wondering what is a WooCommerce brand filter?, it is simply a tool that helps customers easily filter and shop by their preferred brands.
When setting up this feature, always test placements like sidebar or top menus, keep your plugins updated, and watch out for theme or plugin conflicts. These simple steps help you avoid common problems and keep the filter running well. Best wishes as you set up your store for a cleaner and smarter shopping experience.