Using brand filters in WooCommerce facilitates the shopping process by making it easier for customers to find the products they need. This is one of those useful features that prevents users from scrolling too long or becoming lost in a large list of products. Now you might be asking: How to add a brand filter in WooCommerce?
To add a brand filter in WooCommerce, first install a product filter plugin like Dynamic AJAX Product Filters for WooCommerce. Then, create a “Brand” attribute under Products > Attributes, add brand terms, and assign them to products. Enable the filter in Product Filters > Form Manage, customize its style, and ensure the shop page sidebar is visible.
Do you want to know the full process step by step? Keep reading this article to explore all the details you need about setting up brand filters in WooCommerce from start to finish.
How to Add a Brand Filter in WooCommerce?
Adding a brand filter in WooCommerce can significantly improve your customers’ shopping experience by allowing them to easily browse products by brand. The most effective way to do this is by using attributes combined with a product filter plugin. Here’s how you can do it, with simple steps and helpful tips:
Method: Add Brand Filter Using Product Filter Plugin
The product filter plugin allows you to add a brand filter to WooCommerce using attributes. For a more advanced and user-friendly filtering system, using a plugin like Dynamic AJAX Product Filters is highly recommended. This method utilizes WooCommerce product filters to enable real-time product filtering, custom styling (color swatches, checkboxes, images), and better compatibility with variable products. It’s ideal for medium to large online stores that need smooth filtering without page reloads.
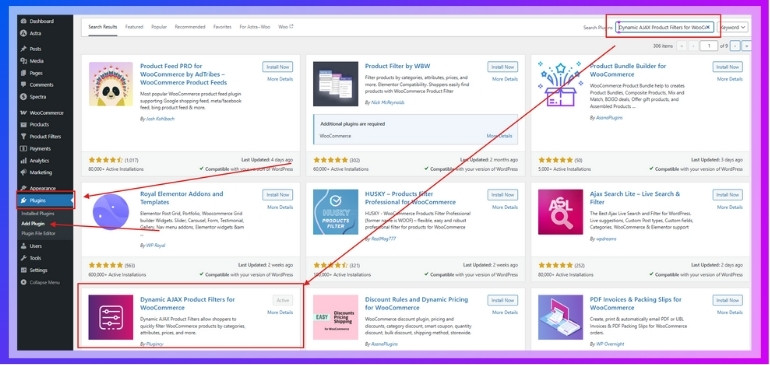
Step 1: Install the Plugin
- In your WordPress dashboard, go to Plugins > Add New.
- Search for Dynamic AJAX Product Filters for WooCommerce.
- Click Install, then Activate the plugin.

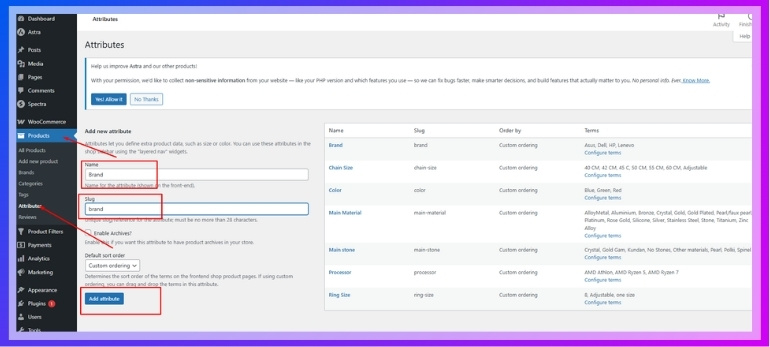
Step 2: Create Brand Attribute and Terms
- Go to Products > Attributes.
- In the Add new attribute section:
- Name: Enter “Brand” (or another suitable name).
- Slug: Enter a lowercase version, e.g., brand.
- Click Add Attribute.

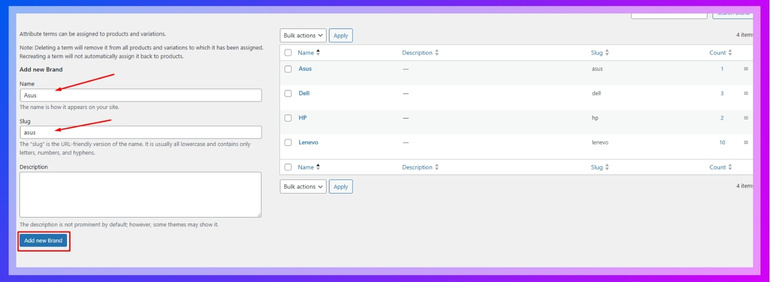
- Click Configure terms next to the new attribute.

- Add each brand as a term, e.g., Asus, Dell, HP, Lenovo, and click Add New Brand after each.


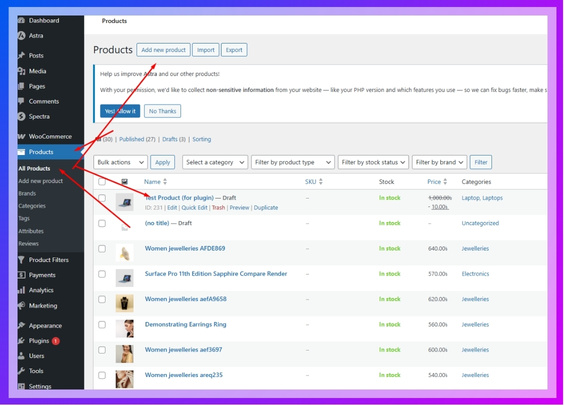
Step 3: Assign Brands to Products
- Go to Products > All Products.
- Edit an existing product or click Add New.

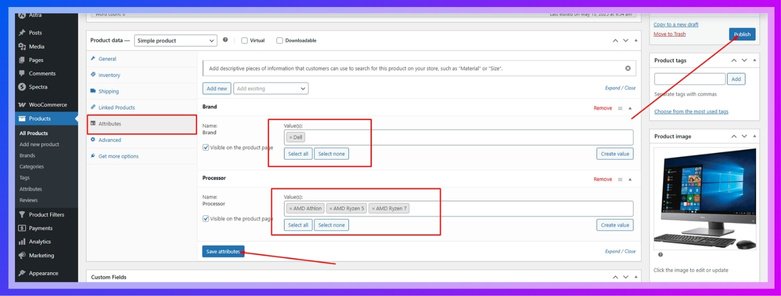
- In the Product data section, go to the Attributes tab.
- Select the Brand attribute from the dropdown, then click Add.
- Choose the appropriate brand(s) for the product.
- Click Save attributes, then Update or Publish the product.

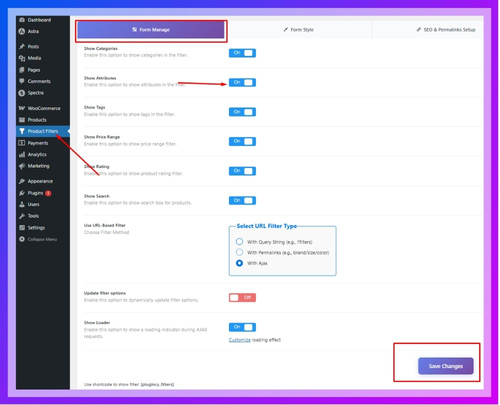
Step 4: Display Brand Filter in the Sidebar
- Go to Product Filters > Form Manage.
- Locate the Show Attributes setting.
- Enable it to display the brand filter in the widget area.

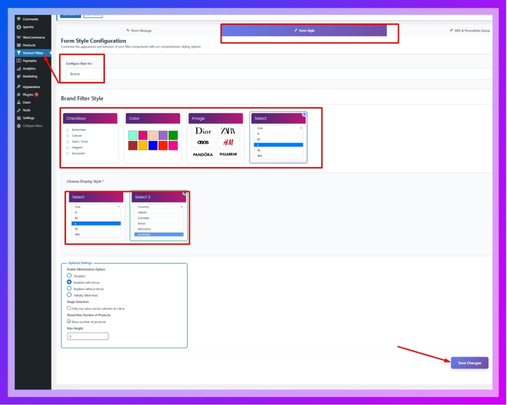
Step 5: Customize the Brand Filter Design
- Go to Product Filters > Form Style.
- In the Select Attribute dropdown, choose Brand.
- Select a style for the filter:
- Checkbox
- Color
- Image
- Select
- Depending on the style, you can further customize (e.g., upload brand logos for the image option).

- Click Save to apply your changes.
Step 6: Ensure the Sidebar Appears on the Shop Page
- Go to Appearance > Customize > WooCommerce > Product Catalog.
- Make sure your Shop layout includes a sidebar.
- If not visible, adjust your theme settings or switch page templates to enable sidebars.
Why Are Brand Filters Important in WooCommerce?
Finding the right product in an online store can sometimes be tricky. Brand filters make it much easier for people to search and shop, especially when there are many choices. If you want to know why brand filters matter so much, keep reading for all the key reasons.
Faster Product Search
Brand filters help customers find what they want without scrolling through everything. Instead of looking at every product, they can just click on their favorite brand. This saves time and makes shopping easier. It’s like going straight to your favorite section in a store. People are more likely to buy when things are easy to find.
Better Shopping Experience
When a store is easy to use, people enjoy shopping more. Filters make the store feel organized and clear. It also helps customers feel like the store understands what they want. If someone always buys from the same brand, filters let them go right there. A happy customer is more likely to come back again.
Helps Big Stores
If your store has many products, brand filters are even more useful. Without filters, a big store can feel confusing or messy. Filters break the store into smaller, easier parts. Customers can pick what they want faster without getting lost. It keeps things simple, even when the store has hundreds of items.
Builds Brand Trust
Some customers really trust certain brands. When they see brand names in filters, it makes them feel more confident. It shows that the store offers trusted products. They might even find new products from their favorite brand. Filters help keep that trust strong.
Good for Phones
Lots of people shop using their phones. Brand filters make it easier to shop on small screens. Instead of scrolling forever, they can tap the brand name and see what they want. It makes the whole shopping process quicker and smoother. A clean, simple design works best for mobile shopping.
Makes the Store Look Neat
Filters help keep the store looking tidy and well set up. Instead of showing everything at once, the store shows only what the customer wants. It feels more organized and less overwhelming. A neat store keeps people on the site longer. That can lead to more sales and happy visitors.
Things to Keep in Mind When Customizing Brand Filter Appearance
Customizing the brand filter in your WooCommerce store is important for both looks and usability. A filter that stands out but still matches your site’s style helps customers shop faster. Here are some simple things to keep in mind when you want your brand filter to look and work its best:
- Match Your Theme: Design the brand filter to blend with your site’s colors and layout, so it doesn’t look out of place or random.
- Keep It Simple: Avoid adding too many styles or effects that confuse users; clean and simple filters always work better for all visitors.
- Use Clear Labels: Choose label names that are easy to understand, so shoppers can instantly recognize what each brand filter is showing them.
- Add Brand Logos: Using logos instead of text adds visual appeal and helps users quickly spot the brand they are looking for.
- Optimize for Mobile: Make sure the filter design works well on small screens to give mobile users a smooth and clear browsing experience.
- Choose the Right Style: Pick from checkboxes, dropdowns, or swatches depending on what fits your layout and offers the easiest experience to shoppers.
- Keep It Visible: Place the filter in a spot that’s easy to find on the page, preferably near product listings or sidebars.
- Limit Filter Length: If there are too many brands, use scroll boxes or search fields so the filter doesn’t become too long or cluttered.
- Test Before Going Live: Try different designs and check how they look and work to be sure everything runs smoothly for your store visitors.
- Stay Consistent Everywhere: Use the same brand filter design across pages to avoid confusion and help users feel more comfortable while shopping.
What Should You Consider When Choosing a Product Filter Plugin for Adding Brand Filters?
There are many filter plugins out there, but not all of them are the same. Picking the right one is important if you want your customers to have a smooth shopping experience. Here are some things you should keep in mind before you decide:
Multiple Filter Choices
A good filter plugin should let you filter by more than just one thing. It should allow customers to pick color, size, brand, and other details at the same time. This helps shoppers find the exact product they want. The more filter choices, the better the shopping experience.

Flexible Filtering Options
Look for a plugin that can filter products in many different ways. It should work with product categories, tags, custom fields, and more. This makes it easier for shoppers to find exactly what they want. The plugin should let you filter by anything, not just the basics.
Speed and Performance
Your website can be hard to use if you have a slow plugin. Make sure the filter plugin is lightweight and does not slow down your store. Fast filters mean quicker page loads, and this keeps people happy. Nobody wants to wait for a slow website.
Easy Management
A good filter plugin should be easy to set up and use. The settings should be simple, even if you’re just starting with WooCommerce. You should be able to add or remove filters without any trouble. This shows the value of WooCommerce premium product filter plugins, which give you more control and better features. When it’s easy to manage, your store runs smoother.
Smart Filter Display
The best filter plugins hide choices that don’t have any products left. If a filter has no results, it disappears so customers don’t get confused. This keeps the filter area neat and easy to use. It also helps people find what’s in stock faster.
Mobile-Friendly Design
People shop on their phones and tablets all the time. Your filter plugin should work well on all screen sizes. Look for one that is easy to tap and use on a mobile device. A mobile-friendly filter means everyone can use your store easily.
Do Brand Filters Affect SEO in WooCommerce?
Yes, brand filters can affect SEO in WooCommerce, both in helpful and not-so-helpful ways, depending on how they are used. When filters create clean and separate URLs, search engines can index those pages properly. If not handled well, filters might lead to duplicate content or poor link structure. That’s why it’s important to manage how filters are shown and used on your site.
Search engines like pages that are easy to crawl and understand, which includes filtered product pages. If a brand filter creates a unique and useful page, it might rank in search results. But if the page has thin content or no extra value, it might not help much. Filters that load with JavaScript might also not get indexed by search engines properly.
Using brand filters in WooCommerce can help users find what they need faster, which leads to better engagement and longer visits. When people stay longer and interact more, search engines see your site as more useful. That can give your site a better chance to show up in search results. So, while filters don’t boost SEO directly, they can support it in smart and helpful ways.
Best Way to Make Brand Filters SEO-Friendly and User-Friendly
Brand filters are great tools for helping people find what they want quickly on an online store. But if not set up the right way, they might not work well for search engines. You need to keep things simple, clear, and useful for both people and search bots. Let’s walk through the best ways to get both jobs done right.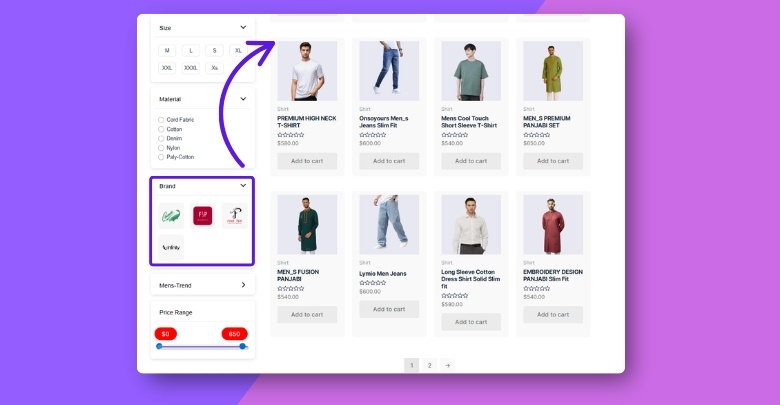
Clean Filter URLs
Use short and clear URLs when filters are applied. This helps search engines understand what the page is about. Avoid messy or confusing links with too many symbols. A good URL should include the brand name. Clean links also look better when shared.
Use Indexable Pages
Let the brand filter pages be visible to search engines. If they are hidden or blocked, they won’t help your SEO. Make sure important filtered pages can be found and crawled. Search bots should be able to reach and read them. This gives your store more chances to rank.
Clear Filter Layout
Filters should be simple and easy to use. People should find brand options without getting lost. Use checkboxes or dropdowns with neat spacing. Label each filter clearly. For price and quantity filtering, you can also add a range slider filter in WooCommerce to enhance the user experience and provide more precise control.
Unique Page Titles
Each filtered page should have a different title. Don’t use the same title over and over again. If someone filters for “Nike,” the title should include that brand. This makes the page more helpful and clear. It also tells search engines what the page shows.
Add Brand Content
Write a short text about the brand on the filtered page. You can use custom meta fields in WooCommerce to store and display this extra brand info. This gives extra value and avoids an empty page. Customers get more info, and search engines like it too. Even a few lines make a big difference.
Fast Page Load
Keep filtered pages loading quickly. Slow pages make people leave and hurt your site’s ranking. Avoid too many heavy images or scripts. A clean design helps speed things up. Fast pages work better for both users and SEO.
Mobile-Friendly Design
Make sure filters work well on phones and tablets. Many people shop from mobile devices today. Filters should be easy to tap and use on small screens. A smooth mobile experience keeps people on your site longer. That’s good for user happiness and search performance.
Avoid Duplicate Pages
Too many pages with the same content confuse search engines. Try not to let filters create lots of similar pages. Use tools to stop indexing extra filter combinations. Only show the ones that really matter. This helps keep your site clean and focused.
Frequently Asked Questions
If you’re planning to add a brand filter to your WooCommerce store, you might have a few extra questions in mind. Whether you’re wondering about setup tips, plugin options, or filter performance, these FAQs will help guide you through the process.
Do Brand Filters Work With Product Variations?
Yes, many modern product filter plugins support variable products. If your products have variations like size or color under a brand, the filter will still recognize and display them. Just make sure the attributes are set correctly for each variation.
What Happens If Two Products Share the Same Brand?
If multiple products are assigned the same brand, the brand filter will show all of them when that brand is selected. This allows customers to view all items under one brand in one click. It helps with easy browsing and brand-focused shopping.
Will Brand Filters Affect My WooCommerce Site Speed?
That depends on the plugin. Lightweight plugins with clean code are built for speed and won’t slow your site down. However, some heavy or poorly optimized plugins may increase load time, especially on stores with large product catalogs.
How to Display Only Popular Brands in the Filter?
To show only top brands, manually select the brand terms you want to appear in the filter settings. Some plugins also allow filters based on product count or popularity. This keeps the list short and focused on well-known brands.
What Should I Do If the Brand Filter Doesn’t Show Any Results?
If no results appear, check if products are correctly assigned to the brand term. Also, confirm the attribute is visible and selected in filter settings. A missing assignment or disabled filter can cause this issue. It’s usually a small setting problem.
Which Products Are Shown When No Brand Is Selected?
When no brand is selected, all products are usually shown by default. The filter only narrows results when a brand is actively selected. This gives customers a full view unless they want to filter down by brand.
How Do I Hide Brands That Have No Products Left?
Many filter plugins let you hide brand terms with zero products. This setting can usually be found under visibility or display options in the plugin. Hiding empty brands keeps the filter list clean and more useful for visitors.
How Often Should I Update Brand Terms?
Brand terms should be updated whenever you add or remove brands in your store. Keeping your brand list clean makes the filter more accurate. This helps avoid confusion and keeps your store looking professional.
Which Layout Works Best for Brand Filters?
A vertical sidebar layout is most common, but horizontal filters can work too, especially on mobile. The best layout depends on your product count and design. Just make sure the brand list is easy to scroll and read.
Bottom Line
Adding a brand filter to your WooCommerce store isn’t just a technical upgrade — it’s a smart way to help your customers shop with ease. Whether you’re running a small shop or a large online store, filters make the whole experience faster, cleaner, and more enjoyable for everyone.
If you’ve been wondering how to add a brand filter in WooCommerce, the good news is that it’s not as complicated as it sounds. With the right plugin and a few simple steps, you can create an easy-to-use system that highlights trusted brands and keeps your store looking neat and organized.
Now that you know the benefits and the full setup process, it’s time to put it into action. Try it out, test your filter design, and give your customers one more reason to love shopping from your store!