Dynamic AJAX Product Filters for WooCommerce allows you to filter WooCommerce products using product custom fields. Custom fields are additional product metadata that can store extra product information, such as material, model number, compatibility, collection, product condition, warranty type, or any other custom value.
This is useful when your store needs filtering options that are not handled by default WooCommerce categories, tags, attributes, price, or stock status.
What Are Custom Fields?
Custom fields are extra metadata added to WooCommerce products.
For example, a product may have custom fields such as:
Material: Cotton
Warranty: 2 Years
Condition: New
Model: X100
Compatibility: iPhone
Collection: Summer
When the Custom Fields filter is enabled, customers can filter products based on these saved custom field values.
Example Use Cases
Custom field filtering is useful for stores that need product-specific data.
Examples:
| Store Type | Custom Field Example |
|---|---|
| Electronics store | Model, Compatibility, Warranty |
| Clothing store | Material, Collection, Fit |
| Furniture store | Wood Type, Room Type, Finish |
| Auto parts store | Vehicle Model, Year, Engine Type |
| Book store | Publisher, Edition, Language |
| Beauty store | Skin Type, Ingredient, Formula |
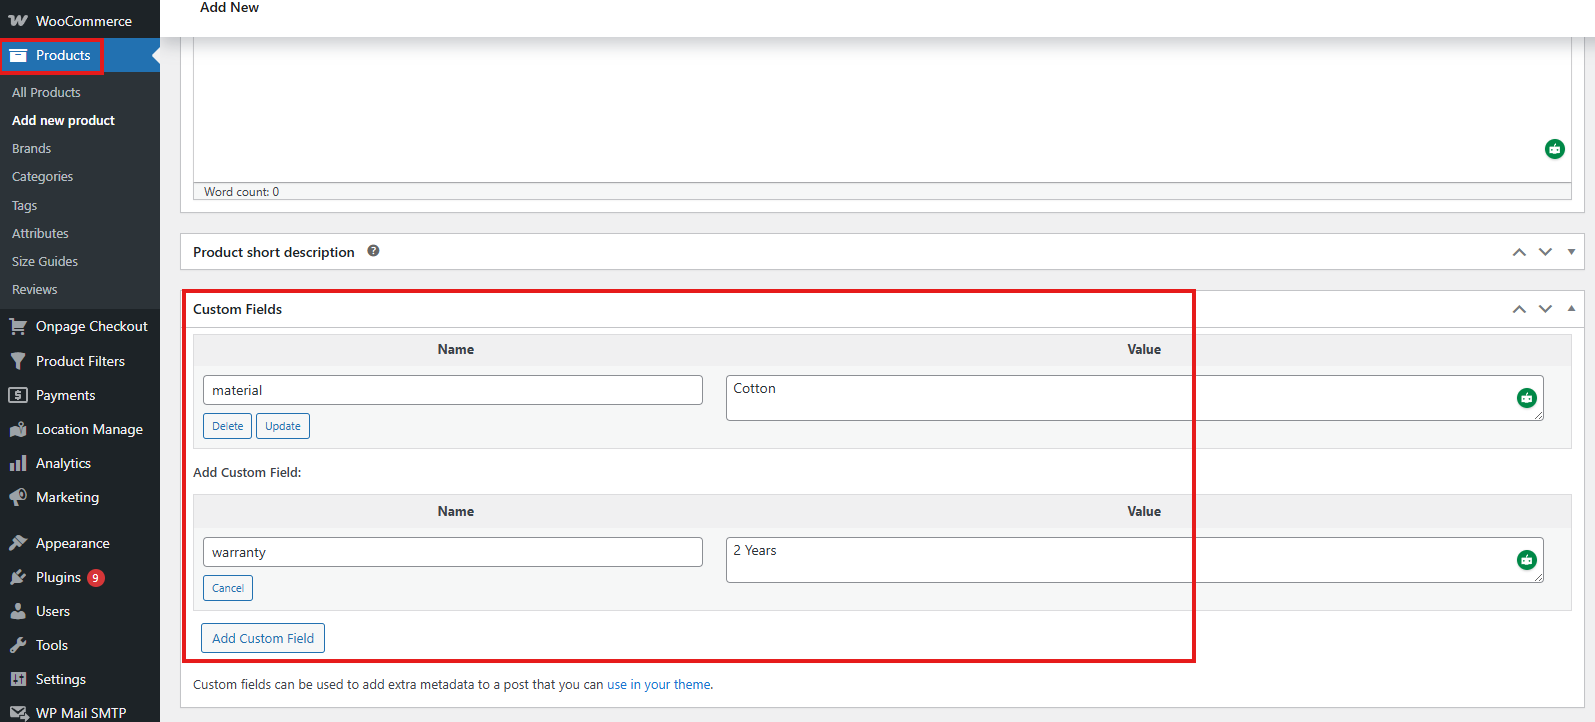
Step 1: Add Custom Fields to Products
To add custom fields:
- Go to WordPress Dashboard → Products.
- Edit an existing product or click Add New.
- Open the custom fields area.
- Add the custom field name and value.
- Update or publish the product.
Example:
Custom Field Name: material
Custom Field Value: Cotton
Another example:
Custom Field Name: warranty
Custom Field Value: 2 Years
Use the same custom field name across multiple products if you want those values to appear under the same filter.
Step 2: Use Consistent Custom Field Names
Custom field names should be consistent.
Good example:
material
material
material
Avoid using different names for the same type of data:
material
Material
product_material
materials
If custom field names are inconsistent, the plugin may treat them as separate filter fields.
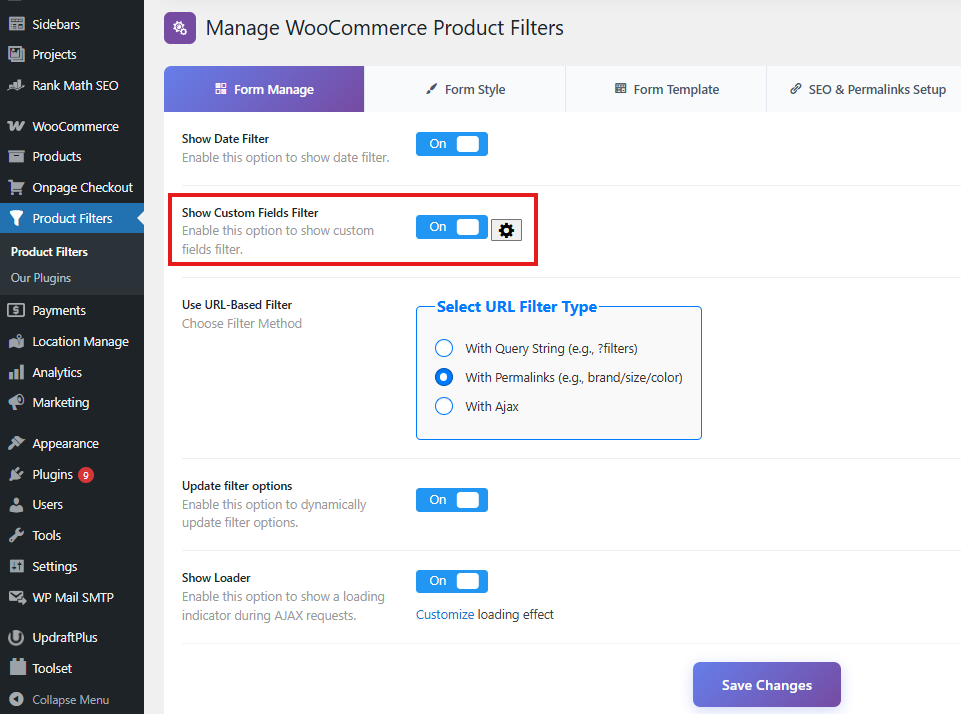
Step 3: Enable Custom Fields Filter
To enable custom field filtering:
- Go to Product Filters → Form Manage.
- Find Show Custom Fields Filter.
- Enable the option.
- Click Save Changes.
Once enabled, available custom fields can be used as filter options.
Step 4: Configure Custom Field Style
To customize the Custom Fields filter:
- Go to Product Filters → Form Style.
- In Configure Style for, select Custom Fields.
- Choose the specific custom field you want to customize.
- Configure the available style and behavior options.
- Click Save Changes.
Each custom field can be styled separately.
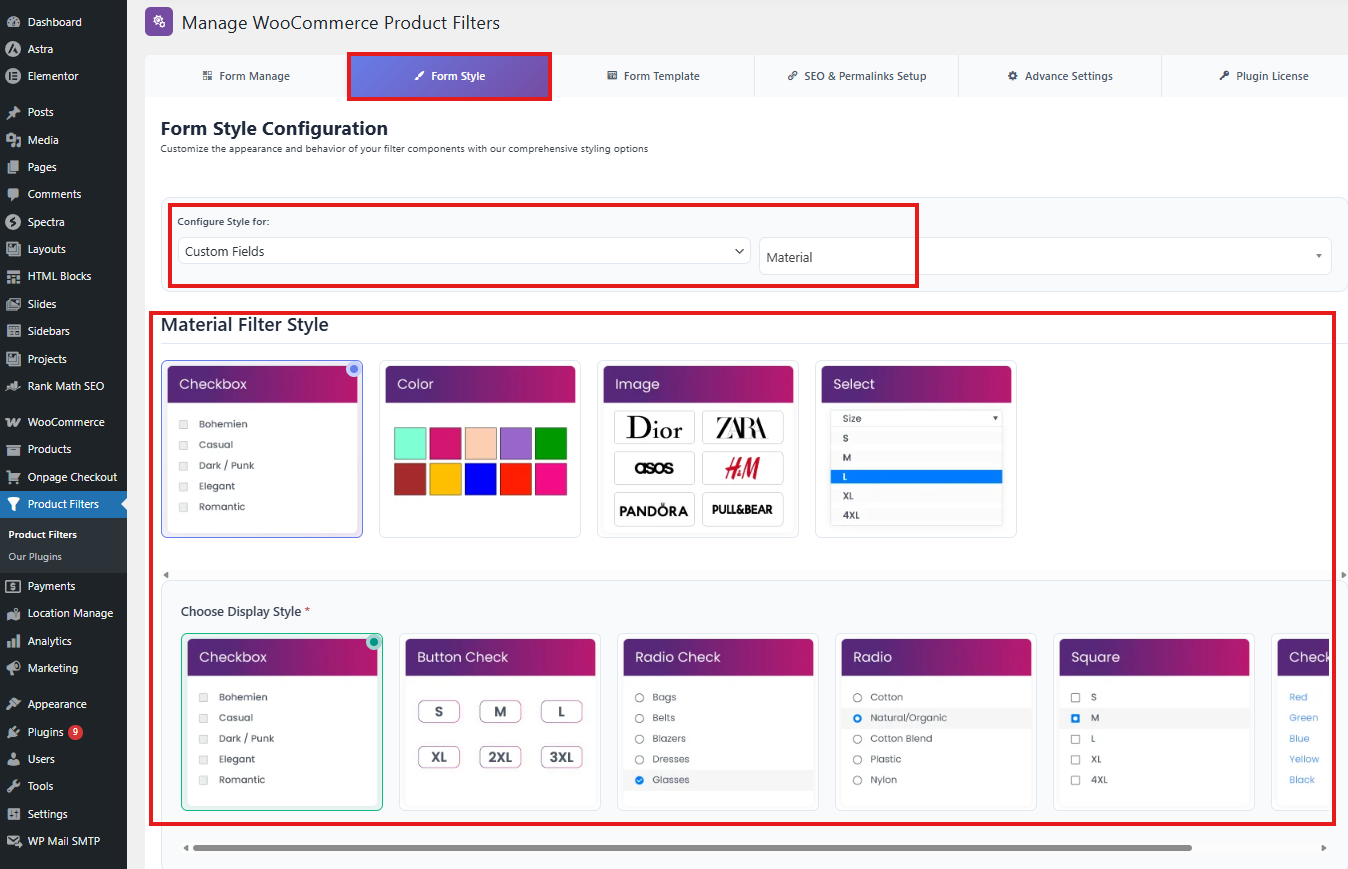
For example, you can style the material field differently from the warranty field.
Available Custom Field Style Options
Depending on the selected custom field and display type, you may be able to configure:
Widget title
Placeholder
Button text
Apply button text
Show in active filters
Show apply button
Show reset button
Apply behavior
Maximum height
Custom CSS class
Operator
Terms
Include/exclude terms
Terms search
Terms search text
Terms search position
Layout
Number of columns
Tooltip
Tooltip text
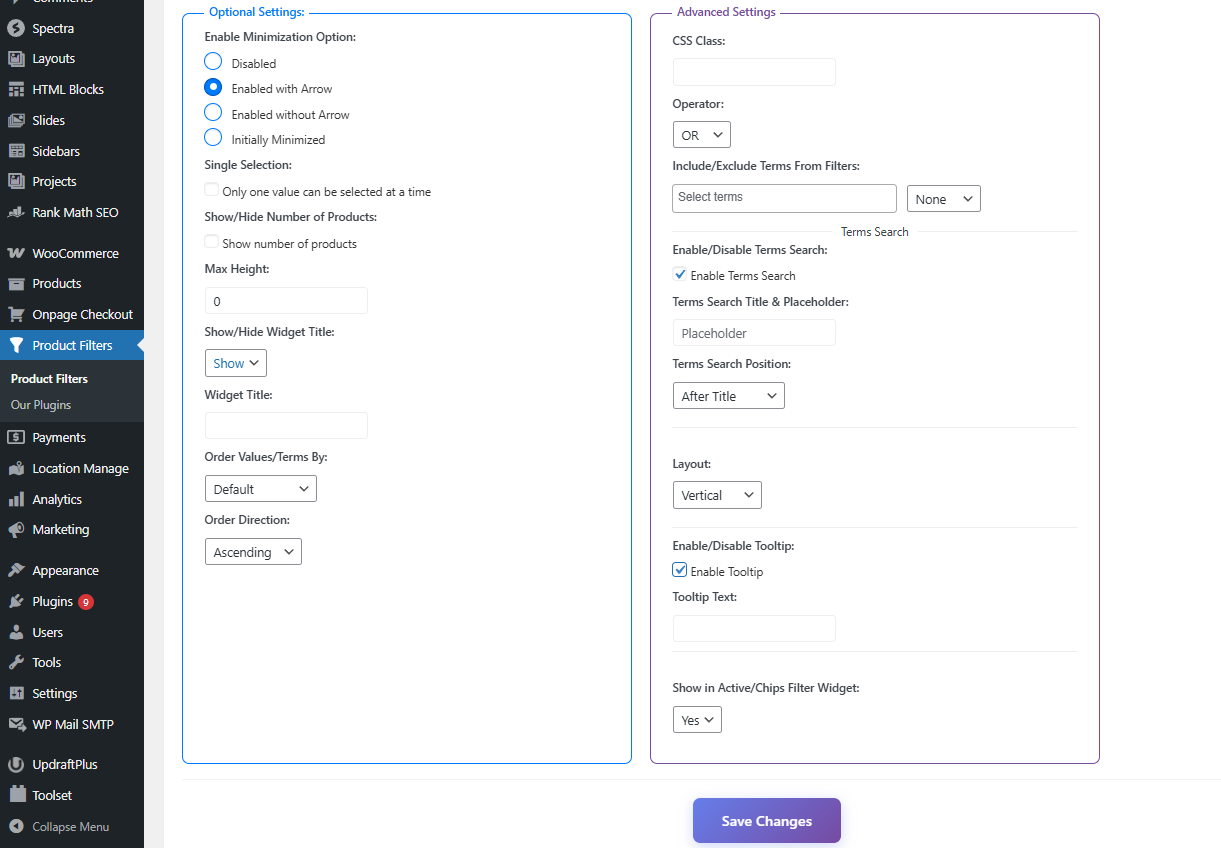
These options help you control how custom field filters appear and behave on the frontend.
Widget Title
The widget title controls the heading shown above the custom field filter.
Example:
Material
Can be changed to:
Filter by Material
Or:
Choose Material
Placeholder
The placeholder appears inside dropdown, select, or input-based filter styles.
Example:
Select material
Other examples:
Choose warranty type
Search model number
Show in Active Filters
The Show in Active Filters option controls whether selected custom field values appear in the active/selected filter area.
Enable this if you want customers to clearly see which custom field filters are currently applied.
Example active filter:
Material: Cotton
Custom Field Operators
The operator controls how multiple selected values are handled.
Common behavior:
OR: Show products matching any selected value
AND: Show products matching all selected values
Use OR for most stores.
Use AND only when products must match every selected custom field value.
Include or Exclude Custom Field Terms
You can control which custom field values appear in the filter.
This is useful when you want to hide specific values from customers.
Example:
Show only: Cotton, Leather, Wool
Or:
Exclude: Internal, Hidden, Test
Use this when some custom field values are used internally and should not be shown in the frontend filter.
Terms Search for Custom Fields
If a custom field has many values, you can enable a search box inside the filter options.
This helps customers quickly find the value they need.
Example:
Search materials
Recommended for custom fields with many values, such as:
Model
Brand compatibility
Material
Collection
Size group
Vehicle year
Tooltip for Custom Field Filters
You can enable tooltip text to explain what a custom field filter means.
Example:
Choose a material to narrow your product results.
Another example:
Filter products by warranty coverage.
Tooltips are useful when the custom field name may not be clear to customers.
Exclude Custom Fields from Filter Display
The plugin also includes an option to exclude custom fields from the filter system.
Use this when some custom fields should not appear as filter options.
Go to:
Product Filters → Advanced Settings
Find the custom field exclusion option and select the fields you want to hide.
This is useful for internal fields such as:
_private_note
_internal_code
_admin_label
_sync_id
_import_batch
Custom fields used only for admin, import, sync, or developer purposes should usually be excluded from frontend filters.
Custom Fields and SEO Permalinks
Custom fields can also be included in SEO-friendly filter URLs when URL-based filtering and SEO permalink options are enabled.
The plugin supports custom field permalink prefixes, allowing filtered URLs to remain clean and readable.
Example:
example.com/shop/filters/material/cotton/
Another example:
example.com/shop/filters/warranty/2-years/
You can manage permalink prefix settings from:
Product Filters → SEO
Important Notes
Custom field filters work best when:
- The same field name is used across products.
- Custom field values are simple and consistent.
- Values are not stored as complex serialized data.
- Internal/admin-only custom fields are excluded.
- Product values are saved correctly before generating filters.
Avoid using custom field filters for highly complex data structures unless they are stored in a simple filterable format.
Recommended Custom Field Format
Good values:
Cotton
Leather
2 Years
New
iPhone
Summer Collection
Avoid inconsistent values:
cotton
Cotton
COTTON
cotton fabric
Cotton Fabric
For best results, use clear and consistent values.
Troubleshooting
Custom Fields filter is not showing
Check that Show Custom Fields Filter is enabled from:
Product Filters → Form Manage
Then check whether the products actually have custom fields assigned.
A specific custom field is not showing
Check whether the field is excluded from Advanced Settings.
Also confirm that the field has values assigned to published WooCommerce products.
Custom field values are missing
Make sure multiple products use the same custom field name and that the values are saved correctly.
Also clear cache after updating custom fields.
Too many custom fields are showing
Use the custom field exclusion option from Advanced Settings to hide fields that should not be used for filtering.
Custom field filter appears but does not return correct products
Check whether the custom field values are consistent.
For example, these may be treated differently:
Cotton
cotton
Cotton Fabric
Use consistent values across products.
Custom field URLs are not SEO-friendly
Make sure URL-based filtering is enabled.
Then configure the custom field permalink prefix from:
Product Filters → SEO
Best Practices
Use custom fields only for product data that customers understand.
Use WooCommerce attributes for common product options like size, color, and material when possible.
Use custom fields for special product metadata that does not fit categories, tags, or attributes.
Keep custom field names lowercase and consistent.
Exclude internal fields from frontend filtering.
Use terms search for custom fields with many values.
Use clear widget titles and placeholders.
Test custom field filters with AJAX filtering, pagination, sorting, and active filter chips.
Summary
The Custom Fields Filter lets customers filter WooCommerce products using product metadata.
Use:
Product Filters → Form Manage
to enable Show Custom Fields Filter.
Use:
Product Filters → Form Style
to customize each custom field’s title, placeholder, layout, terms, tooltip, search, apply/reset behavior, and active filter display.
Use:
Product Filters → Advanced Settings
to exclude custom fields that should not appear in frontend filters.
Use:
Product Filters → SEO
to manage custom field permalink prefixes for SEO-friendly filter URLs.