
The Dynamic AJAX Product Filters plugin allows you to filter WooCommerce products by brand. This is useful for stores that sell products from multiple brands and want customers to quickly find products from their preferred brand.
With the Brand Filter, customers can select one or more brands and instantly view matching products using AJAX filtering.
Step 1: Create Product Brands
Before displaying the Brand Filter, make sure your store has product brands available.
Depending on your WooCommerce setup, brands may come from:
- WooCommerce’s built-in brand feature
- A brand plugin (Dynamic Ajax Product Filters Plugin)
- A custom product brand taxonomy
To create or manage brands:
- Go to your WordPress Dashboard.
- Navigate to the brand management area used by your WooCommerce brand setup.
- Add a new brand.
- Enter the brand name, slug, and other available details.
- Save the brand.
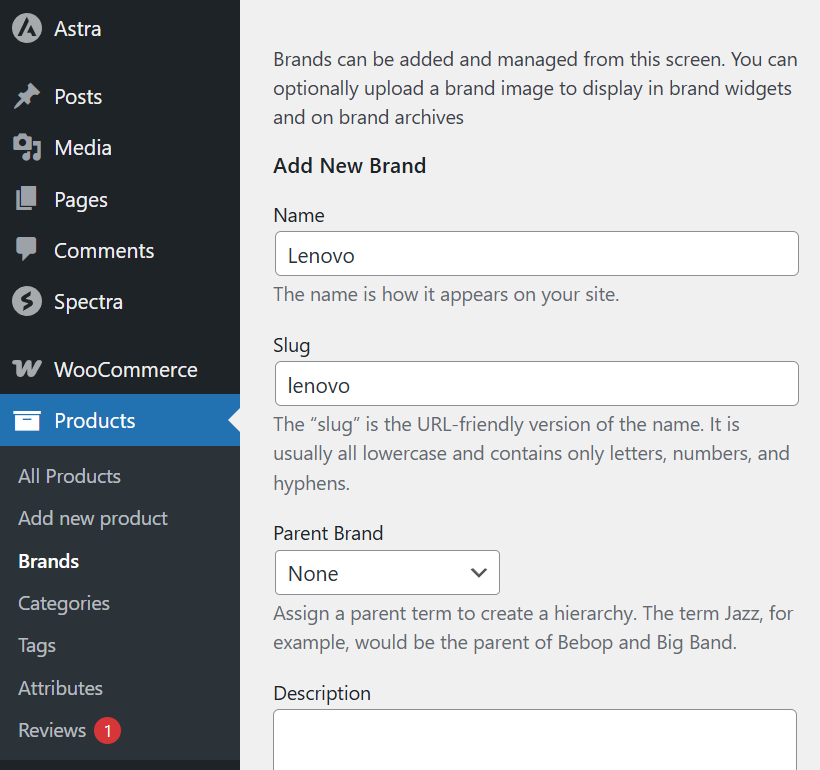
Step 2: Assign Brands to Products
After creating brands, assign them to your WooCommerce products.
- Go to Products > All Products.
- Edit an existing product or click Add New.
- Find the brand section in the product editor.
- Select the brand you want to assign to the product.
- Click Update or Publish.
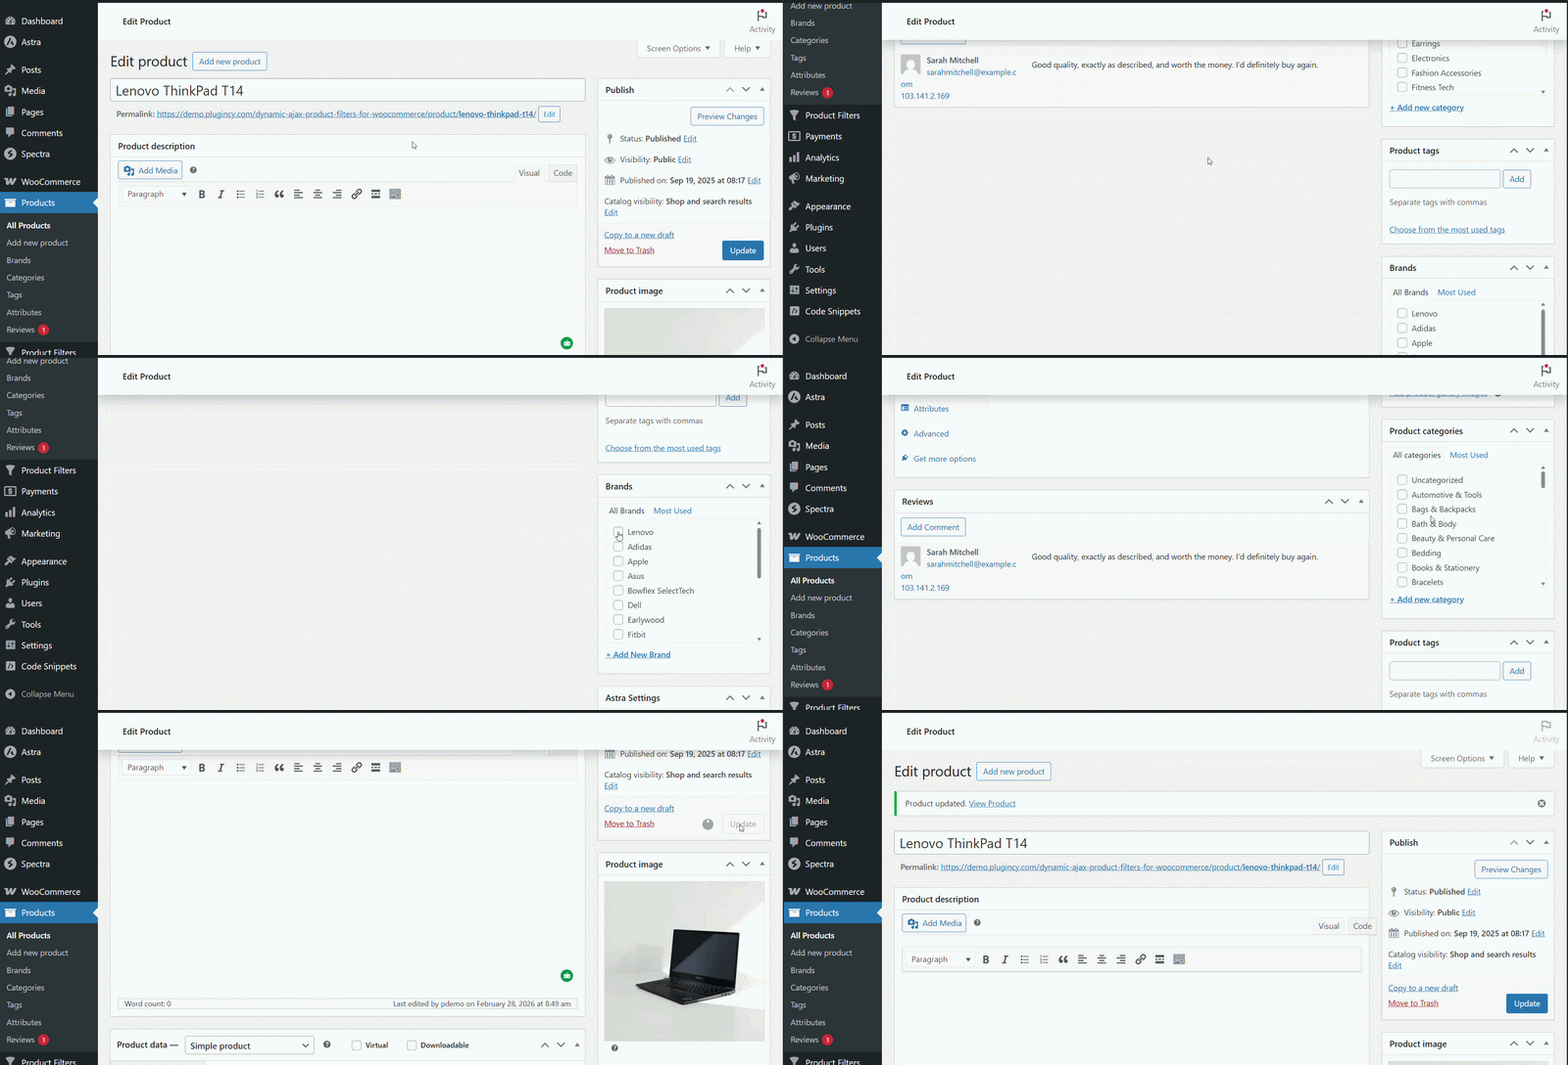
Step 3: Manage Brand in the Filter Widget Form
- Go to Product Filters > Form Manage in your WordPress dashboard.
- Find the Show Brand option.
- Toggle this option On to display the Brand Filter in the filter widget.
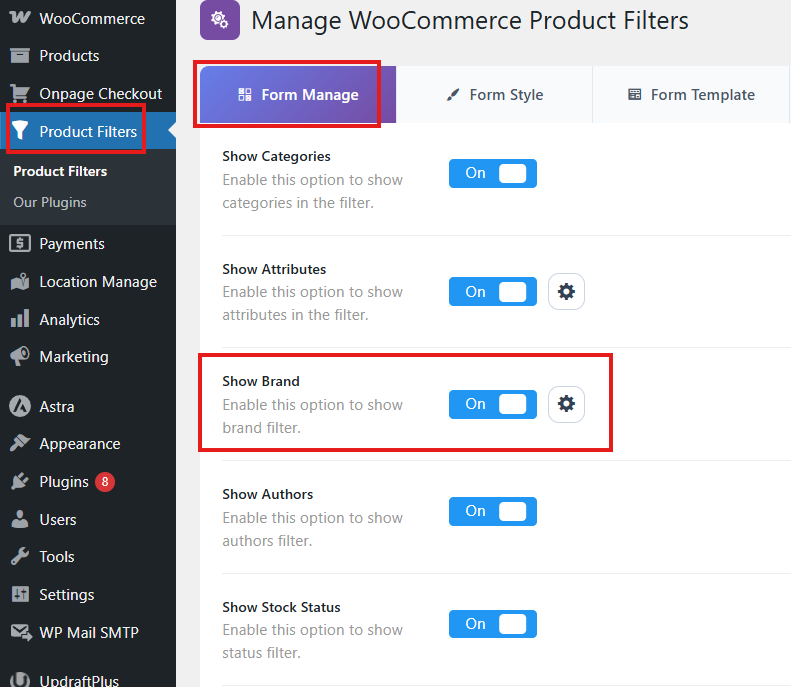
Step 4: Configure Brand Filter Settings
After enabling Show Brand, click the settings icon next to the Brand option to open the Brand Filter Settings popup/modal.
The Brand Filter Settings popup lets you control which brand taxonomy the plugin should use for filtering.
Auto Detect
Choose Auto Detect if you want the plugin to automatically detect the available brand taxonomy from your WooCommerce setup.
This is recommended for most stores.
Use this option when:
- You are using a common WooCommerce brand plugin.
- You are using the default brand taxonomy supported by your setup.
- You are not sure which brand taxonomy your store uses.
Manual Selection
Choose Manual Selection if you want to manually select the brand taxonomy.
Use this option when:
- Your site has multiple brand taxonomies.
- The wrong brand taxonomy is detected automatically.
- You are using a custom brand taxonomy.
- You want full control over which brand taxonomy is used in the Brand Filter.
After selecting the brand taxonomy mode, save the settings.
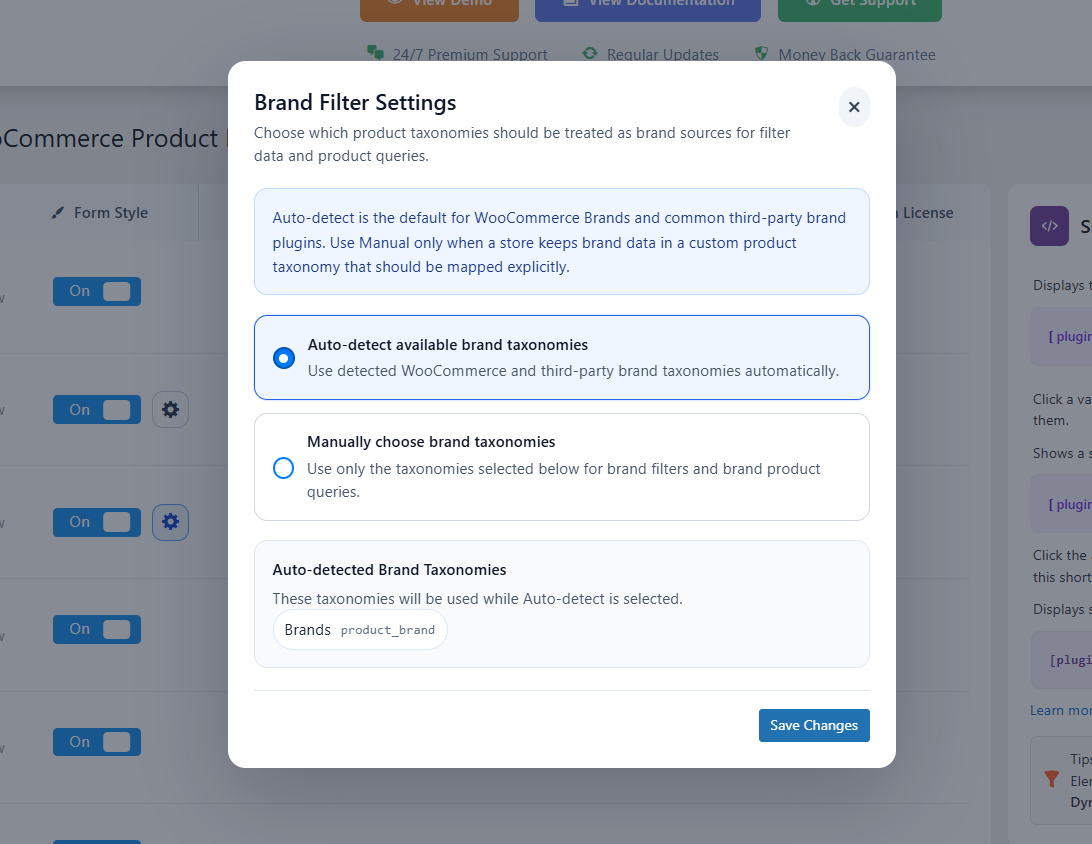
Step 5: Style/Design/Customize the Brand Widget
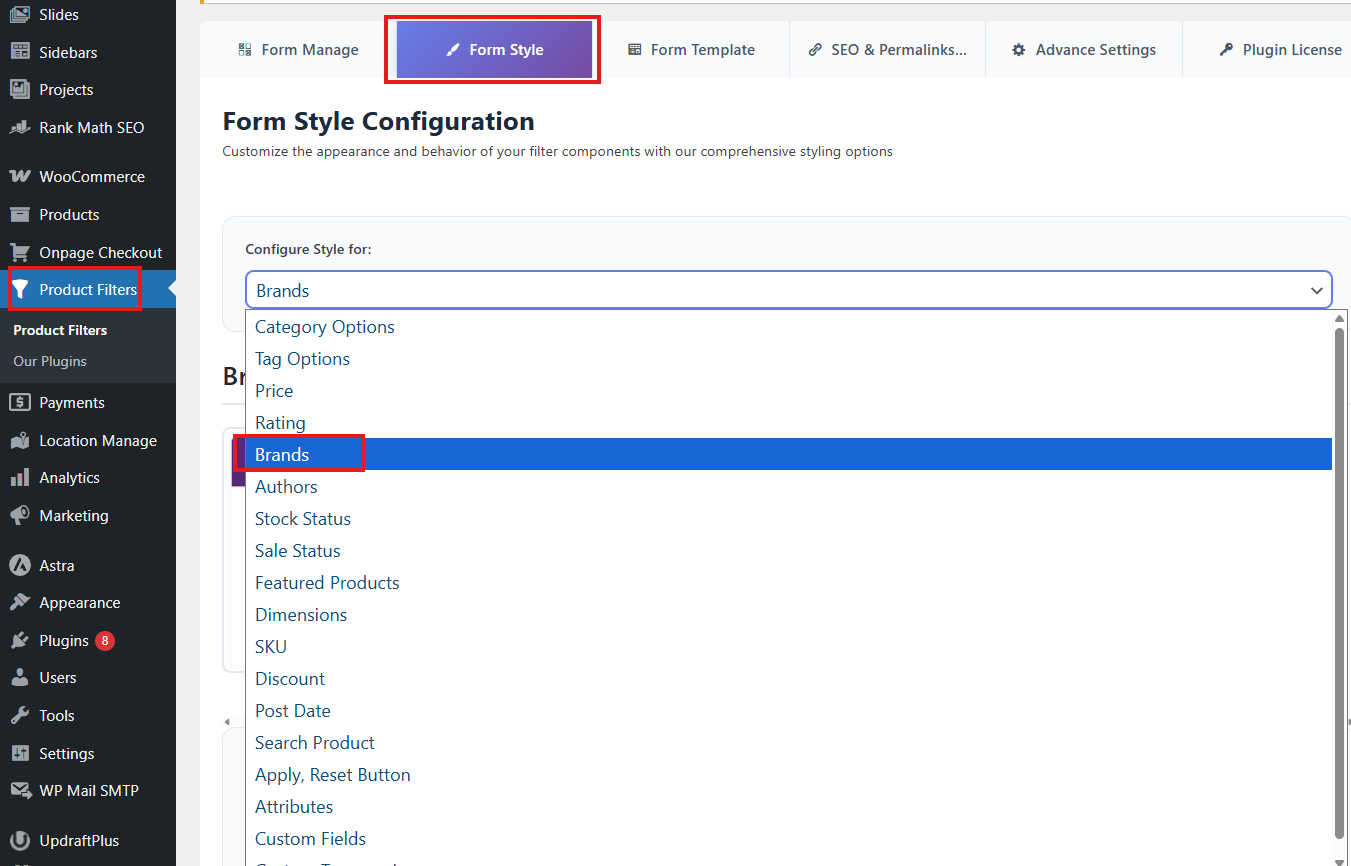
- Go to Product Filters > Form Style in your WordPress dashboard.
- From the Configure Style for dropdown, choose Brand.
- Customize the Brand Filter design based on your requirements.
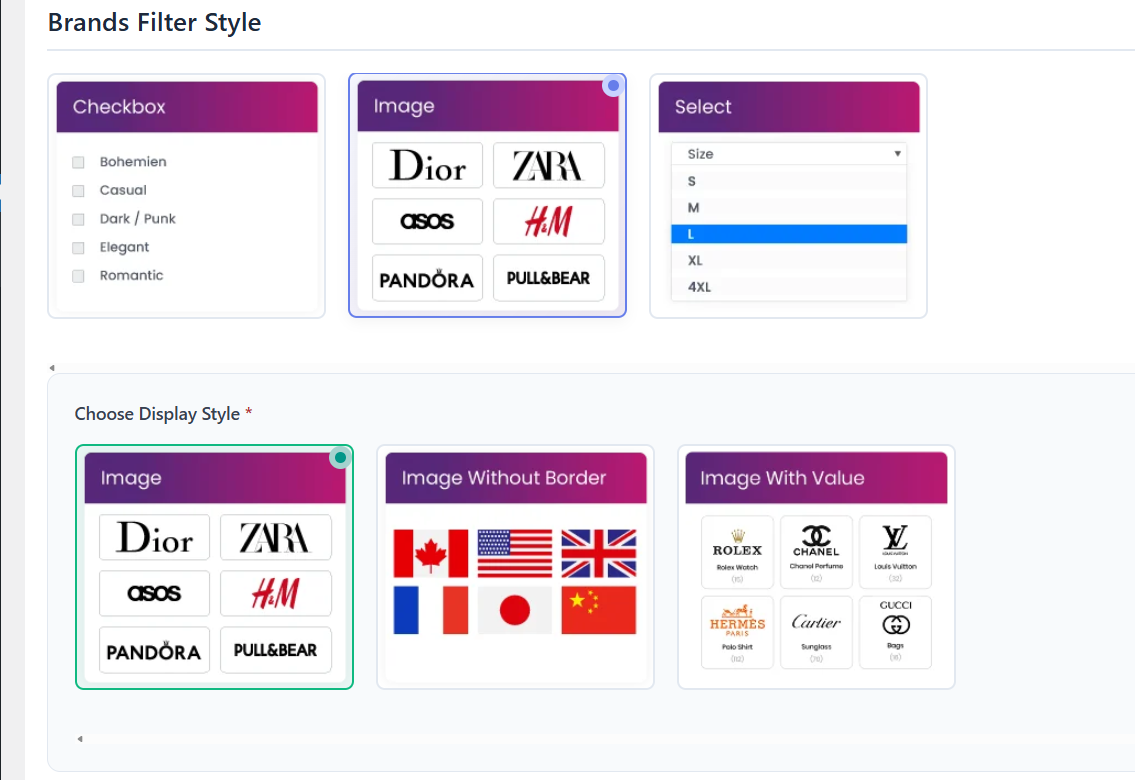
Depending on your plugin settings, you can customize the Brand Filter display style, layout, label, height, brand image/logo display, spacing, and other available style options.
Display Brand Images or Logos
Dynamic AJAX Product Filters for WooCommerce can display brands with text-based options or image/logo-based options, depending on your selected Brand Filter style and available brand data.
This is useful when you want customers to recognize brands visually instead of reading only brand names.
For example, instead of showing:
Nike
Adidas
Puma
Apple
Samsung
you can display brand logos or brand images in the filter widget.
How to Enable Brand Image Style
To style the Brand Filter with brand images:
- Go to Product Filters → Form Style.
- From the Configure Style for dropdown, select Brand.
- Choose an image-based display style if available.
- Adjust the layout, label, height, spacing, and other style options as needed.
- Click Save Changes.
After saving, check the frontend to confirm that brand images or logos appear correctly in the filter widget.
Important Notes About Brand Images
Brand images depend on your WooCommerce brand setup. Some brand plugins store brand logos or thumbnails differently.
If brand images are available for your brand terms, the plugin can use them for the Brand Filter display.
If no brand image is assigned, the filter may show the brand name instead, depending on the selected style and available data.
When to Use Brand Image Style
Use brand image style when:
- Your store sells products from popular brands.
- Customers recognize brands by logo.
- You want a more visual filter layout.
- You want to improve the shopping experience for brand-focused stores.
- You use brand terms with uploaded logos or thumbnails.
Best Practices for Brand Images
Use clear, square, or evenly sized brand images.
Keep image file sizes optimized for fast loading.
Use consistent logo dimensions where possible.
Avoid uploading very large images for small filter icons.
Make sure each brand has a logo or image assigned if you want a consistent visual layout.
Step 6: Save Changes
After configuring and styling the Brand Filter, click Save Changes to apply your settings.
Step 7: Display the Product Filter on Your Webpage
You can display the product filter using the shortcode:
[plugincy_filters]
To add it to a page:
- Edit the page where you want to show the filter.
- Add a shortcode block or shortcode widget.
- Paste the shortcode.
- Update or publish the page.
You can also use it inside a sidebar widget or page builder shortcode module.
If you want to display products along with the filters, you can also add the WooCommerce products shortcode:
[products]
Expected Result
After completing these steps, customers will be able to filter WooCommerce products by brand. When a customer selects a brand, the product list will update and show only matching products.
Notes
- Make sure brands are assigned to products.
- If the Brand Filter is empty, check whether products have brand terms assigned.
- If the wrong brands appear, open Brand Filter Settings and use Manual Selection.
- If you use a caching plugin, clear the cache after changing brand settings.
- The Brand Filter Settings popup is useful when your site has more than one brand taxonomy or when auto detection does not select the expected taxonomy.
Troubleshooting
Brand Filter is not showing
Please check:
- Show Brand is enabled in Product Filters > Form Manage.
- Products have brands assigned.
- The filter shortcode or widget is added to the page.
- The filter settings are saved.
- Cache has been cleared.
Wrong brands are showing
Open the Brand Filter Settings popup and switch from Auto Detect to Manual Selection. Then select the correct brand taxonomy.
Brand Filter is empty
Check that:
- Brand terms exist.
- Products are assigned to those brands.
- The selected brand taxonomy is correct.
- Products are published and visible.
- No exclusion or visibility settings are hiding the products.
Brand Filter does not update products
Check:
- The page has a WooCommerce product listing.
- The filter shortcode is placed correctly.
- Your product selector is configured correctly in Advanced Settings.
- Cache and optimization plugins are not blocking AJAX requests.