
The Image Swatches style allows you to display WooCommerce filter terms as images instead of plain checkboxes, radio buttons, or dropdown options. For brand-based stores, this is especially useful because you can show brand logos as clickable filter options.
With Dynamic AJAX Product Filters for WooCommerce, you can create a visual Brand Filter where customers select a brand by clicking its logo. The product list updates with AJAX and shows products from the selected brand without requiring a full page reload.
This guide focuses on using brand image swatches. The same Image Swatch style can also be used for attributes, categories, tags, or other supported filter terms, but brands are one of the best use cases because logos are easy for customers to recognize.
Step 1: Create or Prepare Brand Terms
Before customizing brand image swatches, make sure your store has brand terms created and assigned to products.
Depending on your WooCommerce setup, brands may come from a brand taxonomy, a product attribute used as brands, or a brand plugin. The important part is that each brand should be available as a filter term and should be assigned to products.
Prepare your brand terms
- Go to the section where your store manages brands.
- Create brand terms such as Nike, Adidas, Samsung, Apple, or any brands used in your store.
- Assign the correct brand term to each WooCommerce product.
- Prepare a clear logo or image for each brand.
For the best result, use clean brand logos with a consistent size, background, and aspect ratio. Square or evenly padded logo images usually look best in swatch layouts.
You can also use image swatches for product attributes, categories, or tags, but this article uses brands as the main example.
Step 2: Open Brand Style Settings
After creating and assigning brand terms, open the Form Style settings for the Brand filter.
- Go to Product Filters > Form Style in your WordPress dashboard.
- Find the Configure Style for dropdown.
- Select your Brand filter from the dropdown.
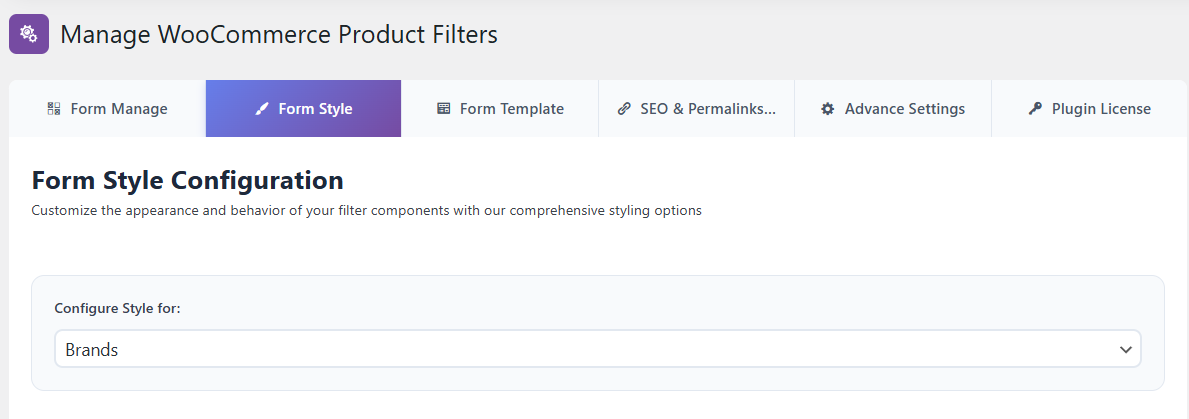
If you do not see the Brand filter in Form Style, first make sure the Brand filter is enabled from Product Filters > Form Manage and that brand terms are assigned to products.
Step 3: Choose the Image Style for Brands
In the Brand style options, choose Image as the filter style. This changes the Brand filter from a text-based list into an image-based brand logo swatch layout.
- Select the Brand filter from Configure Style for.
- Choose Image from the available style options.
- Select the brand image swatch layout you want to use.
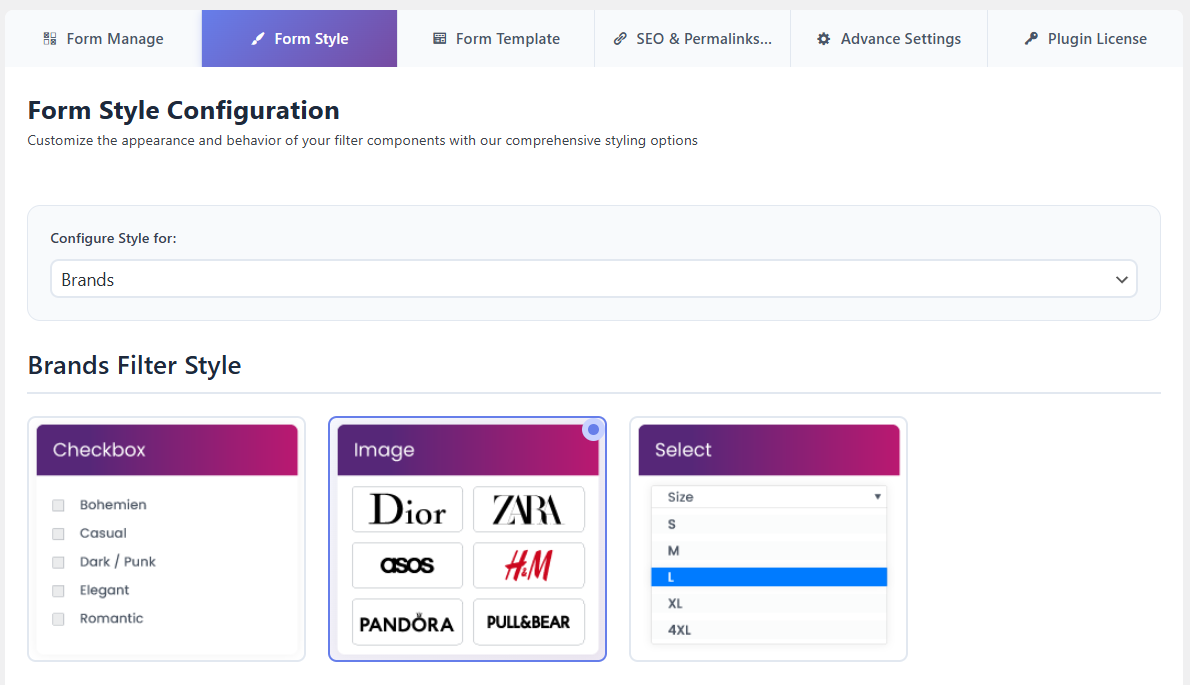
After selecting the Image style, the available image swatch suboptions will appear.
Step 4: Select a Brand Image Swatch Layout
After choosing the Image style, select the layout that best fits your brand filter design.
Available Brand Image Swatch Options
- Image: Displays each brand as an image swatch. Customers can click a brand logo to filter products by that brand.
- Image without Border: Displays brand logos without borders. This creates a clean logo-grid style.
- Image With Value: Displays the brand logo with the brand name. This is useful when some logos may not be instantly recognizable.
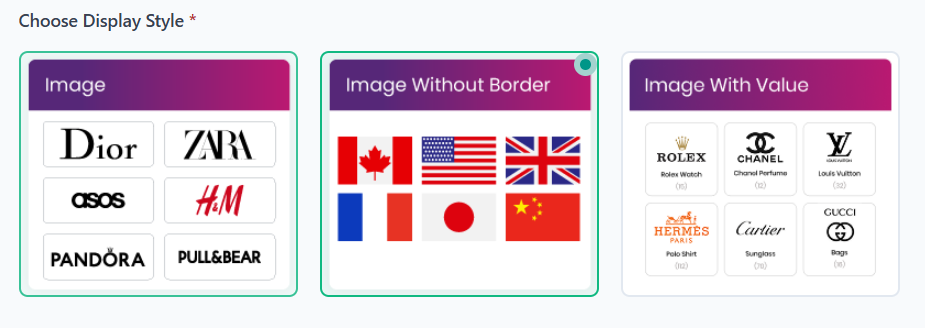
For most brand filters, Image without Border works well for a clean logo display. Use Image With Value if you want to show both the brand logo and the brand name for better clarity.
Step 5: Set Logo Images for Brand Terms
In the Advanced Options for Terms section, you can manage the image used for each brand term. This is where you assign a brand logo to each brand.
- Scroll to Advanced Options for Terms.
- Here, you’ll see all the brands of your store.
- Find the brand term you want to customize.
- Click the image/color editor for that brand.
- Choose the Image option.
- Select the brand logo from the WordPress Media Library.
- Replace or remove the image if needed.
- Repeat the process for each brand.
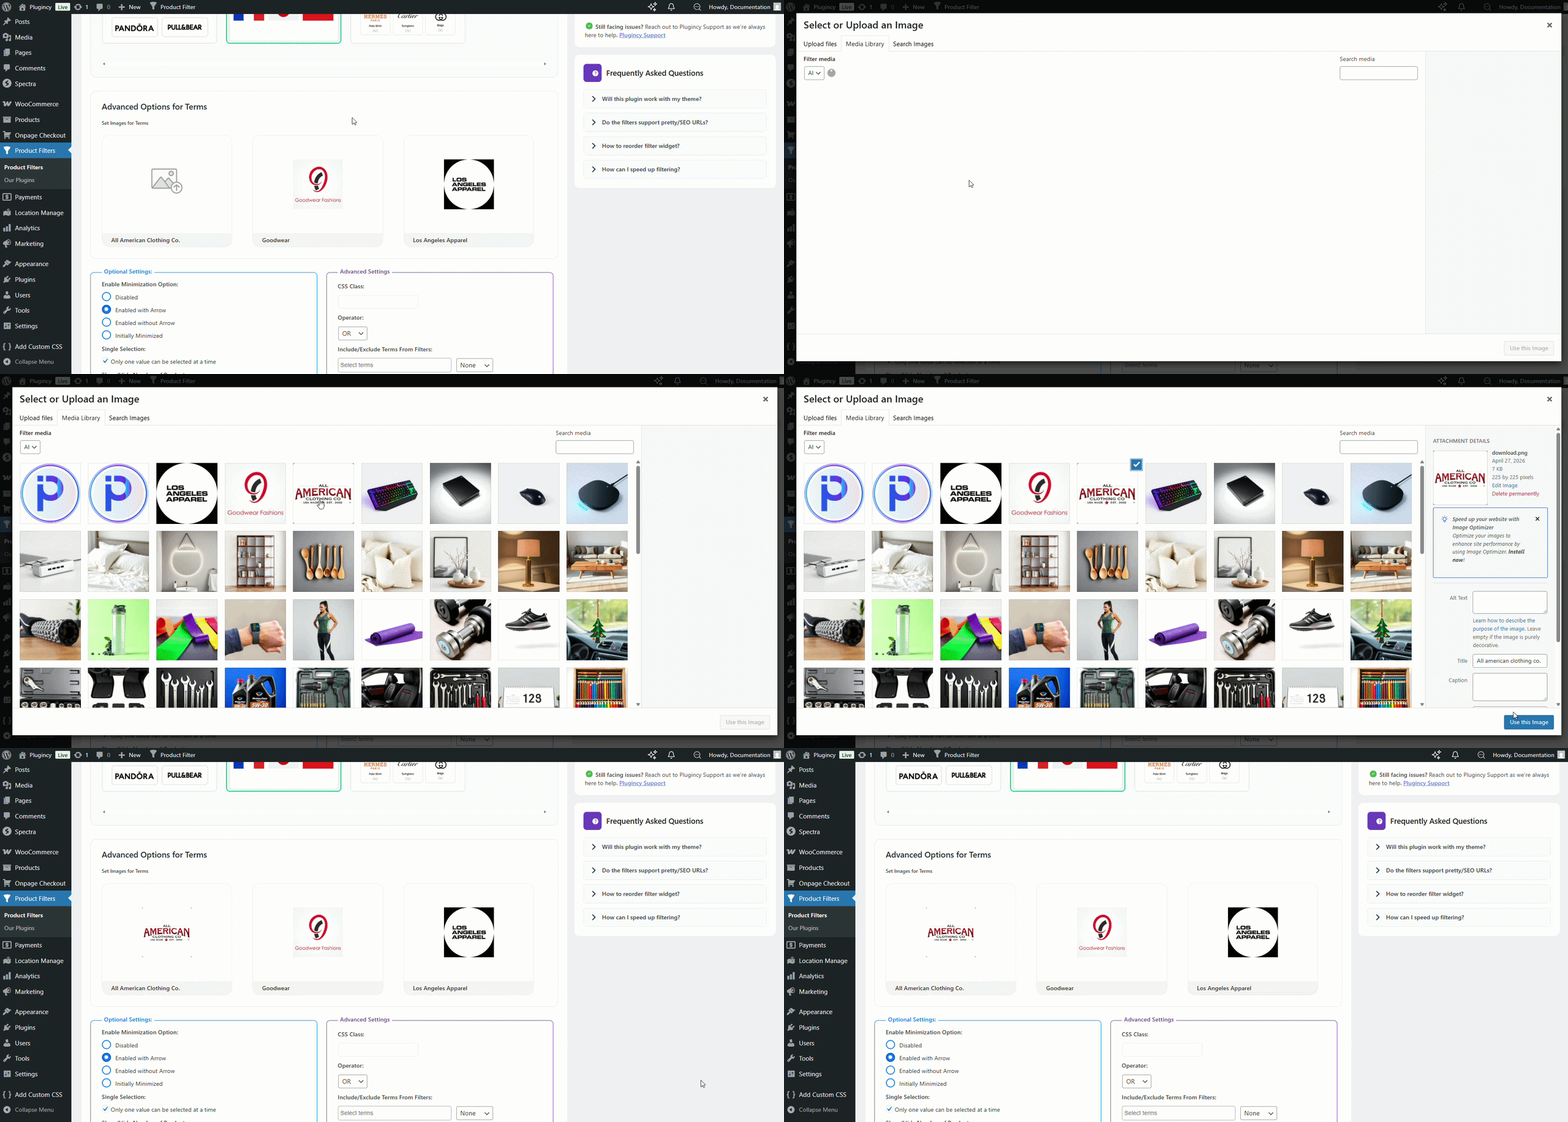
The term editor can be used to set a color, gradient, or image for a term. For brand swatches, choose the image option and use the brand logo as the term image.
Recommended Logo Tips
- Use official or clean brand logos where possible.
- Keep logo images consistent in size and padding.
- Use square images or evenly padded transparent PNG files for better alignment.
- Avoid very small or blurry logos.
- Use Image With Value if customers may not recognize all logos.
Step 6: Configure Optional Brand Filter Settings
You can also adjust optional settings for the Brand image swatch filter. Available options may vary depending on your selected filter source and plugin version.
Useful Optional Settings for Brand Swatches
- Show in Active / Chips Filter Widget: Shows the selected brand in the active filters area.
- Widget Title: Lets you set the title shown above the brand logos, such as Shop by Brand.
- Show / Hide Widget Title: Controls whether the Brand filter title is displayed on the frontend.
- Enable Minimization Option: Allows the Brand filter widget to be collapsed or expanded.
- Terms Search: Adds a search field for finding brands faster when your store has many brands.
- Tooltip: Shows additional information when customers hover over or interact with a brand logo.
- CSS Class: Allows developers to add custom styling for the brand swatch widget.
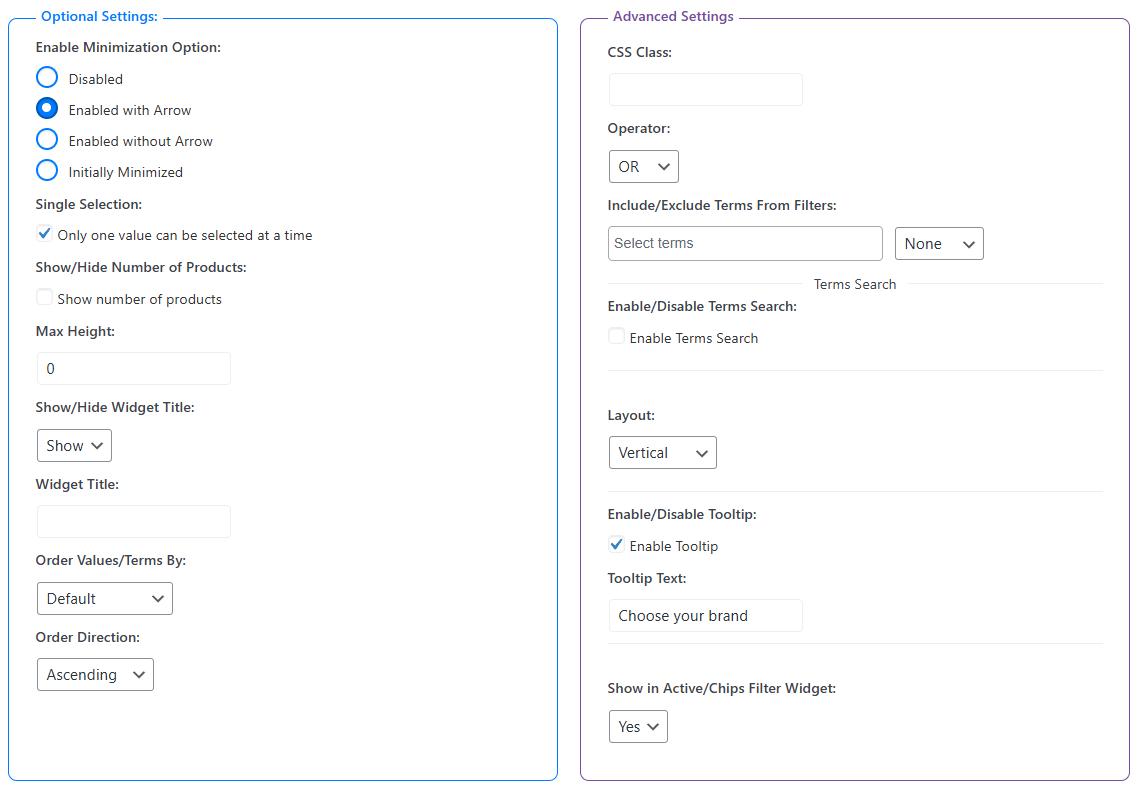
For brand filters, a clear title like Brands, Shop by Brand, or Filter by Brand usually works best.
Step 7: Save Changes
After selecting the Image style, choosing the brand image swatch layout, and assigning logo images to brand terms, click Save or Save Changes.
Then visit your shop, category, or archive page to confirm that the brand logos are displayed correctly.
Step 8: Display the Brand Filter with the Block Editor
You can display the product filter on any page using the WordPress block editor.
Use the main filter shortcode:
[plugincy_filters]
Add the filter to a page
- Go to Pages and edit the page where you want to show the Brand filter.
- Click the + icon to add a new block.
- Search for Shortcode.
- Add the Shortcode block.
- Paste
[plugincy_filters]into the block. - Click Update or Publish.
You can also place the shortcode inside a block-based widget area, sidebar, archive template, or Site Editor template if your theme supports it.
If you want to show products on the same page, add WooCommerce product display blocks or product shortcodes according to your store layout.
Expected Result
After completing the setup, your Brand filter will display brand terms as image swatches or logos on the frontend.
Customers will be able to click a brand logo to filter products by that brand. The product list will update using AJAX and show matching products without a full page reload.
- Brand logos make the Brand filter more visual and easier to scan.
- Customers can filter products by clicking logos instead of text-only brand names.
- The selected brand can appear in the Active Filters or Chips widget if enabled.
Example Use Cases
- Electronics Store: Show logos for Apple, Samsung, Sony, Dell, HP, and other brands.
- Fashion Store: Display clothing or footwear brand logos as filter options.
- Beauty Store: Let customers filter products by beauty or skincare brand logos.
- Marketplace: Use brand logos to help customers quickly find products from trusted manufacturers.
- Wholesale Store: Help B2B buyers quickly filter by supplier or manufacturer brand.
Notes
- Brand terms must be created and assigned to products before they can appear as useful filter options.
- Use clear and consistent logo images for the best frontend appearance.
- If brand logos are missing, check the Advanced Options for Terms section.
- If the brand image swatches do not update on the frontend, clear your cache after saving changes.
- Use Image With Value when customers may not recognize every brand logo.
- Although this guide focuses on brands, Image Swatches can also be used for attributes, categories, tags, and other supported filter terms.
Troubleshooting
Brand image swatches are not showing
Please check the following:
- The Brand filter is enabled in Product Filters > Form Manage.
- The Brand filter is selected in Product Filters > Form Style.
- The selected style is set to Image.
- The filter shortcode is added to the page, sidebar, widget area, or archive template.
- The settings are saved and cache has been cleared.
Brand logos are missing for some brands
Open Advanced Options for Terms and check whether each brand has an image assigned. Select or replace the missing logo from the WordPress Media Library, then save the settings.
Brand logos are showing but products are not filtering
Make sure the selected brand terms are assigned to WooCommerce products. If a brand has no products connected to it, selecting that brand logo may return no results.
Brand logos do not look aligned
Use logo images with the same size and aspect ratio. Square images or transparent PNG files with consistent padding usually work best for brand image swatch layouts.