Dynamic AJAX Product Filters for WooCommerce allows you to filter products by custom taxonomies. A taxonomy is a way to group products into meaningful sets so customers can quickly narrow down product results.
WooCommerce already includes default taxonomies such as product categories, product tags, and product attributes. A custom taxonomy lets you create additional product groups based on your store’s needs.
For example, you can create custom taxonomies such as:
Material
Collection
Region
Product Type
Manufacturer
Season
Compatibility
After creating a custom taxonomy and assigning terms to products, you can display it as a filter in the product filter widget.
What is a Custom Taxonomy?
A taxonomy is used to organize products into groups.
WooCommerce includes default taxonomies such as:
Product Categories
Product Tags
Product Attributes
A custom taxonomy is an additional taxonomy created for a specific store requirement.
For example, if you sell clothing, you may create a custom taxonomy called Material with terms such as:
Cotton
Leather
Wool
Polyester
Denim
If you sell books, you may create a custom taxonomy called Language with terms such as:
English
Spanish
French
German
Arabic
Customers can then use these taxonomy terms to filter products.
Why Use Custom Taxonomy Filters?
Custom taxonomy filters are useful when your products need extra classification beyond categories, tags, and attributes.
Use custom taxonomy filters when:
- You want to group products by a special classification.
- You use custom product data created by another plugin.
- You need filtering by collections, regions, materials, manufacturers, or other product groups.
- You want a structured taxonomy-based filter instead of a simple custom field.
- You want terms to be reusable across many products.
Custom Taxonomy vs Product Attribute
Custom taxonomies and product attributes are both used to group products, but they are not always the same.
Use Product Attributes for common WooCommerce product options such as:
Color
Size
Material
Style
Use Custom Taxonomies when you need a separate product grouping system, such as:
Collection
Region
Designer
Manufacturer
Product Line
Compatibility
If the data is a normal WooCommerce product option, an attribute may be better. If the data is a separate product classification, a custom taxonomy is usually better.
Step 1: Create a Custom Taxonomy
You can create a custom taxonomy using a custom code snippet, a custom post type/taxonomy plugin, or a plugin such as ACF.
The taxonomy must be registered for the WooCommerce Product post type.
Example taxonomy:
Taxonomy Name: Material
Taxonomy Key: product_material
Post Type: Product
Creating a Custom Taxonomy with ACF
ACF allows you to register custom taxonomies from the WordPress dashboard.
Steps:
- Install the ACF plugin
- Go to WordPress Dashboard.
- Click ACF.
- Open Taxonomies.
- Click Add New.
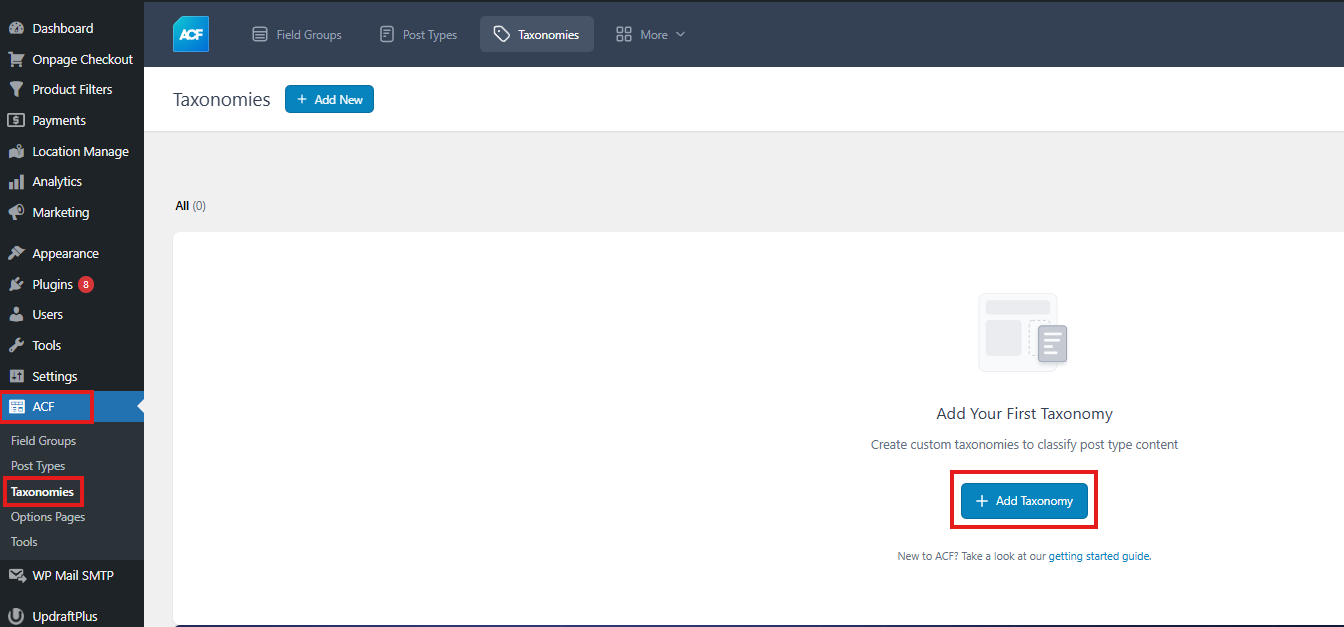
- Enter the taxonomy details.
- Assign the taxonomy to the Product post type.
- Save the taxonomy.
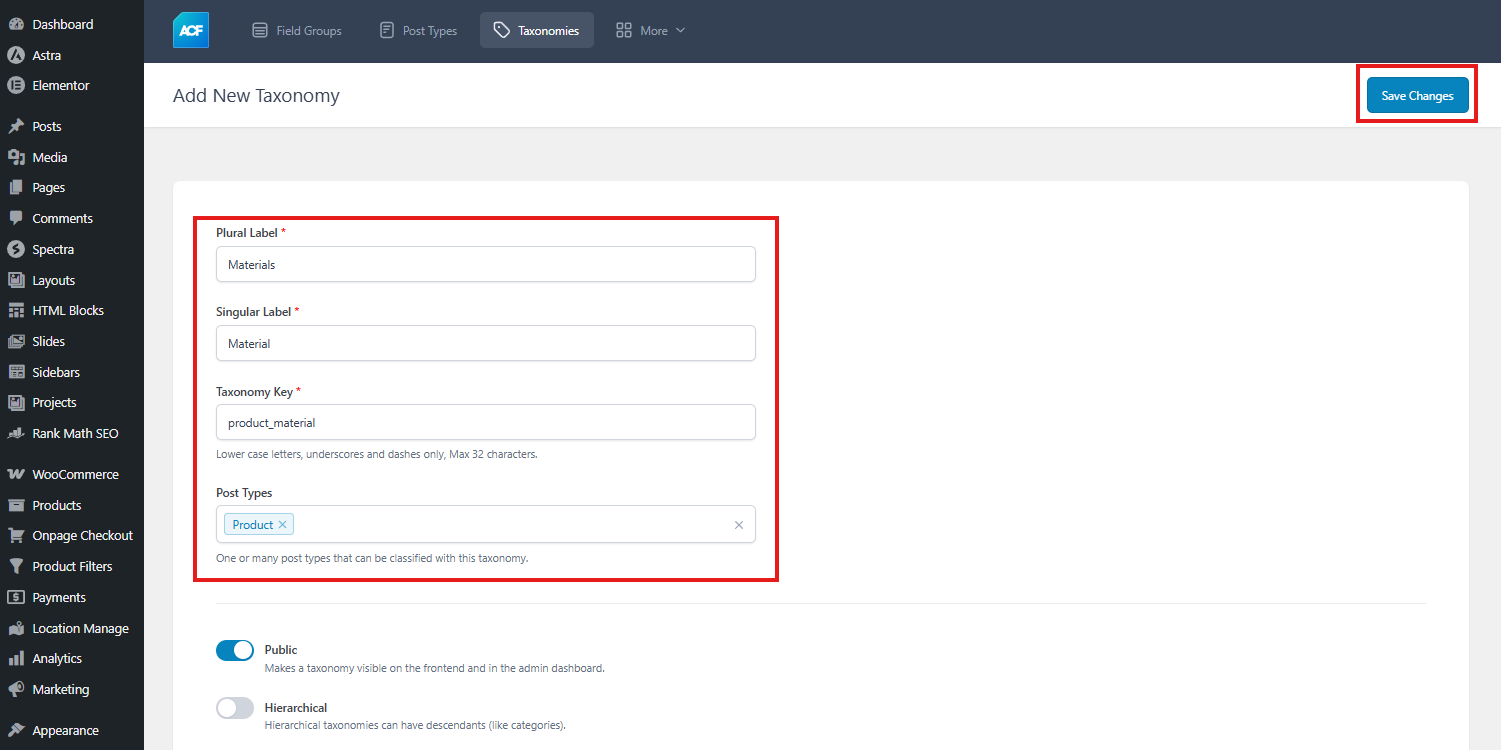
Example setup:
Plural Label: Materials
Singular Label: Material
Taxonomy Key: product_material
Post Type: Product
After saving, the taxonomy will be available for WooCommerce products.
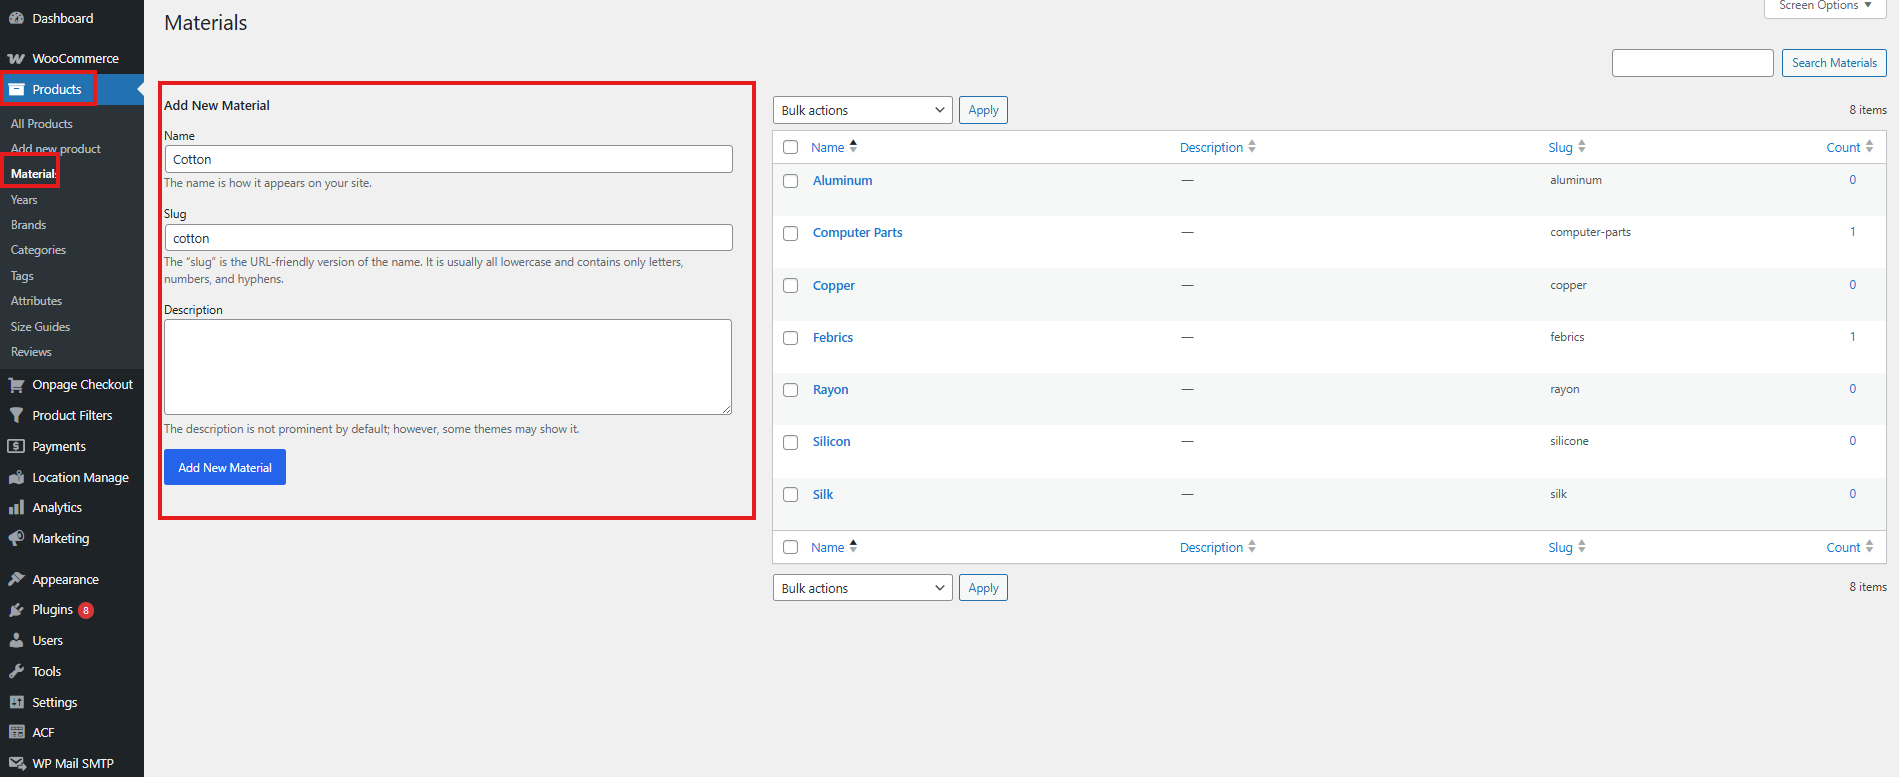
Step 2: Add Terms to the Custom Taxonomy
After creating the custom taxonomy, add terms to it.
Example terms for a Material taxonomy:
Cotton
Leather
Wool
Polyester
Denim
Steps:
- Go to Products.
- Open the custom taxonomy menu, such as Materials.
- Enter the term name.
- Click Add New.
- Repeat this for all terms you want to use.
Step 3: Assign Custom Taxonomy Terms to Products
After adding terms, assign them to products.
Steps:
- Go to Products → All Products.
- Edit a product.
- Find the custom taxonomy section, such as Materials.
- Select the correct term.
- Click Update or Publish.
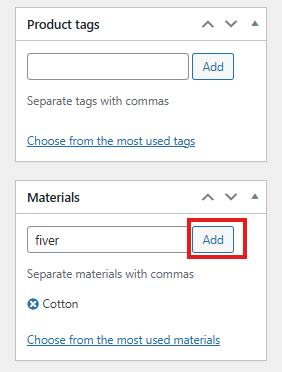
Example:
Product: Cotton T-Shirt
Material: Cotton
Now the product is connected to the custom taxonomy term and can appear in filtered results.
Step 4: Enable Custom Taxonomies in the Filter Form
To display custom taxonomies in the filter widget:
- Go to Product Filters → Form Manage.
- Find Show Custom Taxonomies.
- Enable the option.
- Click Save Changes.
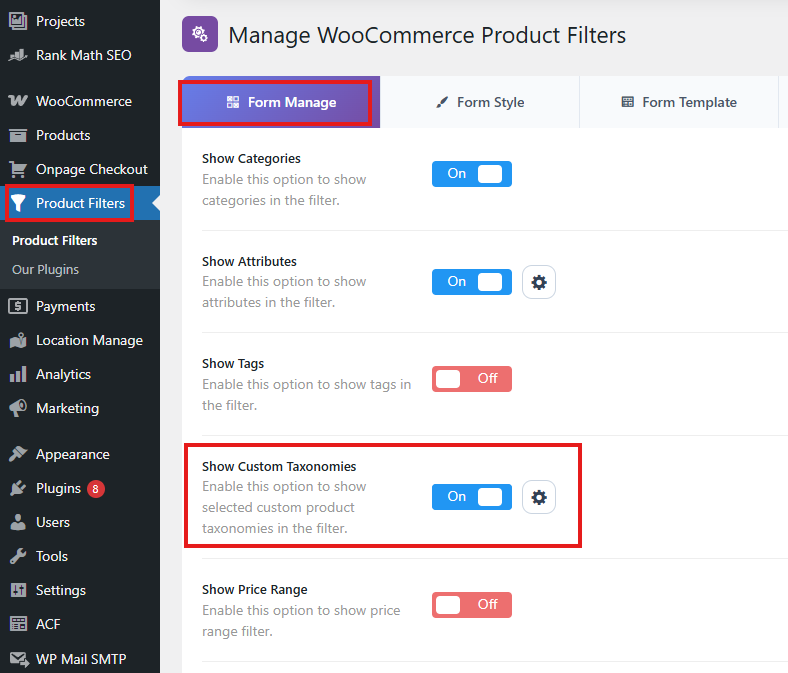
After enabling this option, selected custom taxonomies can appear in the filter widget.
Select Which Custom Taxonomies to Show
If your site has multiple custom taxonomies, open the settings icon next to Show Custom Taxonomies.
From there, select the custom product taxonomies you want to use in the filter.
Example:
Material
Collection
Region
Manufacturer
Only selected custom taxonomies should appear in the custom taxonomy filter settings and Form Style configuration.
This is useful when your site has internal taxonomies that should not be shown to customers.
Step 5: Style and Customize the Custom Taxonomy Filter
To customize the design of a custom taxonomy filter:
- Go to Product Filters → Form Style.
- From Configure Style for, select Custom Taxonomies.
- Select the specific custom taxonomy you want to style.
- Choose the filter style.
- Configure the available options.
- Click Save Changes.
For example, after selecting Custom Taxonomies, you may choose:
Material
Collection
Region
Manufacturer
Each selected custom taxonomy can be styled separately.
Available Display Styles
Depending on your settings, custom taxonomy filters may support styles such as:
Checkbox
Color
Image
Select
Use Checkbox for normal term lists.
Use Select for compact dropdown filtering.
Use Color when taxonomy terms represent colors or visual choices.
Use Image when terms should be represented with images or icons.
Custom Taxonomy Style Options
Depending on the selected style, you may be able to configure:
Widget title
Placeholder
Button text
Apply button text
Show in active filters
Show apply button
Show reset button
Apply behavior
Maximum height
Custom CSS class
Operator
Terms
Include/exclude terms
Terms search
Terms search text
Terms search position
Layout
Number of columns
Tooltip
Tooltip text
Widget Title
The widget title controls the heading shown above the custom taxonomy filter.
Example:
Material
Can be changed to:
Filter by Material
Or:
Choose Material
Placeholder
The placeholder is shown in select/dropdown-based layouts.
Example:
Select material
Other examples:
Choose collection
Select region
Choose manufacturer
Show in Active Filters
Enable Show in Active Filters if you want selected taxonomy terms to appear in the active filters area.
Example:
Material: Cotton
Collection: Summer
This helps customers understand which filters are currently applied.
Operator
The operator controls how multiple selected terms work.
Common behavior:
OR: Show products that match any selected term
AND: Show products that match all selected terms
Use OR for most stores.
Use AND only when products must match every selected taxonomy term.
Include or Exclude Terms
You can choose which taxonomy terms should appear in the filter.
Use this when you want to hide internal or less useful terms.
Example:
Show only: Cotton, Leather, Wool
Or:
Exclude: Internal, Archived, Hidden
Terms Search
For custom taxonomies with many terms, enable terms search.
This adds a search field inside the filter options so customers can quickly find the term they need.
Example placeholder:
Search materials
Recommended for long lists such as:
Manufacturers
Regions
Collections
Vehicle Models
Product Lines
Tooltip
Tooltips can explain the purpose of a custom taxonomy filter.
Example:
Choose a material to narrow your product results.
Another example:
Filter products by collection.
Custom Taxonomies and SEO-Friendly URLs
Custom taxonomy filters can work with URL-based filtering and SEO-friendly permalinks.
When SEO permalink settings are enabled, custom taxonomy filters can create readable URLs.
Example:
example.com/shop/filters/material/cotton/
Another example:
example.com/shop/filters/collection/summer/
To configure SEO/permalink settings, go to:
Product Filters → SEO
Use meaningful permalink prefixes for selected custom taxonomies.
Expected Result
After completing the setup:
- Customers will see the selected custom taxonomy filter in the filter widget.
- Customers can select taxonomy terms such as Cotton, Leather, or Summer Collection.
- The product list will update and show only matching WooCommerce products.
- Selected terms can appear in active filters if enabled.
- Filter URLs can use SEO-friendly taxonomy prefixes if URL-based filtering is configured.
Troubleshooting
Custom Taxonomy filter is not showing
Check that:
- Show Custom Taxonomies is enabled in Product Filters → Form Manage.
- The custom taxonomy is assigned to the Product post type.
- Terms are created for the taxonomy.
- Products are assigned to those terms.
- The filter shortcode, widget, or block is added to the page.
- The settings are saved.
- Cache has been cleared.
No custom taxonomies appear in Form Style
Open Product Filters → Form Manage.
Find Show Custom Taxonomies, open the settings icon, and select the custom taxonomies you want to use.
After saving, go back to Product Filters → Form Style and check the Custom Taxonomies dropdown again.
Wrong custom taxonomy is showing
Check the selected custom taxonomies from the Show Custom Taxonomies settings.
Only choose the custom taxonomies that should appear in frontend filters.
Custom taxonomy terms are missing
Check that:
- Terms exist under the custom taxonomy.
- Products are assigned to those terms.
- Products are published and visible.
- Terms are not excluded from the filter style settings.
- Cache has been cleared.
Filter returns no products
Make sure products are assigned to the selected taxonomy terms.
Also check whether other active filters are narrowing the result too much.
Custom taxonomy URL is not SEO-friendly
Make sure URL-based filtering is enabled.
Then configure the taxonomy permalink prefix from:
Product Filters → SEO
Best Practices
Use clear taxonomy names that customers understand.
Good examples:
Material
Collection
Region
Manufacturer
Product Line
Avoid showing internal taxonomies to customers.
Use terms search for long taxonomy lists.
Use checkbox style for simple term lists.
Use select style for compact layouts.
Use image or color style only when it improves the customer experience.
Keep term names consistent and easy to read.
Assign taxonomy terms to products before testing the filter.
Clear cache after changing taxonomy or filter settings.
Summary
Use Product Filters → Form Manage to enable Show Custom Taxonomies and select which custom taxonomies should appear in the filter.
Use Product Filters → Form Style to customize each selected custom taxonomy’s title, placeholder, layout, terms, operator, tooltip, search, and active filter display.
Use Product Filters → SEO to manage custom taxonomy permalink prefixes for URL-based and SEO-friendly filtering.
Custom taxonomy filtering is best for stores that need structured product grouping beyond default WooCommerce categories, tags, and attributes.