Popup Checkout lets customers complete WooCommerce checkout inside a popup without leaving the current page. This guide explains how to enable Popup Checkout and configure the main behavior settings.
Before you begin
Make sure:
- WooCommerce is installed and active.
- One Page Quick Checkout for WooCommerce is installed and active.
- Your WooCommerce checkout page works normally.
- Payment gateways are configured.
- Shipping methods are configured if you sell physical products.
- Your plugin license is active if Popup Checkout requires Pro access on your site.
To check your license, go to:
Onpage Checkout → Plugin License
Step 1: Open checkout method settings
From your WordPress dashboard, go to:
Onpage Checkout → Checkout Method
or open the plugin settings area where checkout methods are managed.
Depending on your plugin version, Popup Checkout settings may also appear under:
Onpage Checkout → Direct Checkout
Look for the checkout method option that controls what happens after a customer clicks a buy-now or checkout button.
Step 2: Select Popup Checkout as the checkout method
Find the Checkout Method option and choose:
Popup Checkout
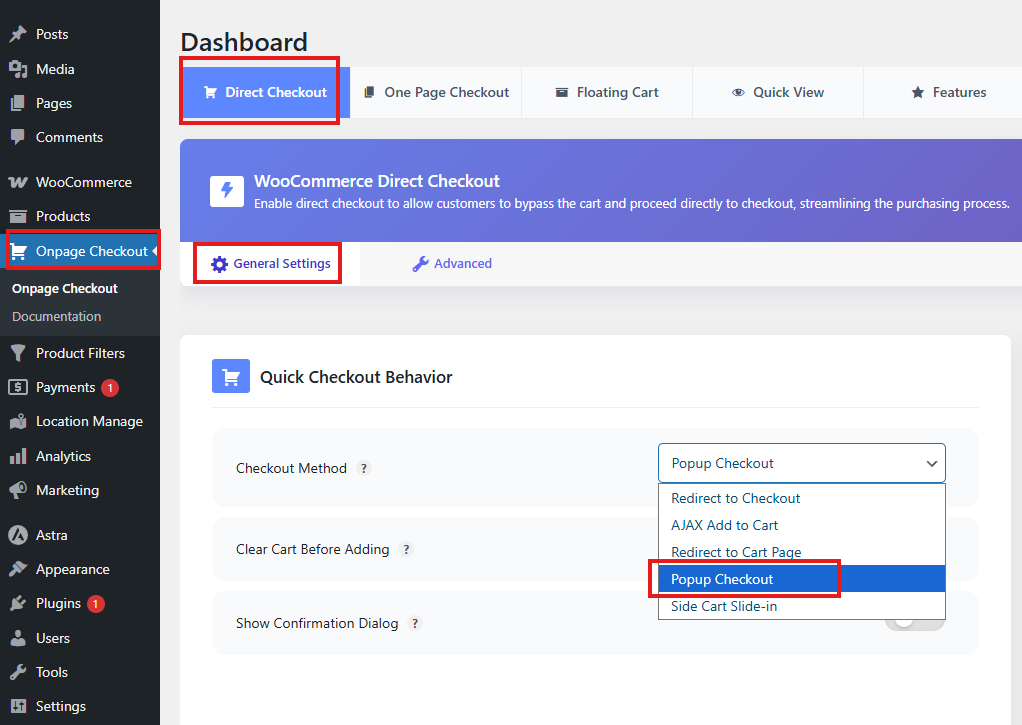
Save your settings.
After this is enabled, clicking the plugin’s checkout/buy-now button should open the WooCommerce checkout form inside a popup instead of redirecting directly to the checkout page.
Step 3: Configure button text
Set the button text customers will click to open Popup Checkout.
Good button text examples:
Buy Now
Checkout Now
Quick Checkout
Complete Purchase
Order Now
Recommended default:
Buy Now
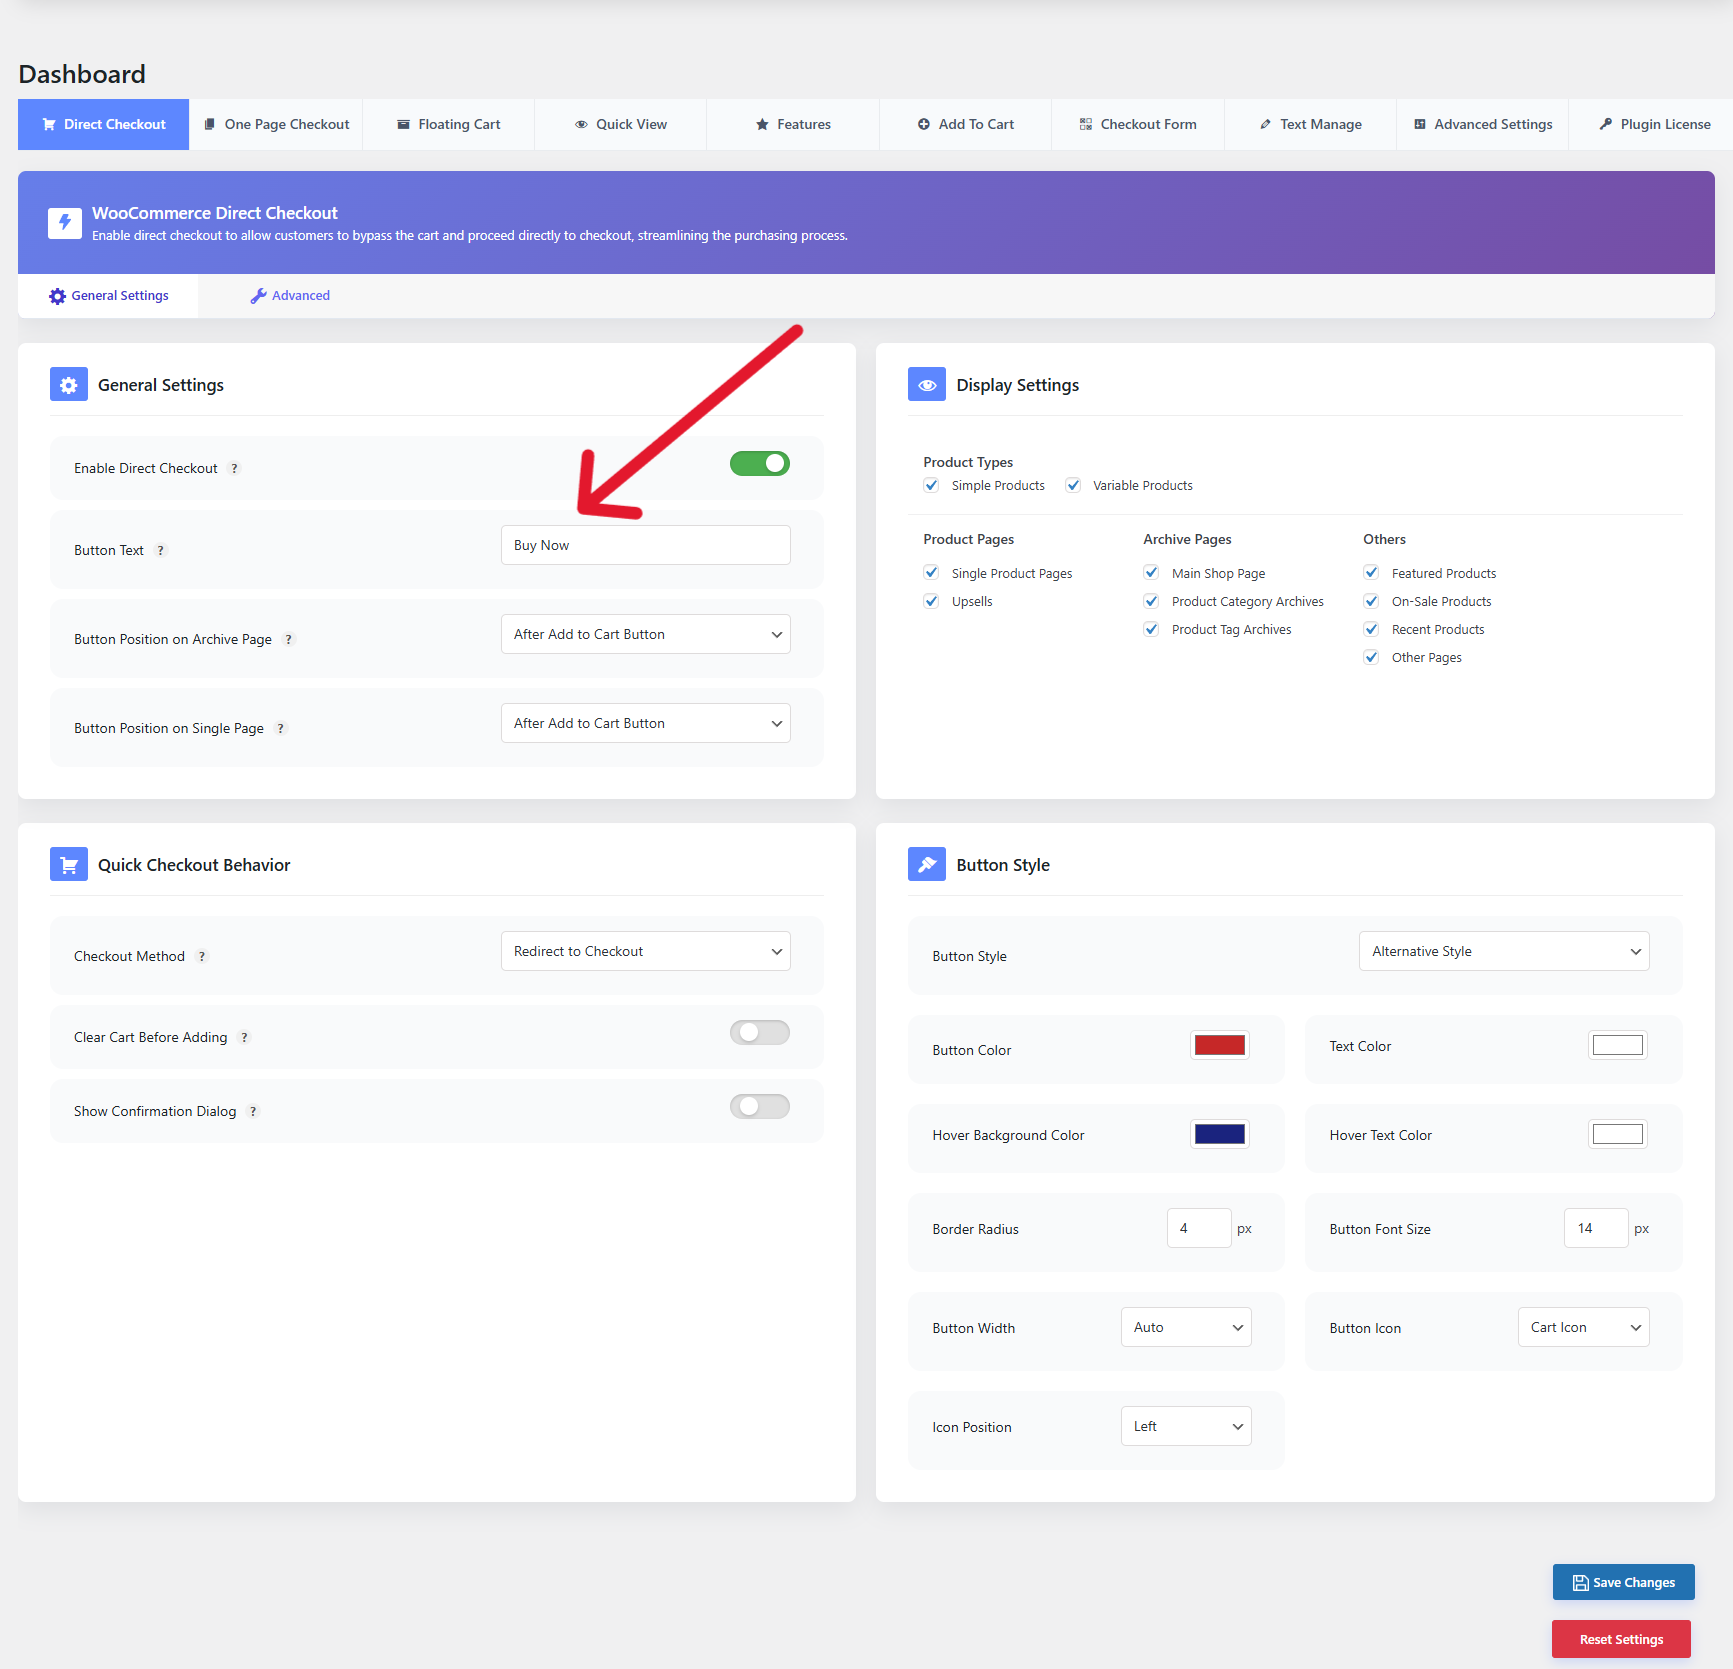
Use short, clear text so customers understand that the button starts checkout.
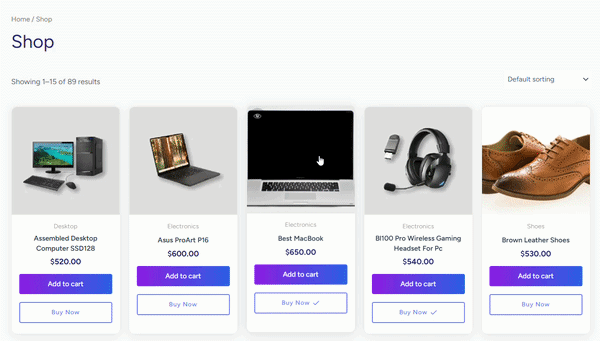
Step 4: Configure button position
Choose where the Popup Checkout button should appear.
Button positions on archive pages:
- Overlay on Product Image
- Overlay on Product Image Hover
- After Product
- After Product Title
- Before Product Title
- After Product Excerpt
- After Product Rating
- After Product Price
- After Add to Cart Button
- Before Add to Cart Button
- Bottom of Add to Cart Button
- Replace Add to Cart Button
Button Position on Single Page:
- After Add to Cart Button
- Before Add to Cart Button
- Bottom of Add to Cart Button
- Replace Add to Cart Button

Recommended position
For most stores, place the button near the regular Add to Cart button.
This makes the popup checkout option easy to find without confusing customers.
Best practice
If both Add to Cart and Popup Checkout buttons are visible, use different button text.
Example:
Add to Cart
Buy Now
This helps customers understand the difference between the normal cart flow and quick checkout.
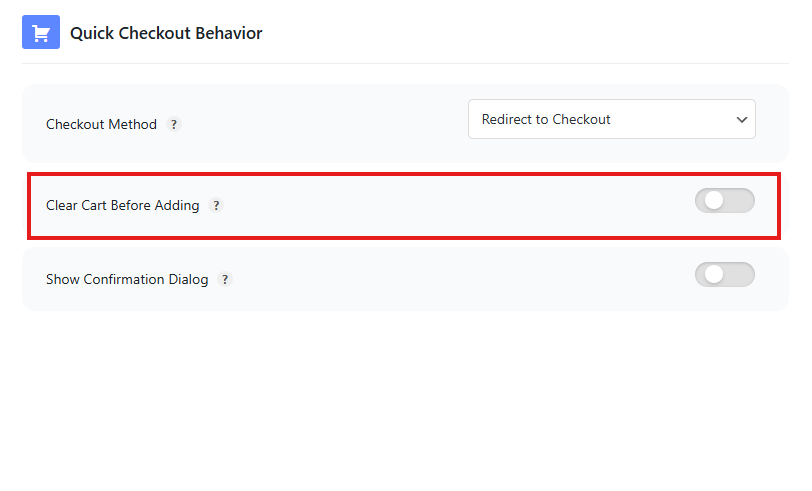
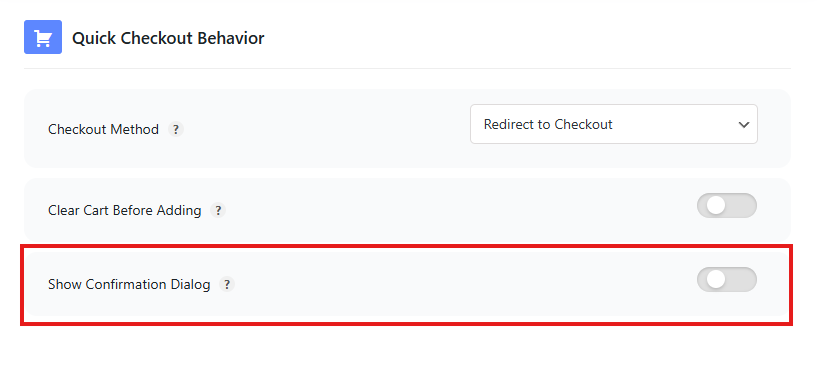
Step 5: Configure clear cart behavior
The Clear Cart Before Adding option controls whether the customer’s existing cart is emptied before Popup Checkout opens.
Clear cart disabled
When disabled, the customer’s existing cart items remain in the cart.
Use this for general WooCommerce stores where customers may add multiple products before checkout.
Recommended for most stores:
Clear Cart: Disabled
Clear cart enabled
When enabled, the plugin clears the existing cart before adding the selected product.
Use this for focused buy-now flows where checkout should include only the selected product.
Best for:
- Single-product landing pages
- Paid ad campaigns
- One-product stores
- Limited-time offers
- Product-specific checkout flows
Recommended for focused campaigns:
Clear Cart: Enabled
Important warning
If Clear Cart is enabled, customers may lose products they previously added to the cart when they start Popup Checkout.
Only enable it when that behavior is intentional.
Step 6: Configure one-click purchase
The One-click Purchase option controls whether the selected product is added and checkout opens immediately with fewer customer actions.
Use this when you want a faster buy-now experience.
When to enable one-click purchase
Enable this option when:
- You sell simple products.
- You want the fastest possible checkout flow.
- The button clearly means “Buy Now.”
- Customers do not need to configure many product options.
When to disable one-click purchase
Disable or test carefully when:
- Products are variable.
- Products require custom options.
- Products require add-ons.
- Customers usually buy multiple products.
- You want customers to review the cart before checkout.
Recommended beginner setting:
One-click Purchase: Disabled until tested
After testing your products and checkout flow, enable it if it works well for your store.
Step 7: Configure confirmation before checkout
The Confirmation option can show a confirmation step before opening checkout or before replacing the customer’s cart.
This is useful when Clear Cart is enabled or when the checkout action changes the customer’s current cart.
When to enable confirmation
Enable confirmation when:
- Clear Cart is enabled.
- Customers may already have cart items.
- You want to avoid accidental cart replacement.
- The checkout button appears on shop/archive pages.
When confirmation may not be needed
You may not need confirmation when:
- Your store sells one product.
- The button is clearly labeled “Buy Now.”
- Clear Cart is disabled.
- The popup simply opens checkout for the current cart.
Recommended setting for general stores:
Confirmation: Enabled if Clear Cart is enabled
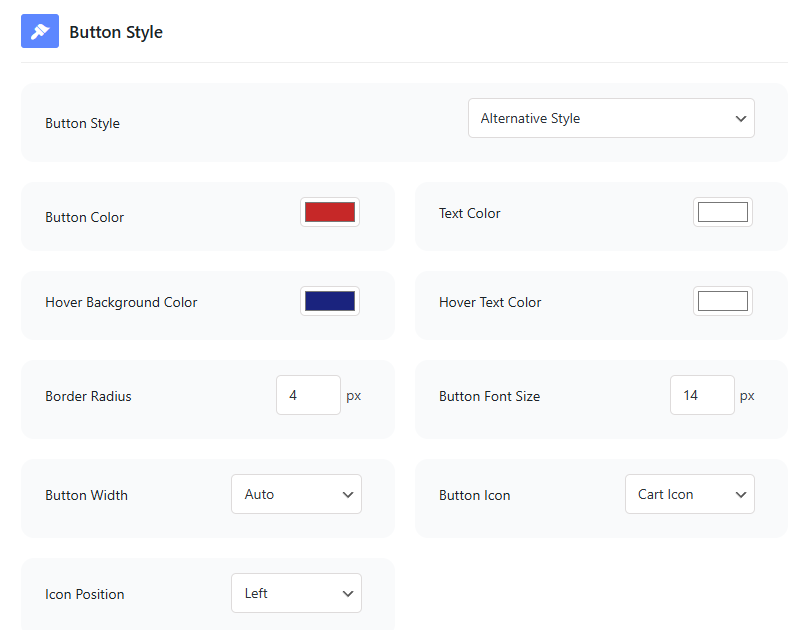
Step 8: Configure button styling
Popup Checkout may use the same button styling controls as Direct Checkout or Add to Cart button settings.
Depending on your plugin settings, you may be able to customize:
- Button background color
- Button text color
- Hover background color
- Hover text color
- Border radius
- Font size
- Button width
- Icon
- Icon position
- Custom CSS
Recommended button style
Use a button style that stands out but still matches your store design.
Example:
| Setting | Suggested value |
|---|---|
| Button text | Buy Now |
| Width | Auto or full width on mobile |
| Border radius | Match theme buttons |
| Icon | Optional |
| Icon position | Left or right |
Step 9: Save settings
After configuring Popup Checkout, save your plugin settings.
Then clear any site cache if you use a cache plugin or CDN.
Step 10: Test Popup Checkout
Testing is important before using Popup Checkout on a live store.
Test with a simple product
- Visit a simple product page.
- Click the Popup Checkout / Buy Now button.
- Confirm the popup opens.
- Confirm the product is in the checkout/order summary.
- Enter customer details.
- Select payment method.
- Place a test order.
Test with a variable product
- Visit a variable product page.
- Select required options, such as size or color.
- Click the Popup Checkout button.
- Confirm the selected variation appears in checkout.
- Confirm price and stock are correct.
- Place a test order.
Test as a guest customer
Open the page in a private/incognito browser and test as a logged-out visitor.
This helps catch guest-only issues related to cache, sessions, AJAX, or checkout permissions.
Recommended beginner setup
For most WooCommerce stores, start with this setup:
| Setting | Recommended value |
|---|---|
| Checkout Method | Popup Checkout |
| Button Text | Buy Now |
| Button Position | Near Add to Cart |
| Clear Cart | Disabled |
| One-click Purchase | Disabled until tested |
| Confirmation | Enabled if Clear Cart is enabled |
| Button Styling | Match theme buttons |
| Cache Exclusion | Enabled for cart/checkout/product pages |
Recommended setup for single-product campaigns
For paid ads, landing pages, or one-product funnels:
| Setting | Recommended value |
|---|---|
| Checkout Method | Popup Checkout |
| Button Text | Buy Now |
| Button Position | Near product price or Add to Cart |
| Clear Cart | Enabled |
| One-click Purchase | Enabled after testing |
| Confirmation | Optional |
| Button Styling | Strong call-to-action |
| Cache Exclusion | Required |
Recommended setup for general stores
For normal WooCommerce stores where customers may buy multiple products:
| Setting | Recommended value |
|---|---|
| Checkout Method | Popup Checkout |
| Button Text | Quick Checkout |
| Button Position | After Add to Cart |
| Clear Cart | Disabled |
| One-click Purchase | Disabled |
| Confirmation | Optional |
| Side Cart | Optional before checkout |
| Cache Exclusion | Required |
Important notes
Popup Checkout depends on WooCommerce checkout
If your normal WooCommerce checkout page has errors, Popup Checkout may also have errors.
Before troubleshooting Popup Checkout, test the standard WooCommerce checkout page.
Product pages with Popup Checkout should not be aggressively cached
Popup Checkout uses WooCommerce cart/session data. Exclude product, cart, and checkout pages from cache if needed.
Test payment methods carefully
Some gateways use iframes, redirects, or external payment pages. Test every active payment method inside Popup Checkout.