Cart Recovery helps your store track abandoned carts and send recovery emails to customers who leave without completing checkout. This guide explains how to enable Cart Recovery and configure the main recovery settings.
Before you begin
Make sure:
- WooCommerce is installed and active.
- Your store has a working cart and checkout page.
- Your email sending system is working correctly.
- Your plugin license is active if you want to use Pro recovery email automation features.
- WordPress cron is working, because recovery email processing depends on scheduled background tasks.
Step 1: Open Cart Recovery settings
From your WordPress dashboard, go to:
Onpage Checkout → Cart Recovery
Then open the Settings tab.
This is where you can enable Cart Recovery, control when a cart becomes abandoned, decide how long cart data is stored, and choose which carts should be excluded from tracking.
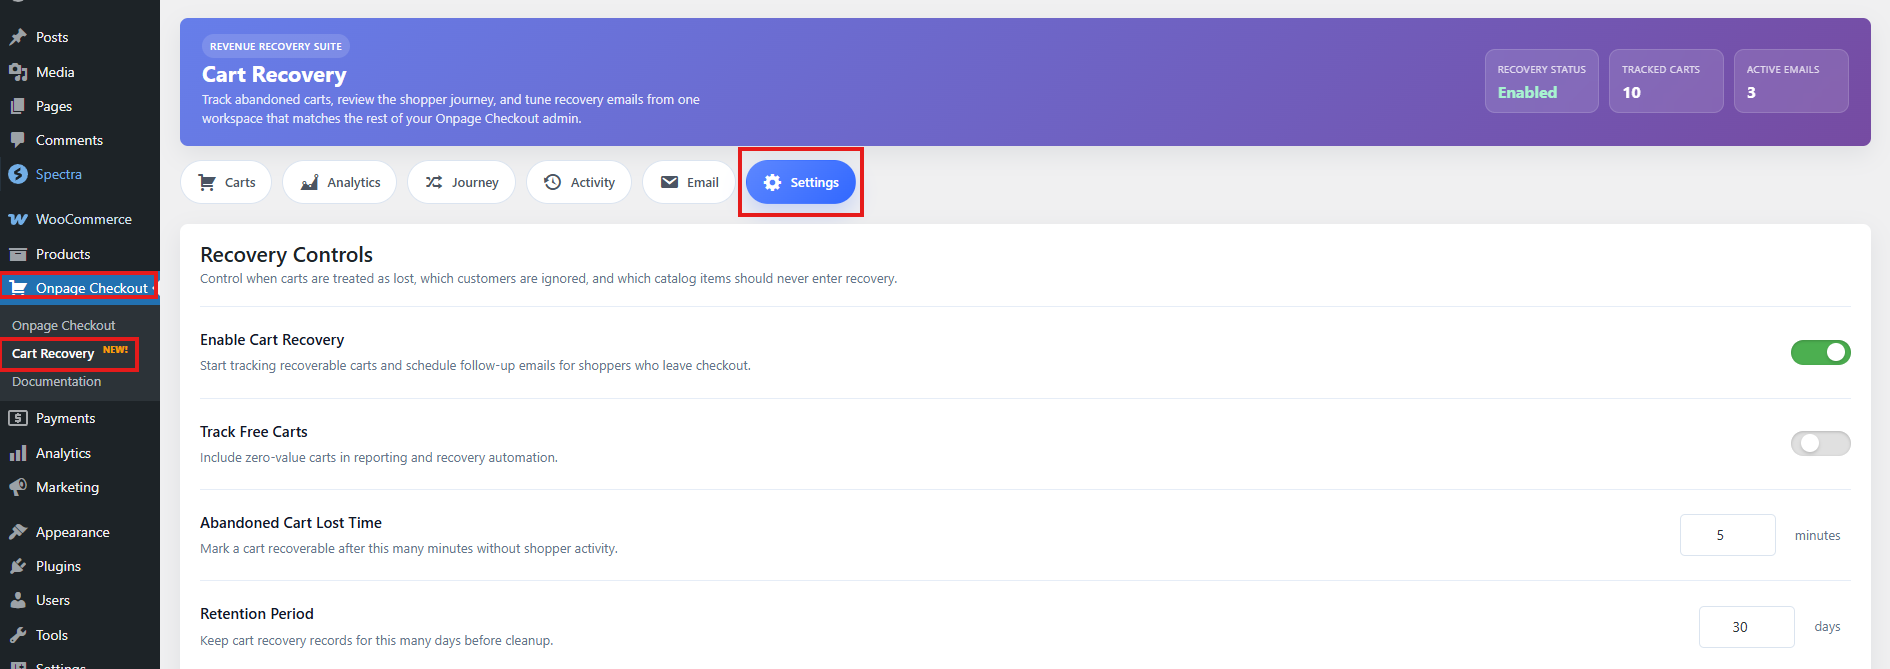
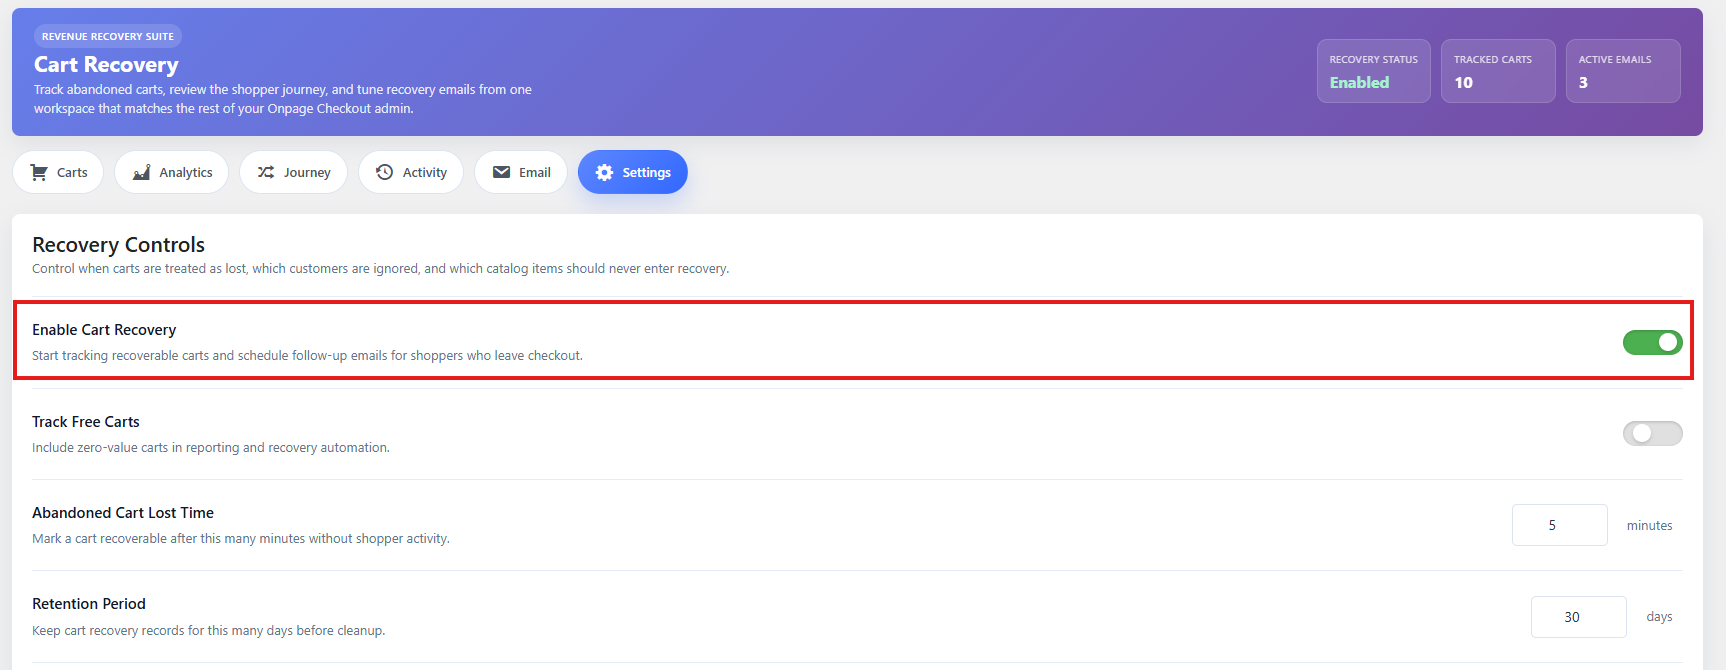
Step 2: Enable Cart Recovery
Find the Enable Cart Recovery option and turn it on.
When enabled, the plugin can start tracking eligible WooCommerce carts. A cart is usually eligible when:
- The cart contains at least one product.
- The cart is not empty.
- The cart has identifiable customer information, such as an email address, phone number, logged-in customer ID, or checkout details.
- The cart is not excluded by product, category, role, or other settings.
If Cart Recovery is disabled, carts will not be processed for abandonment or recovery emails.
Step 3: Set the inactivity timeout
The Inactivity Timeout controls how long a cart must remain inactive before it is marked as abandoned.
Example:
Inactivity Timeout: 30 minutes
This means if a customer adds products to the cart and then leaves without activity for 30 minutes, the cart can become abandoned.
Recommended value
For most stores, start with:
30–60 minutes
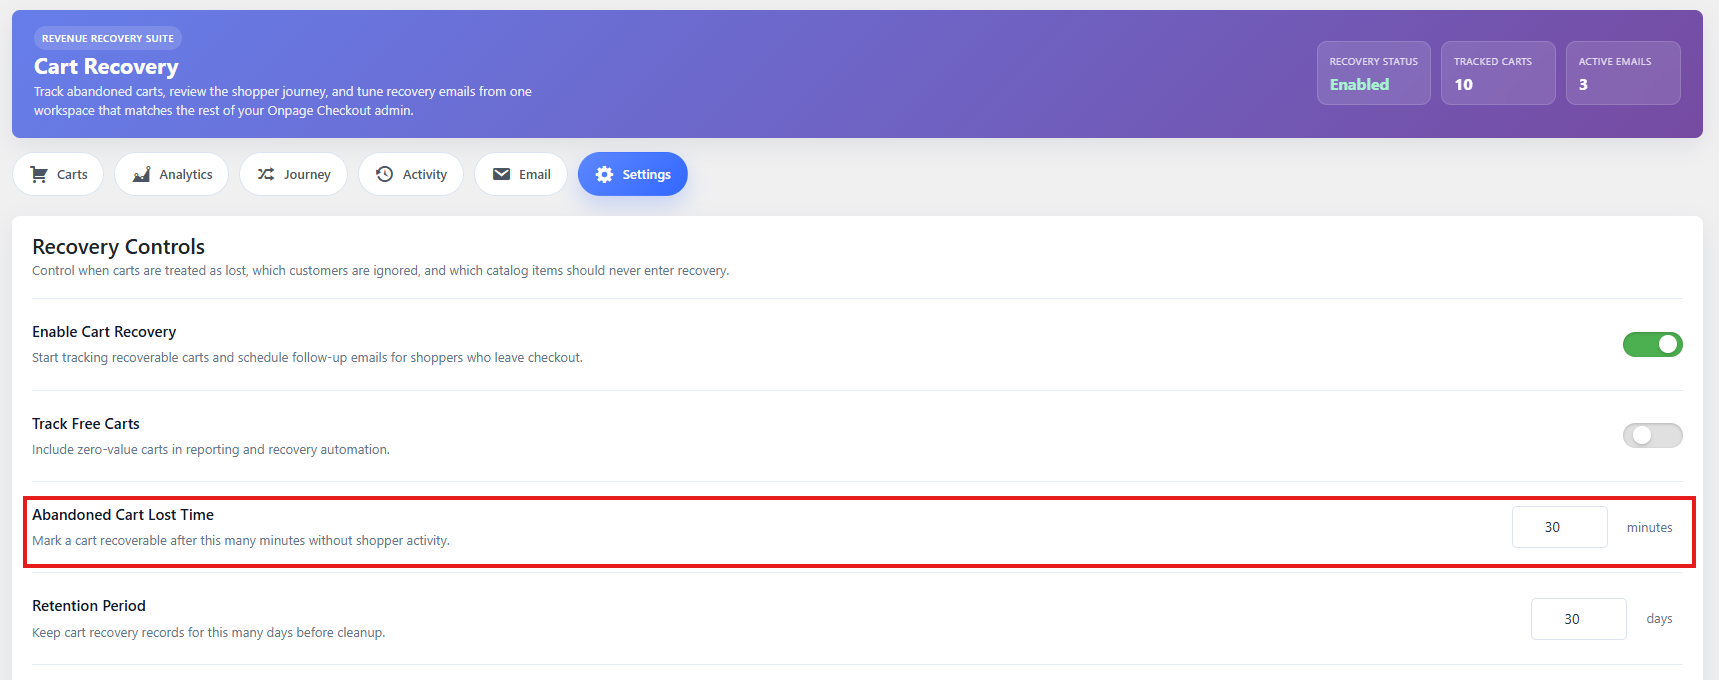
Use a shorter timeout if customers usually buy quickly. Use a longer timeout if your products require more comparison, customization, or decision time.
Suggested settings by store type
| Store type | Recommended inactivity timeout |
|---|---|
| Fast-moving low-cost products | 20–30 minutes |
| General WooCommerce store | 30–60 minutes |
| Expensive or complex products | 1–3 hours |
| B2B or quote-like shopping behavior | 3–12 hours |
Step 4: Set retention days
The Retention Days setting controls how long Cart Recovery keeps tracked cart data.
Example:
Retention Days: 30
This means older cart recovery records can be cleaned up or anonymized after 30 days, depending on how the plugin handles expired recovery data.
Recommended value
For most stores:
30–90 days
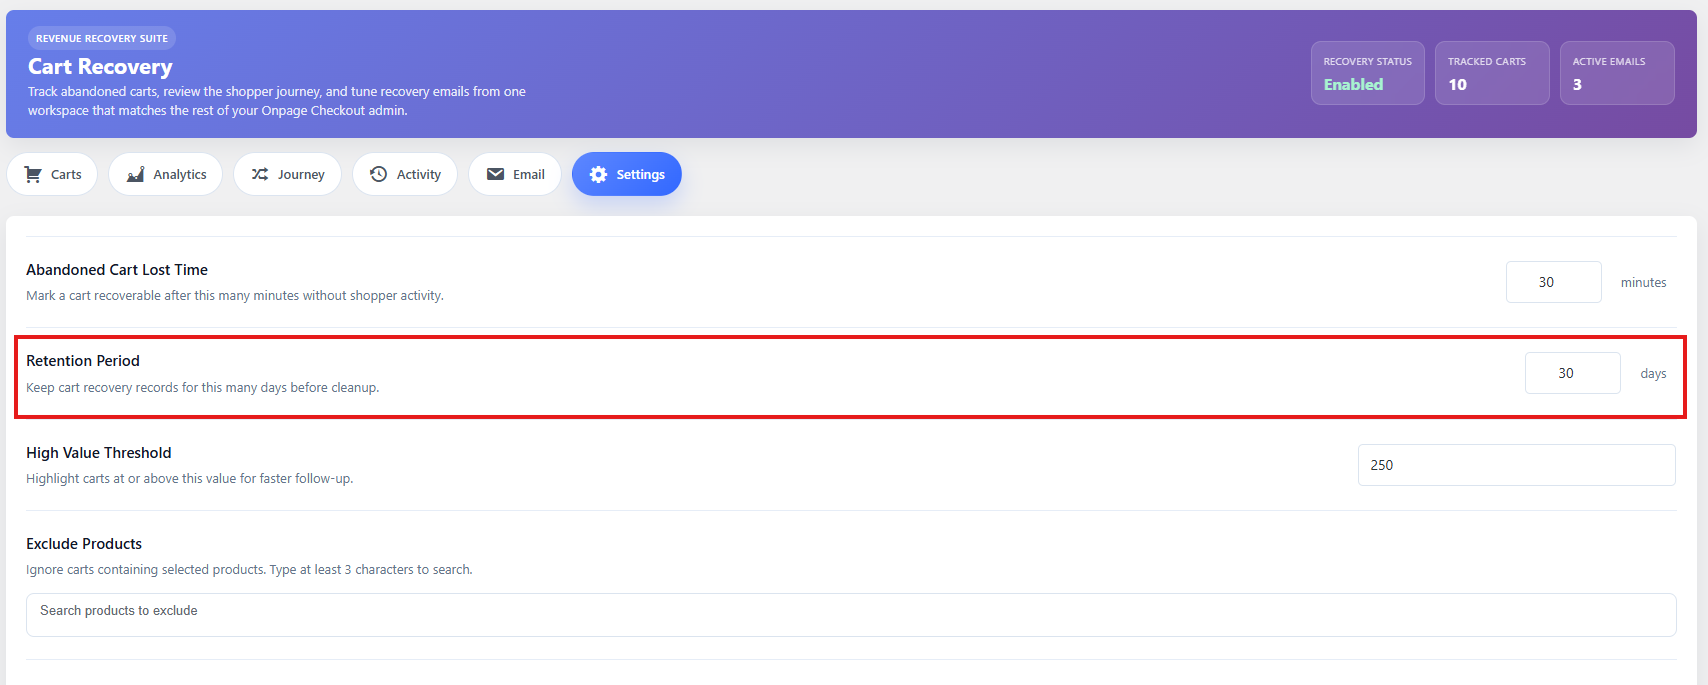
A shorter retention period is better for privacy. A longer retention period gives you more historical recovery data for analytics.
Suggested settings
| Goal | Recommended retention |
|---|---|
| Privacy-focused setup | 14–30 days |
| Standard recovery tracking | 30–60 days |
| Longer analytics history | 90 days |
You should also mention abandoned cart tracking in your store’s privacy policy, because recovery tracking may store customer and cart information.
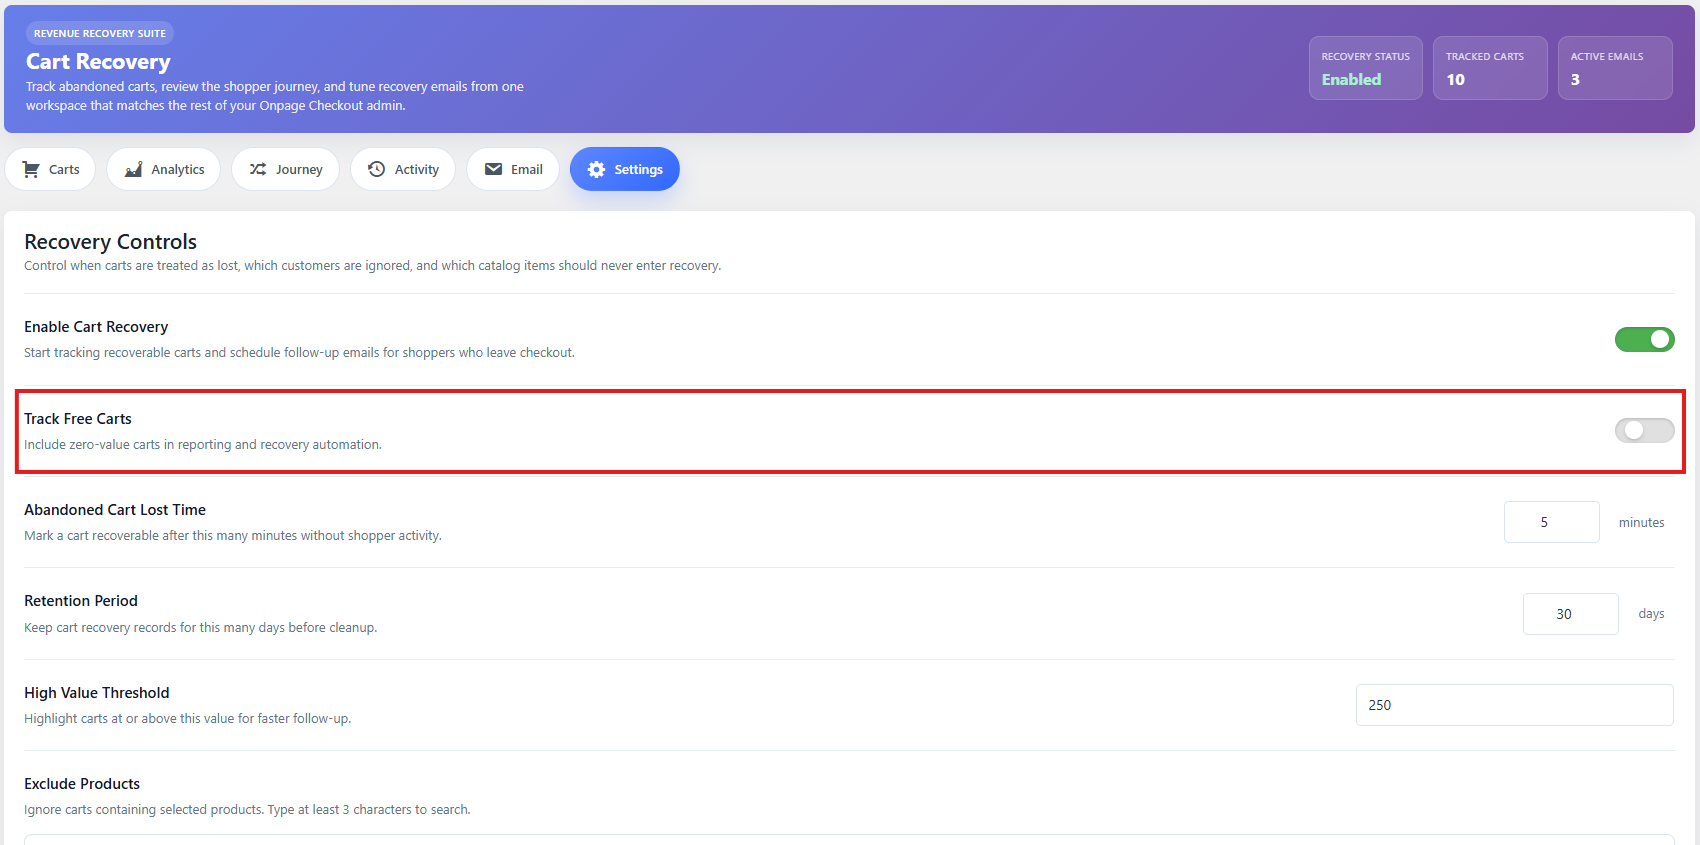
Step 5: Configure free cart tracking
Some stores may have free products, free samples, or 100% discounted carts. The Track Free Carts option controls whether carts with a total value of zero should be tracked.
Enable this option if you want to track:
- Free samples
- Free downloads
- 100% coupon carts
- Free trial products
- Lead-generation products
Disable it if you only want to recover carts with a real order value.
Recommended value
For most stores:
Disabled
Enable it only if free products are important to your sales or lead-generation funnel.
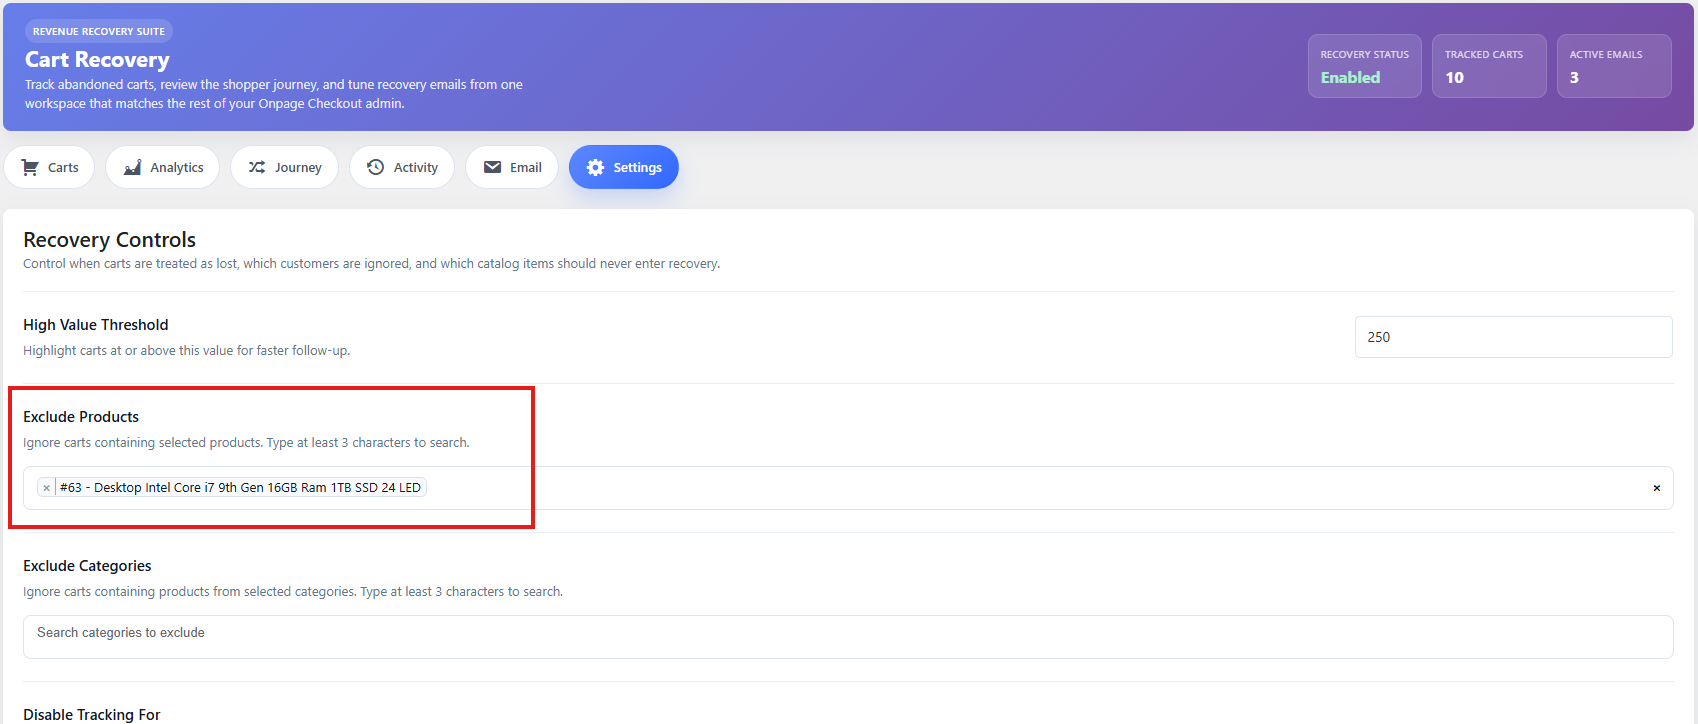
Step 6: Exclude products from Cart Recovery
Use Excluded Products when you do not want specific products to be tracked for abandoned cart recovery.
This is useful for products such as:
- Free test products
- Internal products
- Hidden products
- Products used for demos
- Products that should not trigger recovery emails
- Products with special checkout rules
Example
If you exclude “Free Sample Pack,” then carts containing that product can be skipped from recovery tracking or email processing, depending on your plugin settings.
Recommended setup
Only exclude products that should never trigger recovery follow-up. Do not exclude normal paid products unless there is a clear reason.
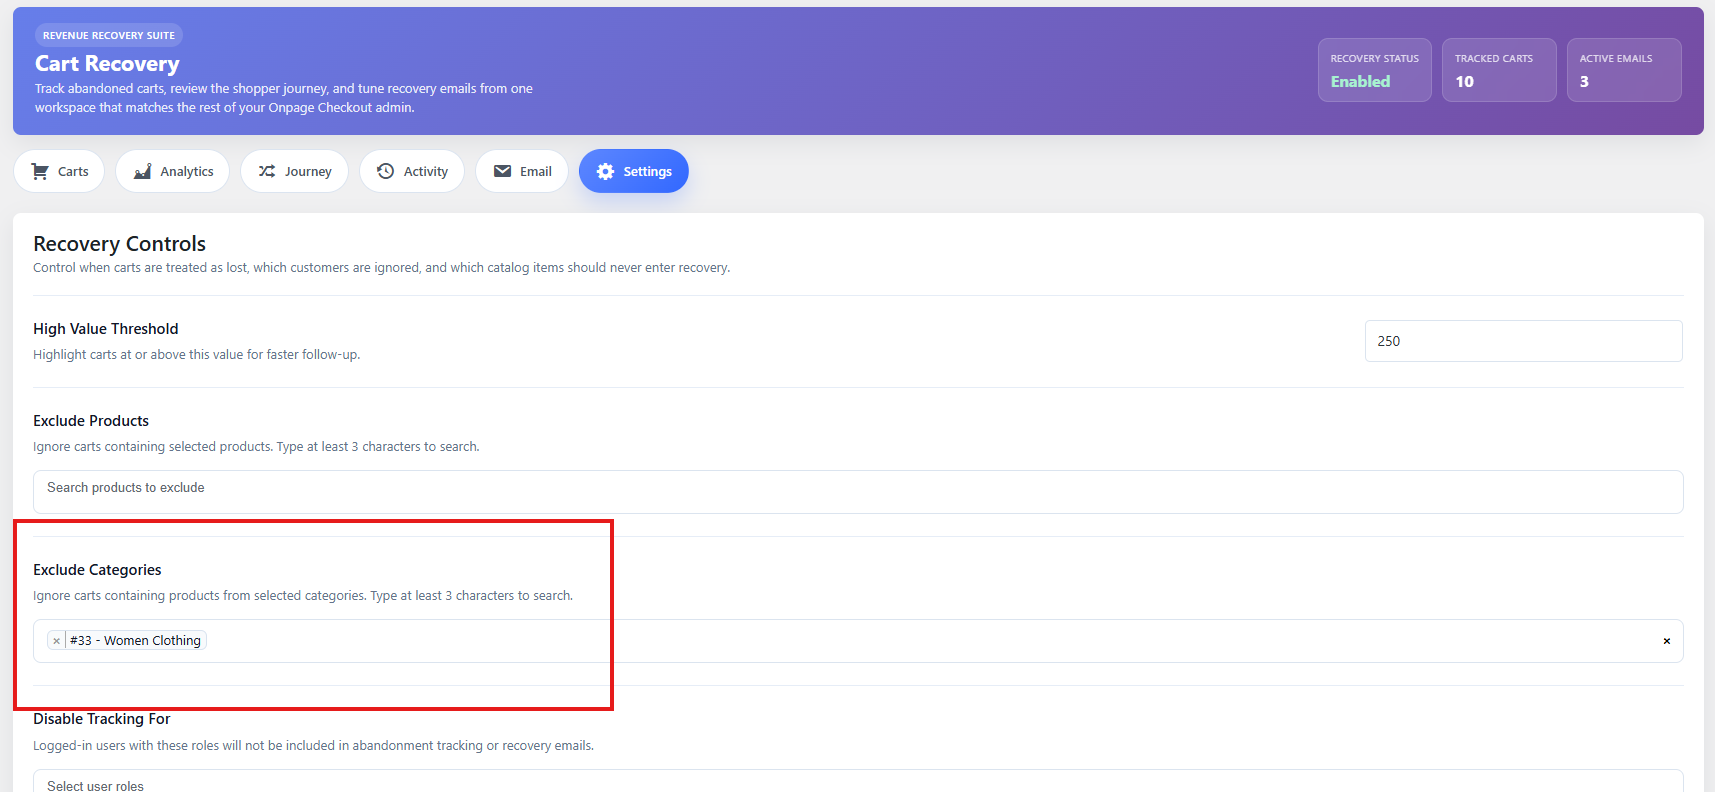
Step 7: Exclude categories from Cart Recovery
Use Excluded Categories when you want to skip recovery tracking for an entire product category.
This is helpful when a full category should not trigger abandoned cart emails.
Common examples:
- Free products
- Wholesale-only products
- Gift cards
- Internal products
- Event tickets
- Products with special compliance rules
Recommended setup
Use category exclusions carefully. If you exclude a category, all products inside that category may be skipped from recovery workflows.
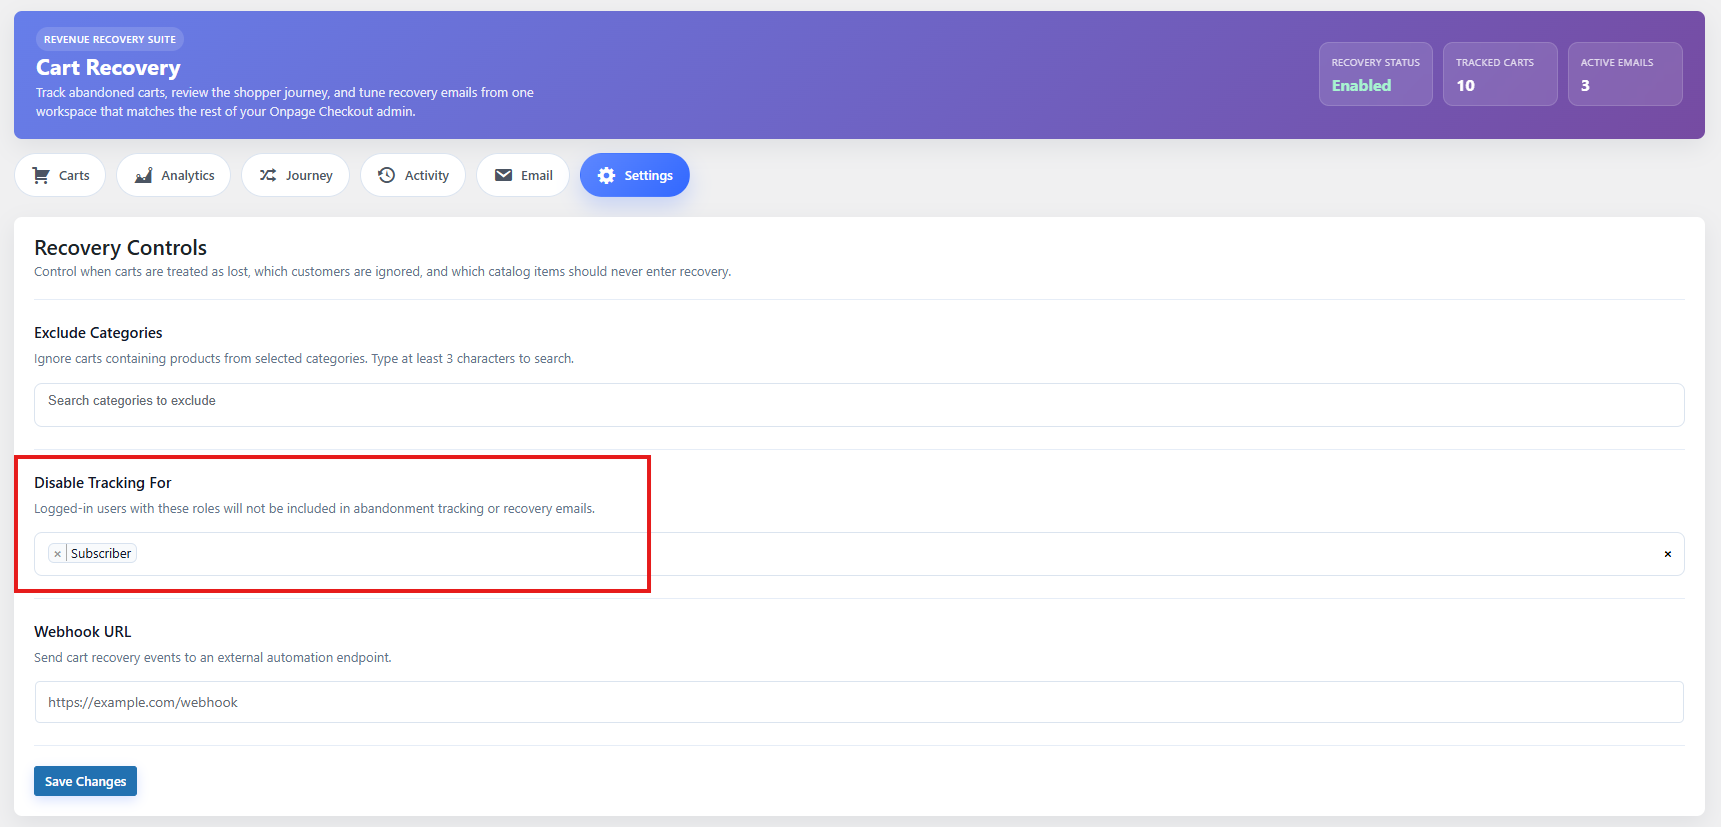
Step 8: Exclude user roles
Use Disable Tracking For to prevent Cart Recovery from tracking carts for certain types of users.
Common roles to exclude:
- Administrator
- Shop manager
- Wholesale customer
- Test customer
- Staff accounts
Recommended setup
At minimum, exclude internal team roles:
Administrator
Shop Manager
This prevents test carts and staff activity from appearing in your recovery reports.
Step 9: Configure the sending window
It controls when recovery emails are allowed to send. To enable it, go to Email > Settings then give the Quiet Hours Start and Quiet Hours End.
Also enable the Quiet Hours.
For example, you may only want recovery emails to send during business hours or during times when customers are more likely to open emails.
Example
Sending Window: 9:00 AM – 8:00 PM
If a recovery email becomes eligible outside this window, it should wait until the allowed sending period.
Recommended value
For most stores:
8:00 AM – 9:00 PM
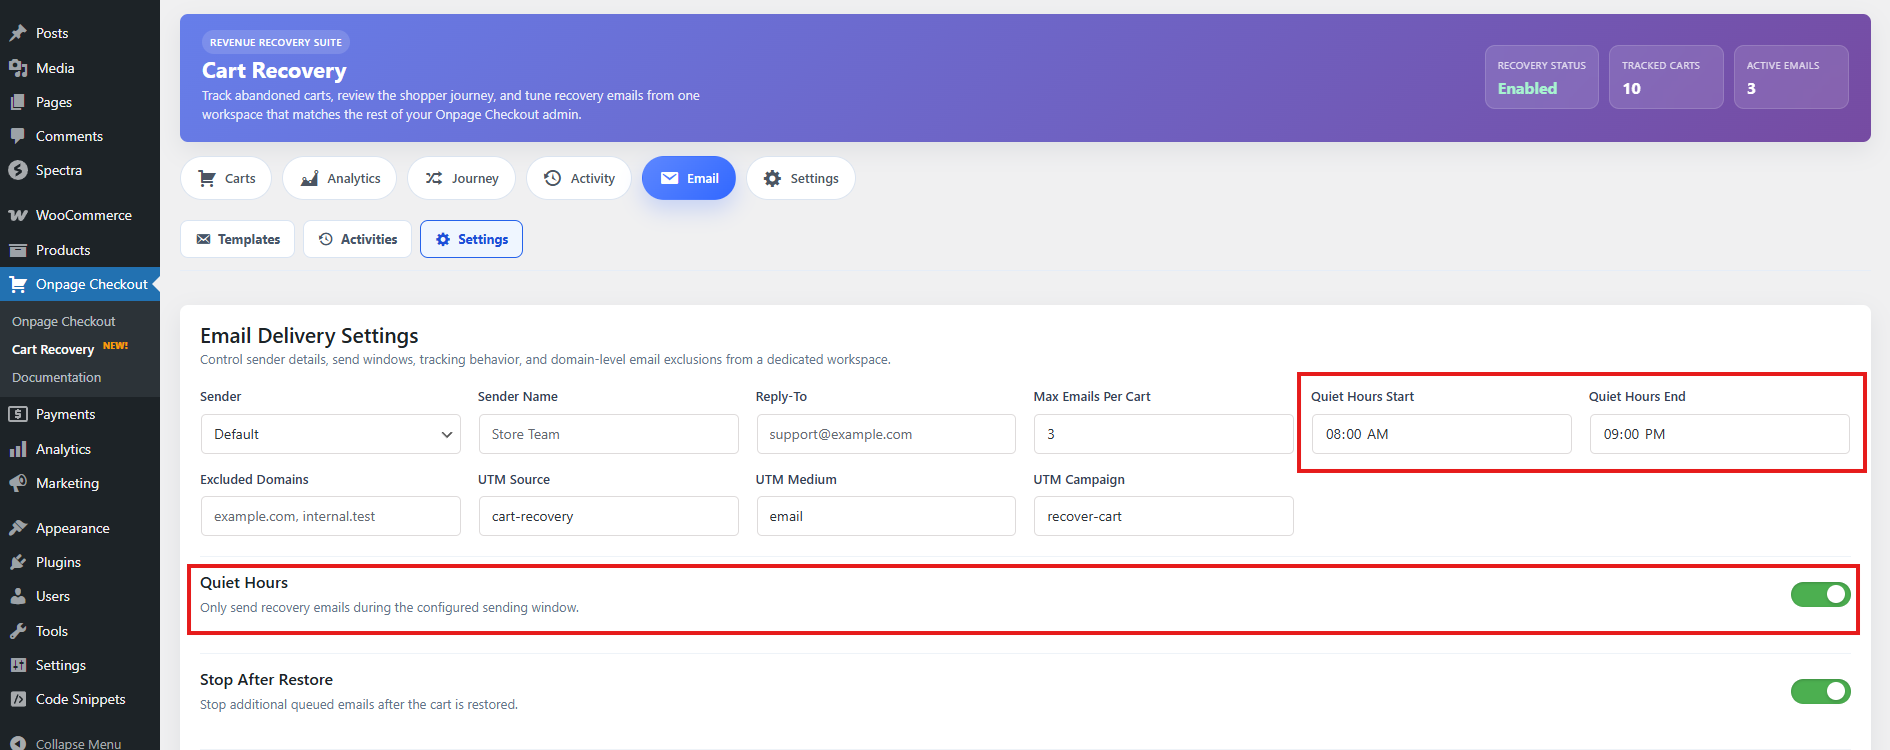
Use your store’s main customer timezone when choosing this setting.
Step 10: Set max emails per cart
The Max Emails Per Cart setting controls how many recovery emails can be sent for one abandoned cart.
Example:
Max Emails Per Cart: 3
This means the plugin can send up to three recovery emails for the same cart, depending on your enabled email templates and schedule.
Recommended value
For most stores:
2–3 emails per cart

Avoid sending too many emails. A short, helpful recovery sequence usually performs better and feels less aggressive.
Recommended recovery sequence
| Timing | Purpose | |
|---|---|---|
| Email 1 | 1 hour after abandonment | Friendly reminder |
| Email 2 | 24 hours after abandonment | Product/value reminder |
| Email 3 | 48–72 hours after abandonment | Final reminder or discount |
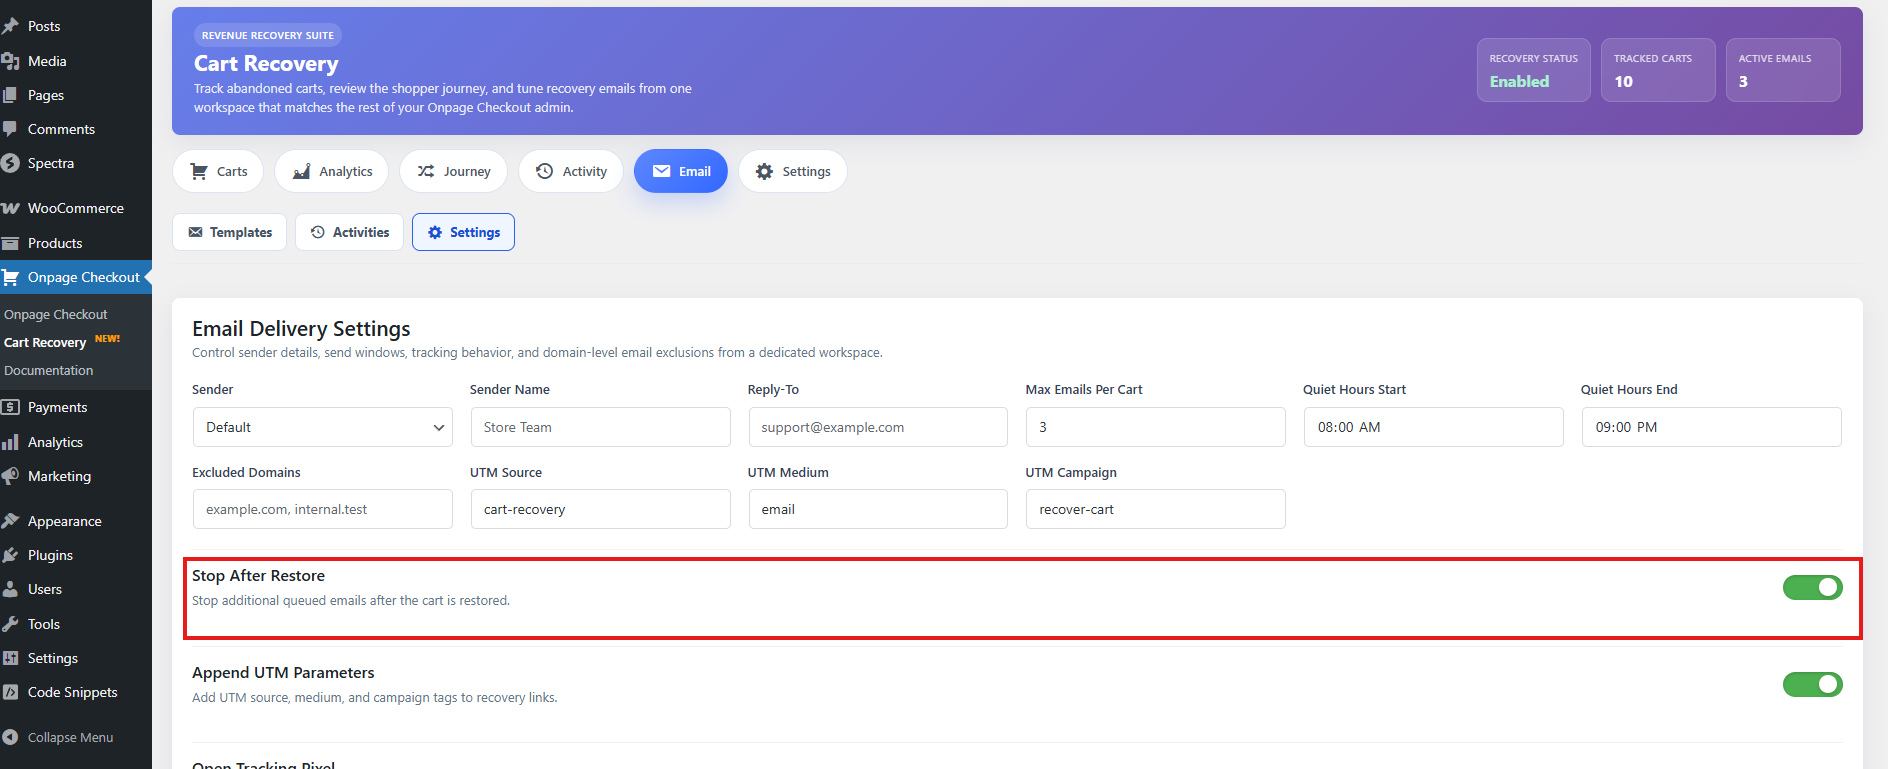
Step 11: Stop emails after cart restore
The Stop After Restore option prevents additional recovery emails from sending after a customer restores their cart.
A cart may be restored when the customer clicks a recovery link and returns to the store.
Recommended value
For most stores:
Enabled
This prevents customers from receiving more abandoned cart emails after they have already returned to continue checkout.
Recommended Cart Recovery settings
For most WooCommerce stores, start with this setup:
| Setting | Recommended value |
|---|---|
| Enable Cart Recovery | Enabled |
| Inactivity Timeout | 30–60 minutes |
| Retention Days | 30–60 days |
| Track Free Carts | Disabled |
| Excluded Products | Only internal/test products |
| Excluded Categories | Only categories that should never trigger recovery |
| Excluded User Roles | Administrator, Shop Manager |
| Sending Window | 8:00 AM – 9:00 PM |
| Max Emails Per Cart | 2–3 |
| Stop Emails After Restore | Enabled |
Best practice setup
A good beginner setup is:
Inactivity Timeout: 45 minutes
Retention Days: 30 days
Max Emails Per Cart: 3
Stop After Restore: Enabled
Excluded Roles: Administrator, Shop Manager
Then create three email templates:
Email 1: Send after 1 hour
Email 2: Send after 24 hours
Email 3: Send after 48–72 hours
This gives customers a helpful reminder without overwhelming them.
Important notes
Cart Recovery depends on customer identity. If the customer never enters an email address, is not logged in, and does not provide checkout details, the cart may not be recoverable by email.
Recovery emails also depend on WordPress cron. If emails are not sending, check whether scheduled tasks are running correctly on your site.
For best deliverability, use a reliable SMTP plugin or transactional email service instead of default WordPress email sending.