
Single Product One Page Checkout lets customers complete their purchase directly from a WooCommerce single product page. Instead of visiting the product page, cart page, and checkout page separately, customers can view the product and complete checkout from one page.
This feature is useful when you want to reduce checkout steps and create a faster buying experience for individual products.
What this feature does
When Single Product One Page Checkout is enabled, the plugin can display the WooCommerce checkout form directly on selected product pages or all product pages.
A typical customer flow looks like this:
Customer opens a product page
↓
Customer reviews the product
↓
Customer selects options, if required
↓
Checkout form appears on the same page
↓
Customer enters billing/shipping/payment details
↓
Customer places the order
This helps reduce friction because customers do not need to manually visit the cart page before checkout.
When to use Single Product One Page Checkout
Use this feature when you want customers to buy a product quickly from its product page.
It is especially useful for:
- Single-product stores
- Digital products
- Courses
- Event tickets
- Consultation products
- Membership products
- Limited-time offers
- Product landing pages
- Paid ad campaign products
- Products where customers usually buy only one item
When not to use it
Single Product One Page Checkout may not be ideal for every store.
Avoid using it for all products if:
- Customers usually browse and add multiple items before checkout.
- Your product pages are already very long.
- You use complex product configurators.
- Your checkout form has many required fields.
- Your store depends heavily on cart-page upsells.
- You do not want checkout forms appearing on every product page.
For general shopping stores, enable it only for selected products first.
Requirements
Before using this feature, make sure:
- WooCommerce is installed and active.
- One Page Quick Checkout for WooCommerce is installed and active.
- Your WooCommerce checkout page is configured correctly.
- The product you want to use is published.
- The product is purchasable.
- The product is in stock, unless backorders are allowed.
- Payment and shipping methods are configured.
- Your plugin license is active if this feature requires Pro access on your site.
If you need to activate your license, go to:
Onpage Checkout → Plugin License
Step 1: Enable One Page Checkout
First, enable the main One Page Checkout feature.
From your WordPress dashboard, go to:
Onpage Checkout → One Page Checkout
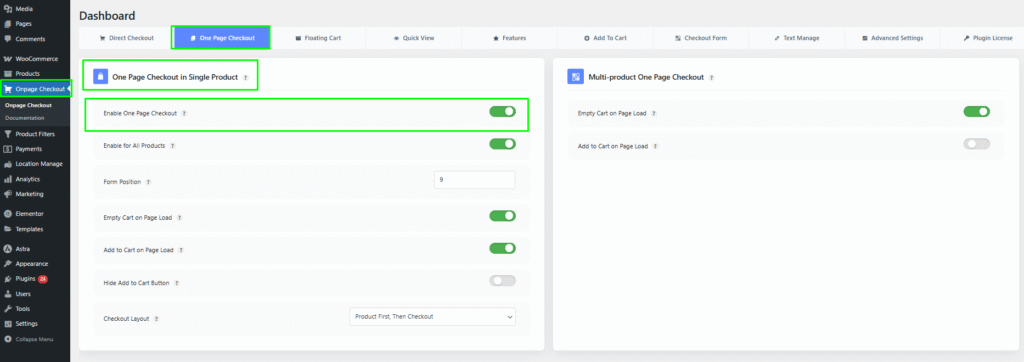
Find the Enable One Page Checkout option and turn it on.
This activates the feature globally, but you can still choose whether it applies to selected products or all products.
Step 2: Enable One Page Checkout for a specific product
Use this method when you only want checkout to appear on selected product pages.
From your WordPress dashboard, go to:
Products → All Products
Then:
- Edit the product where you want to show one-page checkout.
- Find the One Page Checkout option in the product settings.
- Enable the checkbox.
- Update the product.
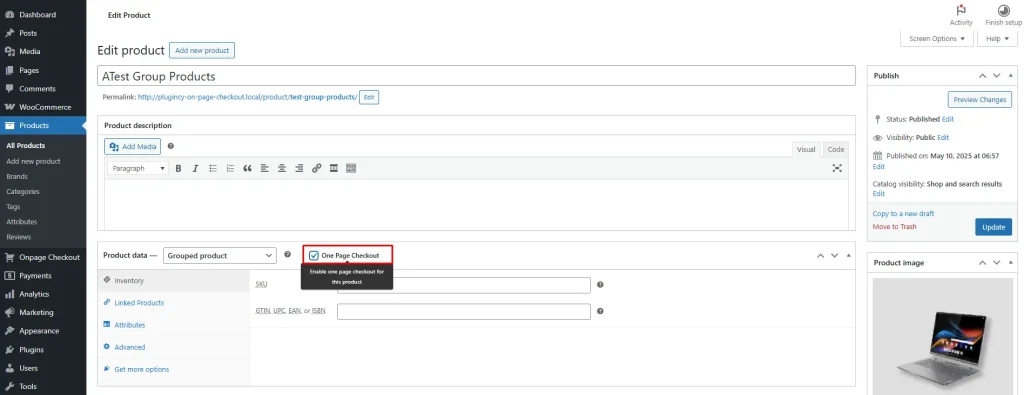
After saving, visit the product page and confirm that the checkout form appears according to your plugin settings.
Best used for
- Featured products
- Campaign products
- High-converting products
- Single-product landing pages
- Products promoted through ads
- Products where quick checkout makes sense
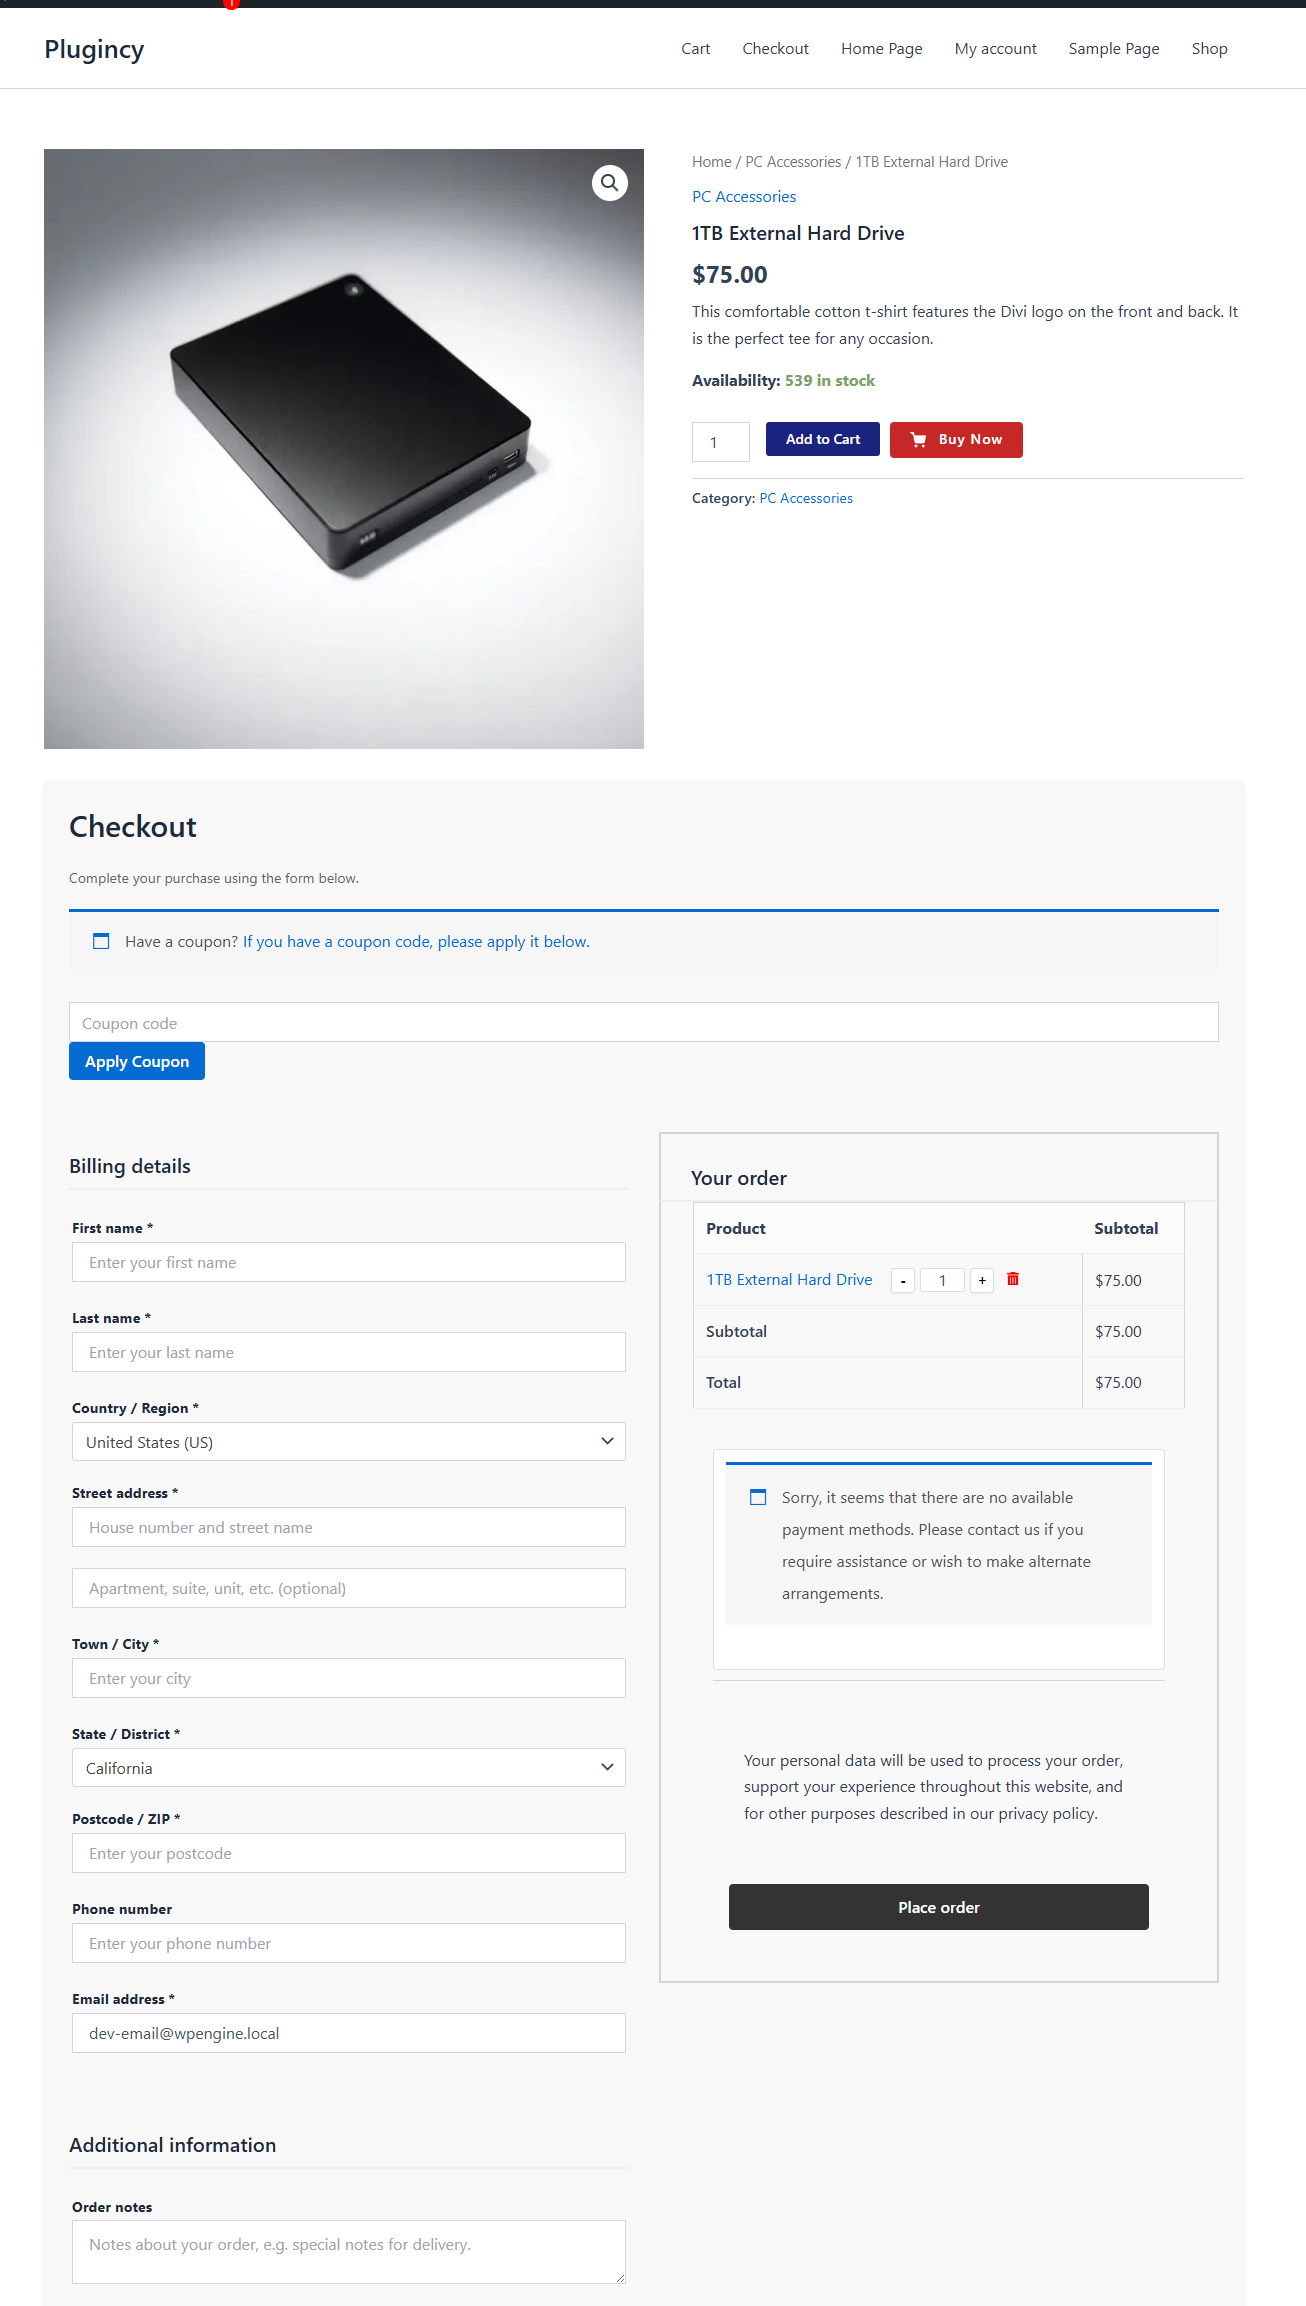
Step 3: Enable One Page Checkout for all products
Use this option if you want checkout to appear on every product page.
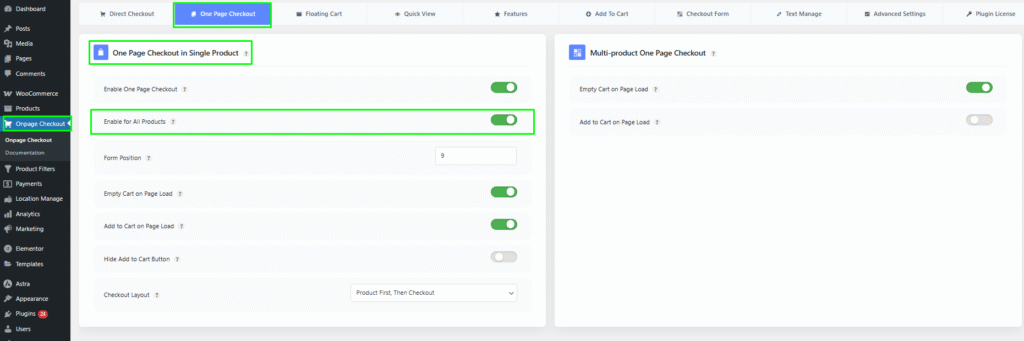
Go to:
Onpage Checkout → One Page Checkout
Enable the option for all products.
What this does
When enabled, all eligible WooCommerce product pages can show the checkout form without needing to enable the option product by product.
Best used for
- Stores that want a fast checkout flow on every product
- Small catalogs
- Single-purpose stores
- Stores where customers usually purchase one product at a time
Important warning
Use this option carefully. If enabled, checkout may appear on every product page.
For larger stores, it is usually better to enable One Page Checkout only for selected products first.
Individual product vs all products
| Option | What it does | Best used for |
|---|---|---|
| Enable One Page Checkout | Turns on the main feature | Required before using the feature |
| Enable for specific product | Shows checkout only on selected product pages | Campaigns, featured products, landing pages |
| Enable for all products | Shows checkout on all eligible product pages | Small stores or stores focused on quick checkout |
Recommended beginner setup:
Enable One Page Checkout: Enabled
Enable for All Products: Disabled
Enable on selected products: Enabled only where needed
Step 4: Choose the checkout form position
The Form Position setting controls where the checkout form appears on the product page.
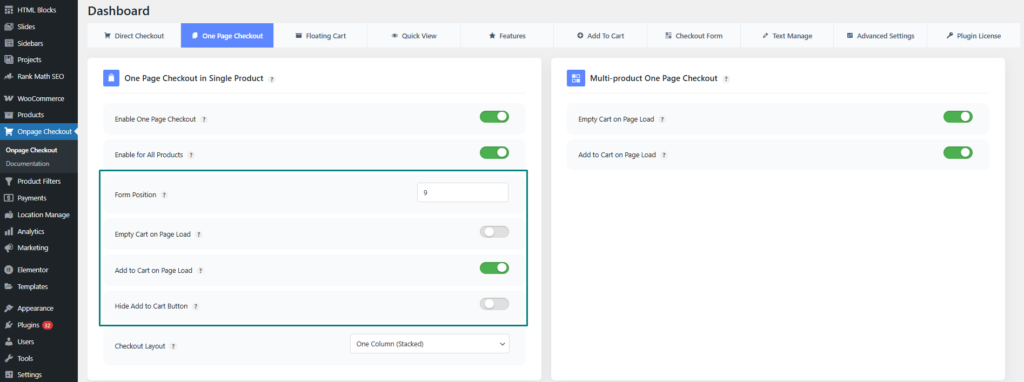
Go to:
Onpage Checkout → One Page Checkout
Find the form position option and choose where the checkout should appear.
Common placement options may include positions such as:
- After product summary
- After Add to Cart section
- After product description
- Before tabs
- After tabs
- Custom priority position, depending on your plugin settings
Recommended position
For most stores, place checkout after the product summary or after the product description.
This lets customers first review the product details, then complete checkout.
Best practice
Avoid placing checkout too high on the page if customers need to read product information before buying.
For simple products or landing pages, a higher checkout position can work well. For complex products, place checkout after the important product details.
Step 5: Configure cart behavior
Single Product One Page Checkout can affect the WooCommerce cart when a customer opens the product page.
These settings are important because they control whether the product is automatically added and whether existing cart items are removed.
Empty Cart On Page Load
The Empty Cart On Page Load option clears the customer’s existing cart when the product page loads.
Use this when
- The product page is a focused sales funnel.
- The customer should only buy this product.
- You are sending paid ad traffic to one product.
- You want to prevent unrelated products from staying in checkout.
Be careful
If this option is enabled, customers may lose products they previously added to the cart when they open the product page.
Avoid enabling this for normal product browsing unless that behavior is intentional.
Recommended value
For most general stores:
Disabled
For focused single-product funnels:
Enabled
Add Product to Cart On Page Load
The Add Product to Cart On Page Load option automatically adds the current product to the cart when the product page loads.
Use this when
- You want checkout to be ready immediately.
- The product page is built for one specific product.
- You want customers to start checkout without clicking Add to Cart first.
- You are creating a one-product landing page.
Be careful with variable products
For variable products, the customer may need to select required options before the correct variation can be added to the cart.
Test variable products carefully.
Recommended value
For simple product funnels:
Enabled
For variable or complex products:
Test before enabling
Hide Regular Add to Cart Button
The Hide Regular Add to Cart Button option can hide the default WooCommerce Add to Cart button on product pages where one-page checkout is active.
Use this when
- The checkout form already handles the purchase flow.
- You want to avoid duplicate purchase buttons.
- You want a cleaner product page.
- You want customers to use the checkout form directly.
Keep it visible when
- Customers need to select variations first.
- You still want customers to use the normal cart flow.
- Your theme or product type requires the default Add to Cart form.
- You are testing compatibility.
Recommended value
For a clean one-page checkout product page:
Enabled
For stores still using the regular cart flow:
Disabled
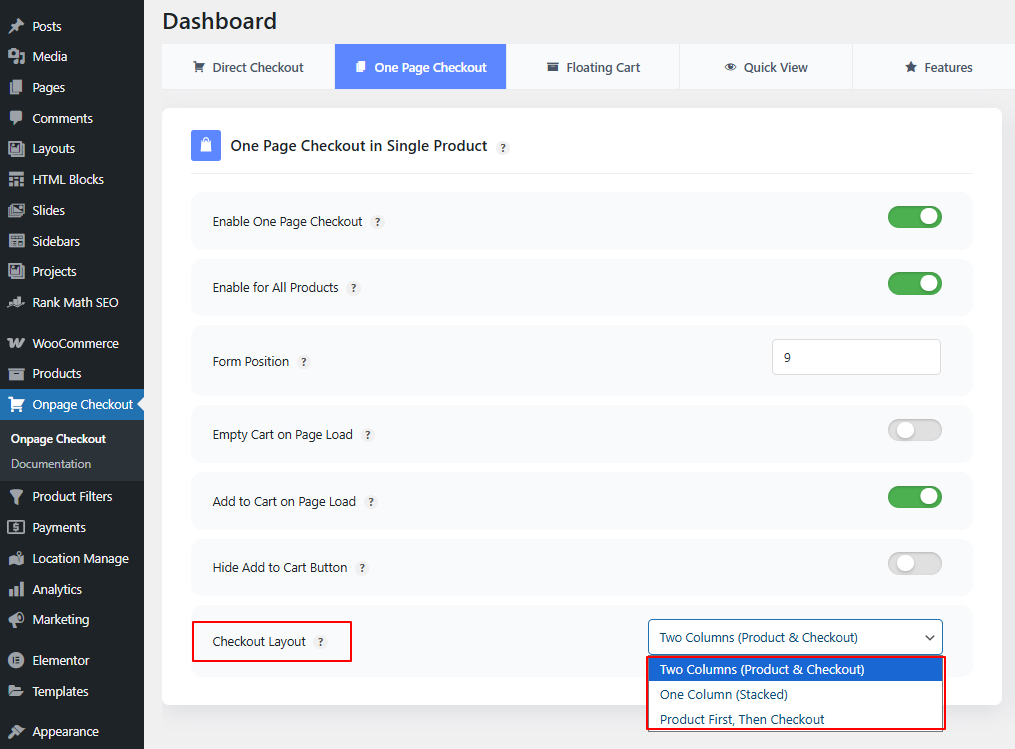
Step 6: Choose a layout
The layout controls how product information and checkout appear on the product page.
Available layout options may include:
- Two Columns
- One Column / Stacked
- Product First, Then Checkout
Two Columns layout
The Two Columns layout displays product information and checkout side by side.
Best used for
- Desktop-focused product pages
- Short product descriptions
- Simple products
- Landing pages
- Products with a clean product summary
Benefits
- Product and checkout are visible together.
- Customers can review details and checkout quickly.
- Good for conversion-focused product pages.
Important note
Always test this layout on mobile. On smaller screens, the layout should stack properly for easier reading and checkout.
One Column / Stacked layout
The One Column or Stacked layout displays product information and checkout vertically.
Best used for
- Mobile-first stores
- Longer product pages
- Products with detailed descriptions
- Stores that want a simple layout
- Themes where two-column checkout feels crowded
Benefits
- Easier to read on mobile
- More natural scrolling experience
- Works well with most themes
Product First, Then Checkout layout
The Product First, Then Checkout layout shows product details first and the checkout form after.
Best used for
- Products that require explanation
- Higher-priced products
- Products with images, features, or benefits
- Pages where customers should read before checkout
Benefits
- Customers understand the product before seeing checkout.
- Better for products that need context.
- Reduces confusion on complex product pages.
Product type compatibility
Different WooCommerce product types may behave differently with Single Product One Page Checkout.
| Product type | Support note |
|---|---|
| Simple product | Best supported and easiest to configure |
| Variable product | Customer must select required variation options before checkout can process correctly |
| Grouped product | Test carefully because grouped products include multiple child products |
| External/Affiliate product | Usually not suitable because purchase happens outside WooCommerce checkout |
Simple products
Simple products usually work best with Single Product One Page Checkout.
Recommended setup:
Add Product to Cart On Page Load: Enabled
Empty Cart On Page Load: Optional
Hide Regular Add to Cart Button: Optional
Use this for digital products, simple physical products, tickets, courses, or single-offer pages.
Variable products
Variable products require customers to choose product options such as size, color, or package.
For variable products, make sure:
- Variations are created correctly.
- Variation prices are set.
- Variations are in stock.
- Required attributes are selected before checkout.
- The checkout updates correctly after variation selection.
Recommended setup:
Add Product to Cart On Page Load: Test carefully
Hide Regular Add to Cart Button: Disable until confirmed
If the customer must select a variation before checkout, keep the product selection flow clear.
Grouped products
Grouped products contain multiple child products.
Test grouped products carefully because the checkout must correctly reflect the selected child products and quantities.
Check:
- Child products are purchasable.
- Quantities update correctly.
- Cart total updates correctly.
- Checkout displays the correct items.
External or affiliate products
External/affiliate products usually redirect customers to another website instead of using WooCommerce checkout.
Single Product One Page Checkout is generally not recommended for external/affiliate products.
Customer checkout flow
After setup, customers can complete checkout from the product page.
Typical flow:
- Customer opens the product page.
- Customer reviews the product.
- Customer selects product options, if required.
- Product is added to the cart or prepared for checkout.
- Checkout form appears on the same page.
- Customer enters billing/shipping details.
- Customer selects payment method.
- Customer places the order.
Recommended setup examples
Selected product only
Use this when only certain products should show one-page checkout.
Enable One Page Checkout: Enabled
Enable for All Products: Disabled
Product-level One Page Checkout: Enabled
Best for:
- Campaign products
- Featured products
- Landing page products
All products
Use this when every product page should show checkout.
Enable One Page Checkout: Enabled
Enable for All Products: Enabled
Best for:
- Small stores
- Single-purpose catalogs
- Stores focused on fast checkout
Single-product funnel
Use this when the product page is designed for one focused offer.
Enable One Page Checkout: Enabled
Product-level One Page Checkout: Enabled
Empty Cart On Page Load: Enabled
Add Product to Cart On Page Load: Enabled
Hide Regular Add to Cart Button: Enabled
Layout: Product First, Then Checkout
Best for:
- Paid ad landing pages
- Digital products
- Courses
- Membership offers
- One-product stores
Best practices
Start with selected products
Do not enable checkout on all products immediately unless your store is designed for that experience. Start with one or two products and test the full checkout flow.
Test mobile layout
Many customers checkout from mobile devices. Make sure the product details, checkout form, payment fields, and buttons are easy to use on small screens.
Keep the product page focused
Avoid adding too many distractions around the checkout form.
Good product page elements include:
- Product title
- Product image
- Short description
- Price
- Variation options, if needed
- Trust badges
- Checkout form
- Refund/support note
- FAQ
Be careful with cart clearing
Only enable Empty Cart On Page Load if you intentionally want to remove existing cart items.
Test all payment methods
Some payment gateways add custom fields or scripts to checkout. Always test the full order process with your active gateways.
Exclude product checkout pages from cache
Product pages with checkout forms are dynamic. Exclude these pages from aggressive page cache, CDN full-page cache, and JavaScript delay settings.
Use trust signals near checkout
Add trust badges, refund policy notes, support contact details, or secure checkout messages near the checkout form.
Troubleshooting
Checkout form does not appear
Check:
- One Page Checkout is enabled.
- Product-level One Page Checkout is enabled, or Enable for All Products is enabled.
- Product is published.
- Product is purchasable.
- Product is in stock.
- WooCommerce checkout page is configured.
- Plugin license is active, if required.
- Page cache is cleared.
Checkout shows an empty cart
Check:
- Product is being added to the cart.
- Add Product to Cart On Page Load is enabled if needed.
- Product is purchasable.
- Product is in stock.
- Variation options are selected, if it is a variable product.
- WooCommerce sessions are working.
- Page is not cached incorrectly.
Product is not added to cart
Check:
- Product type is supported.
- Product is not out of stock.
- Product has a price.
- Product is not private/draft.
- Variation is selected for variable products.
- Add-to-cart validation is not blocked by another plugin.
Variable product does not update checkout
Check:
- Variations are configured correctly.
- Required attributes are selected.
- Variation prices are set.
- Variations are in stock.
- Theme or plugin scripts are not blocking variation changes.
- JavaScript errors are not present.
Checkout appears on all products unexpectedly
Check:
Onpage Checkout → One Page Checkout
If Enable for All Products is enabled, checkout can appear on every eligible product page.
Disable it if you only want checkout on selected products.
Default Add to Cart button still appears
Check whether Hide Regular Add to Cart Button is enabled.
If the button still appears, your theme may be overriding the product page template or outputting a custom Add to Cart button.
Page layout looks broken
Check:
- Theme compatibility
- Product page template overrides
- Page builder product template
- Checkout field styling
- Plugin CSS loading
- Cache/minified CSS
- Mobile responsiveness
Try testing with a default theme to confirm whether the issue is theme-related.
Checkout works for admins but not guests
Check:
- Guest checkout is enabled in WooCommerce, if needed.
- Product visibility is public.
- Page cache is not serving incorrect content.
- WooCommerce session cookies are working.
- Security plugins are not blocking guest AJAX requests.
Payment fields do not load
Check:
- Payment gateway is enabled.
- Checkout page works normally without one-page checkout.
- JavaScript errors are not present.
- Gateway scripts are not delayed or blocked.
- Page optimization plugin is not deferring required checkout scripts.