
The Multi Location Product & Inventory Management for WooCommerce plugin provides powerful tools for managing prices based on location. Before heading into configuration, it is important to understand what the plugin offers and how you can use it.
One of the key features is Location Wise Currency, which automatically converts currency to match the selected location. To use this, you must assign a currency to each location. This can be done while creating a new location or by editing an existing one. For detailed steps, refer to the Location Wise Currency documentation.
Location-wise currency is an advanced extension of location-wise pricing. Before enabling it, make sure you understand how it affects cart, checkout, mixed-location carts, split orders, and order assignment. See Important Rules for Location-Wise Currency for details.
Once currencies are assigned, you can configure Location-Based Price Setup using two methods:
- Method 1: Set Location-Based Pricing from the Product Edit Page.
- Method 2: Set Location-Based Pricing from Stock Central.
For both methods, first you have to enable one setting.
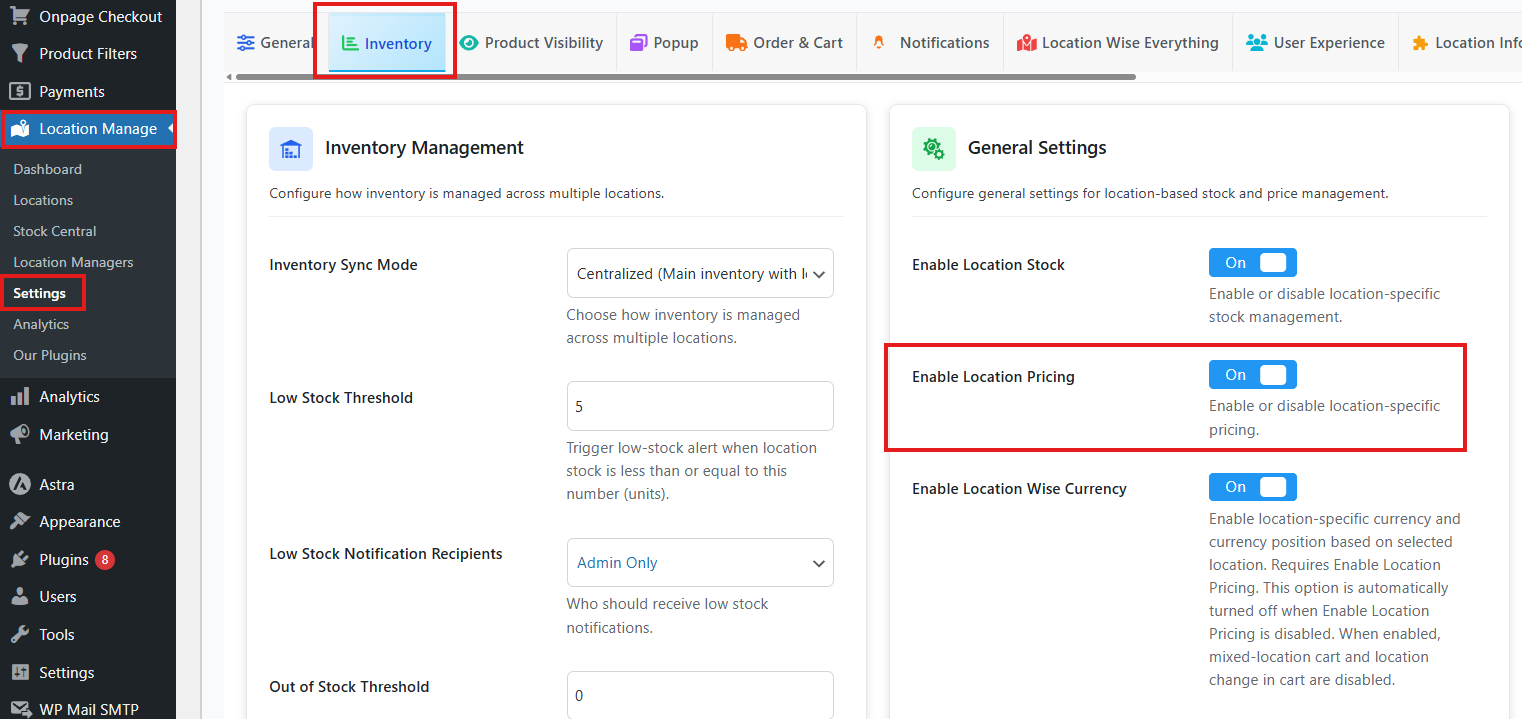
- Go to Location Manage > Settings > Inventory
- From here you’ll see an option named “Enable Location Pricing” enable it
- Now click on Save Changes.
Method 1: Product Edit Page
Simple Products
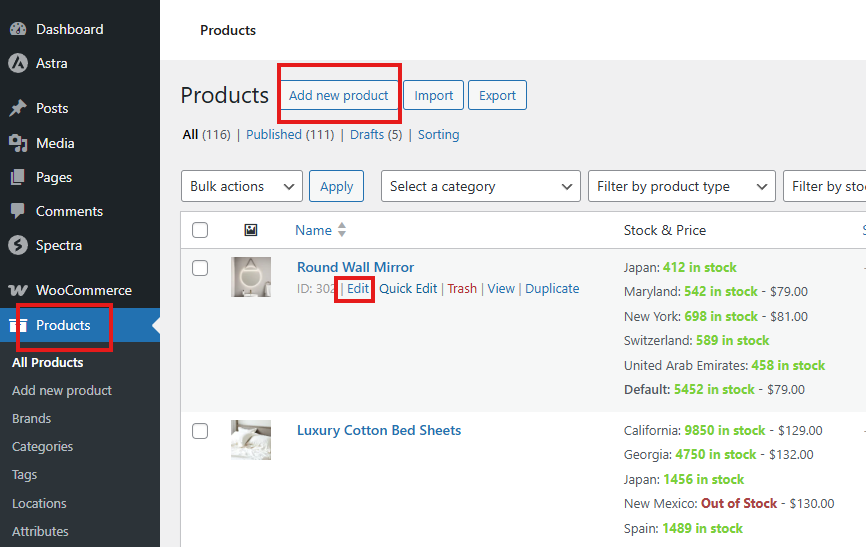
- From your WordPress dashboard, go to Products > All Products.
- Choose the product you want to edit or create a new product.
- Assign locations to the product. (Refer to Create and Manage Location documentation for guidance.)
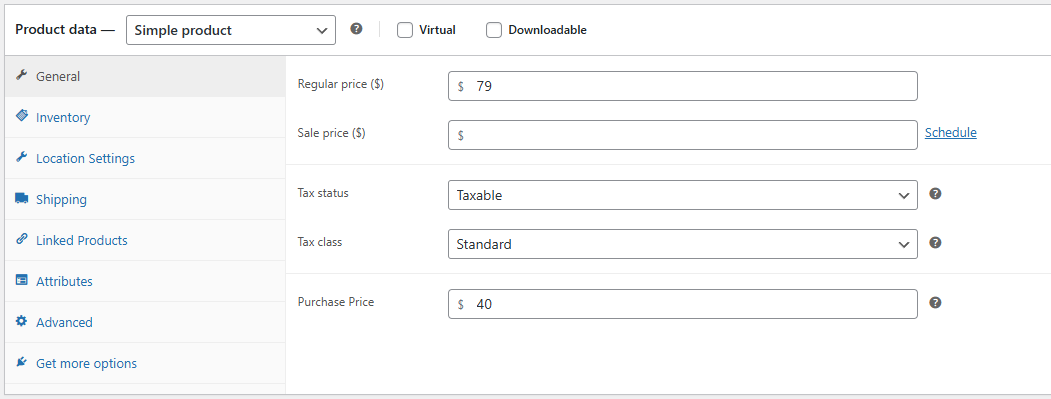
- In the Product Data section, go to the General tab.
- Enter the Regular Price (default currency is usually USD, set in WooCommerce > Settings > General > Currency Options).
- Enter the Sale Price if you want to offer a discount.
- Enter the Purchase Price to track investment costs.
- Go to the Inventory tab and add stock. (Refer to Location Wise Inventory documentation for details.)
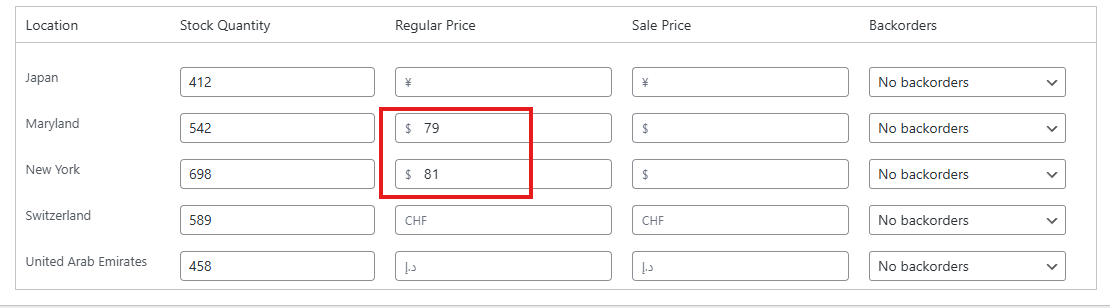
- Now go to the Location Settings tab. Here all the locatoins you have selected for your product will appear.
- For each location, fill in:
- Stock Quantity
- Regular Price
- Sale Price
- Backorder Availability
- For each location, fill in:
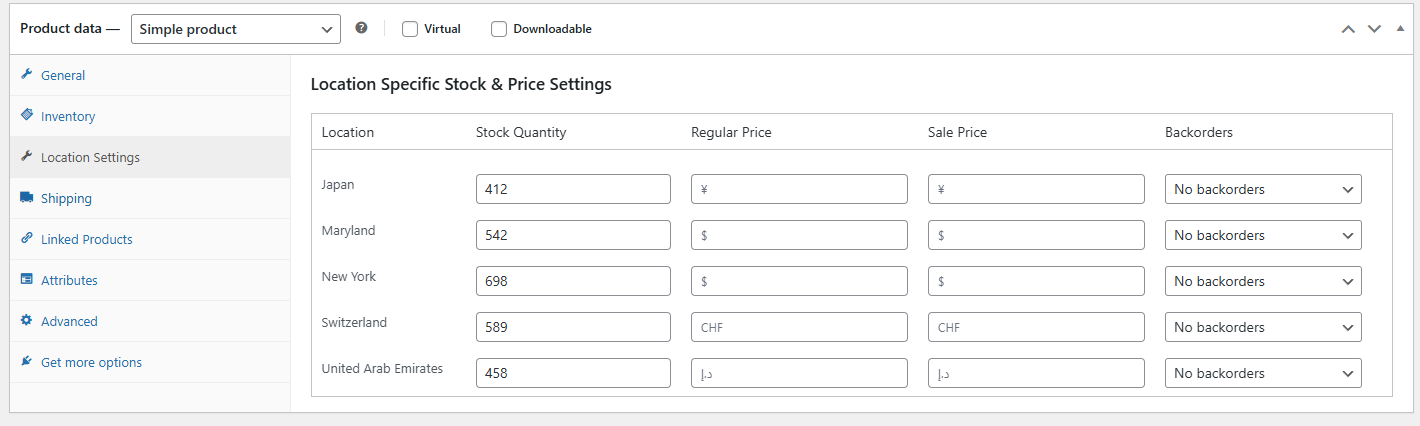
- If a currency is assigned to a location, its icon will appear (e.g., Yen for Japan, USD for New York).
- You can either:
- Enter prices manually (useful when locations share the same currency but require different pricing).
- Leave price fields empty to allow automatic currency conversion on the shop page.
- You can either:
- Add backorder settings. (Refer to Location Wise Backorder documentation for details.)
- Click Update or Publish to save the product.
Variable Products
- Open the variable product and assign locations.
- In the Product Data section, go to the Variations tab.
- Expand each variation by clicking its name.
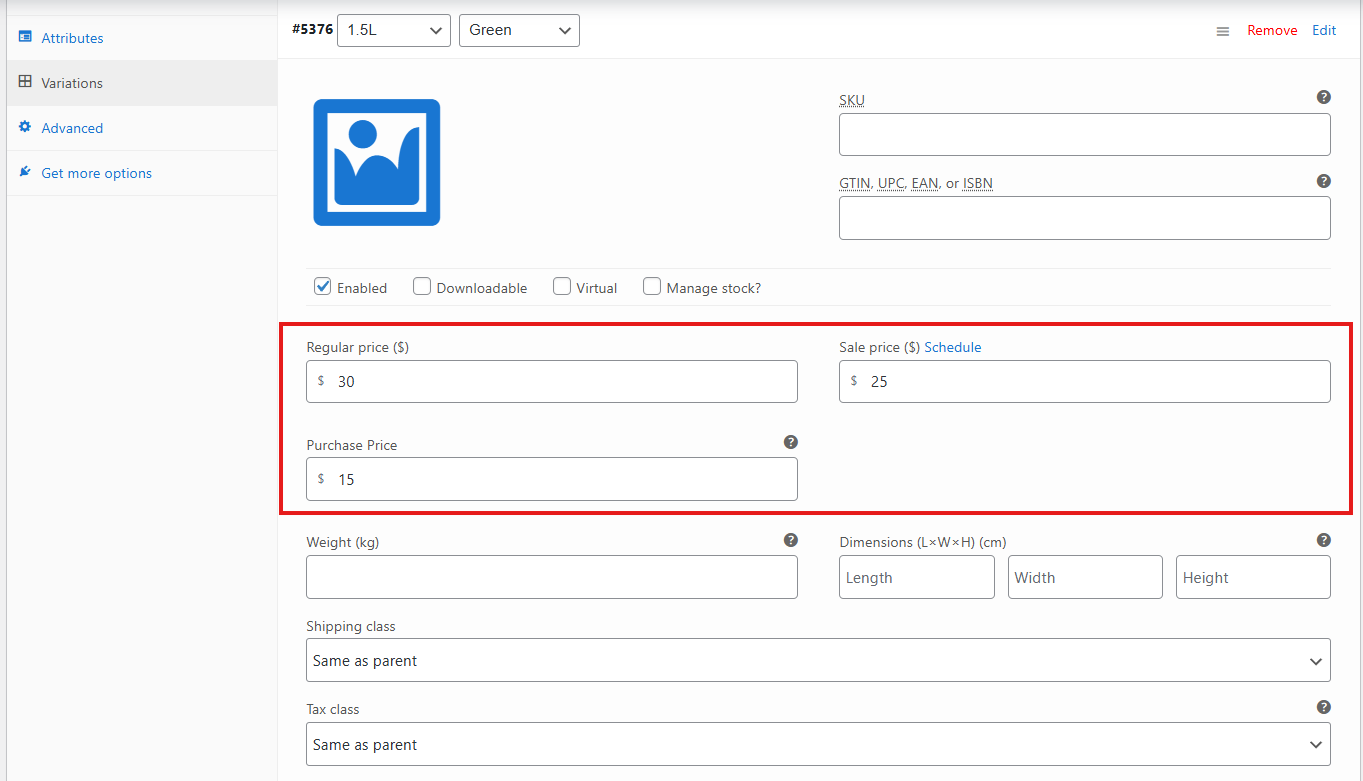
- Enter:
- Regular Price
- Sale Price
- Purchase Price
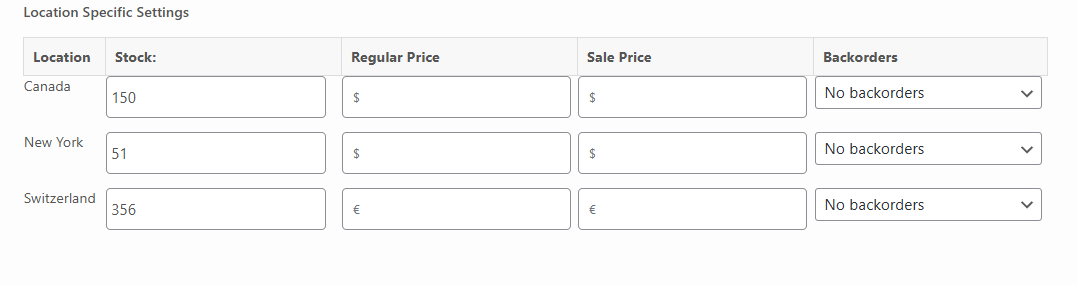
- Scroll down to see the locations assigned to the variation.
- For each location, enter:
- Stock Quantity
- Regular Price (manual or leave empty for automatic conversion)
- Sale Price (manual or leave empty for automatic conversion)
- Backorder Availability
- Repeat for all variations.
- Click Save Changes, then Update or Publish the product.
Method 2: Stock Central
Stock Central provides a more flexible way to manage location-based pricing. It has two modes: Modern Mode and Classic Mode.
Modern Mode
Simple Products
- Go to Location Manage > Stock Central.
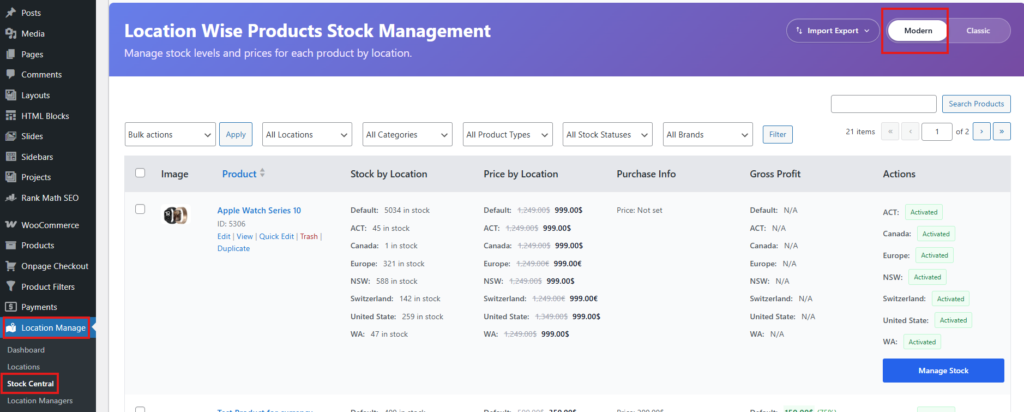
- Choose a product to edit.
- Products without assigned locations show Add to Location.
- Products with assigned locations show Manage Stock.
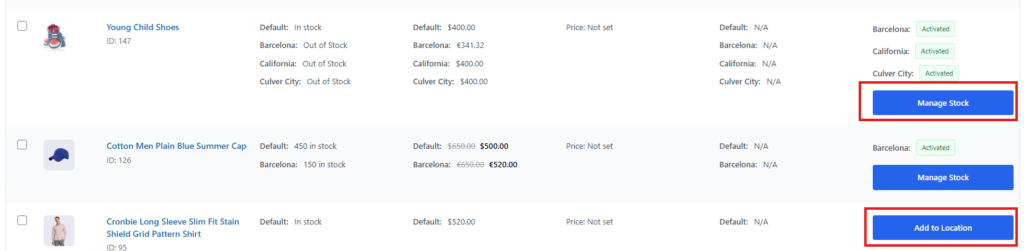
- Click Add to Location or Manage Stock.
- A popup will open showing default settings (General and Inventory tabs combined).
- Check Manage Stock.
- Enter stock quantity, regular price, sale price, and purchase price.
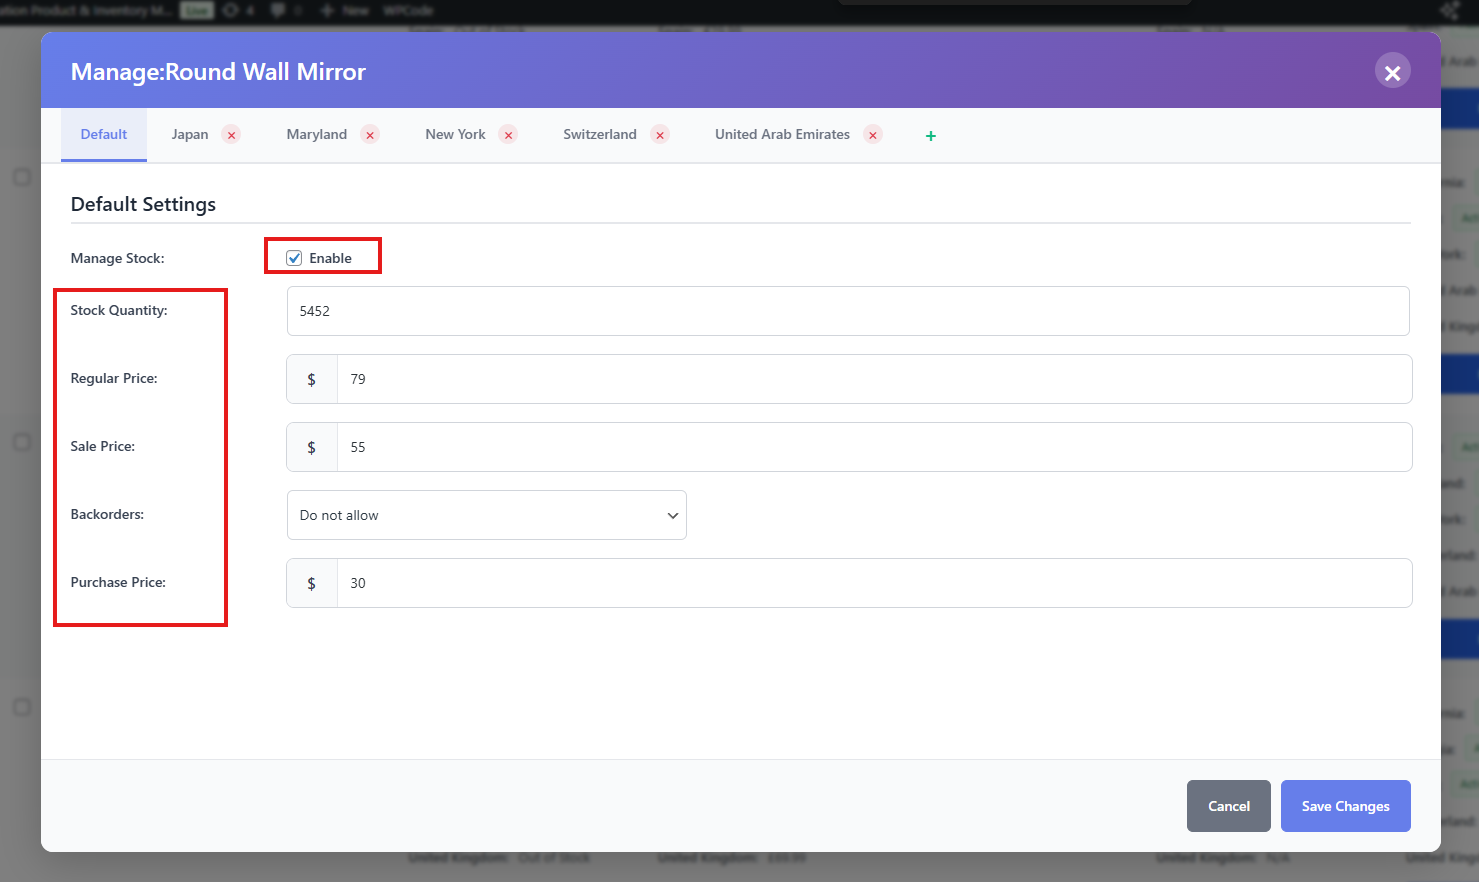
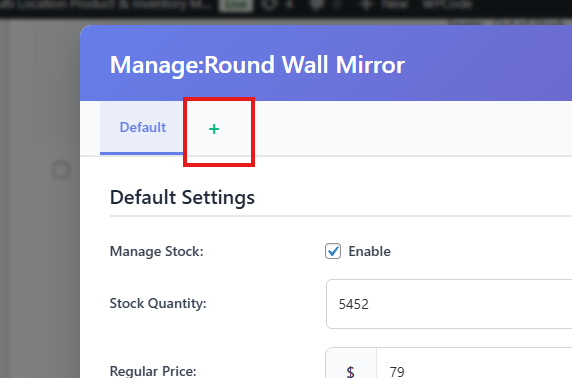
- If no location is assigned then add locations:
- Click the + icon beside Default.
- Select locations and click Add Selected Locations.
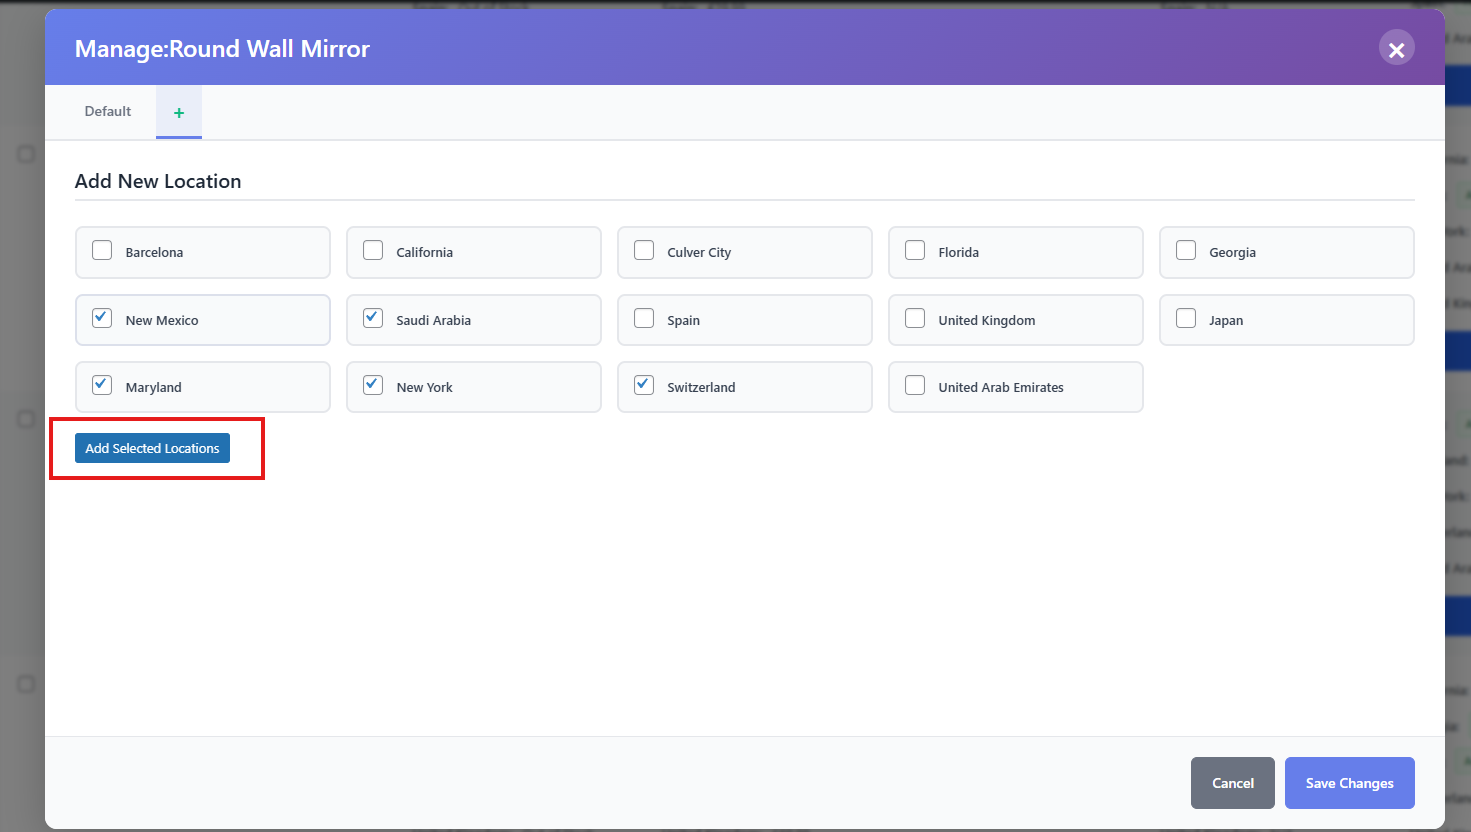
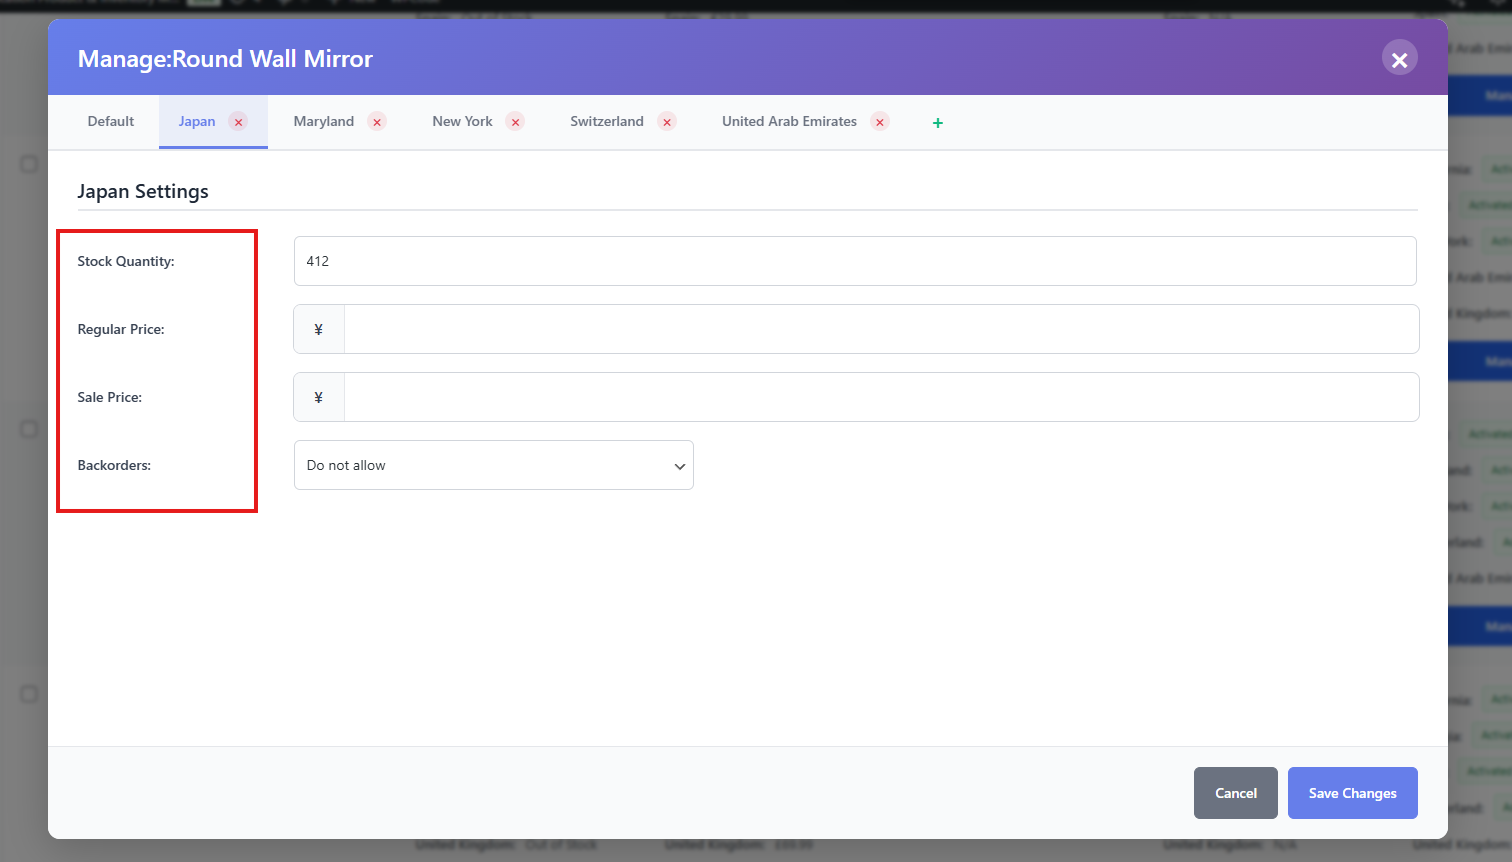
- For each location tab, enter stock quantity and prices.
- Leave price fields empty for automatic conversion.
- Or add prices manually.
- Click Save Changes.
Variable Products
- Choose a variable product in Stock Central.
- Click Manage Stock or Add to Location.
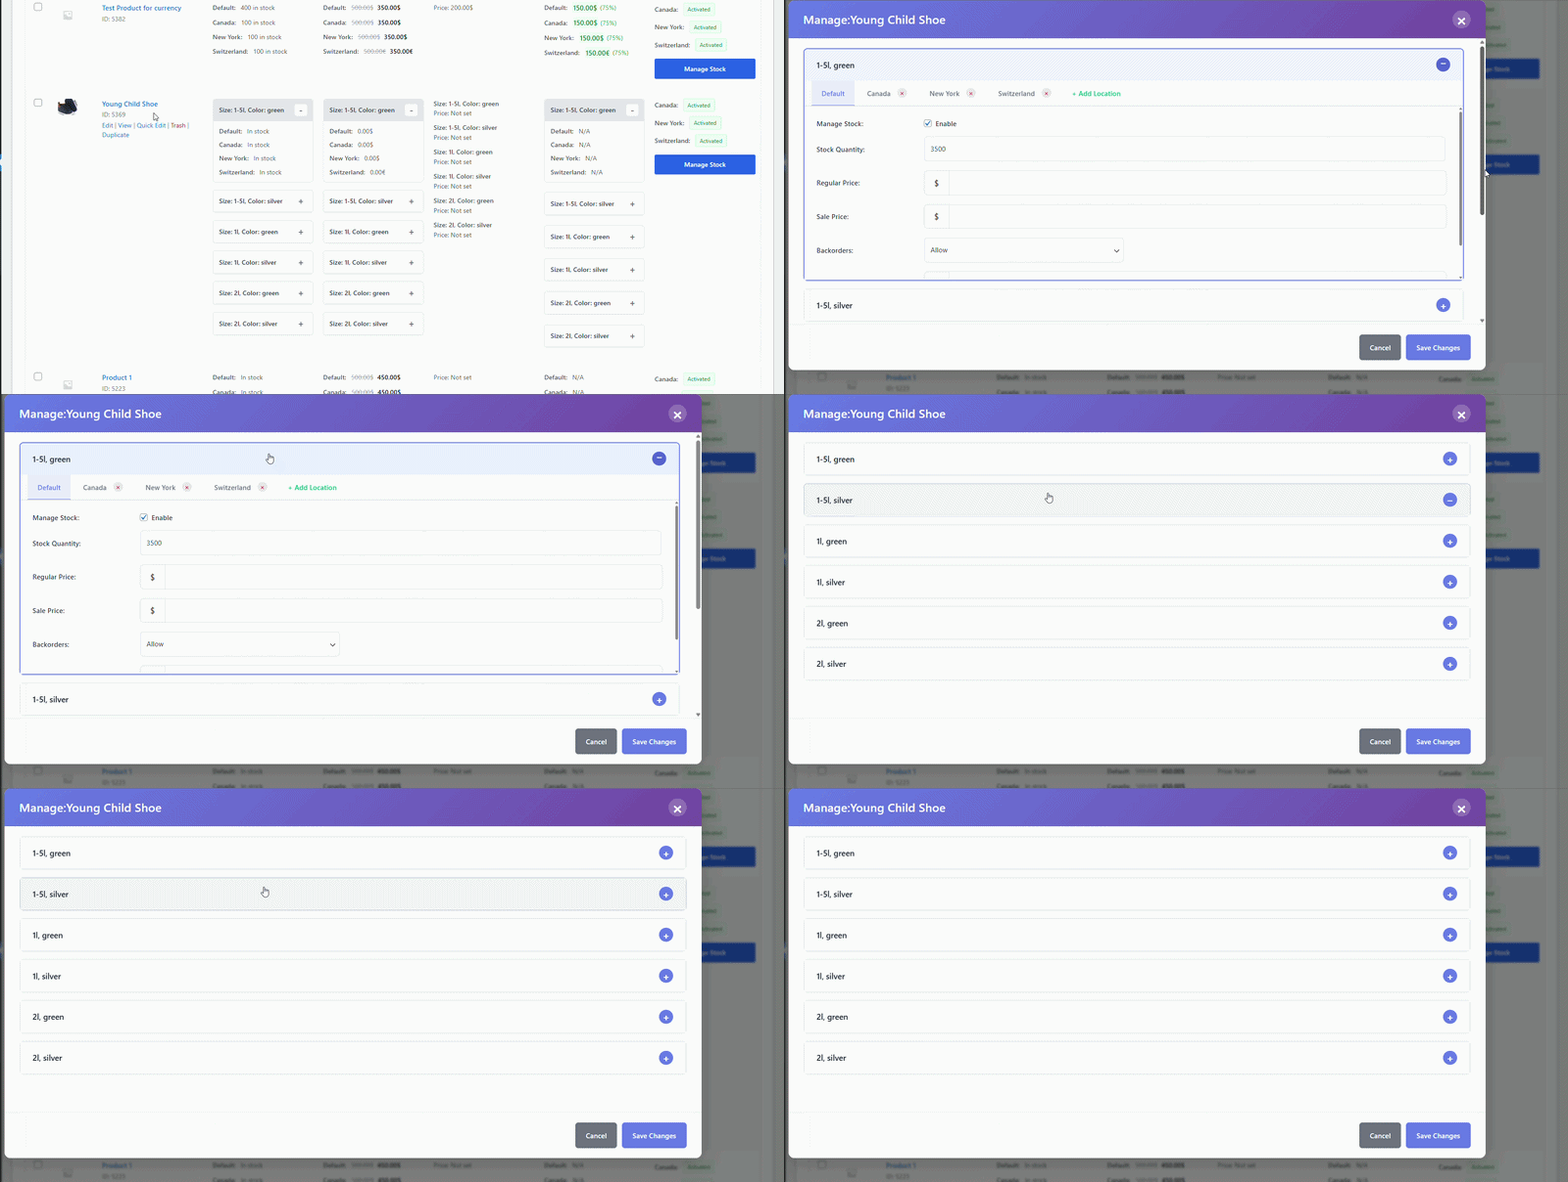
- A popup will appear with expandable tabs for each variation.
- Expand a variation.
- If no location is added, assign locations.
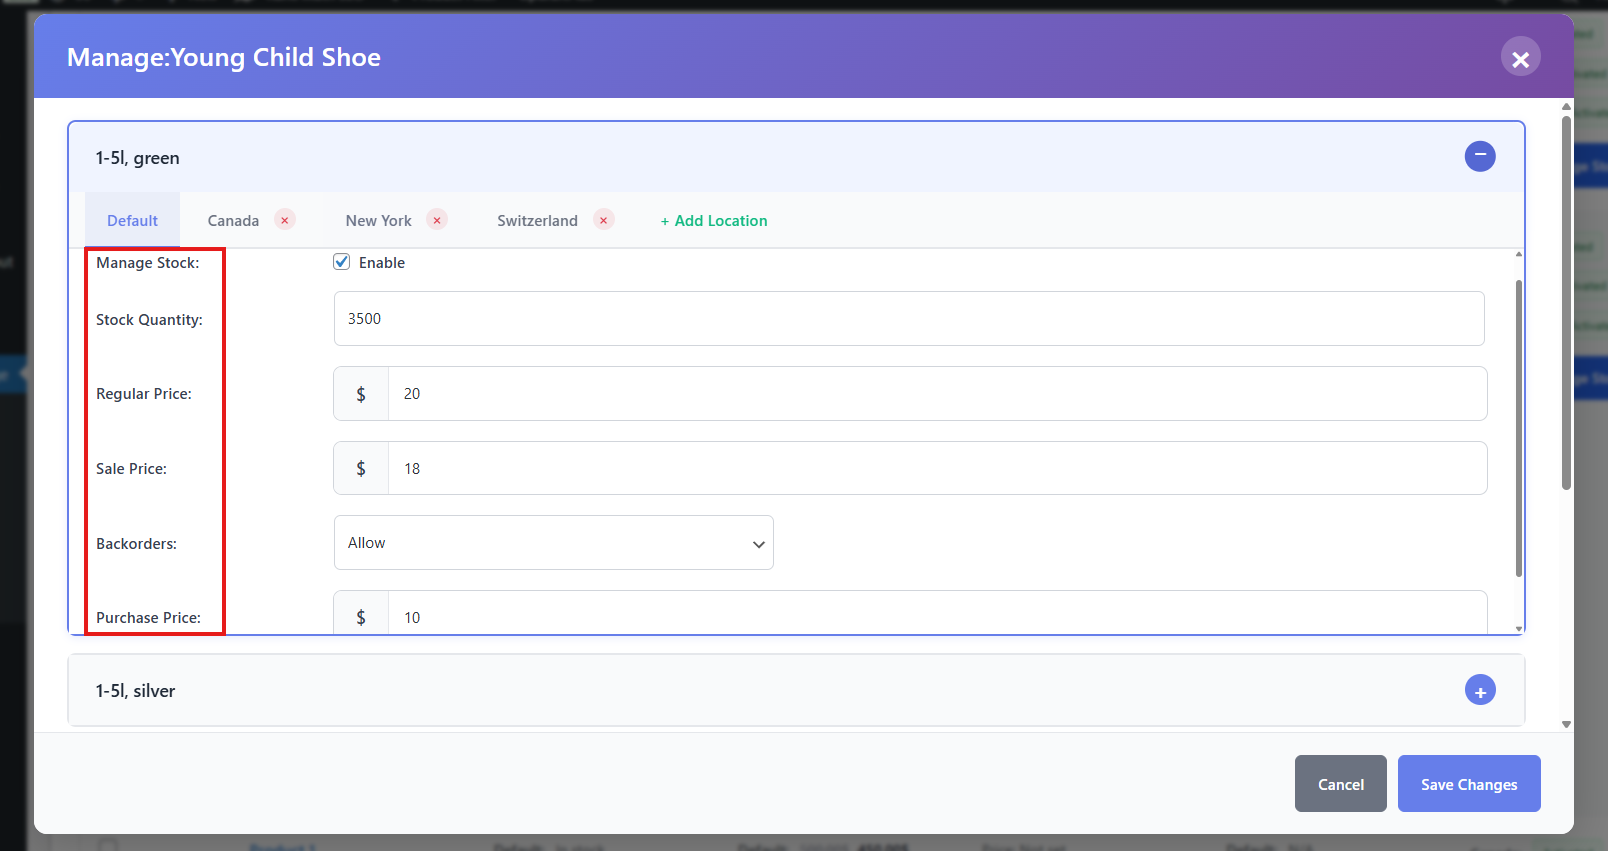
- In the Default tab, enter:
- Stock Quantity
- Regular Price
- Sale Price
- Backorder Availability
- Purchase Price
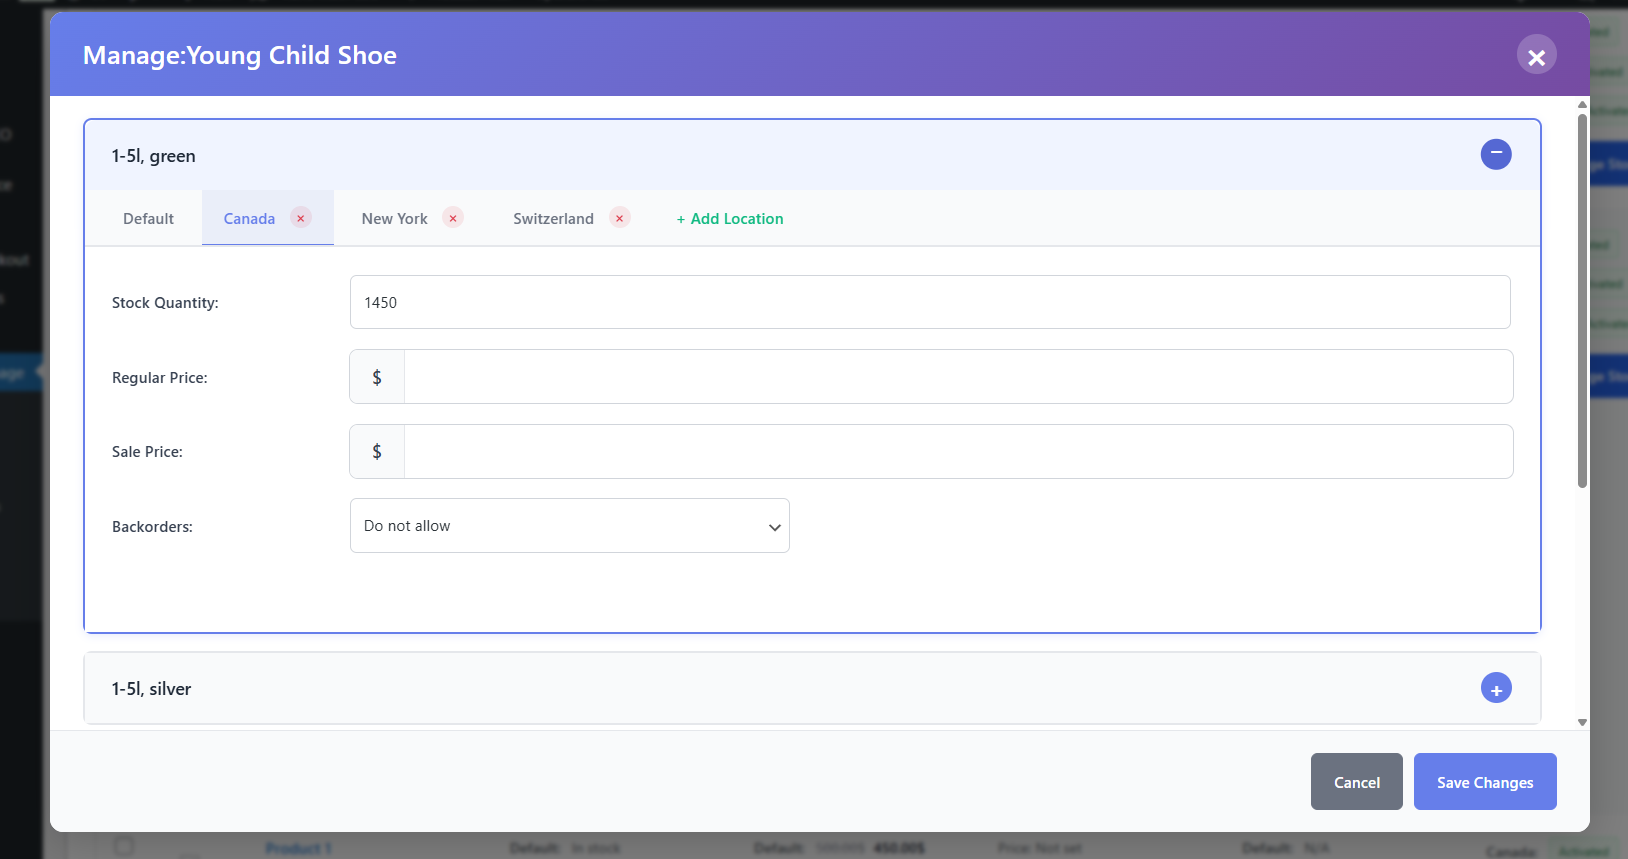
- Go to each location tab and enter:
- Stock Quantity
- Regular Price (manual or leave empty for automatic conversion)
- Sale Price (manual or leave empty for automatic conversion)
- Backorder Availability
- Repeat for all variations.
- Click Save Changes.
Classic Mode
Simple Products
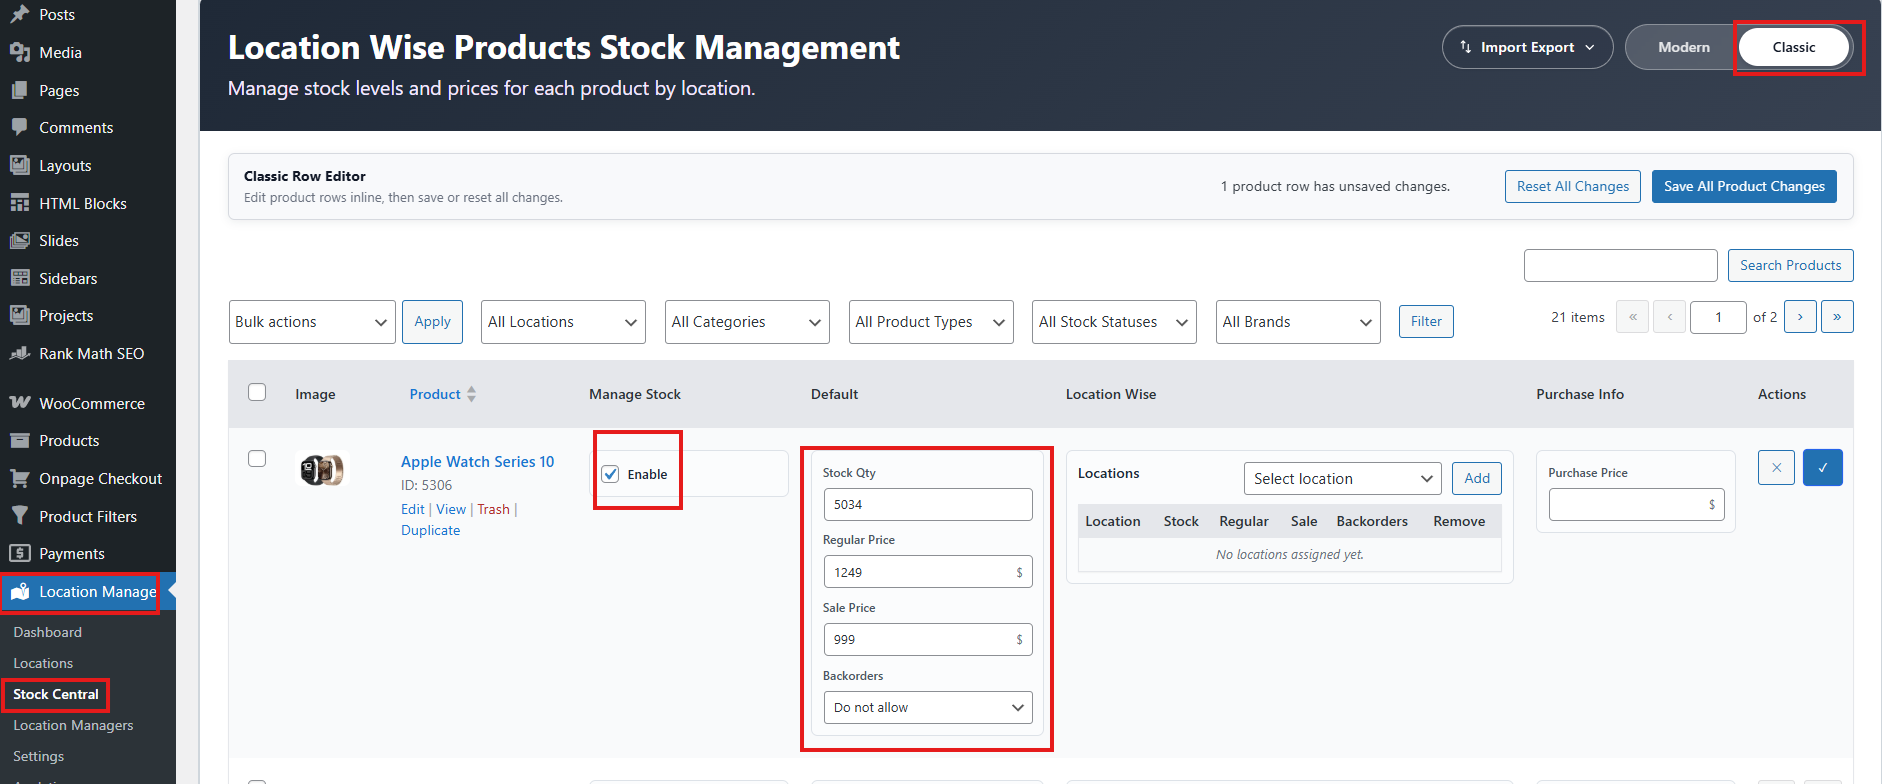
- Toggle to Classic Mode.
- Choose the product you want to edit.
- Beside the product name, tick the Enable option.
- Enter:
- Stock Quantity
- Regular Price
- Sale Price
- Backorder Availability
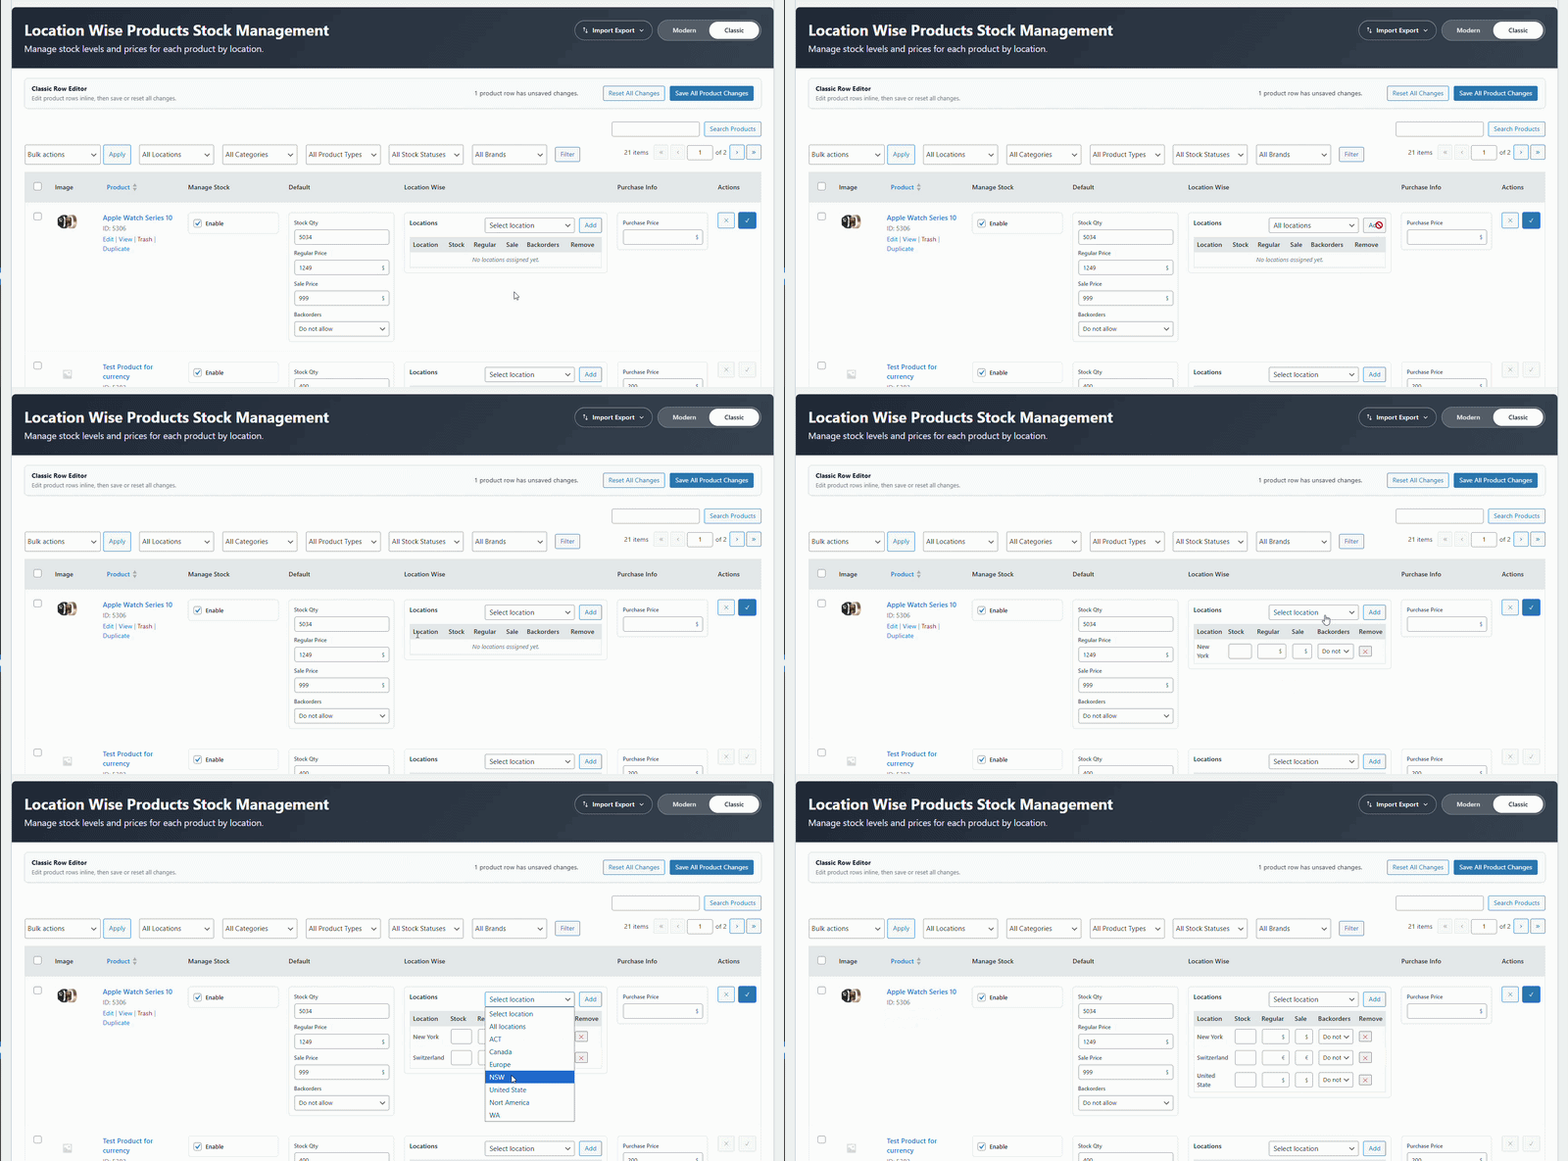
- Go to the Location section.
- If locations are already assigned, they will appear.
- To add locations:
- Select All Locations to add all at once.
- Or add locations one by one.
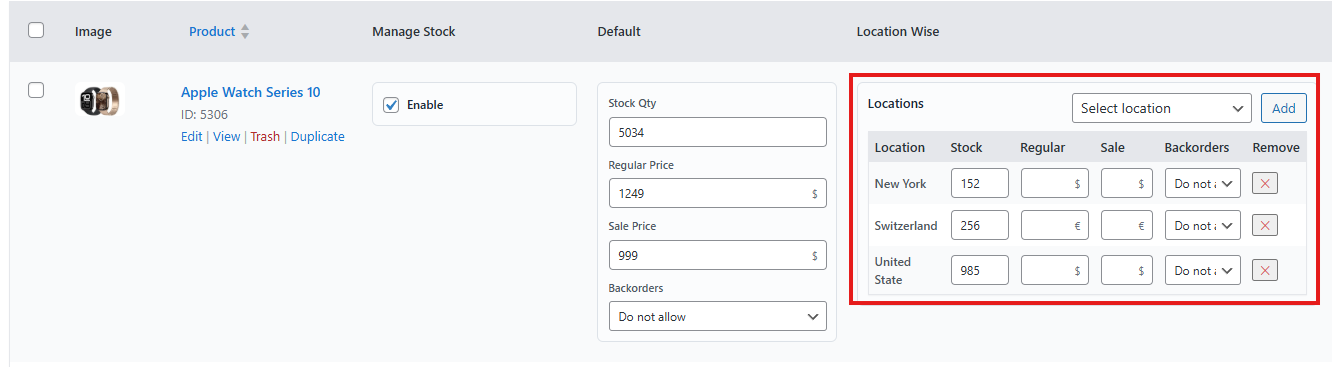
- For each location, enter:
- Stock Quantity
- Regular Price (manual or leave empty for automatic conversion)
- Sale Price (manual or leave empty for automatic conversion)
- Backorder Availability
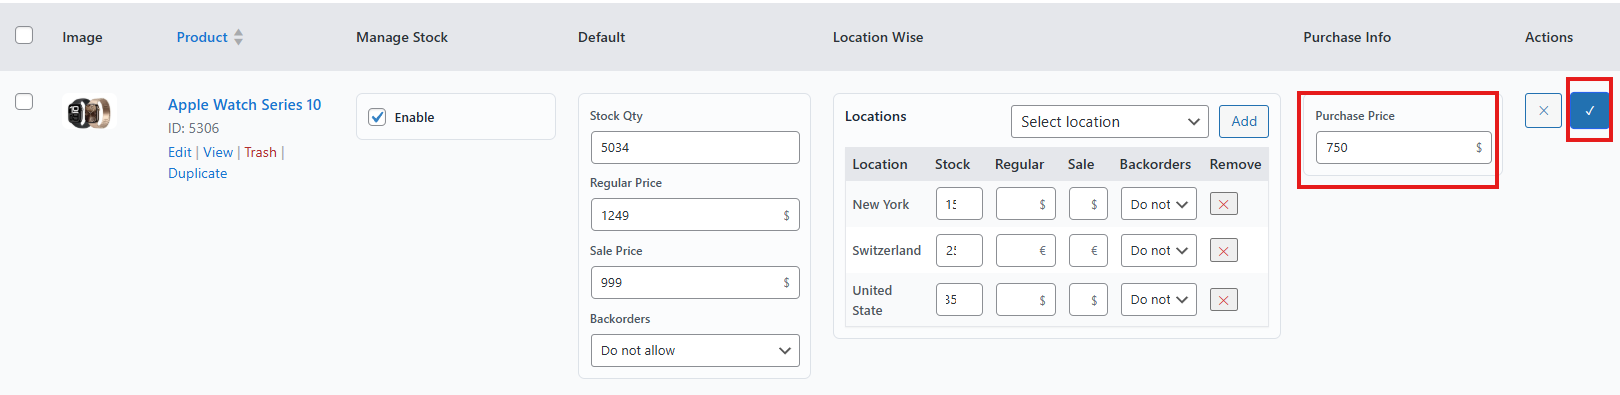
- Enter the Purchase Price.
- Click the checkmark icon to save changes.
Variable Products
- Choose the variable product you want to configure.
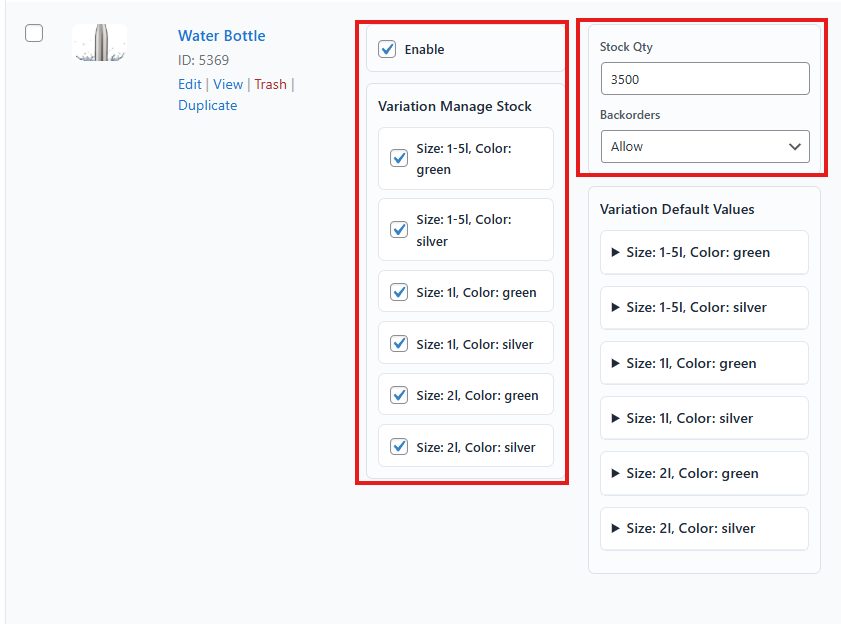
- Tick the Enable option.
- Go to the Variation Manage Stock section.
- Checkmark each variation you want to edit.
- Enter:
- Total Stock Quantity for the product variations
- Backorder Availability
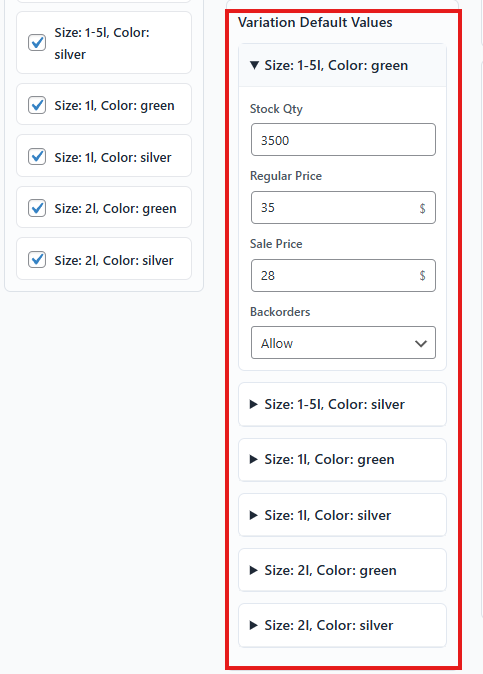
- In the Variation Default Values section, enter for each variation:
- Stock Quantity
- Regular Price
- Sale Price
- Backorder Availability
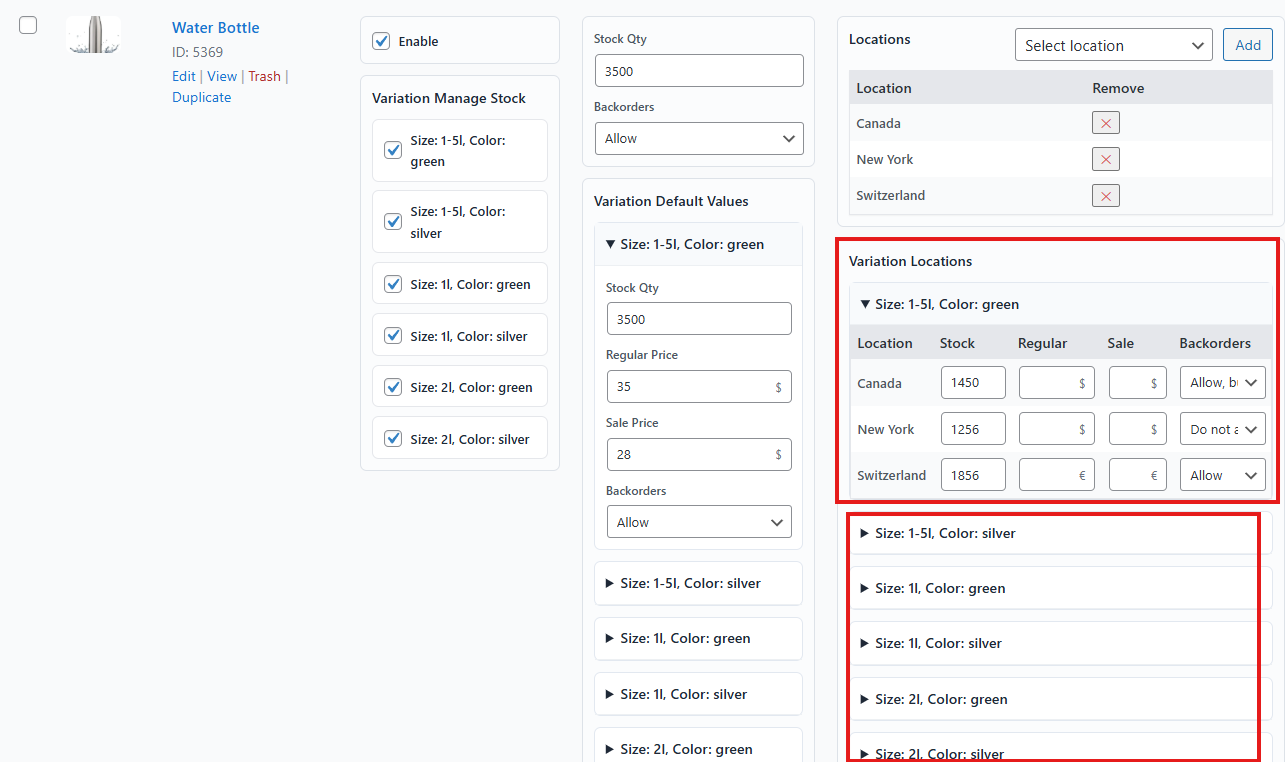
- Go to the Location section.
- Assigned locations will appear.
- You can also add locations (same as simple products).
- In the Variation Locations section, enter for each variation and location:
- Stock Quantity
- Regular Price (manual or leave empty for automatic conversion)
- Sale Price (manual or leave empty for automatic conversion)
- Backorder Availability
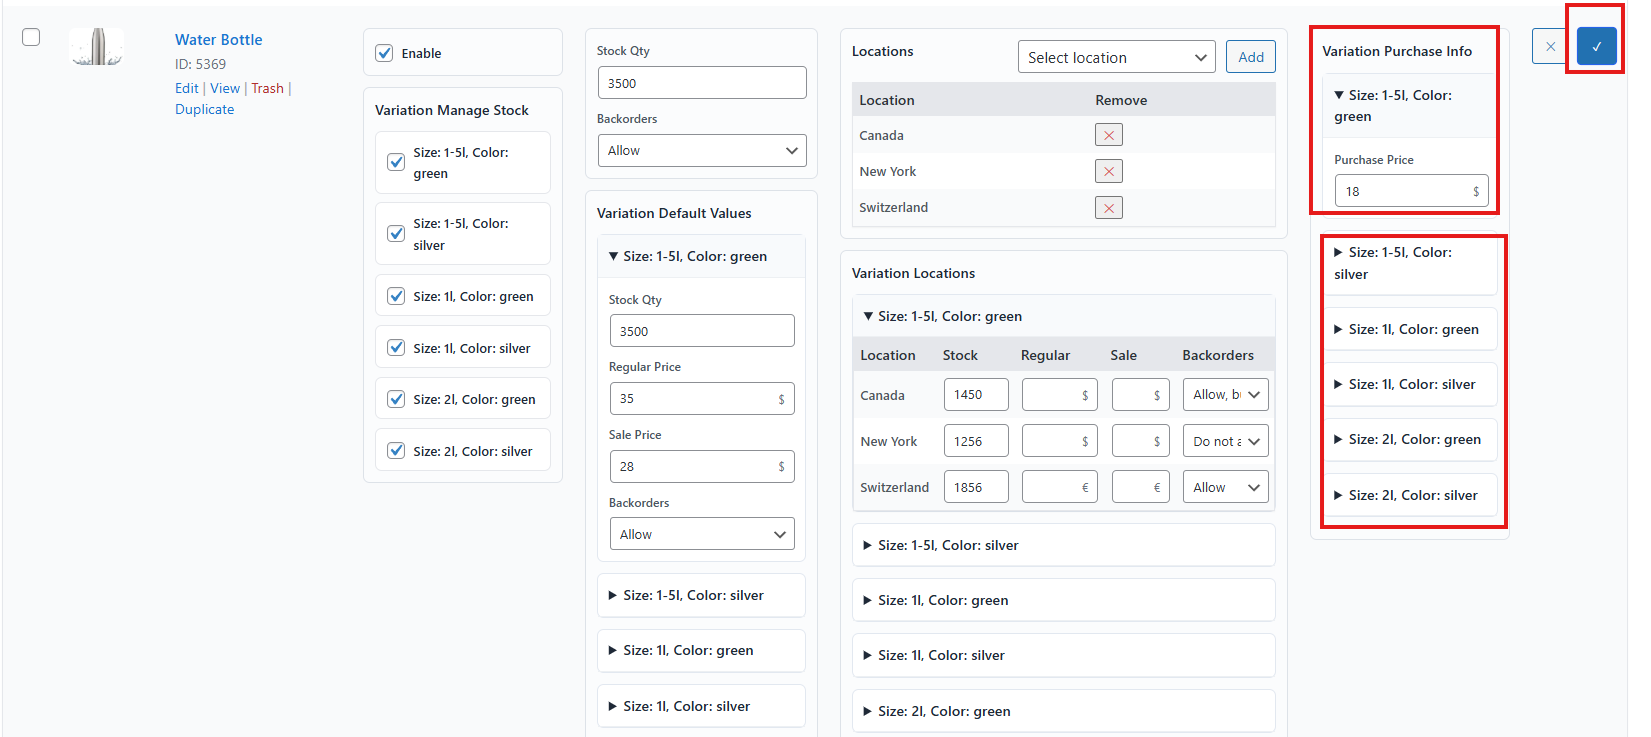
- Go to the Purchase Price section and enter purchase prices for each variation.
- Click the checkmark icon to save changes.
Testing Location-Based Price Setup
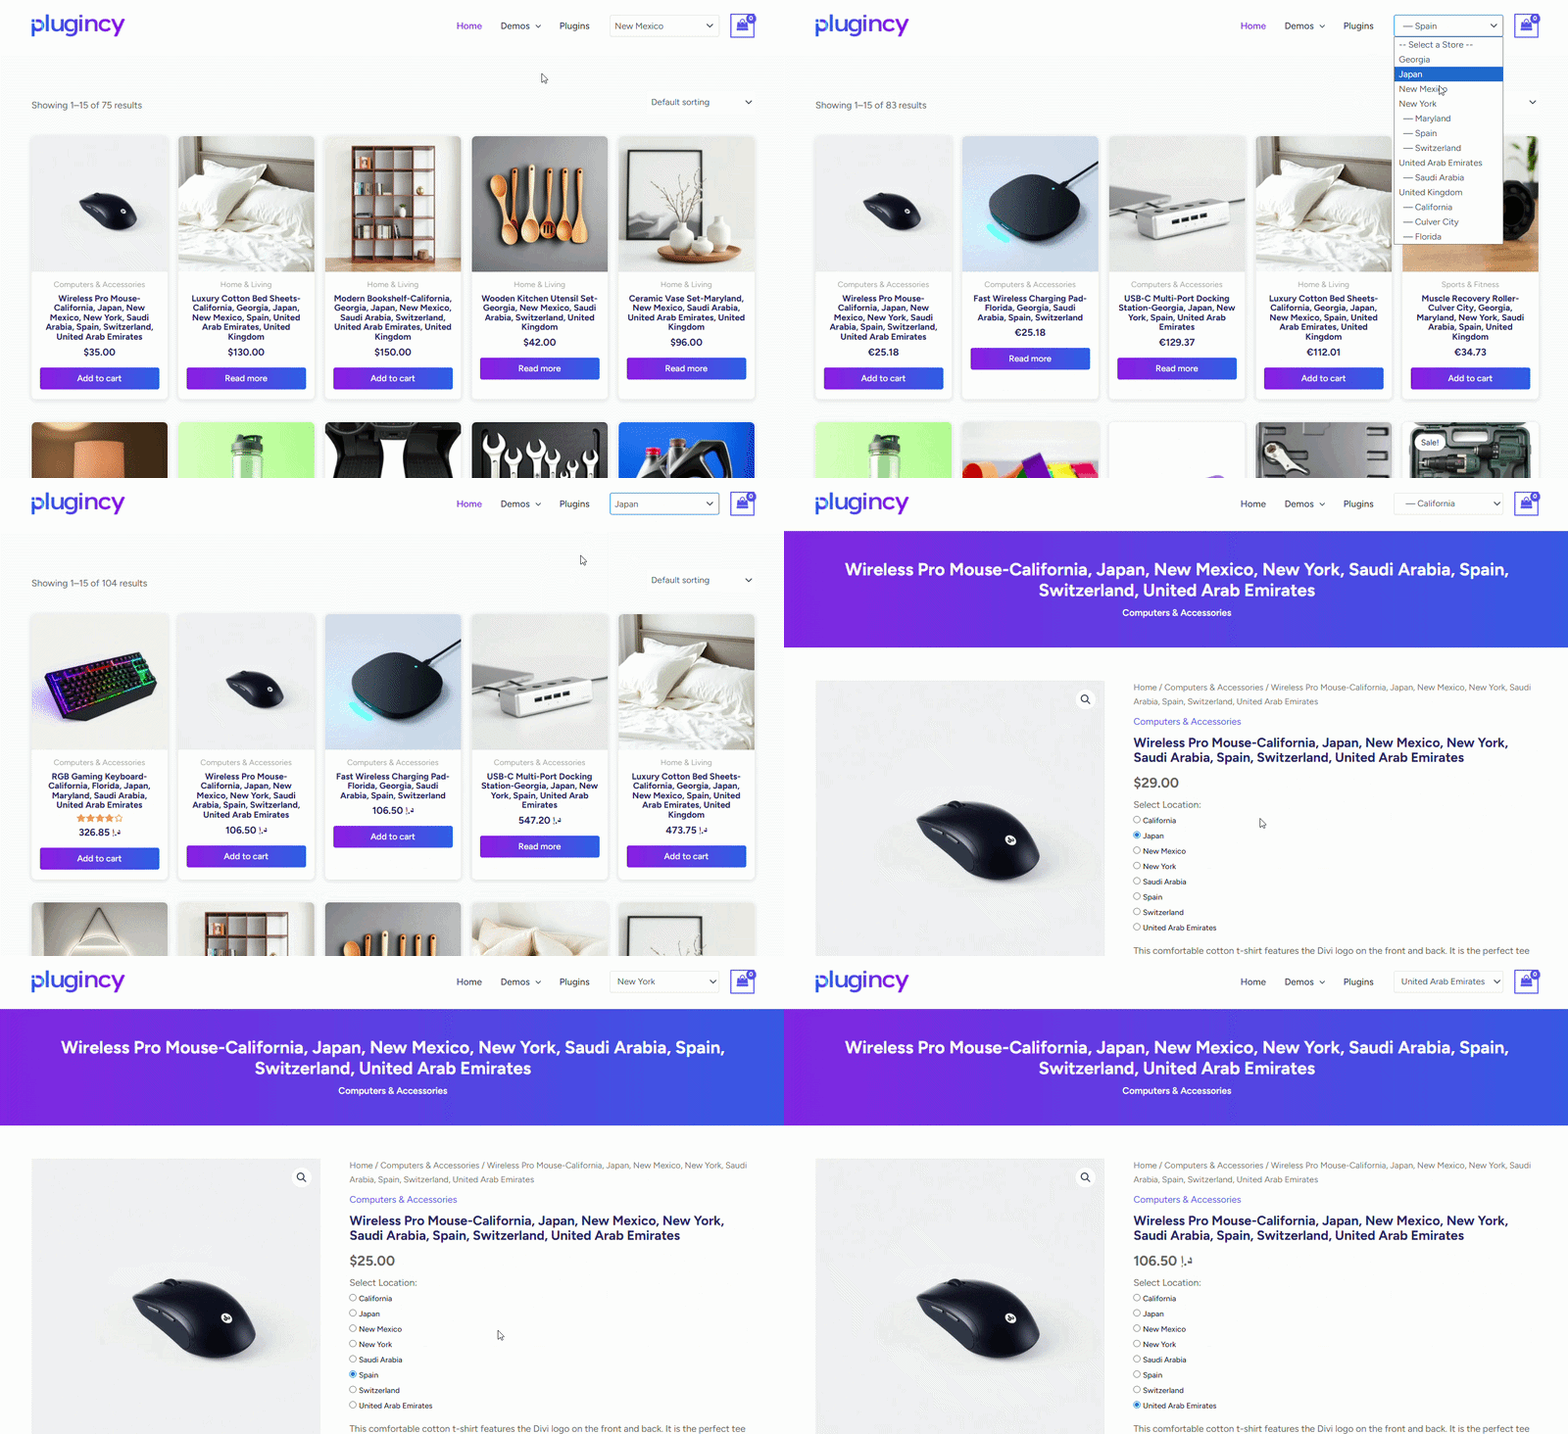
- Enable Location Wise Currency (Location Manage > Settings > Inventory).
- Go to your Shop Page.
- Change the location.
- The currency should change according to the selected location.
- The product amount should convert automatically.
- Check the Single Product Page.
- Currency and amount should change according to the selected location.
Key Takeaway
The Location-Based Price Setup feature allows WooCommerce store owners to manage product pricing across multiple locations with precision. Whether using the Product Edit Page or Stock Central (Modern or Classic Mode), you can configure stock, pricing, and backorder settings for each location. Combined with Location Wise Currency, this ensures accurate, flexible, and location-specific pricing for your store.