
The Multi Product One Page Checkout feature lets you display multiple WooCommerce products and a checkout form on the same page. Customers can choose a product, select variations when available, and complete checkout without going through the default product page → cart page → checkout page flow.
You can add Multi Product One Page Checkout using three methods:
- WordPress Block Editor
- Elementor Widget
- Shortcode
Use the method that best matches how you build pages on your site.
When to use Multi Product One Page Checkout
Use this feature when you want to create a focused checkout page for multiple products.
It is useful for:
- Product bundles
- Pricing plans
- Subscription packages
- Limited-time offers
- Landing pages
- Product comparison pages
- Category-based checkout pages
- Campaign-specific checkout pages
- Sales funnels
Requirements
Before using this feature, make sure:
- WooCommerce is installed and active.
- One Page Quick Checkout for WooCommerce Pro is installed and active.
- Your plugin license is active if this feature requires Pro access on your site.
- Products are published.
- Products are purchasable.
- Products are in stock, unless backorders are allowed.
- Your WooCommerce checkout page is configured correctly.
If a license message appears instead of the checkout layout, go to:
Onpage Checkout → Plugin License
Activate your license, then reload the checkout page.
Method 1: Add Multi Product One Page Checkout with the WordPress Block Editor
If you use the WordPress block editor, you can add the checkout directly from the editor without manually writing a shortcode.
Step 1: Open the page editor
Go to:
Pages → Add New
Or edit an existing page where you want to show the checkout.
Step 2: Add the checkout block
Click the + button to add a new block.
Search for the Plugincy checkout block, then insert it into the page.
Depending on your plugin version, the block may appear as:
One Page Checkout
or:
Plugincy One Page Checkout

Step 3: Configure the block settings
Use the block settings panel to configure the checkout.
Depending on available block options, you may be able to set:
- Product ID or selected products
- Variation ID
- Quantity
- Auto-add behavior
- Clear cart behavior
- Checkout display options
Step 4: Preview the page
Click Preview and test the checkout page.
Check that:
- Products appear correctly.
- Checkout form loads.
- Product selection works.
- Variable products work correctly.
- Cart and checkout totals update.
- Payment methods appear correctly.
Step 5: Publish or update the page
When everything looks correct, publish or update the page.
Method 2: Add Multi Product One Page Checkout with Elementor
If you use Elementor, the plugin includes a built-in Elementor widget for Multi Product One Page Checkout. You do not need to manually paste a shortcode unless you prefer that method.
The widget is registered as Multi Product One Page Checkout and includes controls for templates, product queries, product-selection options, styling, and custom CSS.
Step 1: Edit the page with Elementor
Go to the page where you want to add the checkout and click:
Edit with Elementor
Step 2: Search for the widget
In the Elementor widget panel, search for:
Multi Product One Page Checkout
You can also search keywords like:
checkout
one page checkout
plugincy
woocommerce
products
The widget is added under the Plugincy widget category in Elementor.
Step 3: Drag the widget into the page
Drag the Multi Product One Page Checkout widget into your page layout.
Place it where you want the product selection and checkout form to appear.
Elementor widget settings
The Elementor widget includes several control groups.
General Settings
Use General Settings to choose how products should be displayed.
Main options include:
| Setting | Description |
|---|---|
| Display Template | Controls the product display layout |
| Product Selection Position | Controls where product selector appears for the product-selection template |
| Show Product & Variation Images | Shows or hides product and variation images for product-selection layout |
| Product Layout | Controls how products appear when images are enabled |
The Elementor widget supports these display templates:
| Template | Description |
|---|---|
| Product Table | Displays products in a table layout |
| Product List | Displays products in a list layout |
| Product Single | Displays a product-focused layout |
| Product Slider | Displays products in a slider |
| Product Accordion | Displays products in accordion sections |
| Product Tabs | Displays products in tabs |
| Pricing Table | Displays products like pricing plans |
| Product Selection | Lets customers select a product and update checkout |
These template options are defined directly in the Elementor widget controls.
Product Query
Use Product Query to choose which products appear in the checkout.
The widget supports product selection by:
| Query option | Description | Example |
|---|---|---|
| Product IDs | Show specific products | 152,153,154 |
| Product Categories | Show products from category slugs | electronics,clothing |
| Product Tags | Show products from tag slugs | featured,sale |
| Product Attribute | Filter by attribute | color, size, brand |
| Attribute Terms | Filter by attribute terms | red,blue,green |
The Elementor widget includes controls for product IDs, category slugs, tag slugs, product attributes, and attribute terms.
Text Management
Text Management appears for the Product Selection template.
You can customize:
| Setting | Description |
|---|---|
| Product Label | Label shown for product selection |
| Variation Label | Label shown for variation selection |
| Updating Selection Text | Message shown while checkout/product selection updates |
Example labels:
Product Label: Choose Your Plan
Variation Label: Choose an Option
Updating Selection Text: Updating checkout...
Layout and Spacing
The Elementor widget includes style controls for layout spacing.
Available options include:
| Setting | Description |
|---|---|
| Border Radius | Adjusts rounded corners |
| Element Spacing | Controls spacing between checkout elements |
| Enable Box Shadow | Adds shadow styling to the checkout container |
These settings are available in the Elementor Style tab.
Colors and Buttons
Use Colors & Buttons to style the checkout.
Available options include:
| Setting | Description |
|---|---|
| Primary Color | Main color for buttons and highlights |
| Secondary Color | Secondary/accent color |
| Button Style | Choose filled, outlined, or text-only button style |
| Button Typography | Controls button typography |
| Button Padding | Controls button spacing |
The widget supports button styles such as Filled, Outlined, and Text Only.
Advanced settings
The Elementor widget also includes advanced options such as:
| Setting | Description |
|---|---|
| CSS Classes | Add custom CSS classes |
| CSS ID | Add a custom CSS ID |
| Custom CSS | Add custom CSS for this widget |
Use these only if you need custom design adjustments.
Method 3: Add Multi Product One Page Checkout with shortcode
You can also add Multi Product One Page Checkout using the shortcode:
[plugincy_one_page_checkout]
This method is useful if you are using the Classic Editor, a shortcode block, a page builder shortcode widget, or a custom PHP template.
Basic shortcode examples
Display selected products
[plugincy_one_page_checkout product_ids="152,153,154"]
Display products from a category
[plugincy_one_page_checkout category="hoodies" template="product-table" show_images="yes"]
Display products by tag
[plugincy_one_page_checkout tags="summer-sale" template="product-list"]
Display products by attribute
[plugincy_one_page_checkout attribute="pa_color" terms="black,blue" template="product-table"]
Display pricing table
[plugincy_one_page_checkout product_ids="152,153,154" template="pricing-table"]
Display product selection layout
[plugincy_one_page_checkout product_ids="152,153,154" template="product-selection"]
Shortcode attributes reference
| Attribute | Example | Description |
|---|---|---|
product_ids | product_ids="152,153,154" | Displays specific products by ID |
category | category="hoodies" | Displays products from category slug |
tags | tags="new-arrival,bestseller" | Displays products by tag slug |
attribute | attribute="pa_color" | Filters products by attribute |
terms | terms="black,blue" | Filters products by attribute terms |
template | template="product-tabs" | Controls product display layout |
show_images | show_images="yes" | Shows product and variation images where supported |
position | position="after_description" | Controls product-selection position |
product_layout | product_layout="select_dropdown" | Controls product layout in product-selection mode |
product_label | product_label="Choose Your Product" | Custom product selection label |
variation_label | variation_label="Choose an Option" | Custom variation selection label |
updating_selection_text | updating_selection_text="Updating checkout..." | Text shown while selection updates |
primary_color | primary_color="#555BFF" | Main styling color |
secondary_color | secondary_color="#F3F4FF" | Secondary styling color |
border_radius | border_radius="12" | Controls rounded corners |
spacing | spacing="20" | Controls spacing |
button_style | button_style="filled" | Button style |
Available templates
You can use the same templates in the shortcode and Elementor widget.


| Template value | Elementor label | Best used for |
|---|---|---|
product-table | Product Table | Product lists and comparisons |
product-list | Product List | Simple product selection |
product-single | Product Single | Focused product display |
product-slider | Product Slider | Visual browsing |
product-accordion | Product Accordion | Compact product sections |
product-tabs | Product Tabs | Plans or grouped products |
pricing-table | Pricing Table | Packages and pricing plans |
product-selection | Product Selection | Choose-one-product flows |
Product Selection template
The Product Selection template is useful when customers should choose one product or plan and then complete checkout.
Example shortcode:
[plugincy_one_page_checkout product_ids="152,153,154" template="product-selection"]
In Elementor, choose:
Display Template → Product Selection
Then configure:
- Product Selection Position
- Show Product & Variation Images
- Product Layout
- Product Label
- Variation Label
- Updating Selection Text
- Colors and buttons
Product Selection position
For the Product Selection template, the Elementor widget supports these positions:
| Position | Description |
|---|---|
| After checkout description | Shows product selector after the checkout description |
| Before order notes | Shows product selector before order notes |
| After checkout form | Shows product selector after the checkout form |
These positions are available in the widget’s Product Selection Position control.
Product Selection layout
When images are enabled, the widget supports these product layout options:
| Layout | Description |
|---|---|
| Select Dropdown | Default dropdown layout |
| Cards in Dropdown | Shows product cards inside the dropdown |
| Card & More | Shows a card-based product layout |
Additional plugin settings
Some behavior is controlled from the plugin settings instead of the block, widget, or shortcode.
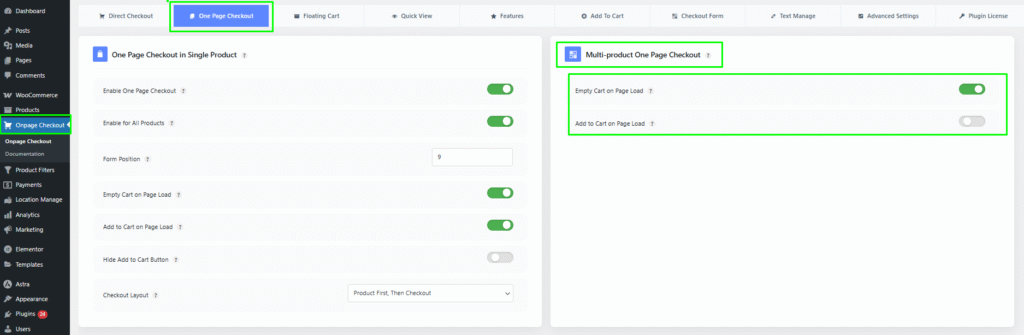
Go to:
Onpage Checkout → One Page Checkout
Important settings may include:
- Empty Cart On Page Load
- Add to Cart On Page Load
- One-page checkout behavior
- Checkout/product section behavior
Empty Cart On Page Load
The Empty Cart On Page Load option clears the customer’s existing cart when the page loads.
Use it when the page is designed for one focused offer or campaign.
Use this when
- The page should only contain the products shown on that page.
- You are building a dedicated campaign page.
- You want to avoid unrelated cart items in checkout.
Be careful
If enabled, customers may lose products they previously added to the cart when they visit the page.
Add to Cart On Page Load
The Add to Cart On Page Load option can automatically add products to the cart when the page loads.
Use it when customers should immediately see checkout populated with the selected or default products.
Use this when
- The page is built for a specific offer.
- You want to reduce checkout steps.
- You want products ready in checkout automatically.
For Product Selection layouts, test carefully so the correct product is added or selected.
Best practices
Use the block for simple WordPress pages
If you are using the WordPress block editor and want a simple setup, use the built-in block.
Use the Elementor widget for visual page building
If you build landing pages with Elementor, use the built-in widget. It gives you a visual interface for templates, product queries, text, colors, buttons, and layout controls.
Use the shortcode for advanced or flexible placement
Use the shortcode when you need to place checkout inside:
- Classic Editor
- Shortcode block
- Page builder shortcode widget
- Custom templates
- Custom PHP output
- Documentation examples
Keep product selection focused
Avoid showing too many products on one checkout page. Too many choices can distract customers.
Test variable products
If you sell variable products, test variation selection, price updates, cart updates, stock validation, and checkout completion.
Exclude checkout pages from cache
Pages with one-page checkout are dynamic. Exclude them from page cache, CDN full-page cache, and aggressive JavaScript delay settings.
Troubleshooting
The block does not appear
Check:
- Plugin is active.
- WooCommerce is active.
- You are using the block editor.
- Your plugin version includes the block.
- Browser/editor cache is cleared.
The Elementor widget does not appear
Check:
- Elementor is installed and active.
- WooCommerce is installed and active.
- One Page Quick Checkout plugin is active.
- Search for “Multi Product One Page Checkout.”
- Check the Plugincy widget category.
- Clear Elementor cache/regenerate files if needed.
The Elementor widget only registers when Elementor and WooCommerce are available.
Shortcode appears as plain text
Use a Shortcode block or shortcode widget.
Correct:
[plugincy_one_page_checkout product_ids="152,153,154"]
Products are not showing
Check:
- Product IDs are correct.
- Products are published.
- Products are purchasable.
- Products are in stock.
- Category, tag, attribute, or term slugs are correct.
- Product visibility is not hidden.
Checkout form is empty
Check:
- Products are being added to the cart.
- Products are purchasable.
- WooCommerce checkout page is configured.
- Checkout page is not cached.
- Add to Cart On Page Load is configured correctly if needed.
- There are no JavaScript errors.
License notice appears
Go to:
Onpage Checkout → Plugin License
Activate your license, then reload the checkout page.